background image

28

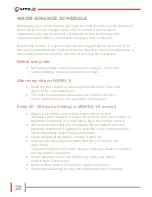
MAINTAINANCE SCHEDULE

Maintaining your bicycle ensures you’ll get the most out of every ride and out of
the entire life of your Oxygen electric bike. How much of your bike’s
maintenance you can do yourself will depend on your knowledge, skill,
experience and whether you have the necessary tools for the job.

Beyond this manual, it is good to consult your Oxygen dealer for advice if you
are at all unsure about any of the procedures described. Normal maintenance is
not covered under the warranty and this service may be chargeable.

Before every ride

Mechanical safety checks, (see notes on page 2). Use a fully

charged battery. Visual inspection for damage.

After every ride

(or WEEKLY)

Clean the bike, including chain rings and sprocket. Clean and

lightly oil the chain and gears.

This must be carried out after every ride in dusty, marine or

winter conditions due to the salt laden atmosphere.

Every 20 - 30 hours of riding

(or MONTHLY if sooner)

Squeeze the brakes and rock the bike to check for any

looseness of the headset or brake mechanisms with each forward or
backward movement. If any are loose, have your dealer check it.

Lift the front wheel and turn handlebars left and right to check for

tightness of steering. If tightness is detected it may be necessary to
lubricate bearings and/or adjust the headset.

Check and adjust the brakes, replace if worn out.

Squeeze spokes in adjoining pairs between your thumb and

index finger.
They all should have the same tension. Have your dealer re-spoke or
true the wheel if necessary.

Check cables for rust, kinks and fraying, have your dealer

replace them if necessary.

Check bottom bracket for play and adjust if necessary.

Check wheel bearings for play and adjust/lubricate if necessary

Содержание MTB-X

Страница 1: ...Owner Manual...

Страница 2: ...yre pressures are correct Also check all fasteners including quick release mechanisms before every ride DEALER STAMP White Matte Black FW BATTERY SERIAL NUMBER MODEL 20 PURCHASE DATE DAY MONTH YEAR DA...

Страница 3: ...ECTRIC BICYCLE 1 BATTERY with 2 Keys 1 BATTERY CHARGER with UK Mains Lead 1 MANUAL 1 WARRANTY CARD 1 DATATAG Regiistration Certificate Contents Parts Identification PAGE 4 Battery Care Charging PAGE 6...

Страница 4: ...22 23 24 25 28 29 30 26 27 LCD Display Gear Selector 3 front Rear Brake Lever Front Brake Lever Motor Cutout Switch Gear Selector 8 rear Bell Gear Indicator Battery Security Lock Battery Charging Sock...

Страница 5: ...5 22 18 24 23 19 BOTTOM OF SEAT TUBE 25 30 20 21 17 26 28 29 27 S N1234BBS567...

Страница 6: ...Do not charge at temperatures below 0 C Switch off the battery before charging using switch located on the side of the battery Battery can be charged on or off the bike Always make sure the battery a...

Страница 7: ...change to GREEN May take up to 6 hrs for flat battery Once charged switch off at the wall outlet and unplug Disconnect the charging lead from the battery and replace the cover over the charging socket...

Страница 8: ...edal cycle by simply not switching on the battery or using in Zero Assist see below Usage Buttons Display Information Areas UP POWER DOWN CYCLE COMPUTER FUNCTION TYPE BATTERY STATUS POWER USAGE Displa...

Страница 9: ...on the handlebar mounted display unit the various functions of the power controller and Cycle Computer can be utilised See the following sections for details To turn off the LCD and the power to the...

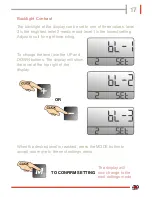
Страница 10: ...in the battery in the lower right of the display The indicators will gradually go out as the battery power is used up Refer to the table below for details Battery Meter Display Backlighting Night Mod...

Страница 11: ...s per hour MPH The display is accurate to about 10 when the wheel size is correctly calibrated and the tyre inflated as per the manufacturers recommendations Speed Display During normal use the displa...

Страница 12: ...these lower power levels when negotiating busy cycle paths and crowded areas Also use when setting off and gradually increase through the levels for a smoother performance Ideal for negotiating obstac...

Страница 13: ...t loadings and steeper hills it is wise to keep an eye on the battery meter during your ride If the assistance level is set to ZERO then the motor will not be turned on Your Oxygen MTB X will now act...

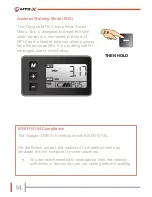
Страница 14: ...are recommended to seek advice from the relevant authorities in the country you are visiting before travelling Your Oxygen MTB X has a Walk Assist Mode This is designed to propel the bike under power...

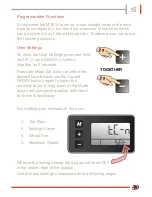
Страница 15: ...hold the UP and DOWN buttons together for 2 seconds Press the Mode M button to select the desired function and use the Up and DOWN buttons again to select the required value A long press of the Mode b...

Страница 16: ...ltaneously and hold for 2 seconds Average Speed and Maximum Speed reset automatically on power down Resetting the Trip TOGETHER The Odometer distance displays the total distance travelled by the bicyc...

Страница 17: ...e lowest setting Adjust to suit for night time riding To change the level use the UP and DOWN buttons The display will show the level at the top right of the display TO CONFIRM SETTING The display wil...

Страница 18: ...the size of the wheel and tyre combination so that the speed disaplay is accurate If you change the tyres then it may be necessary to change this value The 27 5 x 2 10 tyres fitted to the MTB X as sup...

Страница 19: ...speed of the bike when under power can be set lower than that supplied The readings are in km h and can be set in the range as below This is useful if you want to limit the assistance power for novice...

Страница 20: ...ce readings When first turned on the display shows the Speed in MPH in the top right The assistance level PAS is set to the lowest level 1 ECO To change the display to show the Average Speed simply pr...

Страница 21: ...21 Current Speed in MPH Average Speed since last reset Maximum Speed since last reset Total Distance in Miles Cannot be reset Trip Time since last reset Trip Distance in Miles...

Страница 22: ...imply pull squeeze the upper lever with your index finger To decrease the gear push the lower lever away from you with your thumb You must be pedalling forwards as you change gears Suspension The MTB...

Страница 23: ...Stand To put the bicycle on its stand 1 While holding the bicycle upright push the stand downwards to its full extent 2 Lean the bicycle over onto the stand Make sure bicycle is on solid ground Do no...

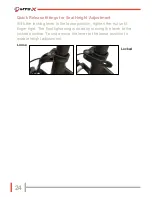
Страница 24: ...ustment With the locking lever in the loose position tighten the nut until finger tight The final tightening is done by moving the lever to the locked position To undo move the lever to the loose posi...

Страница 25: ...If an error occurs the display will show a code as in the example shown Make a note of the error number and turn off the bicycle power at both the LCD and the battery switch After 2 minutes turn on t...

Страница 26: ...Prevention Product The system protects your bicycle frame forks and battery plus the Datadots are used to mark many of your electric and non electric cycle components The system includes the following...

Страница 27: ...er your Datatag as soon as possible preferably within 48 hours of purchasing your bike Register your Datatag Visit www datatag co uk cycle and look for the PRO Cycle System Registration button If you...

Страница 28: ...hain and gears This must be carried out after every ride in dusty marine or winter conditions due to the salt laden atmosphere Every 20 30 hours of riding or MONTHLY if sooner Squeeze the brakes and r...

Страница 29: ...out the repairs You can always of course consult a specialist and carry out the repairs on your own if you are confident that you have the necessary skills As there are no electronic components on th...

Страница 30: ...ll light to show an approximation of the remaining charge in the battery The Battery Switch located on the right side of the battery must be switched to the ON position to operate the meter The switch...

Страница 31: ...efer you may take your original battery to Oxygen for recycling Never dispose of batteries in a fire or subject to puncture or crushing Battery USB Socket On the right side of the battery next to the...

Страница 32: ...ibed to normal wear and tear Poor maintenance or modifications that no longer complies with regulations or original technical specifications Damage due to external causes The bicycle is put up for hir...

Страница 33: ...or refurbished battery at the discretion of Oxygen Electric Bikes Limited Warranty Upgrade Offer Register your bike for a free upgrade to 2 year battery warranty Subject to Terms Conditions Extended B...

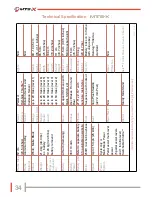
Страница 34: ...sbar height Battery Power 36V 10 4Ah Brakes Disc Brakes Front and Rear Wheelbase 116 cm 45 7 inches Battery Life Refer to separate battery info available on website Wheels 27 5 x 2 10 with puncture re...

Страница 35: ...35...

Страница 36: ...ANUAL MTB X ISSUE 1 2015 Oxygen Electric Bikes Limited Oxygen Electric Bikes Limited Goldthorpe Industrial Estate Commercial Road Goldthorpe South Yorkshire S63 9BL Phone 01709 886677 www oxygenbicycl...

Отзывы: