10400669-001
©2015 Overland Storage, Inc.
Page 3 of 4
Spare Control Panel Instructions
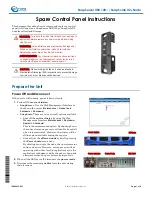
Remove the Wiring
1.
Using a small tool, loosen both the top and bottom of the
wiring connector
.
2.
Gently pull the wiring connector out of its
socket
.
Dispose of the old flange properly. There is no need to
return it.
Install New Flange
1.
Carefully insert the
wiring connector
into the socket on
the new flange.
2.
Gently push the
ends
of the connector to verify that it
seats correctly.
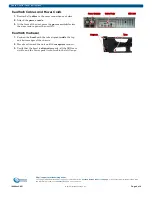
Reinstall LED Wire Cover & Flange
1.
Using the retained screws, attach the
new flange
.
2.
Insert the front of the
cover
into its slot, push it in and
against the chassis.
Verify the alignment of the tabs along the cover into the
slots on the chassis.
3.
Using the
retained screw
, secure the cover at the rear.
Reassemble the Unit
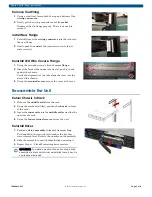
Return Chassis to Rack
1.
Slide out the
middle rails
from the rack.
2.
Using the mechanical lifter, position the
chassis
in front
of the rack.
3.
Insert the
inner rails
into the
middle rails
and slide the
unit into the rack.
4.
Using the
four
retained screws
, secure the unit.
Reinstall Drives
1.
Position a
drive assembly
in front of its empty
bay
.
For SnapScale, they must be returned to the bay they
were removed from. Refer to the number on the assembly.
2.
Slide the assembly in until the
latch
clicks, securing it.
3.
Repeat
for
all
remaining drive carriers.
IMPORTANT: To maintain proper airflow and cooling, a drive
assembly or a blank carrier must be installed in
every
bay. No
empty bays are allowed.


