background image

OPERATION

Form No. OVm360m-0115

13

Changing Temperature Unit of Measure

Use the following procedure to change the temperature unit of

measure  between  fahrenheit  and  celsius.  This  procedure

requires access to password-protected screens and should be

performed by authorized personnel only.

1. From the main Recipes screen, touch the “up” arrow. 

• a password keypad will appear on the touchscreen.

2. Input the password using the keypad, and touch ENTER. 

• The  admin  mode  screen  will  appear  on  the

touchscreen.

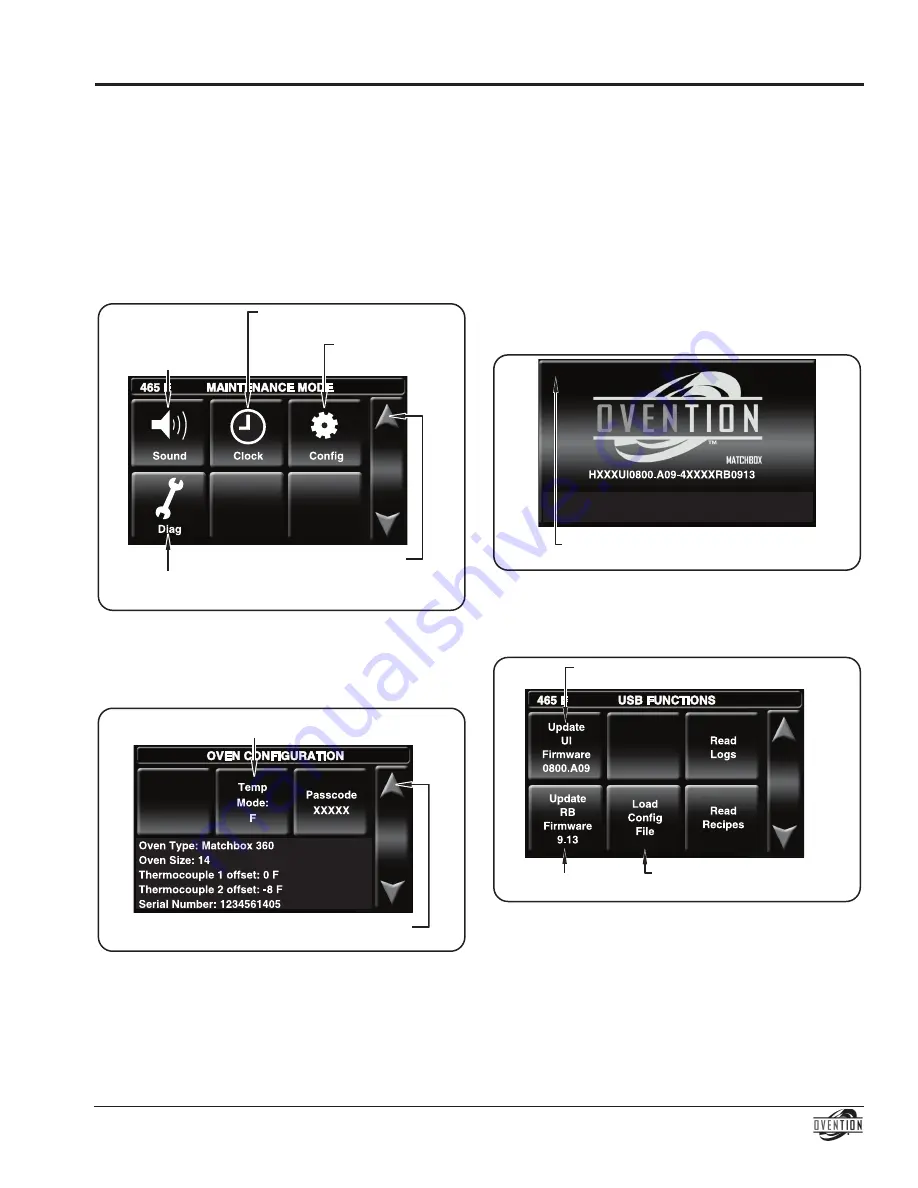
3. Touch maINT to access the maintenance mode screen.

maintenance mode Screen

4. Touch CONFIG on the maintenance mode screen. The

Oven Configuration screen appears.

5. Touch TEmP mODE on the Oven Configuration screen to

toggle the unit of measure between fahrenheit and celsius

Oven Configuration Screen

Touch to return to

Maintenance Mode screen.

Touch to toggle between

fahrenheit and celcius.

Touch to access

Oven Configuration

screen.

Touch to return to

Admin Mode screen.

Touch to access

Sound Settings

screen.

Touch to access

Diagonostics Mode

screen.

Touch to access

Set Time/Date

screen.

Uploading from a USB Drive

Use the following procedure to upload pre-programmed menu

items  or  firmware  updates  from  an  external  USB  drive.  This

procedure requires access to password-protected screens and

should be performed at oven startup by authorized personnel only.

NOTE: USB drive must have a capacity of 4 GB or less.

1. Remove  the  cover  from  the  USB  port  next  to  the

touchscreen, and insert the USB drive into the port.

2. move the Standby switch up to the “On” position.

• The touchscreen will energize and show the name of

the  oven  and  current  software  version  for  a  few

seconds.

3. Touch the upper left-hand corner on the touchscreen.

• a password keypad will appear on the touchscreen.

Startup Screens

4. Input the password using the keypad, and touch ENTER. 

• The admin mode screen will appear.

5. Touch USB to access the USB Functions screen.

USB Functions Screen

6. Touch  the  desired  function  to  begin  the  corresponding

upload.

• Select the upload file from the list that appears.

• a screen will appear to indicate that the upload is in

progress.

• When the upload is complete, the oven will restart.

7. When the startup screen reappears, remove the USB drive

from the USB port, and replace the port cover.

8. Perform the normal “Startup” procedure at the beginning of

this section to use the oven.

Touch here to access password keypad

followed by the Admin Mode screen.

Touch to upload relay

firmware update.

Touch to upload touchscreen

firmware update.

Touch to upload pre-programmed

menu items.

Содержание Matchbox 360

Страница 1: ...guimiento de las instrucciones contenidas en este manual puede resultar en un serio lesi n o muerte Este manual contiene importante informaci n sobre seguridad concerniente al mantenimiento uso y oper...

Страница 2: ...he next food item Ovention matchbox 360 ovens are products of extensive research and field testing The materials used were selected for maximum durability attractive appearance and optimum performance...

Страница 3: ...ceptacle do not match contact a qualified electrician to determine and install proper voltage and size electrical receptacle Unit must be grounded properly Failure to ground unit properly could result...

Страница 4: ...m Operator controls consist of a touchscreen two control keys a Standby switch and a main Disconnect switch model m360 14 only a USB port allows the uploading of pre programmed menu items installation...

Страница 5: ...abel is located on the left side of the unit See the label for the serial number and verification of unit electrical information Plug Configurations Units are equipped with an electrical cord and plug...

Страница 6: ...4 356 mm m360 14 33 1 4 843 mm 41 5 16 1049 mm 19 15 16 505 mm 28 11 16 728 mm 21 5 8 548 mm 16 406 mm SPECIFICATIONS Form No OVm360m 0115 6 Dimensions Specification Label on left side of unit A B C F...

Страница 7: ...company immediately DO NOT lift unit by platform on front of oven chamber Staging platform is not designed to support weight of unit Lift from underneath oven chamber only 6 Place the unit in the desi...

Страница 8: ...menu items can be used to help develop specific menu items appropriate for the installation Refer to the Programming menu Items procedure in this section for instructions on creating menu items Start...

Страница 9: ...cates a category Touch to access menu items in Category Indicates oven setpoint temperature 3 Touch the desired menu item on the touchscreen The turntable rotates the food product into the oven chambe...

Страница 10: ...onnect switch or unplug unit immediately after use Internal fans must cool oven to avoid damage to electrical components CAUTION Touch to cancel current cooking sequence and start queued menu item Tou...

Страница 11: ...to access settings for next stage if required 5 When programming is complete touch EXIT OPTIONS on the New Recipe Settings screen a The Recipe Dev Exit Options screen will appear b Touch the desired...

Страница 12: ...ld be performed by authorized personnel only 1 From the main Recipes screen touch the up arrow a password keypad will appear on the touchscreen 2 Input the password using the keypad and touch ENTER Th...

Страница 13: ...firmware updates from an external USB drive This procedure requires access to password protected screens and should be performed at oven startup by authorized personnel only NOTE USB drive must have...

Страница 14: ...l fans must cool oven to avoid damage to electrical components WARNING CAUTION IMPORTANT NOTE Use of cleaning chemicals not approved by Ovention when cleaning the oven chamber will void the warranty C...

Страница 15: ...e access to the oven is limited refer to the Front Removal of Jet Plates procedure in this section a Turn the door latch counterclockwise to release the latch and open the oven door so that the inside...

Страница 16: ...ng Turntable Assembly Slide inner lower jet plate toward door and remove through chamber opening Lower Jet Plate Rear Support 6 Remove both upper jet plates To remove a Slide the outer upper jet plate...

Страница 17: ...ature or menu item selection Verify desired setpoint temperature and menu item selection Change to proper settings if necessary refer to OPERaTION section Jet plate or air flow malfunction Contact aut...

Страница 18: ...T COVER Damage to touchscreens from abuse or impact Wear items such as air filters and conveyor belts Damage to catalyst from use of non approved cleaning products Product misuse tampering or misappli...

Страница 19: ...Form No OVm360m 0115 19 NOTES...

Страница 20: ...53234 0500 U S A 855 298 OVEN 6836 connect oventionovens com partsandservice oventionovens com www oventionovens com Need help Call our 24 hour toll free Ovention Hotline Printed in U S a January 201...

Отзывы: