background image


Issue: 4.7.2134-2 

Ovation Systems Ltd 

Page 22 


www.ovation.co.uk 

FlashBack-3

Covert Video Recorder

User Guide


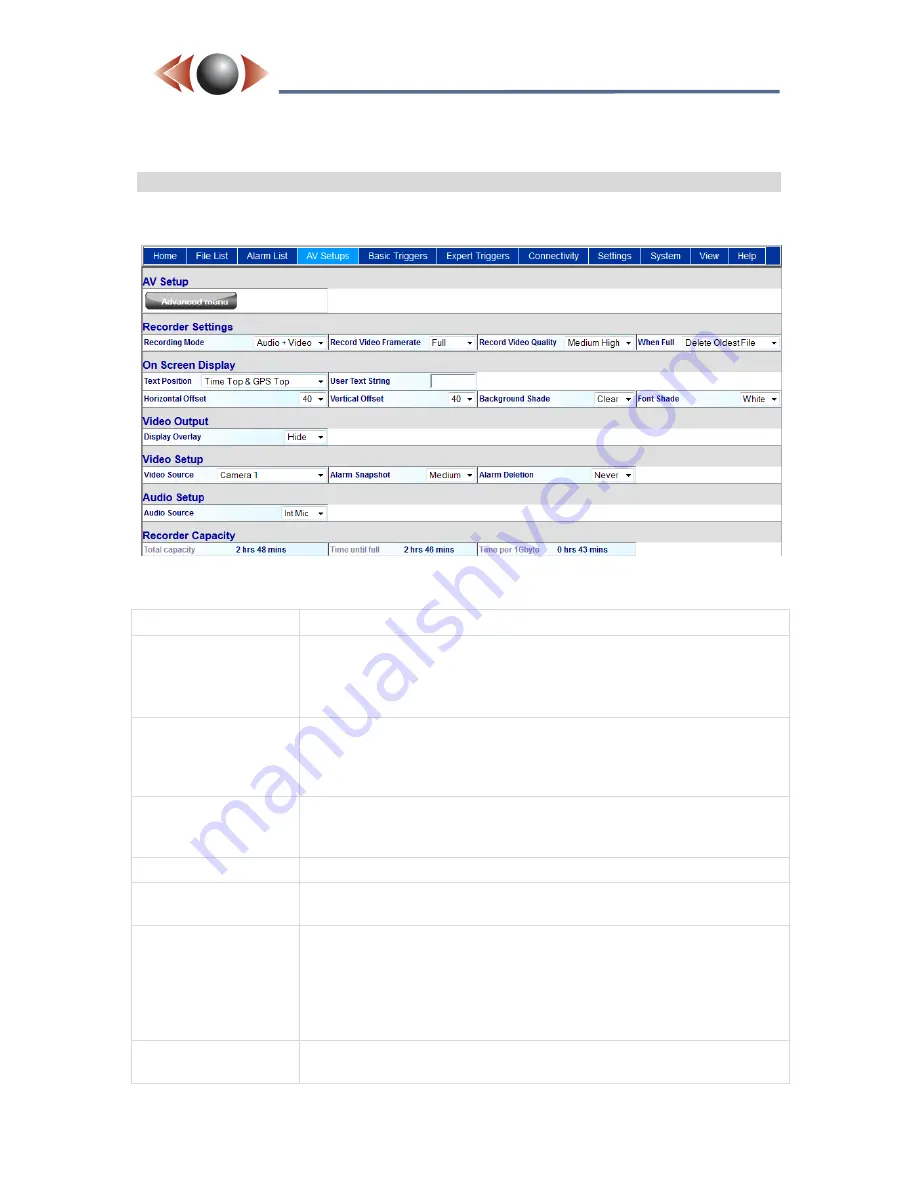
7.6  Audio / Video Setup Page (A/V Setups) 

 
This page configures the audio and video recording to the local SD card. 


The most important parameters are described below: 
 

Recording Mode: 

Sets the recording format to the SD card. 

Record Video 
Framerate: 

Reduces the number of recorded frames per second. Reducing the 
frame rate increases the record time.  

NB►

 if audio recording is enabled, the audio track is still recorded in 

real-time, even though the video frame rate is reduced. 

Record Video 
Quality: 

Sets the recorded video quality. The default is "Medium High" which 
equates to approximately 40 minutes of real-time recording per 
gigabyte of disk space. The "Record Capacity" section shows the 
expected total record time on the SD card. 

When full: 

Governs what to do when the SD card is full. "Loop recording" 
deletes the oldest data to continue recording. "Stop recording" fills 
the SD card and stops.    

On Screen Display: 

Configures the on screen text overlaid on the recordings.   

Video Output: 

When set to 'Status' overlays the On Screen text display above on 
the video monitor output, if supported (see 2.2 page 7). 

Alarm Snapshot: 

Stores a JPEG snapshot at the point of an alarm (e.g. on motion 
detection). This snapshot appears in the Alarm List Page (see 
section 7.5, page 21) and the FindMe timeline (see 

FindMe User 

Guide

). FlashBack is able to store a maximum of 1000 alarm events. 

By default, once 1000 is reached, older alarms will be deleted. This 
can be changed to keep the first 1000 by clicking [Advanced]  

Audio Source : 

"Int Mic" uses the internal microphone. "Line" is a high level audio 
input, and "Ext Mic" is for use with external microphones. 


Содержание FlashBack-3C

Страница 1: ...rt Video Recorder User Guide FlashBack 3C H 264 AVC Single Dual SD Card Recorder Version 4 User Guide Ovation Systems Ltd Springfield Barn London Road Milton Common Oxfordshire OX9 2JY UK Tel 44 1844...

Страница 2: ...tting the Date and Time zone 13 3 5 Status LED 13 3 6 Make a Recording 14 3 7 Switching Off 14 3 8 Reset to Defaults 15 3 9 FlashBack 3 Dual 15 4 Playing SD Card Recordings 16 4 1 Playing with VLC 16...

Страница 3: ...Introduction FlashBack 3C is a miniature DVR video streamer designed for covert surveillance operations in the FlashBack 3 product line The FlashBack 3C has Ovation s I Conex connectors on the rear o...

Страница 4: ...tereo inputs Mic bias supplied Onscreen display of date time and coordinates from an external GPS receiver if connected 100Mbps Ethernet interface supporting video streaming control configuration and...

Страница 5: ...s to the rear of FlashBack 3 are colour coded to indicate their function as shown in Figure 2 below CAUTION Only connect cables with the same colour code to each input Figure 3 shows a basic FlashBack...

Страница 6: ...A Phono 200mm Audio Camera 1M 500mm 1M Male to Female Extension x 1 0 5M Male to Female Extension x 1 Power Control Power Long Extension Short Extension Male Male 200mm 1 5 m Audio Right Video 2 Audio...

Страница 7: ...wn below Camera Power Mic Bias 3V DC Video Ground Ground Audio Ground 1 1 1 1 4 4 4 4 Video In 1 Audio In L Video In 2 Audio In R 2 2 2 2 3 3 3 3 Rec Control 2 record trigger 6 to 28 V DC In GPS Power...

Страница 8: ...5M Male to Female Extension x 2 Power Control Power Long Extension Short Extension Male Male 200mm Audio Right Video 2 Audio Left Video 1 Audio Video Splitter Ethernet Socket RJ45 DC Power IN 2 1 mm...

Страница 9: ...Record Control 2 Green cable By default Record Control 1 is configured to record when connected to Ground i e a record switch input and Record Control 2 records for a pre set time when connected to g...

Страница 10: ...e FlashBack 3C range including miniature low light cameras Knowles microphones GPS receivers etc GPS Antenna Bullet Camera Miniature 12V Bullet Camera Knowles Microphone pair GPS Antenna Receiver RS23...

Страница 11: ...a the i Connex cable adaptor provided It is powered via the same connector which is enabled via the Connectivity web page Section 7 9 page 27 The RS232 interface can also control an external PTZ when...

Страница 12: ...5 C 27 F to allow for internal heating FlashBack 3 has a maximum operational temperature of 60 C 140 F so a card with a 80 C 176 F temperature specification is recommended eg SanDisk Extreme or simila...

Страница 13: ...D The LED on the front panel gives an indication of the unit s status over a 2 second cycle with major functions as shown below In general terms the more the LED shows green the better 0 0 5 1 0 1 5 2...

Страница 14: ...6 page 22 4 To stop recording press the Stop button or open Control Input 1 The file closes almost immediately and the card is ready to be removed as soon as the Status LED reverts to a long green NB...

Страница 15: ...8 Reboot the FlashBack 3 The unit is now set to the factory defaults including an IP address set by DHCP which defaults to 192 168 0 123 thirty seconds after boot if no DCHP address is supplied 3 9 F...

Страница 16: ...on the SD card in the folder marked flv Files are limited from 1 to 15 minutes long set via the webpage interface see Section 7 6 page 22 To play the recordings open the flv folder and play the files...

Страница 17: ...help save battery power when the unit is not recording it is recommended to enable the inactivity sleep timer in the System Advanced webpage See Section 7 11 page 28 IMPORTANT Installing the battery...

Страница 18: ...3 adds a configuration Wizard to the SD card Remove the card from your FB3 and inset into your PC and double click FB3 Config Wizard Go through the instructions and save a file called settings txt to...

Страница 19: ...ated by that server If this does not happen within 20 seconds the unit reverts to a static IP address as set in the Connectivity web page see Section 7 9 page 27 default is 192 168 0 123 NB The Wizard...

Страница 20: ...your FlashBack 3 unit At the login prompt enter your username and password Defaults are admin admin 7 3 Home Page The Home page gives an overview of the FlashBack 3 s status and recording control The...

Страница 21: ...enhanced list of files with a time line showing motion activity alarms etc see Section 9 page 31 7 5 Alarm List Page This is a chronological list of alarm events generated from the triggers set up via...

Страница 22: ...d Capacity section shows the expected total record time on the SD card When full Governs what to do when the SD card is full Loop recording deletes the oldest data to continue recording Stop recording...

Страница 23: ...Timer you are presented with options to enable days of the week start time and duration see below Figure 18 Timer Example In the above example the timer is set up to record from 9 am to 5 pm on weekd...

Страница 24: ...rest by clicking individual cells to enable disable motion detection Clear cells are where motion detection is active red cells inactive When selection is complete click the Apply button to save the s...

Страница 25: ...opened or a PIR becoming inactive The following example is the set up for starting stopping recording on GPS Movement 1 Click a in an unused column of the GPS Movement row until is shown 2 Press S st...

Страница 26: ...trigger example it is useful to extend the trigger as a vehicle could be in slow traffic and only moving from time to time In Figure 21 below the end of the GPS trigger has been extend by 5 minutes s...

Страница 27: ...nd password it is recommended to make the changes while the WEB Password is set to not required and then re enable Peripherals Camera Power The camera power can be set to off 5 9 or 12 Volts with a ma...

Страница 28: ...t via the drop down list 2 Enter the date via the drop downs 3 Set the daylight savings mode as required recommend Enabled 4 Then enter the current time see TIP1 below TIP1 If your device is on a netw...

Страница 29: ...tings to the SD card via the Save File button Copy this file which is located in the settings folder of the SD card to the root directory of another SD card Now place this card in the target device an...

Страница 30: ...ate_r bin on to a newly formatted SD card and follow the instructions in the diagram below IMPORTANT Do not use SD cards of greater than 32GB when upgrading firmware 1 Remove the SD card s and switch...

Страница 31: ...ts all your active FlashBack 3 devices It is then easy to select the required unit open its webpage stream live video or download video recordings to your PC from a time line of motion activity In the...

Отзывы: