background image

Model 1707 Integrated Amplifier User Manual 

w w w . o v a t i o n h i f i d e l i t y . c o m


P a g e  

8 | 19


Connecting Signal Sources to your Model 1707 Integrated Amplifier 


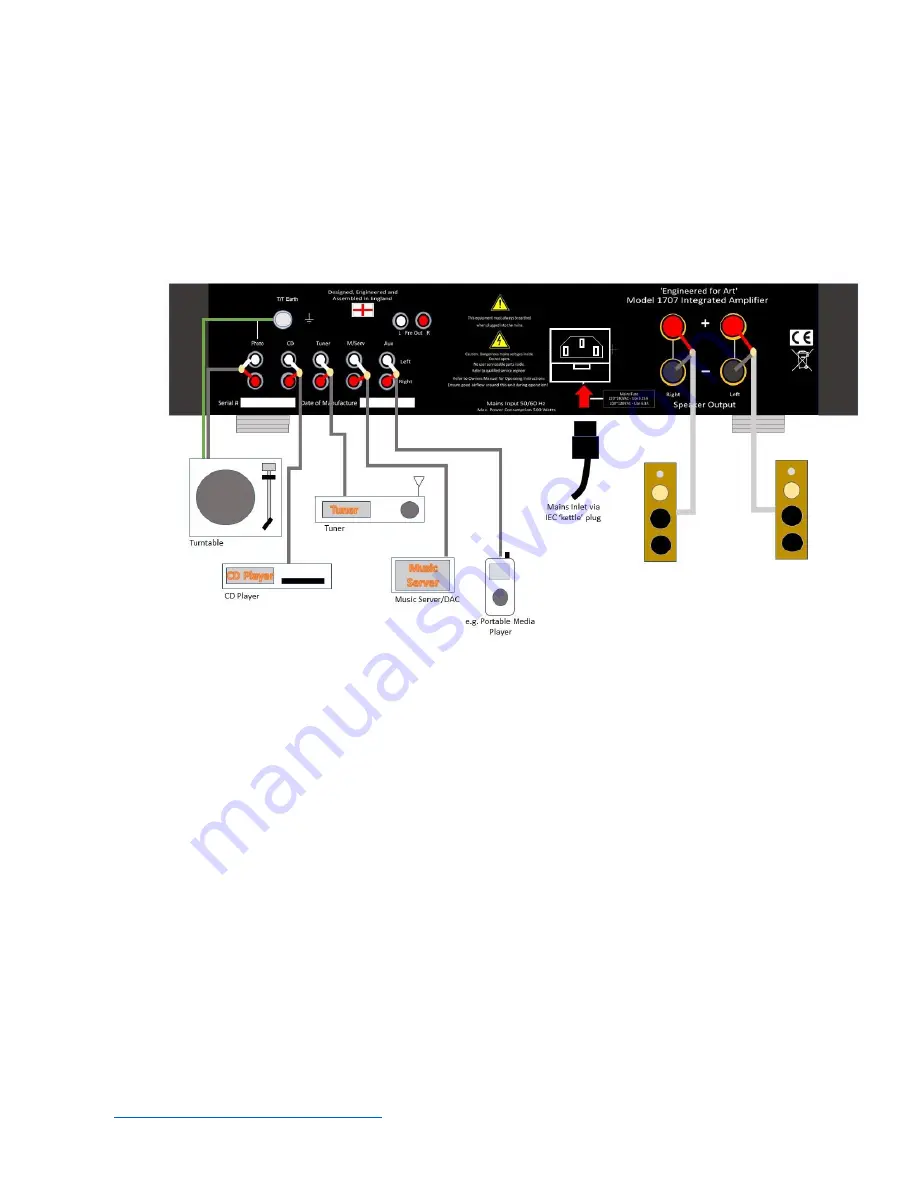
Figure 3 - Model 1707 Connection Diagram


The figure above shows how to connect the Model 1707 to source equipment 
and your loudspeakers. Note carefully the polarity of the loudspeaker 
connections. 


Switching ON and OFF 
 
(See ‘Using the Model 100 Remote Control’ later in this Document for the 
functions supported by remote control operation) 

 
Firstly, ensure the MAINS POWER SWITCH on the wall socket is ON. When 
first plugging the unit into the mains power, the unit will enter standby mode 
where the power consumption will be <0.5W. 
 
To bring the unit out of standby, depress and then release the select dial on 
the left-and side of the front panel. Note if you do this too quickly, the unit will 
intentionally not respond 

– you must keep the button depressed for at least 1 

second. The red MUTE LED will illuminate along with the green input selection 
LED made during the last power-up cycle.  Note, the default input is CD which 
is selected when the unit is powered up after the mains is first been applied.  

Содержание Engineered for Art 1707

Страница 1: ...Engineered for Art...

Страница 2: ...Model 1707 Integrated Amplifier User Manual w w w o v a t i o n h i f i d e l i t y c o m P a g e 1 19...

Страница 3: ...tegrated Amplifier User Manual w w w o v a t i o n h i f i d e l i t y c o m P a g e 2 19 O V A T I O N H I G H F I D E L I T Y Engineered for Art Model 1707 Integrated Amplifier User Manual February...

Страница 4: ...you staple this into the rear inside cover of this user manual and retain it in a safe place after reading it Product Usage Declaration This product is designed for use in a domestic hi fi system wit...

Страница 5: ...al packaging The product is not damaged in anyway whatsoever either electrically or cosmetically The company reserves the right to deduct from the refund any costs required to make good any damage to...

Страница 6: ...for your region User manual this document Where to Locate Your New Model 1707 Integrated Amplifier Your Model 1707 must be located in a well ventilated area away from sources of heat dust and humidity...

Страница 7: ...le to ensure this If you are not going to be using your equipment for any length of time e g going away on vacation it is advisable to unplug it from the mains Cleaning your Ovation High Fidelity Prod...

Страница 8: ...mplifier User Manual w w w o v a t i o n h i f i d e l i t y c o m P a g e 7 19 Model 1707 Front Panel Controls Figure 1 Model 1707 Front Panel Layout Model 1707 Rear Panel Connections Figure 2 Model...

Страница 9: ...emote control operation Firstly ensure the MAINS POWER SWITCH on the wall socket is ON When first plugging the unit into the mains power the unit will enter standby mode where the power consumption wi...

Страница 10: ...ght hand side of the front panel Rotate it clockwise to increase the volume and anti clockwise to decrease the volume When coming out of standby or powering up for the first time the volume is automat...

Страница 11: ...ring power up an power down cycles to ensure there are no extraneous sounds the system mutes the loudspeakers and the headphone output In the event of a fault condition arising and the speakers being...

Страница 12: ...nput source indicator LED on the front panel will illuminate Switch the tone control in and out with this button Applies only to those products that have this facility Depressing this button will mute...

Страница 13: ...sert 2 off new AAA batteries carefully noting the polarity orientation 4 Replace the battery compartment cover after which the remote should function correctly again Important Note If you are not goin...

Страница 14: ...d below Important Always unplug the unit from the mains before attempting to replace the fuse Use a flat bladed screw driver to lever open the fuse drawer Replace the Model 1707 fuse with the ratings...

Страница 15: ...nput Without a turntable connected to the Phono input on the rear panel you will get hum and hiss from the loudspeakers when you turn the volume up Once you connect a turntable this noise will disappe...

Страница 16: ...se The presence in any electrical signal of unintended harmonics and or noise Reducing distortion and noise are key goals in any equipment that reproduces audio signals EMI or Electro Magnetic Interfe...

Страница 17: ...t into 8 s Better than 0 007 at 100 Watts into 8 s Better than 0 01 at 160 Watts into 4 s 0 1 at rated output power Peak Output Current 20 A for 50 ms both channels driven Slew rate 140 V us in both v...

Страница 18: ...f i d e l i t y c o m P a g e 17 19 Owners Information Date Purchased ____________________________________ Dealer if Applicable ________________________________ Warranty Registration Date ____________...

Страница 19: ...Model 1707 Integrated Amplifier User Manual w w w o v a t i o n h i f i d e l i t y c o m P a g e 18 19...

Страница 20: ...Model 1707 Integrated Amplifier User Manual w w w o v a t i o n h i f i d e l i t y c o m P a g e 19 19 The Ovation High Fidelity Company Norfolk England www ovationhifidelity com...

Отзывы: