background image

16


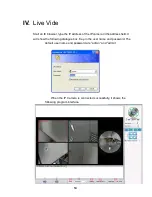
Double-click the video to switch to full screen view. Press “Esc” or double- 

click the video again back to normal mode. 


Right-Click the mouse on the video, it will show a pop-up menu. 


1. Snapshot: Save a JPEG picture 

2. Record Start: Record the video in the local PC. It will ask you where to save 

the video. To stop recording, right-click the mouse again. Select “Record 

Stop”. The video format is AVI. Use Microsoft Media Player to play the 

recorded file. 

3. Mute: Turn of the audio. Click again to turn on it. 

4. Full Screen: Full-screen mode. 

5. ZOOM: Enable zoom-in and zoom-out functions. Select “Enable digital zoom” 

option first within the pop-up dialogue box and then drag and drop the bar to 

adjust the zoom factors. 

Содержание OVC-2DV360

Страница 1: ...User Manual VANDAL DOME IP CAMERA...

Страница 2: ...T THROUGH VENTILATION GRILLS CAUTION CAUTION RISK OF ELECTRIC SHOCK DO NOT OPEN CAUTION TO REDUCE THE RISK OF ELECTRIC SHOCK DO NOT REMOVE COVER OR BACK NO USER SERVICEABLE PARTS INSIDE REFER SERVICIN...

Страница 3: ...ing 7 B Hardware Installation 8 C IP Assignment 10 D Install ActiveX control 12 IV Live Video 14 V IP Camera Configuration 17 A System 18 B Network 21 C A V Setting 30 D Event List 34 VI Network Confi...

Страница 4: ...cation Product Specifications Main Features 1 3 2 2 Megapixel CMOS Sensor Full HD 1080P 30fps real time Digital Noise Reduction Digital Wide Dynamic Range Shutter Speed adjustion Sense Up adjustion Va...

Страница 5: ...Hue Saturation Sharpness AGC Shutter Time Sense Up D WDR Flip Mirror Day Night adjustion Noise reduction Triple Streaming Yes Image snapshot Yes Full screen monitoring Yes Privacy Mask Yes 3 differen...

Страница 6: ...s 7 2000 XP 2003 Microsoft IE 6 0 or above Chrome Safari Firefox Mobile Support iOS 4 3 or above Android 1 6 or above Hardware Suggested Intel Dual Core 2 53G RAM 1024MB Graphic card 128MB Minimum Int...

Страница 7: ...7 III A Product Installation Monitor Setting 1 Right Click on the desktop Select Properties 2 Change color quality to highest 32bit...

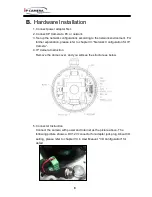
Страница 8: ...ase refer to chapter VI Network Configuration for IP Camera 4 IP Camera Instruction Remove the dome cover and you will see the structure as below 5 Connector Instruction Connect the camera with power...

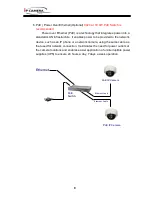
Страница 9: ...y that integrates power into a standard LAN infrastructure It enables power to be provided to the network device such as an IP phone or a network camera using the same cable as that used for network c...

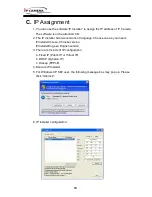
Страница 10: ...versions of language Choose one as your need IPInstallerCht exe Chinese version IPInstallerEng exe English version 3 There are 3 kinds of IP configuration a Fixed IP Public IP or Virtual IP b DHCP Dyn...

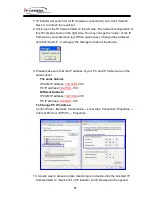
Страница 11: ...apply the change and reboot the Device 9 Please make sure that the IP address of your PC and IP Camera are on the same subnet The same Subnet IP CAM IP address 192 168 1 200 PC IP address 192 168 1 1...

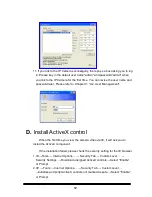
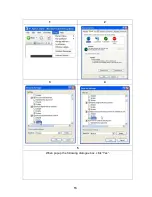
Страница 12: ...agement D Install ActiveX control When the first time you view the camera video via IE it will ask you to install the ActiveX component If the installation failed please check the security setting for...

Страница 13: ...13 1 2 3 4 5 When popup the following dialogue box click Yes...

Страница 14: ...s of the IP camera in the address field It will show the following dialogue box Key in the user name and password The default user name and password are admin and admin When the IP Camera is connected...

Страница 15: ...een pattern 7 Use the bottom to choose one of the split screen that you want to apply the PTZ control The part you choose is indicated by a red frame arround it 8 PTZ control Step by step or Continuou...

Страница 16: ...e local PC It will ask you where to save the video To stop recording right click the mouse again Select Record Stop The video format is AVI Use Microsoft Media Player to play the recorded file 3 Mute...

Страница 17: ...17 V IP Camera Configuration Click to get into the administration page as below Click to back to the live video page...

Страница 18: ...implified Chinese to select When change it will show the following dialogue box for the confirmation of changing language b OSD Setting Select a position where date time stamp text showing on screen M...

Страница 19: ...hree different users administrator general user and anonymous user a Anonymous User Login Yes anonymous login is allowed No Username password are required to access this IP camera b Add user Type the...

Страница 20: ...ot system Re start the IP camera c Factory default Delete all the settings in this IP camera d Setting Management User may download the current setting to PC or load the previously saved setting i ii...

Страница 21: ...utomatically Static IP Please type in IP address subnet mask gateway and DNS manually b IPv6 Assignment IPv6 is a newer numbering system that provides a much larger address pool than IPv4 which accoun...

Страница 22: ...allow the Network Camera to open ports on the router automatically so that video streams can be sent out from a LAN There are three External port can be set Web Port Http Port and RTSP port To utiliz...

Страница 23: ...Server Multicast is a bandwidth conservation technology This function allow several user to share the same packet sent from IP camera To use Multicast appoint IP Address and port here TTL means the l...

Страница 24: ...rotocol Secure Https can help protect streaming data transmission over the internal on the higher security level Https setting Before setting new request please remove old secure identification at Htt...

Страница 25: ...et Certificate Install Signed Certificate and Create Self Signed Certificate b SNMP Simple Network Management Protocol i ii Enable SNMPv1 or SNMPv2 and write the name of Write Community and Read Commu...

Страница 26: ...SCP Quality of Server Differentiated Services Code point DSCP specifies a simple mechanism for classifying and managing network traffic and provide QoS on IP networks DSCP is a 6 bit in the IP header...

Страница 27: ...server support This camera supports EAP TLS method Please enter ID password issued by the CA then upload related certificates 3 PPPoE DDNS a PPPoE Select Enabled to use PPPoE Key in Username and passw...

Страница 28: ...can now log by http username ddns camddns com Register successfully Update Failed the name is already registered The user name has already been used Please change it Update Failed please check your in...

Страница 29: ...nfiguration first b FTP To send out the video via mail of ftp please set up the configuration first c Samba Select this option to send the media files via a network neighborhood when an event is trigg...

Страница 30: ...rve the setting Please refer to the details below for Image setting b Image Setting Brightness Saturation and Sharpness can be adjusted here WDR Enable the function to balance the contrast in the view...

Страница 31: ...tandard Medium Low The higher the quality is the bigger the file size is It might affect Internet transmitting speed if the file gets too large iii Video Frame Rate The video refreshing rate per secon...

Страница 32: ...can choose 1 10 compression rate iv Video Bitrate The quality adjustment of CBR You can choose 32kbps 8Mkbps The higher the value is the higher the image quality is v Video Frame Rate The video refre...

Страница 33: ...io IP Camera supports 2 way audio User can send audio from IP Camera mic input to remote PC User can also send audio from remote PC mic to IP Camera s external speaker a Audio from IP camera built in...

Страница 34: ...send video to some specific mail addresses transmit the video to remote ftp server and save video to local SD card To set up the motion area click Area Setting Using mouse to drag and draw the area T...

Страница 35: ...e IP address of the PC which has recording software installed Enable the function of Save to SD card then click Apply The interval of two video files recorded on SD card is fixed with 30 seconds 2 Sch...

Страница 36: ...mera executes the action according to the interval you choose after triggered 4 Log List Sort by System Logs Motion Detection Logs and I O Logs In addition System Logs and I O Logs won t lose data due...

Страница 37: ...one day Example It is five o clock now Choose The 1st day The files will be kept from five o clock yesterday to five o clock today Note The use of the SD card will affect the operation of the IP Came...

Страница 38: ...o the internet d For fixed real IP set up the IP into IP Camera For dynamic IP start PPPoE Configuration 2 a Internet AccessL ADSL or Cable Modem b IP address More than one real IP or one dynamic IP c...

Страница 39: ...dem b IP address one real IP or one dynamic IP c IP Camera and PC connect to the internet d Device needed IP sharing e Use virtual IP set up port forwarding in IP sharing VII I O Configuration I O Con...

Страница 40: ...N C pin depend on the device to the external relay buzzer device Or b Please connect the GND Alarm pin to the external Trigger Device I O Setup Click I O Setting from the system setup page via IE and...

Страница 41: ...d the dome cover Press and hold the button as the picture below Connect power to the camera and do not release the button during the system booting It will take around 30 seconds to boot the camera Re...

Страница 42: ...class4 16GB SDHC class4 32GB SD class4 16GB SD class4 32GB SDHC class6 4GB SDHC class6 8GB SDHC class6 16GB SD class6 4GB SD class6 8GB SD class6 16GB SDHC class10 4GB SDHC class10 8GB SDHC class10 16...

Отзывы: