www.desatech.com
123748-01A
7
aSSEMBLy
Continued
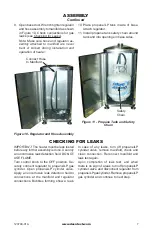
9. Open base door. Wrench tighten regulator
and hose assembly to manifold as shown
in Figure 10. Check connections for gas
leaks (see
Checking for Leaks
).
Note: Make sure hose and regulator as-
sembly attached to manifold are never
bent or kinked during installation and
operation of heater.
Figure 10- Regulator and Hose Assembly
Connect Hose
to Manifold
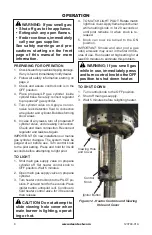
Figure 11 - Propane Tank and Safety
Chain
Safety
Chain
10. Place propane/LP tank inside of base.
Attach regulator.
11. Install propane tank safety chain around
tank and into openings in base sides.
cHEcking FOr LEakS
IMPORTANT:
The heater must be leak tested
before any further assembly is done. Use only
a noncorrosive leak detection fluid. DO NOT
USE FLAME.
Turn control knob to the OFF position. Se-
curely connect regulator to propane/LP gas
cylinder. Open propane/LP cylinder valve.
Apply a noncorrosive leak detection fluid to
connections at the manifold and regulator
connections. Bubbles forming show a leak.
In case of any leaks, turn off propane/LP
cylinder valve, remove manifold, check and
clean connection. Reconnect manifold and
leak test again.
Upon completion of leak test, and when
there is no sign of a leak, turn off propane/LP
cylinder valve and disconnect regulator from
propane/LP gas cylinder. Remove propane/LP
gas cylinder and continue to next step.

