Osram traxon e:cue LCE-mx Скачать руководство пользователя страница 33

1

IS07237/00

Istruzioni per le operazioni di servizio per l’apparecchio di illuminazione
Instructions on luminare service operations
Instructions pour les opérations de service du luminaire
Wartungsanleitung für die Leuchte
Instructies voor de onderhoudsoperaties op de verlichtingsarmatuur
Instrucciones para las operaciones de servicio del aparato de alumbrado
Anvisninger i serviceindgreb på belysningsarmatur
Anvisninger for betjening av lysapparatet
Instruktioner för användning av belysningsanordningen

Инструкции по эксплуатации осветительного прибора

照明装置检修操作说明

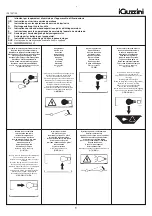
Sostituire la lampada parzialmente esausta

Replace the partly exhausted lamp

Remplacer la lampe partiellement épuisée

Die teilweise erschöpfte Lampe austauschen

Vervang de gedeeltelijk lege lamp

Sustituir la lámpara parcialmente agotada

Udskift den delvist udtjente pære

Skifte ut den delvis utbrente lyspæren

Byt ut den delvis förbrukade lampan

Замена частично отработанной лампочки

更换部分老化的灯泡


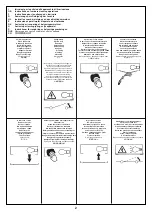
Aprire l’apparecchio

Open the fixture

Ouvrir le luminaire

Das Gerät öffnen

Open het apparaat

Abrir el aparato

Åbn armaturet

Åpne apparatet

Öppna anordningen

Раскрыть прибор

打开装置

Rimuovere la lampada esausta

Remove the exhausted lamp

Retirer la lampe épuisée

Die alte Lampe entnehmen

Verwijder de lege lamp

Quitar la lámpara agotada

Tag den udtjente pære ud

Fjerne den utbrente lyspæren

Ta bort den förbrukade lampan

Вынуть старую лампочку

取出老化的灯泡

Portarla in un centro di riciclaggio

Carry it to a recycling centre

La porter dans une déchetterie pour son 

recyclage

Ordnungsgemäß entsorgen

Breng de lamp naar een recyclingcentrum

Llevarla a un centro de reciclaje

Aflever den på en genbrugsstation

Levere den til en miljøstasjon

Lämna in den till en återvinningsanläggning

Сдать ее в пункт приема утильсырья

将其送往回收中心

Inserire la nuova lampada

Introduce the new lamp

Installer la lampe neuve

Die neue Lampe einsetzen

Doe de nieuwe lamp op zijn plek

Montar la nueva lámpara

Sæt den nye pære i

Sette i den nye pæren

Sätt i den nya lampan

Вставить новую лампочку

装入新灯泡

Inserire la nuova lampada nel portalampada

Fit the new lamp into the socket

Installer la nouvelle lampe dans le support 

de lampe

Die neue Lampe in den Sockel einsetzen

Doe de nieuwe lamp in de lamphouder

Montar la nueva lámpara en el portalámpara

Sæt den nye pære i fatningen

Sette den nye pæren inn i lampeholderen

Sätt i den nya lampan i lamphållaren

Вставить новую лампочку в патрон

将新灯泡插入灯泡架中

Riposizionare ottica

 Re-place the optic

 Remettre l’optique à sa place

 Die Optik wieder einsetzen

 Doe de optiek weer op zijn plaats

 Volver a montar la óptica

 Sæt den optiske enhed på plads

 Innstille linsen

Flytta om optiken

Отрегулировать линзы

 重新定位光头


Effettuare prova di funzionamento

 Perform operative test

 Procéder à un essai de fonctionnement

 Eine Funktionsprüfung durchführen

 Controleer de correcte werking

 Hacer una prueba de funcionamiento

      Afprøv funktionen

 Prøve om den fungerer

 Utför funktionstest

Выполнить проверку исправности работы

 执行功能测试


Interrompere l’alimentazione dell’apparecchio

Cut the power supply to the luminaire

Couper l’alimentation du luminaire

Stromversorgung der Leuchte unterbrechen

Onderbreek de voeding van het apparaat

Interrumpir la alimentación del aparato

Afbryd armaturets strømforsyning

Avbryte strømtilførselen til apparatet

Koppla från anordningens strömförsörjning

Отключить электропитание прибора

中断装置供电


Spegnimento

Switch it off

Extinction

Ausschaltung
Uitschakeling

Apagado

     Slukning

Slukking

Släckning

Выключение

关灯


I
GB
F
D
NL
E
DK
N
S
RUS
CN

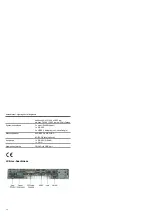
Содержание traxon e:cue LCE-mx

Страница 1: ...Lighting Control Engine mx Setup Manual...

Страница 2: ...rasse 38 Paderborn Germany An OSRAM company Lighting Control Engine mx Setup Manual Edition 18 04 12 2012 Traxon Technologies Europe GmbH All rights reserved Comments and corrections documentation tra...

Страница 3: ...ect the delivery content 8 In case of returning the LCE mx 8 Mounting the LCE mx 8 Supplying power to the LCE mx 10 Initial start up 10 System Configuration 10 Setting the network address 11 Technical...

Страница 4: ...ng der LCE mx 20 Montage der LCE mx 20 Stromversorgung der LCE mx 22 Inbetriebnahme 22 System Konfiguration 23 Programmer Netzwerk Adresse 26 Technische Daten 27 Allgemeine Daten 27 System 27 LCE mx A...

Страница 5: ...5 Setup Manual Lighting Control Engine mx English...

Страница 6: ...entilated environment Ventilation slots may not be obstructed Do not install next to heat emitting sources or in a place subject to direct sunlight or excessive dust Device components inside the syste...

Страница 7: ...protect the device against condensation water unpack it and wait until all moisture remain ing in the LCE mx has evaporated Condensation can occur when the device is moved from a cold to a warm locati...

Страница 8: ...ata are kept y y Remove the USB license dongle and keep it at a save place The dongle stores the credits for the Lighting Application Suite and may be upgraded Mounting the LCE mx You can mount the LC...

Страница 9: ...stalled all interfaces to down side 2 Horizontal wall mounting with brackets for wall mounting all interfaces to down side 3 Vertical wall mounting with brackets for wall mounting all interfaces to le...

Страница 10: ...conductors to the housing The permitted cable cross section for the 24 V DC connection is 0 75 sqmm to 2 5 sqmm The conductor cross section must not be less than 2 5 sqmm Required tool for protective...

Страница 11: ...Control Engine mx Setting the network address To change the network address of one of the installed network cards click on the Start icon and enter Connections in the search box Select View network co...

Страница 12: ...ting Control Engine mx You now see all available connections Right click on the desired connection and select Properties In this open window click on Internet Protocol Version 4 TCP IPv4 then press th...

Страница 13: ...gine mx Enter the appropriate address for the network Confirm your input by clicking on the OK button You can close all windows now The network connection is now configured Programmer s network settin...

Страница 14: ...as and select Application Options Under the Advanced tab you can specify which network card the programmer software e net outputs to You can specify this setting for the Art Net and KiNet protocols e...

Страница 15: ...Housing Steel aluminum Mounting 35 mm DIN rail wall mouning flat portrait Certifications CE EN 61000 6 4 EN 61000 6 2 EN 61000 6 3 EN 61000 6 1 cULus UL 60950 and UL 508 Engine User interface Externa...

Страница 16: ...o max 1920 x 1200 pixels at 32 bit colors System connection ports 2 x e net RJ45 Ethernet 1 x RS 232 4 x USB2 1 used for licence dongle Data storage 64 GB SSD SATA2 HDD 8 GB CF card optional Outputs 1...

Страница 17: ...17 Setup Manual Lighting Control Engine mx Deutsch...

Страница 18: ...ten Umgebungen betreiben Die L ftungsschlitze d rfen nicht verdeckt werden Nicht in der N he von Hitzequellen oder in direktem Sonnenlicht betreiben Komponenten im System k nnen im Betrieb hei werden...

Страница 19: ...me durch Kondensationswasser zu verhindern warten Sie nach dem Auspacken bis das System die Temperatur am Installa tionsort angenommen hat Reinigung Bevor Sie das Ger t reinigen trennen Sie es vom Net...

Страница 20: ...Sie den USB Lizenz Dongle und bewahren Sie ihn an einem sicheren Platz auf Auf dem Dongle befinden sich die Credits f r die Lighting Application Suite diese k nnen erweitert worden sein Montage der L...

Страница 21: ...t Alle Anschl sse nach unten weisend 2 Horizontale Wandmontage Mit Winkeln zur Wandmontage Alle Anschl sse nach unten weisend 3 Vertikale Wnadmontage Mit Winkeln zur Wandmontage Alle Anschl sse nach l...

Страница 22: ...en mitgelieferten Stecker Schlie en Sie den Schutzleiter an das Geh use an Der erlaubte Kabelquerschnitt f r die 24 V Versorgung betr gt 0 75 qmm bis 2 5 qmm Der Kabelquerschnitt f r den Schutzleiter...

Страница 23: ...Control Engine mx System Konfiguration Alle hier gezeigten Schritte beziehen sich auf die Englische Version von Microsoft Windows 7 Sollten Sie eine andere Sprachversion haben k nnen die Texte anders...

Страница 24: ...erten Netzwerkkarte n zu ndern clicken Sie auf das Start Icon und geben Connections als Suchbegriff ein W hlen sie View network connections in der Ergebnisliste Sie sehen nun alle verf gbaren Netzwerk...

Страница 25: ...gine mx In diesem Fenster clicken Sie Internet Protocol Version 4 TCP IPv4 dann den Properties Button Geben Sie die gew nschte Netzwerk Adresse ein und best tigen Sie mit Ok Schlie en Sie nun alle Fen...

Страница 26: ...erprise Clicken Sie Extras und w hlen Sie Application Options Unter dem Advanced Tab k nnen Sie w hlen ber welche Netzwerkkarte der Programme e net Output sendet Ebenso k nnen Sie die Einstellungen f...

Страница 27: ...use Stahl Aluminium Montage auf 35 mm DIN Hutschiene Wandmontage Zertifizierungen CE EN 61000 6 4 EN 61000 6 2 EN 61000 6 3 EN 61000 6 1 cULus UL 60950 und UL 508 System Benutzerschnittstellen Extern...

Страница 28: ...ax 1920 x 1200 Pixel bei 32 bit Farben Systemanschl sse 2 x e net RJ45 Ethernet 1 x RS 232 4 x USB2 1 belegt durch Lizenz Dongle Massenspeicher 64 GB SSD SATA2 HDD 8 GB CF Karte optional Ausg nge 1 x...

Страница 29: ...29 Setup Manual Lighting Control Engine mx Appendix...

Страница 30: ...30 Setup Manual Lighting Control Engine mx Dimensions Abmessungen All dimensions in mm Alle Abmessungen in mm 297 286 262 15 100 4 5...

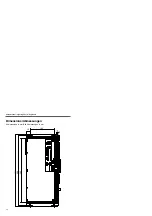
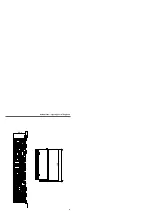
Страница 31: ...31 Setup Manual Lighting Control Engine mx 46 5 10 138 141 1...

Страница 32: ......

Страница 33: ...de reciclaje Aflever den p en genbrugsstation Levere den til en milj stasjon L mna in den till en tervinningsanl ggning Inserire la nuova lampada Introduce the new lamp Installer la lampe neuve Die ne...

Страница 34: ...Quitar el polvo de la ptica exterior T r st vet af den udvendige optiske enhed Fjerne st v fra den eksterne lysenheten Damma av den yttre optiken Lavare l ottica esterna Wash the external optic Laver...

Страница 35: ...ud til bortskaffelse Fjerne apparatet som skal kastes Ta bort anordningen f r bortskaffningen Istruzioni per il fine vita e lo smaltimento dei componenti Instructions on end of life and component dis...

Отзывы: