


75
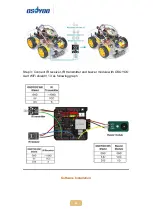
Step 3:
Connect OSOYOO MODEL X motor driver module and OSOYOO
Uart WiFi shield V1.3 as following graph:
Remember following tips restore your motor control system to lesson 1:
If your last project is lesson 1,2,3,4, your motor control system is same
as Lesson 1, no need do anything.
If your last project is lesson 5,6, you need change ENA wire from D3 to
D9, keep wiring in D6,D7,D8,D11,D12 at same position and remove all
other wires in OSOYOO Uart WiFi shield V1.3.
I suggest you run the sketch code in Lesson 1 and make sure motor
connection is correct. This is very important for next steps.
Содержание V2.1
Страница 28: ...27 ...
Страница 39: ...38 Step 4 Fix the screws on copper pillars to connect upper chassis to lower chassis ...
Страница 41: ...40 Step 4 Choose corresponding board port for your project upload the sketch to the board ...
Страница 58: ...57 Step 4 Choose corresponding board port for your project upload the sketch to the board ...
Страница 60: ...59 as per link Ultrasonic sensor servo initial direction alignment ...
Страница 73: ...72 Note F1 F6 are further development functions in the future ...
Страница 81: ...80 ...
Страница 86: ...85 ...