background image

37

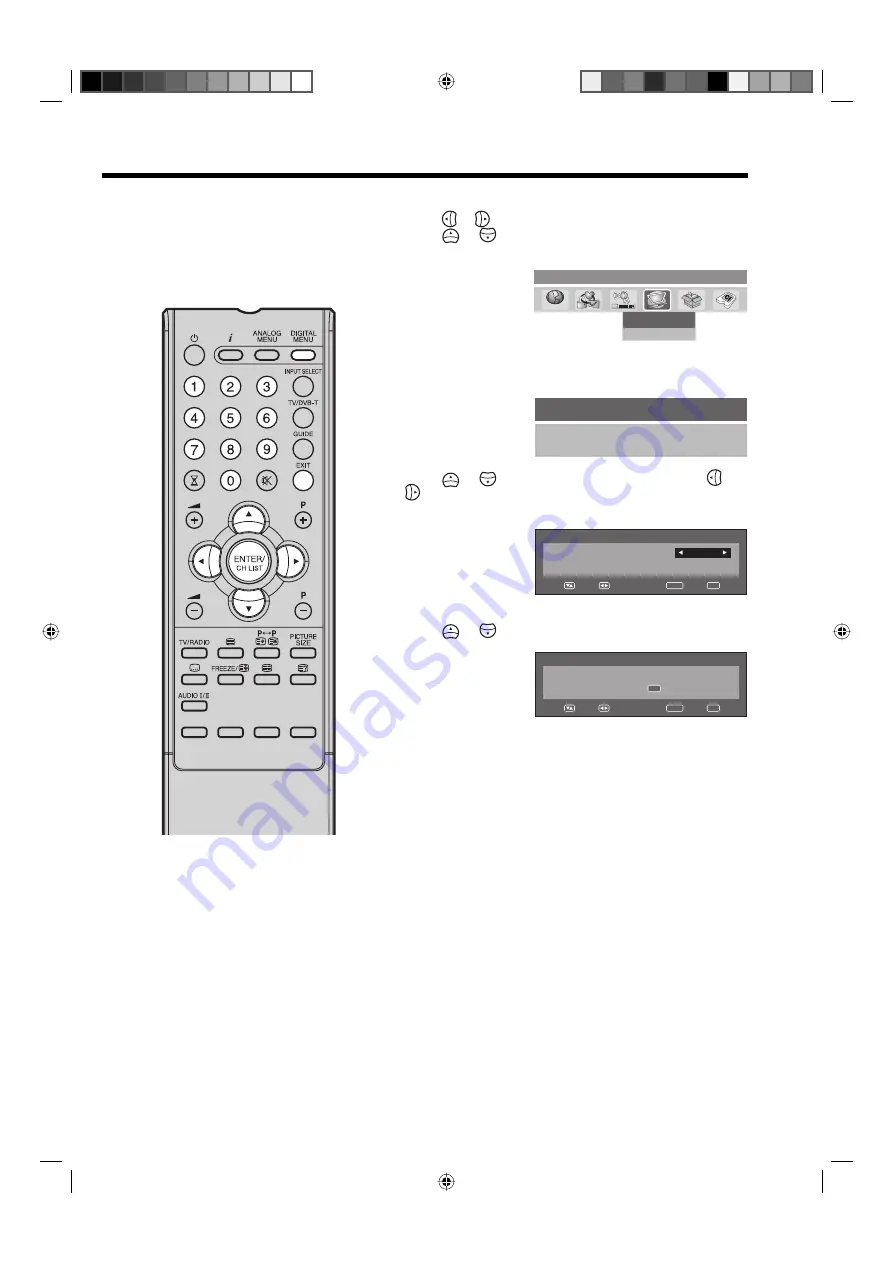
Password Setup (Parental lock)

1

Press 

DIGITAL MENU

, the menu will appear on the screen. 

Press   or   to select System Configuration option.

Press 

 or 

 to select ‘Password Setup’ from sub menu 

tab, then press 

ENTER

.

Password Setup

Display Setup

Main menu

System Configuration

A C

B

A C

B

2

‘Enter Password’ will appear. Press ‘

0 0 0 0

’ using the 

Number Buttons

. (This is the default password.) 

Enter Password

– – – –

3

Press 

 or 

 to select ‘Parental Lock’, then press   or 

 to select desired parental rating (see note). Then press 

EXIT

 to return to the normal screen.

Password Setup

Parental Lock

None

Change password

– – – –

Navigate

Enter

Exit

4

You can also change the password using the next option.

Press 

 or 

 to select ‘Change password’.

Password Setup

Parental Lock

8

Change password

– – – –

Navigate

Enter

Exit

0..9

Then enter your chosen new password (be sure to 

remember this password). After you have entered the new 

password for the first time, you need to enter the same 

password again for confirmation. The Information banner 

will then appear.
Press 

EXIT

 to return to the normal screen.

While toggling between channels, if a service which has a 

parental rating is selected then you will be asked to enter the 

correct password to view that channel. If the channel you are 

currently watching supports a parental rating then the rating will 

also be displayed in the Channel banner menu (see page 40).

Notes:

There are 15 age-based ratings, 

ranging from ‘4’ (years old) to ‘18’ 

(years old) and ‘None’. Eg. If the 

Parental Lock is set to ‘8’ (years 

old), only the services which have 

the parental rating of ‘8’ (years old) 

or under will be viewable without 

entering the Password.

You will be prompted to enter the 

password, when you set new 

parental rating.

You can set the new parental rating 

only when you enter the password 

correctly, otherwise the old parental 

code will be retained.

This feature allows you to have 

a parental control of the service 

viewing as per your preference.

Once a service is protected with 

a password, it cannot be viewed 

unless the correct password is 

provided.

32W0346A_ENG.indd   37

32W0346A_ENG.indd   37

5/28/07   9:40:29 AM

5/28/07   9:40:29 AM

Содержание TV20RN10D

Страница 1: ...Operating Instructions Before operating the unit please read this manual thoroughly Digital LCD Colour Television TV20RN10D 32W0146A_ENG indd 1 32W0146A_ENG indd 1 6 6 07 10 53 59 AM 6 6 07 10 53 59 AM ...

Страница 2: ...ation for the DVB T function Any function relative to the digital television with the DVB logo is available only within the country or area where such signals are transmitted Verify with the salesman if it is possible to receive a DVB T signal in the zone where you live Even if the television conforms to the DVB T specifications the compatibility to future digital DVB T transmissions is not guaran...

Страница 3: ...ess Contrast Colour and Sharpness 21 DNR 22 Blue back 22 Rec screen status LCD Power on off 22 Selecting the colour temperature 23 Selecting the picture preference 23 Picture format 24 Remarks on DVB T system 25 Language Setup 26 Auto Scan 27 Manual Scan 28 Carrier Setup 29 Channel Organizer 30 Favourite 31 Lock 32 Skip 32 Go To 33 Delete 33 Rename 34 Move 35 Move to 35 View 35 Display Setup 36 Pa...

Страница 4: ...unit near heat sources The casing and flex could be damaged by the impact of heat Watch out for kiddies copying what adults do Do not stick any objects through the vents The vents must remain open No newspapers or covers should be put on the unit The remote control is not a toy Toddlers could swallow the batteries If a battery has been swallowed please seek out a doctor immediately The screen is m...

Страница 5: ...o not place in direct sunshine When placing on a shelf leave 10 cm free space around the whole unit Make some space around TV Correct shelf assembly The apparatus shall not be exposed to dripping or splashing and that no objects filled with liquids such as vases shall be placed on the apparatus Liquids spilled into the unit can cause serious damage Switch the set OFF and disconnect the mains power...

Страница 6: ...engrained in the LCD TV panel and cause subtle but permanent ghost images This type of damage is NOT COVERED BY YOUR WARRANTY Never leave your TV on for long periods of time while it is displaying the following formats or images Fixed Images such as stock tickers video game patterns TV station logos and websites Special Formats that do not use the entire screen For example viewing letterbox style ...

Страница 7: ...buttons Press to change to a higher numbered channel set into memory Press to change to a lower numbered channel set into memory In Menu Setting In Standby Turning on the unit 6 MENU button To display the menu screen 7 TV AV button Select input mode for TV AV In Menu Using as ENTER button 8 Power button To turn the unit on or off Power is still used unless the AC power cord is discon nected from t...

Страница 8: ...Exit the menu screen Volume 17 Change the TV channel or Teletext page up or down In Standby Turn on the power 17 18 32 12 Cursor buttons Memorize Teletext page 100 CH LIST 19 17 Toggle between the TV and radio mode 40 Teletext ON TV Text OFF 18 Switches between the present channel and the last selected channel Sub Page selection 17 19 Select picture format 24 Display the subtitle 41 Still picture ...

Страница 9: ...the battery compartment 2 Install the batteries as shown below ensuring the correct polarity 3 Close the battery compartment The remote control handset will not work properly in the following cases If bright sunlight directly beams onto the unit front If an obstacle is placed between the unit and the handset Z Z Z Z Z Z If the batteries have not been installed according to their polarities If the ...

Страница 10: ...cket AV1 For the connection of scart cables See P 44 E DVB T antenna Connect a DVB T antenna if DVB T is already available in your transmission area Special versions allow for simultaneous connection of the analogue cable TV network F Ask your specialist retailer The built in combi tuner receives all analogue cable programmes and DVB T channels G C I slot for DVB T PayTV still no providers at pres...

Страница 11: ...utomatically tune in all available channels Your TV will tune the analogue channels first then tune the digital channels Note Please be patient the Auto Tuning process can take several minutes to complete When the programme on the screen stops changing and the sound comes on the search process is complete LANGUAGE ENGLISH COUNTRY UK AUTO TUNING AUTO INSTALLATION 10 AUTO TUNING ANALOGUE Auto Scan T...

Страница 12: ...CH ALLOCATION LANGUAGE ENGLISH AV1 OUTPUT TV AV COLOUR AUTO 3 Press or to select AUTO TUNING then press ENTER to enter the AUTO TUNING menu on the following pages the MENU can be called in the same way as here AUTO TUNING MANUAL TUNING CH ALLOCATION LANGUAGE ENGLISH AV1 OUTPUT TV AV COLOUR AUTO 4 Press EXIT to return to the normal screen Selecting the video input source Press INPUT SELECT to view ...

Страница 13: ...CATION LANGUAGE ENGLISH AV1 OUTPUT TV AV COLOUR AUTO 2 Select COUNTRY then press ENTER Press or to select your country then press ENTER COUNTRY START UK UK 3 Select START Then press ENTER The automatic tuning will search for available broadcasts and should store the channels in the correct order During the search the sound is muted When all programs have been stored the normal TV screen will appea...

Страница 14: ... ZDF 175 30MHz 5 If you like use fine tuning Select FINE and press ENTER Press or to fine tune See the note on this page ZDF 175 30MHz SEARCH FINE 175 30MHz COLOUR SYSTEM AUTO AUTO SOUND SYSTEM 6 To store other stations in additional memory cells repeat steps 1 to 5 7 Press EXIT to return to the normal screen Manual TV station presetting If you like you may manually tune a certain station into a s...

Страница 15: ...ON memu 4 Press EXIT to return to the normal screen Description about the each setting option SORT Press or to select the channel that you want to move then press ENTER Press or to select the position that you want to move the channel to then press ENTER ERASE PROGRAM Press or to select the channel that you want to erase then press ENTER SKIP Press or to select the channel that you want to skip th...

Страница 16: ...ote control of the satellite receiver You can not store the same station once again additionally in LCD Monitor which already stored in satellite receiver Connection to Satellite Receiver TV Satellite Receiver Scart cable not supplied To AV1 32W0346A_ENG indd 16 32W0346A_ENG indd 16 5 28 07 9 40 19 AM 5 28 07 9 40 19 AM ...

Страница 17: ... adjusting Press or to adjust the volume The volume level indicator disappears after 4 seconds MUTE Press The sound will be cut off MUTE will appear for approx 4 seconds The muting can be released by pressing again or or Information display In the analogue TV mode Press Channel number and picture size setting will appear for approx 4 seconds In the digital TV mode Press The program information wil...

Страница 18: ... teletext Press You will now see a teletext page If 100 is shown without any text information it may mean that the channel you have selected does not support teletext Press again in order to switch off teletext Press again in order to switch on teletext again The last page which was stored is now shown Note You cannot select any other channels as long as teletext is switched on Switch teletext off...

Страница 19: ...8 1 2 Press in order to select subpage 2 4 dashes are shown Enter 0 0 0 2 It can take a minute before subpage 0002 appears Press again in order to switch off the subpage feature You can only select other teletext pages when the subpage feature is switched off Enlargement In order to enlarge the display press Either the upper or lower half of the screen is enlarged Each time you press you switch be...

Страница 20: ... A broadcast signal is received NICAM M1 M2 illuminates for approx 4 seconds when a NICAM MONO A and MONO B broadcast signal is received This will be displayed for approx 4 seconds if a NICAM signal is received when the NICAM OFF option is selected Stereo reception in Germany STEREO illuminates for approx 4 seconds when a STEREO broadcast signal is received When 2 channel sound reception is availa...

Страница 21: ...eper to create a pseudo surround sound from the TV s speakers The feature works with stereo signals from TV broadcast or AV input 1 Select SURROUND then press ENTER Then press or to select ON or OFF OFF NICAM AUTO BASS 25 TREBLE 25 BALANCE 0 SURROUND OFF RESET 2 Press EXIT to return to the normal screen Brightness Contrast Colour and Sharpness 1 Select BRIGHTNESS then press ENTER Then press or to ...

Страница 22: ...pness and smearing Blue back You can set the TV to automatically change to a blue screen and mute the sound if the signal is weak or absent 1 Select BLUE BACK then press ENTER Then press or to select ON or OFF OFF DNR COLOUR TEMPERATURE MEDIUM BLUE BACK RESET OFF OFF 2 Press EXIT to return to the normal screen Rec screen status LCD Power on off This function is used in conjunction with the Timer f...

Страница 23: ...g the picture preference You can select from four picture preference Sports Standard Movie and Memory has described in the following table 1 Select PICTURE PREFERENCE then press ENTER STANDARD PICTURE PREFERENCE STANDARD BRIGHTNESS 25 CONTRAST 40 COLOUR 25 TINT SHARPNESS 0 0 2 Press or to select the mode you prefer Mode Picture Quality SPORTS Bright and dynamic picture factory set STANDARD Standar...

Страница 24: ...ize In future this is the wrong setting for this future picture size In future press PICTURE SIZE to set the 16 9 size The screen will look like this Note Additionally the DVB T allows you to choose screen format AUTO When receiving a 16 9 transmission without black bars the picture would look like the one shown in picture 5 With AUTO on black bars are added to the upper and lower portion of the p...

Страница 25: ...ps Visible interference e g blocky picture can result at extremely low data rates despite there being excellent reception quality within vicinity of the transmitter Blocky pictures are no fault of the receiver They are the result of the low data rate transmitted The digital DVB T sound can be transmitted to the digital amplifier via the digital output of your TV set Image Format Images are transmi...

Страница 26: ...A C B A C B 2 Language Setup menu will appear Press or to select the item you want to change Press or to select desired language Language Setup Menu Language English Pref Audio Language English Pref Subtitle Language English Pref Digital Service Language English Navigate Enter Exit 3 When all changes are decided press EXIT to return to the normal screen Note If FINLAND is selected on the AUTO INST...

Страница 27: ...n blue 3 The Auto Scan process will now begin The scanning process will be displayed in the progress bar When the search has been completed Scan completed message will be displayed And the Auto Scan menu will exit automatically Auto Scan TV Progress Searching Carrier 1 Frequency kHz 562000 003 DVB T 16QAM Radio 070 BBC Radio 1 001 001 BBC ONE 002 BBC TWO 007 BBC THREE Navigate Exit Notes All the c...

Страница 28: ...ring the scan process the list of services TV Radio collected for the carrier will be listed On completion Scan completed message will be shown Information Scan Completed 5 Then the confirmation banner will be displayed Press or to select Yes or No then press ENTER the selected option is shown in blue 6 Press EXIT to return to the normal screen With the Manual Scan option you can tune one carrier ...

Страница 29: ...rrier then press Green button The check mark will be displayed for selected carrier Then press ENTER The confirmation banner will be displayed Press or to select Yes or No then press ENTER If the option Yes is selected then all the marked carriers will be deleted from the list Rescan Rescan allows to tune the already tuned carrier to collect any new programmes that are currently available in the s...

Страница 30: ... 1 7 or the ENTER key you can activate the following functions from this menu for each channel Favourite Lock Skip Go To Delete Rename Move Move to and View You can deactivate each of these functions by pressing the same number again Indications S No Service Name Fav Lock Skip Del Move 030 CBBC 1 Service number Service name Pay channel Locked service Delete mark Favourite group Skipped service Mov...

Страница 31: ... to select specified Favourite group r e z i n a g r O l e n n a h C S No Service Name Fav Lock Skip Del Move 001 BBC ONE 002 BBC TWO 003 BBC THREE 030 CBBC 040 BBC News 24 1 Fav 2 Lock 3 Skip 4 Go To 5 Delete 6 Rename 7 Move 8 Move to Enter View None Fav1 Fav2 Fav3 Fav4 Navigate Enter D Menu TV Radio Exit 0 9 TV 3 Press ENTER The selected service will be added to the specified favourite group r e...

Страница 32: ...the Numbered Buttons to enter your chosen password see page 37 for further details Lock icon will be displayed for selected service Enter Password 3 You can save the settings by pressing DIGITAL MENU and it will be followed by Successfully updated message Press EXIT to return to the normal screen Skip 1 In the Channel Organizer menu press or to select the specified service 2 Then press number 3 Sk...

Страница 33: ...specific service from the service list 1 In the Channel Organizer menu press or to select the specified service you want to permanently remove from the list 2 Press number 5 The Delete icon will be displayed for selected service r e z i n a g r O l e n n a h C S No Service Name Fav Lock Skip Del Move Navigate Enter D Menu TV Radio Exit 0 9 001 BBC ONE 002 BBC TWO 003 BBC THREE 030 CBBC 040 BBC New...

Страница 34: ...he new character and press ENTER The old character will be replaced with the new one You can toggle between the name and the character palette using the Yellow button Rename BBC ONE Navigate Enter Exit Select 0 1 2 3 4 5 6 7 8 9 _ A B C D E F G H I J K L M N O P Q R S T U V W X Y Z a b c d e f g h i j k l m n o p q r s t u v w x y z The Number Buttons can be used to enter any numeric digits requir...

Страница 35: ...HREE 030 CBBC 040 BBC News 24 1 Fav 2 Lock 3 Skip 4 Go To 5 Delete 6 Rename 7 Move 8 Move to Enter View Navigate Enter D Menu TV Radio Exit 0 9 TV 4 You can save the setting by pressing DIGITAL MENU which is followed by Successfully updated message 5 Press EXIT to return to the normal screen Move to Press number 8 in step 2 above Now you can change the service number on the left side of the screen...

Страница 36: ...set the transparency ratio of the Display menus The Display transparency setting can be altered between None no transparency to 50 The default transparency level will be set to 10 1 Press DIGITAL MENU the menu will appear on the screen Press or to select System Configuration option Press or to select Display Setup from sub menu tab then press ENTER Password Setup Display Setup Main menu System Con...

Страница 37: ...onfirmation The Information banner will then appear Press EXIT to return to the normal screen While toggling between channels if a service which has a parental rating is selected then you will be asked to enter the correct password to view that channel If the channel you are currently watching supports a parental rating then the rating will also be displayed in the Channel banner menu see page 40 ...

Страница 38: ...ER Software upgrade Version Main menu Technical Information A C B A C B 2 If a software upgrade is available from an Over Air Download OAD then the message S W available do you want to download will be displayed you can then select Yes or No by pressing or then press ENTER the selected option is shown in blue Confirmation S W available do you want to download Yes No 3 If you select the option Yes ...

Страница 39: ...TV Enter Exit 3 In the CI Menu CAM specific information such as Module information Smart card information Language and Software Download are shown Press or to select information then press ENTER to see detail Cl Menu Main menu Module information Smart card information Language Software Download Press Ok to select or Exit to quit Navigate 4 Press EXIT to return to the normal screen Note If you remo...

Страница 40: ...e displayed up to about 15 characters if the name is longer than this it will be abbreviated Subtitles are displayed on the channel banner Some broadcasts may not provide this service Channel banner When you change from one channel to another the Channel banner will be displayed for the selected service In the channel banner menu information such as current date time channel name etc will be displ...

Страница 41: ...de list Multi audio Audio mode Navigate Enter Exit 001 ENG L R No Language Code 3 Press EXIT Your selected audio preferences will be saved DVB Subtitle DVB Subtitle is a feature supported in DVB Digital Video Broadcasting applications in which the service shown can be accompanied by a text display on the screen in parallel with the corresponding audio service The DVB Subtitle feature can be enable...

Страница 42: ...ng or the Event list will be refreshed accordingly and you will see the programme information for the currently highlighted programme To scroll through the service list page by page press Red or Green Key Events list List the events in a grid of rows and columns Each row shows the list of events that are available for the corresponding service in the service list Within each row you can press or t...

Страница 43: ...hornberrys Bogged Down Nigel and Eliza are on their way to film a rare fish Nigel suggests a shortout through a bog but Ellza is reluctant Th 16 30 17 00 The Wild Thornberrys CBBC 7 0 0 2 8 0 0 2 n u S E N O C B B 1 0 0 16 30 Channels The Wild T Ready Steady Co Little Be No Event Name No Event Name No Event Na 17 30 17 00 The Blue The Weakest Link No Event Name Navigate Enter Exit View Info TV Rad...

Страница 44: ...wer supply in order to avoid any potential damage from occurring Make sure to establish the required connection Make sure that connections are properly and correctly attached before connecting the appliances to the power supply 2 Connecting a DVD player Note S Video signals can be played back through the AV2 input see P 45 For to ensure optimum picture quality select RGB for the DVD player s outpu...

Страница 45: ...tput from the TV A B TV Left side view Stereo amplifier Audio input Coaxial digital lead not supplied Surround sound amplifier system COAXIAL AUDIO OUT Scart RCA cable not supplied Video camera to AV2 Playback TV Left side view Video recorder to AV1 Recording AV cable not supplied SCART cable not supplied S VIDEO cable not supplied AV output 4 Connecting Video camera and Video recorder Select the ...

Страница 46: ...ustment The AV Colour setting only applies when viewing devices connected to the AV inputs 1 Select select AV COLOUR then press ENTER 2 Press or to select AUTO AUTO TUNING MANUAL TUNING CH ALLOCATION LANGUAGE ENGLISH AV1 OUTPUT TV AV COLOUR AUTO 3 If AUTO option does not work press or to select desired colour e g NTSC 3 58 4 Press EXIT to return to the normal screen Note PAL is the colour system u...

Страница 47: ...abase empty message appears on the screen Check all antenna connections and try auto tuning again 29 The LCD panel is a very high technology product giving you fine picture details Occasionally a few nonactive pixels may appear on the screen as a fixed point of blue green or red Please note that this does not affect the performance of your product System Analogue PAL UK IR CCIR FRENCH System B G D...

Страница 48: ...J32W0146A SH07 06 P 32W0146A_ENG indd 48 32W0146A_ENG indd 48 6 6 07 10 54 02 AM 6 6 07 10 54 02 AM ...

Отзывы: