background image

32

○○

DVD discs must be Region 2 or Region ALL type to play on this unit.

The loaded Disc (DVD and Audio-CD) will be recognized automatically.

The suitable disc formats are: DVD-Video, DVD-R/-RW (Video format only), Audio CD, CD-R/CD-RW, Video CD and

SVCD.

Some CD-R/RW discs may be incompatible.

• This unit can play an 8cm disc. Please do not use a disc adapter. It may cause trouble.

• Please do not insert any disc of an irregular shape into the unit, as it may interfere with the function of the unit.

You may not be able to remove it.

• Please do not use after market accessories, such as a ring protector, as this may cause trouble with the

operation of the unit.

Do not play DVD-ROM, DVD-Audio, CD-G or Photo CD to prevent accidental erasure of prerecorded material.
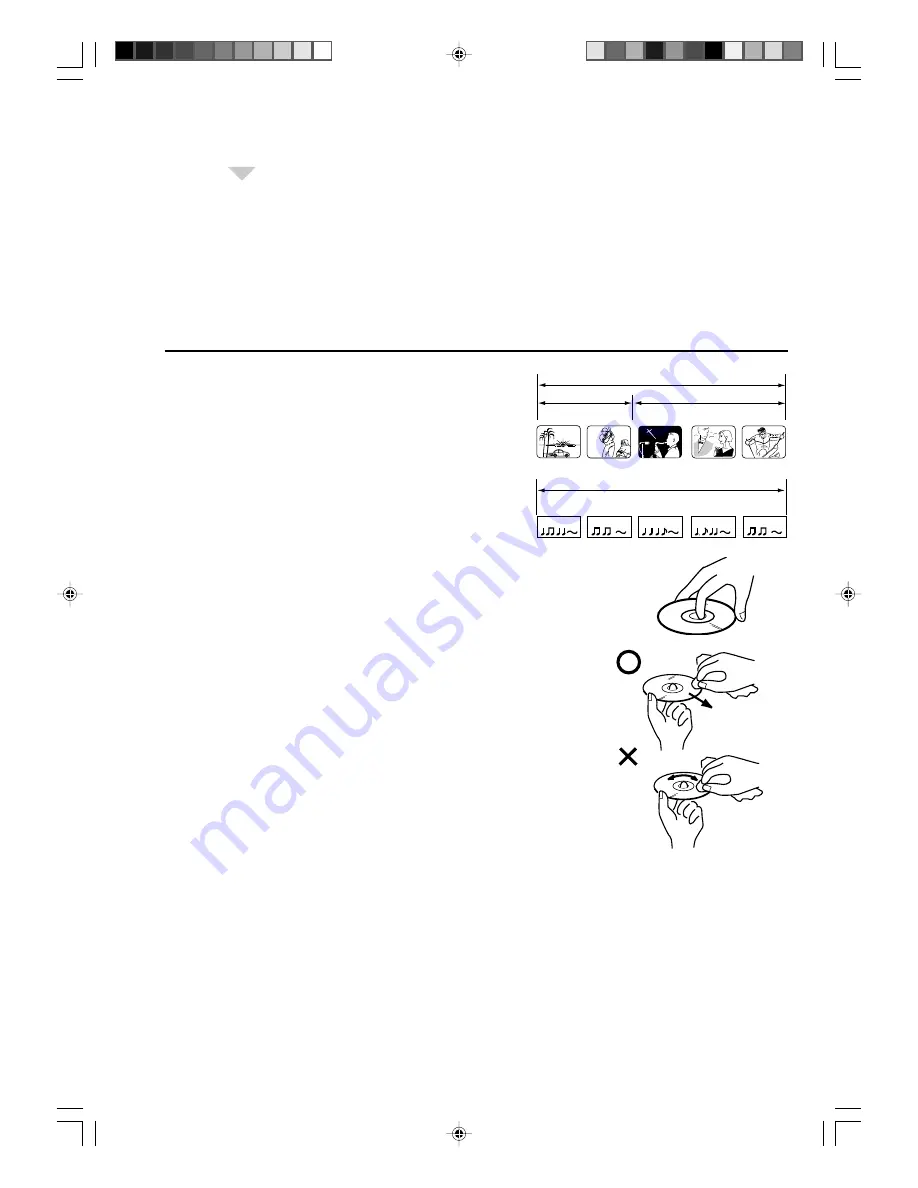
Title

When two or more movies are recorded on a disc, the disc is

divided into two or more sections. Each section is called a “TITLE”.

Chapter

The titles can be subdivided into many sections.

Each section is called a “CHAPTER”.

Track

An Audio CD can contain several items.

These are assigned to tracks.

Removing Disc from Case

Be sure to hold the edge of disc. Do not touch the surface of the

disc.

Pick up the disc gently from the case.

• Do not scratch the disc.

• Do not get dirt on the surface of the disc.

• Do not stick a label or adhesive tape on the disc.

• Do not drop or bend the disc.

Storing Disc

• Store the disc in the case to avoid risk of scratches, dirt or damage.

• Do not leave disc exposed to direct sunlight or in hot or humid places.

Cleaning Disc

Wipe the disc with a clean, dry cloth from center to edge.

• Do not wipe in circular direction.

• Do not use liquid or aerosol cleaners.

On Video CDs

This unit supports Video CDs equipped with the PBC (Version 2.0) function. (PBC is

the abbreviation of Playback Control.) You can enjoy two playback variations

depending on types of discs.

• Video CD not equipped with PBC function

(Version 1.1) Sound and movie can be played on this DVD/VCR in the same way as an audio CD.

• Video CD equipped with PBC function

(Version 2.0) In addition to operation of a Video CD not equipped with the PBC function, you can enjoy playback

of interactive software with search function by using the menu displayed on the TV screen (Menu Playback). Some

of the functions described in this owner’s manual may not work with some discs.

To turn off the PBC

1. Press 

PLAY MODE

 in the Stop mode.

2. Press 

/

▼ 

to select “Mode”, then press 

ENTER 

repeatedly unit “off” appears.

3. Press 

PLAY MODE

 again to clear the screen.

To turn on the PBC

Follow the above step 1~2, then press 

ENTER

 repeatedly unit “PBC” appear.

Disc


TRACK  1

TRACK  2

TRACK  3

TRACK  4

TRACK  5

Audio-CD

 50A0201A_p32-37.p65

9/12/07, 4:57 PM

32

Содержание TV19PL120DVD A

Страница 1: ...uction manual Quick Set up guide Remote control Battery R 6 AA x 2 AC mains lead TV19PL120DVD TV19PL120DVD A Instruction manual 19 DIGITAL LCD TELEVISION WITH DVD PLAYER Before operating the unit plea...

Страница 2: ...IF DIRECTED BE SURE TO OPERATE THE PLAYER CORRECTLY AS INSTRUCTED WHEN THIS UNIT IS PLUGGED INTO THE WALL OUTLET DO NOT PLACE YOUR EYES CLOSE TO THE OPEN INGS TO LOOK INTO THE INSIDE OF THIS UNIT USE...

Страница 3: ...a fire electric shocks or injuries from dropping the unit The distance between eyes and the screen should be about 5 7 times as long as diagonal length of the screen Viewing from too close a distance...

Страница 4: ...analogue menu Activate the digital menu Toggle between the TV and radio mode Teletext ON TV Text OFF Select menu of a DVD disc Select title of a DVD disc DVD control buttons Four coloured buttons DVD...

Страница 5: ...output via this socket see page 5 G PC Monitor input PC See pages 7 and 8 H PC HDMI Audio input socket See pages 7 9 I HDMI input See page 9 J Scart socket AV1 For the connection of other equipment vi...

Страница 6: ...connections are properly and correctly attached before connecting the appliances to the power supply 2 Connecting a decoder You can use the AV1 SCART socket when connecting a decoder and other audiovi...

Страница 7: ...T DVB T DIGITAL AUDIO OUT COMPONENT Pr Y R R MONO AUDIO VIDEO S VIDEO AV 2 MONO Connect the Video camera or games console to the TV unit using the appropriate RCA Phono AV leads or S Video if applicab...

Страница 8: ...his source select the COMPONENT input mode see page 4 6 Selecting the setting for the SCART socket 1 Press ANALOG MENU the menu will appear on the screen Press B or A to select SETUP menu Press C C C...

Страница 9: ...unit to your PC change the adjustment of your PC s graphic card Otherwise the picture may not appear cor rectly on the unit Turn on your PC still with your old Monitor and select under 1360 x 768 for...

Страница 10: ...djust the horizontal and vertical placing of the image PHASE and CLOCK eliminates the horizontal PHASE and vertical CLOCK interfering lines RED GREEN BLUE influences the colour balance BACKLIGHT Press...

Страница 11: ...trademarks of HDMI Licensing LLC or DVI device HDMI device To DVI output Audio lead not supplied HDMI to DVI adapter lead HDMI type A connector not supplied HDMI lead type A connector To HDMI out TV...

Страница 12: ...reen Language Selection This TV has 13 different languages for menu set up which can be selected through the On Screen Display English German French Spanish Italian Dutch Portuguese Swedish Finnish Po...

Страница 13: ...Your TV will tune the analogue channels first then tune the digital channels Note Please be patient the Auto Tuning process can take several minutes to complete When the programme on the screen stops...

Страница 14: ...TION LANGUAGE ENGLISH VERTICAL POSITION 0 AUTO 4 3 DEFAULT 16 9 SETUP menu EXIT END MENU RETURN AUTO TUNING MANUAL TUNING CH ALLOCATION LANGUAGE ENGLISH VERTICAL POSITION 0 AUTO 4 3 DEFAULT 16 9 UK EX...

Страница 15: ...tallation site and range then press ENTER 7 Repeat steps above to preset other TV stations 8 Press EXIT to return to the normal screen Usually the Auto Tun ing stores all available stations in the rec...

Страница 16: ...selected channel or input source Volume adjusting Press or to adjust the volume The volume level indicator disappears after 4 seconds MUTE Press The sound will be cut off MUTE will display on the scre...

Страница 17: ...mistype something just enter the complete 3 digit wrong page number then enter the desired number again Or press one of the coloured teletext buttons so that a page from Fastext TOPtext is shown Hold...

Страница 18: ...ll be displayed for approx 4 seconds when NICAM OFF is selected in the menu screen Stereo reception STEREO illuminates for approx 4 seconds when a STEREO broadcast signal is received Adjusting the Nic...

Страница 19: ...SCREEN Stretches the left and right hand sides of a 4 3 picture horizontally to fill the screen while leaving the centre of the picture unstretched Note In this mode the picture is geometrically dist...

Страница 20: ...ge 9 RESET Select RESET to reset BASS TREBLE and BALANCE to the factory preset values AUTO TUNING See page 12 MANUAL TUNING See page 13 CH ALLOCATION See page 12 LANGUAGE See page 10 VERTICAL POSITION...

Страница 21: ...be displayed over the digital TV screen Guide to using the Digital Menu System When the set is in the digital mode you can access the main menu by pressing DIGITAL MENU on the remote control This mai...

Страница 22: ...Auto Scan from the sub menu tab then press ENTER 2 The confirmation banner will be displayed Press B or A to select Yes or No then press ENTER 3 The Auto Scan process will now begin The scanning proc...

Страница 23: ...and select each one individually to Rename Delete or Rescan 3 Rename Select carrier then press Red button The alphanumeric keypad will appear You can rename a service as per your preference Delete Sel...

Страница 24: ...anise the channels The following options are supported Favourite Lock Skip Go To Delete Rename Move Move to View Note While in TV mode only TV programmes will be displayed and only radio programmes wi...

Страница 25: ...e s from the memory 1 Press C D to select the desired service 2 Press 5 on the remote control An icon displays indicating the service to be deleted Pressing 5 will turn the delete icon on and off 3 Pr...

Страница 26: ...ress C or D to select Parental Lock then press B or A to select desired parental rating see note Then press EXIT to return to the normal screen 4 You can also change the password using the next option...

Страница 27: ...u Select Software upgrade from sub menu tab by pressing C or D Then press ENTER 2 If a software upgrade is available from an Over Air Download OAD then the message S W available do you want to downloa...

Страница 28: ...TV and Radio services The TV RADIO key is used to toggle between the TV and Radio mode If you press CH LIST when you are in Radio mode then the channel list menu will display the list of Radio servic...

Страница 29: ...al strength and quality of the selected service here 3 To remove the Channel banner immediately press again Channel banner The Channel banner should be displayed for every channel change and also thro...

Страница 30: ...tle language from the available languages 3 To turn off the DVB Subtitle press repeatedly until Off appears in the Subtitle menu Multi audio DVB Subtitle You can select your preferred Audio mode and D...

Страница 31: ...red links press the corresponding one of the four coloured buttons red green yellow blue If there is a movable cursor press C D B A to select your desired link then press ENTER 4 To see other DVB Text...

Страница 32: ...From within the Guide menu you can open the Description menu for the currently highlighted programme by pressing The Guide Description menu shows the extended event description of an event You can scr...

Страница 33: ...LCD Power on off This is so that if you are using the timer to make a re cording to your VCR or other device the TV screen will not switch on unless you want it to If you try to switch to another cha...

Страница 34: ...the surface of the disc Do not stick a label or adhesive tape on the disc Do not drop or bend the disc Storing Disc Store the disc in the case to avoid risk of scratches dirt or damage Do not leave d...

Страница 35: ...the guides and place it in position DO NOT FORCE THE DISC THIS CAN DAMAGE THE MECHANISM LIGHTLY PUSH THE DISC UNTIL IT IS ACCEPTED 3 On the TV screen changes to Reading and then playback commences A m...

Страница 36: ...ng facility Resuming cannot function when you play a PBC featured Video CD while the PBC is on To turn off the PBC see page 32 Some playback operations of DVDs may be intentionally fixed by software p...

Страница 37: ...Playing in slow motion DVD VCD Press or during playback Each time you press or the slow motion speed changes To resume normal playback Press PLAY Note The sound is muted during slow motion playback R...

Страница 38: ...the DVD disc to locate the desired point to playback In the case of VCD Audio CD discs time and track are used to locate the desired point to playback To check the title chapter track and time press...

Страница 39: ...ss or to select the Marker 1 3 3 Press ENTER Playback starts from the marked scene To cancel the Marker Follow the above steps 1 2 then press CANCEL Note Some discs may not work with the marking opera...

Страница 40: ...ion is cancelled whenever SKIP or SKIP is pressed A B Repeat Playback DVD VCD Audio CD A B repeat playback allows you to repeat selection between two selected points 1 Press REPEAT A B during playback...

Страница 41: ...ected title will start Note Depending on the DVD you may not be able to select the title Depending on the DVD a title menu may simply be called a menu or title in the instruc tions supplied with the d...

Страница 42: ...el the display press again Video CD DVD 1 2 Eng Dolby Digital 2 2 Fre Dolby Digital 1 5 Eng Off Note If the desired language is not heard after pressing the button several times the language is not re...

Страница 43: ...racks will be played It may take more than one minute for this unit to read MP3 WMA JPEG files depending on its structure Music recorded by Joliet Recording Specification can be played back The music...

Страница 44: ...rts playing back The unit records the stopped point appears on the screen Press PLAY to resume playback from the scene point If you press again or unload the disc the unit will clear the stopped point...

Страница 45: ...Slide show playback The slide show enables you to view pictures files one after another automati cally Preparation Set JPEG Interval setting to 5 Seconds 10 Seconds or 15 Seconds See page 49 1 Select...

Страница 46: ...ss ENTER to select Random 3 Press PLAY The Random playback will start To resume normal playback Select Repeat Off in step 2 Folder 1 Folder 2 MP3 1 Select Files Repeat Off Mode Off Folder 1 Folder 2 M...

Страница 47: ...s only the programed files that you have added in Step 2 5 In the Program View press PLAY The files start to playback in programmed order that were added by you To remove file from program list in sto...

Страница 48: ...en press to select the Program Playback and press ENTER The programs you selected will start to playback in order To resume normal playback select Mode Off in step 2 To change the program 1 Select Mod...

Страница 49: ...Picture Mode JPEG Interval Night Mode Digital Out Parental Password Details To select the language of Menu Subtitle and Audio if more than one languages are available on the disc To select a preferred...

Страница 50: ...You have the following screen sizes to choose from 4 3 Letterbox When playing back a wide screen DVD disc it displays the wide picture with black bands at the top and bottom of screen 4 3 Panscan It...

Страница 51: ...at 5 second intervals 10 Seconds Plays back images in the form of a slide show at 10 second intervals 15 Seconds Plays back images in the form of a slide show in 15 second intervals Night Mode Night M...

Страница 52: ...riction will notwork The password is required every time when you change the parental level If you input a wrong number press CANCEL Password 1 Press or to select Password then press ENTER Enter Curre...

Страница 53: ...ich follows the Reading screen will change depending on which disc is played If you select YES with the ENTER key password input screen will then appear 3 Enter the password with Number buttons 0 9 Th...

Страница 54: ...25 Thai 3018 Bihari 1218 Hungarian 1831 Oriya 2528 Tibetan 1225 Breton 1228 Icelandic 1929 Panjabi 2611 Tigrinya 3019 Bulgarian 1217 Indonesian 1924 Pashto Pushto 2629 Tonga 3025 Burmese 2335 Interlin...

Страница 55: ...to the AC outlet Set it to ON Connect the Mains lead to the AC outlet Check aerial connections or broken wires Press the Sub Power button Try another channel Try another channel Check aerial connecti...

Страница 56: ...of the contents It is in the mode of repeat playback memory playback etc The function is prohibited with the unit or the disc appears on the screen DVD REMOTE CONTROL 33 32 33 50 32 35 This product i...

Страница 57: ...jack Audio input 15 pin mini D sub PC Component C I Common Interface EN50221 DIGITAL AUDIO OUTPUT RCA pin Audio Headphones 3 5 mm jack Audio output Audio input that share with HDMI and PC Audio Output...

Страница 58: ...56 Memo 50A0201A_p50 Back p65 9 12 07 5 00 PM 56...

Страница 59: ...57 Memo 50A0201A_p50 Back p65 9 12 07 5 00 PM 57...

Страница 60: ...870 6001 338 UK customers only Calls charged at National Rate Whilst Orion products have been designed and manufactured to a very high standard and have been subjected to rigorous quality control regr...

Отзывы: