background image

39

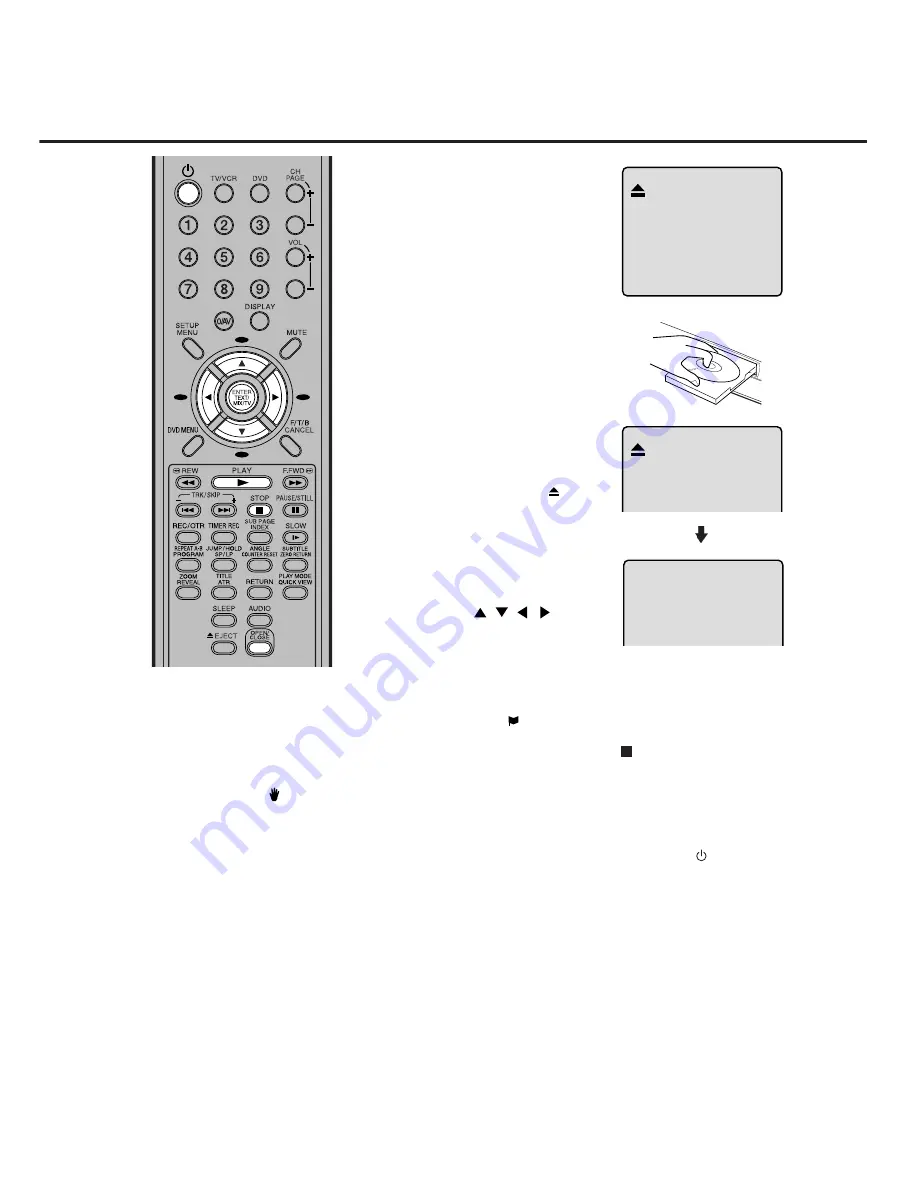
PLAYBACK PROCEDURE

1

Press 

OPEN/CLOSE 

on

the unit or the remote con-
trol.
The disc tray will open.

2

Place a disc onto the tray.
Position it with the printed
label side up, align it with
the guides, and place it in
its proper position.

NOTES:

• If a non-compatible disc is loaded, “In-

correct Disc”, “Region Code Error” or
“Parental Error” will appear on the TV
screen according to the type of loaded
disc. If these appear, check your disc
again (see pages 36 and 52).

• Some discs may take a minute or so to

start playback.

• A  “Prohibition” symbol    may appear

at the upper left of the screen. This sym-
bol means either the feature you tried
is not available on the disc, or the unit
cannot access the feature at this time.
This does not indicate a problem with
the unit.

• When you set a single-faced disc label

downwards (i.e. the wrong way up) and
press

  PLAY 

or 

OPEN/CLOSE 

on the

unit, “Reading” will appear on the dis-
play and then “Incorrect Disc” will be dis-
played.

• Some playback operations of DVDs

may be intentionally fixed by software
producers. Since this unit plays DVDs
according to the disc contents the soft-
ware producers designed, some play-
back features may not be available. Also
refer to the instructions supplied with the
DVDs.

Reading

4

Press 

PLAY

  or 

OPEN/

CLOSE

.

The disc tray closes auto-
matically.
On the screen, 

 changes

to “Reading” and then play-
back will commence.

• A menu screen may ap-

pear on the TV screen, if
the disc has a menu fea-
ture. In this case, press

 or 

ENTER

to operate a menu fea-
ture.

3

Press 

STOP

 to end playback.

• The unit memorizes the stopped point, depending on the

disc. “

” appears on the screen for approx. 4 seconds.

Press 

PLAY

 to resume playback (from the stopped point).

• If you press 

STOP

 again (“   ” appears on the screen) or

unload the disc, the unit will clear the stopped point.

5

Then press 

OPEN/CLOSE

.

The disc tray opens.
Remove the disc and press 

Sub Power (

)

.

The disc tray closes automatically and the unit turns off.

Содержание TELETEXT 21FVD

Страница 1: ...Before operating the unit please read this manual thoroughly Operating Instructions Combination 21 Flat TV and Video Recorder DVD Video Player 21FVD TELETEXT Region Region discs only PAL SECAM...

Страница 2: ...images and maximum picture playback CAUTION THIS UNIT IS A CLASS 1 LASER PRODUCT HOWEVER THIS UNIT USES A VISIBLE LASER BEAM WHICH COULD CAUSE HAZARDOUS RADIATION EXPOSURE IF DIRECTED BE SURE TO OPERA...

Страница 3: ...ITLES 48 CHANGING ANGLES 49 TITLE SELECTION 49 DVD MENU 49 ADVANCED FUNCTIONS OF THE DVD SECTION SETTING THE ASPECT RATIO OF TV SCREEN 50 SETTING ON SCREEN DISPLAY 50 DYNAMIC RANGE CONTROL 51 PARENTAL...

Страница 4: ...unit is suddenly moved from a cold place to a warm place moisture may form inside the unit In this case do not operate it for two or three hours Video Tape PRECAUTIONS Head Drum WHAT IS MOISTURE COND...

Страница 5: ...ting to use the unit again When you leave your home for a long period of time unplug the AC mains lead The ventilation holes prevent overheating Do not block or cover these holes Especially avoid cove...

Страница 6: ...on DVD REW Rewind SKIP button DVD STOP button DVD PLAY button DVD VIDEO AUDIO IN L R jacks AV2 Rear Note for key operation During TV VCR mode When you press DVD 6 or 7 SKIP the unit switches to DVD SK...

Страница 7: ...back 22 23 40 SKIP Skip chapter to forward or reverse direction 40 42 TRK TRACKING Manual tracking 22 STOP Stop 22 39 PAUSE STILL Still picture Recording pause on off 23 24 40 REC OTR Recording OTR 24...

Страница 8: ...ed For best performance it is recommended batteries be replaced on a yearly basis or when remote operation becomes erratic Do not mix old and new batteries Weak batteries can leak and severely damage...

Страница 9: ...onsult your local dealer ANTENNA CONNECTIONS Antenna socket Mains lead EXTERNAL ANTENNA The type of antenna required depends on the position of your home it s distance from the transmitter and local i...

Страница 10: ...or the location of video and audio inputs and outputs To Audio L Input To Audio R Input AUDIO cord not supplied Amplifier Rear of unit Coaxial digital cable not supplied AV Amplifier with built in dig...

Страница 11: ...ton to select AV2 to use the TV as a monitor You ll need to consult each component s Owner s Manual for additional information 1 To connect the unit to a VCR Press the AV button to select AV2 to use t...

Страница 12: ...guage selecting screen shown in step 4 will appear This is not a fault please select the language first before proceeding with setting the unit up 5 Preparation Make sure that the MAIN POWER ON switch...

Страница 13: ...off the clock andallitsprogrammedsettingwillremain in the memory for 30 minutes If the power failure is longer than 30 minutes you will have to reset the present time If you want to correct the digit...

Страница 14: ...Press or to select the AUTO TUNING mode then press ENTER 3 The Auto Tuning will start and memorize all the channels in sequence available in your area 4 5 When the Auto Tuning is finished the CHANNEL...

Страница 15: ...n to be 4 5 TO CHANGE THE TV STATIONS TO ANOTHER CHANNEL POSITION Example Changing the TV Station from CH 4 to CH 6 position Press ENTER Press MENU to return to the normal screen SELECT TV SETUP ENTER...

Страница 16: ...nel number flashes To cancel the skip setting select the skipped channel using Direct Channel Selection then press CANCEL 5 Press or to select the required channel number 1 110 Press ENTER to store th...

Страница 17: ...be adjusted to a desired level by pressing VOL or The VOLUME control is represented by a green bar on the screen 3 NOTE If the station being viewed stops broadcasting the TV will shut off after 15 min...

Страница 18: ...utes each time the button is pressed in the order of 120 110 20 10 0 After the sleep time is programmed the display will disappear and will reappear every 10 minutes To confirm the sleep time setting...

Страница 19: ...press ENTER the picture adjustment Screen changes as follows BRIGHTNESS Press ENTER until BRIGHTNESS appears on the screen then press or to adjust the brightness When is pressed the darker portions of...

Страница 20: ...s 1 6 then press or to select the CANCEL position Press MENU to return to the TV After setting the ON TIMER of the OFF TIMER will flash on and off If you wish to set the OFF TIMER press ENTER then fol...

Страница 21: ...or to select the CANCEL position Press MENU to return to the TV To confirm the ON OFF TIMER Press PROGRAM twice to indicate the programmes on the screen 5 Preparation Press TV VCR to select TV VCR mo...

Страница 22: ...any mode The second press will eject the tape Pull the cassette out AUTOMATIC EJECT When the unit is automatically rewinding the tape and reaches its end AUTO REWIND the tape will be ejected automati...

Страница 23: ...the COLOUR SYSTEM mode 2 Press to select the AUTO PAL MESECAM or SECAM Press MENU twice to return to normal TV screen 3 Preparation Press the TV VCR to select TV VCR mode Select your appropriate Colou...

Страница 24: ...e STOP mode will appear on the screen DIGITAL AUTO TRACKING ADJUSTMENTS When a tape is played the Digital Auto Tracking system automatically adjusts the tracking to obtain the best possible picture If...

Страница 25: ...layback Press PLAY again to resume normal playback NOTE SLOW TRACKING AND VERTICAL LOCK AD JUSTMENT If noise bars appear in the picture during slow motion press TRK SKIP or to reduce the noise bars If...

Страница 26: ...on the TV screen for approx 4 seconds AUTO REWIND FEATURE This unit will automatically rewind and eject the tape when the tape has ended except during OTR and TIMER REC If the erase prevention tab has...

Страница 27: ...program any timer recordings If you want to correct the digits while setting press until the item you want to correct flashes then press or to correct the desired setting 5 Preparation Load a cassette...

Страница 28: ...splayed The setting changes as follows TO CONFIRM THE SETTINGS Press PROGRAM 3 times The screen returns to the normal screen Press PROGRAM once The TV screen displays the timer program list Press PROG...

Страница 29: ...You cannot change the channel while the unit is recording but you can switch to the DVD mode and watch a DVD without affecting the recording 5 EXAMPLE One touch Timer Recording for 30 minutes Press R...

Страница 30: ...counter will display the passed time 3 When you wish to make the counter disappear press DISPLAY once again 4 NOTES If you rewind the tape from 00 00 00 a minus sign will be displayed in front of the...

Страница 31: ...ny location on the tape by pressing the COUNTER RESET button and ZERO RETURN button Before playback or recording press COUNTER RESET to set the counter to 00 00 00 2 Begin playback or recording 3 Pres...

Страница 32: ...uring INDEX search the tape may stop and begin to play at a slightly different location INDEX may not function properly with old or worn out video tapes SEARCHING FOR AN INDEX MARK EXAMPLE When the ta...

Страница 33: ...edirectionorpositionofthe antenna may improve the reception SNOW If your receiver is located in the fringe area of a television station where the signal is weak your picture may be marred by the appea...

Страница 34: ...STILL 3 Press the PLAY button on the playback VCR then press the PAUSE button 4 Release the Recording Pause and Still Playback to begin the duplicating process 5 NOTES It is recommended that the tape...

Страница 35: ...o start the disc playback 2 During disc playback press REC OTR 3 NOTES You can set the duplicating time using the OTR function At step 3 above press REC OTR repeatedly until the desired duplicating ti...

Страница 36: ...ote handset 2 Push TEXT MIX TV The first push on TEXT MIX TV button switches the Teletext on The second push on TEXT MIX TV displays the TV program and the Teletext together MIX The third push on TEXT...

Страница 37: ...AGE 0000 The screen s lower left corner will display To call sub page 2 enter 0 0 0 2 Your input will be displayed in the lower left corner 0002 It may take some time until sub page 2 is broadcast The...

Страница 38: ...lled a CHAPTER Track An Audio CD can contain several items These are assigned to tracks Removing Disc from Case Be sure to hold the edge of disc Do not touch the surface of the disc Pick up the disc g...

Страница 39: ...C outlet If the AC cord plug is plugged in for the first time wait for about 5 seconds before pressing POWER ON on the front NOTE When connecting to other equipment unplug the unit from the AC outlet...

Страница 40: ...or ENTER and then press or to select desired language e g English then press ENTER 5 Press SETUP or RETURN to remove the Menu screen NOTES If the selected soundtrack language is not recorded on the di...

Страница 41: ...unit Reading will appear on the dis play and then Incorrect Disc will be dis played Some playback operations of DVDs may be intentionally fixed by software producers Since this unit plays DVDs accordi...

Страница 42: ...ress PLAY To resume the still playback press PAUSE STILL Press SLOW during normal playback or still playback Each press of SLOW will change the speed of the slow x1 2 x1 4 x1 6 x1 7 Slow motion Playba...

Страница 43: ...JPEG software that records data al phabetically or numerically 2 Name each file including two digit or three digit number e g 01 02 or 001 002 3 Refrain from making too many sub folders CAUTION Some...

Страница 44: ...enu appears on the TV screen If you want to watch the other file repeat steps 4 5 To display a picture menu press DVD MENU To return to a file menu press TITLE Press or to select the desired file To d...

Страница 45: ...a slide show at 5 second inter vals 10 Seconds Plays back images in the form of a slide show at 10 second intervals 15 Seconds Plays back images in the form of a slide show in 15 second intervals To...

Страница 46: ...esired file type All Displays all files Music Only Displays only MP3 files Pictures Only Displays only JPEG files To make SETUP screen disappear press SETUP or RETURN Tv Screen Display On JPEG Interva...

Страница 47: ...Zooming Use the title chapter and time recorded on the disc to locate the desired point to play back Press Number buttons 0 9 to input the number If you input a wrong number press CANCEL Refer to the...

Страница 48: ...to repeat material between two selected points 1 Press REPEAT A B during playback The start point is selected 2 Press REPEAT A B again The end point is selected Playback starts at the point that you...

Страница 49: ...der of tracks on the disc Program playback Play Mode Off Repeat Off Enter Play Mode Program Playback 02 31 08 29 Track 7 11 1 Press PLAY MODE during playback or stop mode Random playback Play Mode Off...

Страница 50: ...on the disc Changing soundtrack language is can celled when you open the disc tray The initial default language or available lan guage will be heard if the disc is played back again Changing subtitle...

Страница 51: ...tle Selection Some DVDs allow you to select the disc contents using the menu When you play back these DVDs you can select the sub title language and soundtrack language etc using the DVD menu 1 Press...

Страница 52: ...Panscan the disc may not offer this option In this case the picture would dis play in whichever format the disc is capa ble of playing back Setting the aspect ratio of TV screen You can select the asp...

Страница 53: ...creen DRC Dynamic Range Control ena bles you to control the dynamic range so as to achieve a suitable sound for your equipment NOTES This function works only during play back of Dolby Digital recorded...

Страница 54: ...Off The parental control setting does not function Level 8 Virtually all DVD software can be played back Level 1 DVD software for adults cannot be played back Select from level 1 to level 8 The limit...

Страница 55: ...elect Password then press number buttons 0 9 to enter the password NOTE You can change the password at this time if you want Press ENTER The parental level is changed and locked Press SETUP or RETURN...

Страница 56: ...llows the Reading screen will change depending on which disc is played If you select YES withENTER key Yourdiscexceedstheparentalcontrollevel1 e g screen will then appear 3 Enter the password with Num...

Страница 57: ...Other Other languages can be selected See the Language code list on page 58 English Francais Espanol Deutsch Italiano The selected language is the first priority Menu language Press or ENTER Then pre...

Страница 58: ...your desired language then press ENTER 1 Press SETUP in the stop mode Press or to select Lan guage 2 3 Press SETUP or RETURN to remove the Menu screen 4 NOTE If the selected language is not recorded...

Страница 59: ...anguage can always be selected by your unit even if you replace the disc or turn the power off English Francais Espanol Deutsch Italiano The language you have selected will play if it is recorded on t...

Страница 60: ...436 Hindi 1819 Norwegian 2425 Thai 3018 Bihari 1218 Hungarian 1831 Oriya 2528 Tibetan 1225 Breton 1228 Icelandic 1929 Panjabi 2611 Tigrinya 3019 Bulgarian 1217 Indonesian 1924 Pashto Pushto 2629 Tonga...

Страница 61: ...es not work Timer recording does not work Connect Mains lead to AC outlet Set it to ON Set it to OFF TIMER REC indicator is off Wait for a few hours Connect the Mains lead to the AC outlet Check anten...

Страница 62: ...function is set Playback does not follow the course of the disc s program These operations may prevent a proper progress of the contents It is in the mode of repeat playback memory playback etc The f...

Страница 63: ...azimuth recording Color signal converted sub carrier phase shift recording 1 Track 12 65mm high density tape Approx 1 minute 48 seconds With E 180 Cassette Tape SP 23 39 mm s LP 11 69 mm s NTSC SP 33...

Страница 64: ...ORION ELECTRIC CO LTD JAPAN J5N20401A SH05 11 N...

Страница 65: ...ery compartment How to install the batteries Use micro batteries type UM 4 AAA Size 1 Open the battery compartment cover in the direction of the arrow 2 3 Replace the compartment cover Antenna Connect...

Страница 66: ...e normal TV screen appears 4 Press MENU If you press MENU for the first time the language setting menu will appear 2 Press Sub Power The indicator will disappear Turn on Main power ON switch The STAND...

Страница 67: ...s the button to select the AUTO TUNING Then press the ENTER button 3 When the Auto Tuning is finished the CHANNEL SETUP screen will appear Then press the MENU button to return to the normal screen 5 T...

Страница 68: ...loses automatically On the screen changes to Reading and then playback will commence A menu screen may appear on the TV screen if the disc has a menu feature In this case press or ENTER to operate a m...

Отзывы: