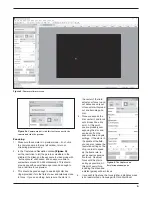


• Status indicator lights
(Figure 1)
: Shows connection to
the camera, data transfers (flashing light), power to the elec-
tronics, TEC (thermoelectric cooler) and fan.
2. Getting Started
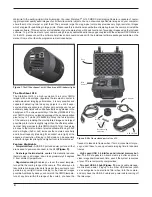
Parts List
• G10 Color Camera
• 2" nosepiece (camera ships with nosepiece attached)
• USB 3.0 cable
• DC power adapter and cable
• External desiccant plug
• Hard carrying case
System Requirements
Telescope
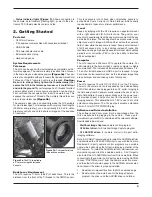
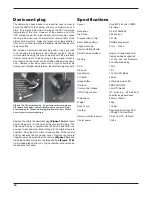
The G10 can be used with most telescopes compatible with 2"
format eyepieces. The camera is simply inserted into a focuser
in the same way as a standard eyepiece
(Figure 3a)
. The cam-
era is also compatible with any focusers that include male 42mm
T-threads, if the 2” camera nozzle is unthreaded.
Caution:
Be sure to always firmly tighten the thumbscrew(s) that
secure the G10 in the telescope focuser, or it could fall out
and onto the ground! If your telescope has T-threads for direct
camera attachment, a more secure connection can be made.
First, unthread the nosepiece from the G10 camera body. This
exposes the camera’s T-threads. Then, simply thread the cam-
era onto your telescope
(Figure 3b)
.
The camera’s pixel size and sensitivity make the G10 suitable
for most telescopes. For telescopes with very long focal lengths
(2000mm and greater), you can optionally bin 2x2 to utilize
greater sensitivity and obtain sharper images at the expense
of resolution.
Back-focus Requirement
The G10 requires 17.5mm (0.689") of back-focus. This is the
distance from the front of the T-threads to the CMOS sensor.
This is necessary info to have when calculating spacers to
put behind a Coma Corrector or Field Flattener, which usually
require 55mm of space for optimum performance.
Mount
Deep sky imaging with the G10 requires an equatorial mount
with a right ascension (R.A.) motor drive. The goal for your
mount is to seamlessly track the apparent movement of the sky
as the Earth rotates. The tracking must be very accurate, or the
object you want to image will drift and blur across the camera’s
field of view while the exposure is taken. Even a small amount
of drift will cause a star to look oblong instead of round. We
recommend using a high-quality equatorial mount which utilizes
periodic error correction (PEC) or has the ability to interface
with an autoguider.
Computer
The G10 requires a Windows PC to operate the camera. For
astro-imaging in the field at night, a laptop computer is highly
recommended. The included software requires Windows 7, 8,
10, and for full data speed, a USB 3.0 port is required. A large
hard drive is also recommended, as the individual image files
are quite large, and can take up a lot of disk space.
Power
The G10 requires 12 volts DC (12VDC) to run the TE cooler.
Power to the cooler and fan is supplied by the included 3amp
AC/DC transformer when plugged into an AC outlet. Imaging in
the field away from AC power usually requires the use of a por-
table field battery to supply power. Make sure the power sup-
ply provides at least 3 amps of current for the duration of your
imaging session. This allows the G10 TEC to use 100% of its
potential cooling power. The 12v input port accepts a standard
5.5mm/2.1mm DC TIP POSITIVE plug.
Software and Driver Installation
The software and driver must first be downloaded from the
Orion website before plugging in the camera. Please go to:
www.telescope.com/G10 to download all the relevant software.
Downloadable files include:
• StarShoot Image Capture: camera control program
• G10 direct driver: for Starshoot Image Capture program
• G10 ASCOM driver: for camera control in 3rd part astro-
imaging software.
Note it is HIGHLY recommended to install the ASCOM platform
and download the G10 ASCOM driver to use with the camera.
Dedicated 3rd party camera control programs are available
online which will unlock the full astro-imaging potential of the
G10 camera. To install the ASCOM platform, visit www.ascom-
standards.org and click the download button. Don’t forget to
also install the G10 ASCOM driver from Orion’s website. When
connecting to the camera in a 3rd party program using ASCOM,
choose “ASCOM camera” from the camera selection menu,
and then the G10 should appear in the ASCOM camera selec-
tion window if the driver is properly installed.
1. Download all relevant files from the G10 download page
2. Double-click on the install .exe for the Image Capture
program, the driver, and the ASCOM driver, and follow
Figure 3a.
The G10, installed in
a 2
"
focuser using the included
2
"
nozzle
Figure 3b.
T-threads for direct
threaded connections
3
Содержание StarShoot G10 Color
Страница 11: ...11...