4
2. assembly
Carefully open all of the boxes in the shipping container. Make
sure all the parts listed in Section 1 are present. Save the
boxes and packaging material. In the unlikely event that you
need to return the telescope, you must use the original pack-
aging.
Assembling the telescope should take only about 15 minutes.
Be careful not to overtighten screws and bolts or the threads
may strip.
During assembly (and anytime, for that matter), DO NOT
touch any of the lenses of the telescope, finder scope, or
eyepieces, or the prism of the diagonal, with your fingers. The
optical surfaces have delicate coatings on them that can eas-
ily be damaged if touched inappropriately. NEVER remove
any lens assembly from its housing for any reason, or the
product warranty and return policy will be voided.
1. Lay the equatorial mount on its side. Attach a tripod leg to
each of the three flanges by aligning the hole in the leg
with the holes in the flange and inserting the long bolt
(with a washer next to the head) through the aligned holes.
Then put a second washer on the protruding end of the
bolt and screw on the large wing nut. (Use a flat-blade or
Phillips screwdriver on the head of the bolt while tighten-
ing the wing nut.) The hinged accessory tray bracket on
each leg should face inward.
2. Screw a lock bolt (with knob) into each tripod leg in the
threaded hole of the lower metal cuff. For now, keep the
legs at their shortest (fully retracted) length; you can
extend them to a more desirable length later, after the
scope is completely assembled.
3. Stand the tripod with the equatorial mount attached
upright, and spread the legs apart enough to attach the
accessory tray to the three hinged tray brackets on the
legs. The brackets should be positioned underneath the
tray. Use the three small accessory tray screws and wing
nuts provided. Do not tighten the wing nuts yet.
4. Now, with the accessory tray attached but not tightened,
spread the tripod legs apart as far as they will go, until the
accessory tray brackets are taut. Then tighten the wing
nuts of the accessory tray screws.
5. Next, tighten the wing nuts of the tripod leg bolts at the
base of the equatorial mount.
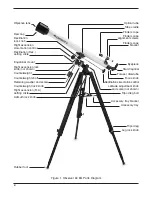
6. Orient the equatorial mount as it appears in Figure 1, with
the latitude scale set at about a 40° angle. Tighten the
latitude adjustment knob, the declination (Dec.) and right
ascension (R.A.) lock knobs, and the azimuth lock knob all
finger-tight.
7. Slide the counterweight on to the counterweight shaft.
Make sure the screw that holds the retaining washer at the
bottom end of the shaft is tightened. This washer will pre-
vent the counterweight from slipping off the shaft and
possibly onto your foot if the counterweight lock knob
should come loose! Now, with the counterweight lock knob
loose, hold the counterweight in one hand and thread the
shaft into the equatorial mount (base of declination axis)
with the other hand. When it is threaded all the way in,
position the counterweight about halfway up the shaft and
tighten the counterweight lock knob.
8. Attach the telescope optical tube to the cradle of the equa-
torial head and tighten the two wing nuts. (Note that the
Dec. slow-motion shaft, where the Dec. slow-motion con-
trol cable attaches, should be pointing back toward the
eyepiece end of the telescope. If it isn’t, remove the tele-
scope optical tube, loosen the Dec. lock knob, and rotate
the equatorial head 180° on the Dec. axis.)
9. Attach a knob to each of the slow-motion cables by first
removing the Phillips-head screw from the cuff of the
cable. Then insert the knob over the cuff and secure it in
place with the screw.
10. Now attach the two slow-motion cables to the R.A. and
Dec. slow-motion shafts of the equatorial mount by posi-
tioning the setscrew on the end of the cable over the
indented slot on the shaft, then tightening the knurled
setscrew.
11. Attach the finder scope bracket to the optical tube over the
two pre-installed bolts located near the focuser. The
bracket should be oriented so the larger objective lens of
the finder scope faces the same direction as the objective
lens of the main telescope. Secure the bracket in place
with the two round thumbscrews. Do not loosen the two
small hex nuts at the base of the bolts, as they keep them
from falling into the optical tube.
12. Insert the chrome barrel of the star diagonal into the end
of the focuser drawtube and secure with the thumbscrew
on the focuser drawtube.
13. Then insert the eyepiece into the star diagonal and secure
it in place with the thumbscrew on the diagonal. (Always
loosen the thumbscrews before rotating or removing the
diagonal or an eyepiece.)
3. Balancing the telescope
To insure smooth movement of the telescope, it is imperative
that the optical tube be properly balanced.
1. Keeping one hand on the telescope optical tube, loosen
the R.A. lock knob. The telescope should now be able to
rotate freely about the R.A. axis. Rotate it until the coun-
terweight shaft is parallel to the ground (i.e., horizontal).
2. Now loosen the counterweight lock knob and slide the
weight along the shaft until it exactly counterbalances the
telescope. That’s the point at which the shaft remains
horizontal even when you let go with both hands.
3. Retighten the counterweight lock knob.
The telescope is now balanced. Now when you loosen the
lock knobs on either or both of the axes and manually point
the telescope, it should move without resistance and not drift
from where you point it.


