Orion 9026 Скачать руководство пользователя страница 6

6

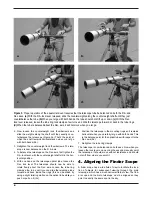
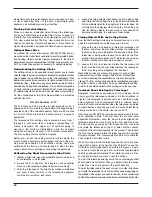
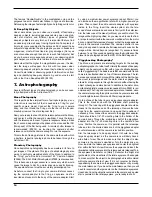
2. Now loosen the counterweight lock thumbscrews and

slide the weights along the shaft until they exactly coun-
terbalance the telescope (Figure 5a) That’s the point at
which the shaft remains horizontal even when you let go
with both hands (5b).

3. Retighten the counterweight lock thumbscrews. The tele-

scope is now balanced on the R.A. axis.

4. To balance the telescope on the Dec. axis, first tighten the

R.A. lock lever, with the counterweight shaft still in the hor-
izontal position.

5. With one hand on the telescope optical tube, loosen the

Dec. lock lever. The telescope should now be able to
rotate freely about the Dec. axis. Loosen the tube ring
clamps a few turns, until you can slide the telescope tube
forward and back inside the rings (this can be aided by
using a slight twisting motion on the optical tube while you
push or pull on it) (5c).

6. Position the telescope in the mounting rings so it remains

horizontal when you carefully let go with both hands. This
is the balance point for the optical tube with respect to the
Dec. axis (5d).

7. Retighten the tube ring clamps.

The telescope is now balanced on both axes. Now when you
loosen the lock lever on one or both axes and manually point
the telescope, it should move without resistance and should
not drift from where you point it.

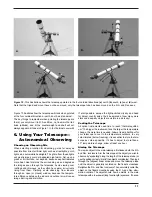
4. Aligning the Finder Scope

A finder scope has a wide field of view to facilitate the loca-
tion of objects for subsequent viewing through the main
telescope, which has a much narrower field of view. The find-
er scope and the main telescope must be aligned so they
point to exactly the same spot in the sky.

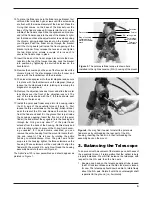
Figure 5. Proper operation of the equatorial mount requires that the telescope tube be balanced on both the R.A. and 
Dec. axes. (a) With the R.A. lock lever released, slide the counterweights along the counterweight shaft until they just
counterbalance the tube. (b) When you let go with both hands, the tube should not drift up or down. (c) With the Dec.
lock lever released, loosen the tube ring lock clamps a few turns and slide the telescope forward or back in the tube rings.
(d) When the tube is balanced about the Dec. axis, it will not move when you let go.

a.

c.

d.

b.

Содержание 9026

Страница 1: ...Consumer Optical Products Since 1975 Customer Support 800 676 1343 E mail support telescope com Corporate Offices 831 763 7000 P O Box 1815 Santa Cruz CA 95061 INSTRUCTION MANUAL Orion AstroView 120...

Страница 2: ...arge counterweight Counterweight lock thumbscrews Toe saver retaining bolt Azimuth fine adjustment knobs Tripod leg Accessory tray bracket attachment point Accessory tray bracket Accessory tray Leg lo...

Страница 3: ...and star clusters If you have never owned a telescope we are pleased to welcome you to amateur astronomy Take some time to familiarize yourself with the night sky Learn to recognize the patterns of st...

Страница 4: ...he holes in the tray 5 Next tighten the wingnuts at the top of the tripod legs so the legs are securely fastened to the equatorial mount Use the larger wrench and your fingers to do this 6 Orient the...

Страница 5: ...ich is locat ed at the rear of the R A axis Remove the rubber O ring from the finder and seat it in the groove that is just inside the housing s opening Insert the front end of the polar finder the en...

Страница 6: ...ance point for the optical tube with respect to the Dec axis 5d 7 Retighten the tube ring clamps The telescope is now balanced on both axes Now when you loosen the lock lever on one or both axes and m...

Страница 7: ...ered on the finder s crosshairs The finder scope is an invaluable tool for finding objects in the night sky its usage for this purpose will be discussed later in detail If when looking through the fin...

Страница 8: ...he AstroView 120 is the polar axis finder scope housed inside the R A axis of the equatorial mount see Figure 3 When properly aligned and used it makes accurate polar align ment quick and easy to do A...

Страница 9: ...ongitude of your observing site This information can be obtained by looking at a local map Now you must figure the difference between the longitude of your observing site and the closest standard time...

Страница 10: ...e pointer indicates the R A coordinate listed for the bright star in the star atlas Do not retighten the setscrew when using the R A setting cir cles for finding objects the set screw is only needed f...

Страница 11: ...through an open or closed window because the tempera ture difference between the indoor and outdoor air will cause image blurring and distortion If at all possible escape the light polluted city sky...

Страница 12: ...r observing deep sky objects as many of them appear quite big but faint If you want to use 2 eyepieces such as the Orion Optiluxe 2 eyepieces we recommend that you also purchase a 2 star diagonal for...

Страница 13: ...e your atlas might show a globular cluster sitting just above the lid of the Teapot pattern of stars in Sagittarius You then know to point your telescope in that direction to home in on the clus ter w...

Страница 14: ...the whole system into the tele scope s focuser drawtube and secure firmly with the setscrew Aim the telescope at the planet or Moon you wish to shoot The image will be highly magnified so you may nee...

Страница 15: ...t a life time Store it in a clean dry dust free place safe from rapid changes in temperature and humidity Do not store the tele scope outdoors although storage in a garage or shed is OK Small componen...

Страница 16: ...ion any warranted instrument that proves to be defective pro vided it is returned postage paid to Orion Warranty Repair 89 Hangar Way Watsonville CA 95076 If the product is not registered proof of pur...

Отзывы: