

5
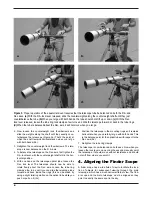
12. To place the finder scope in the finder scope bracket, first
unthread the two black nylon screws until the screw ends
are flush with the inside diameter of the bracket. Place the
O-ring that comes on the base of the bracket over the
body of the finder scope until it seats into the slot on the
middle of the finder scope. Slide the eyepiece end (narrow
end) of the finder scope into the end of the bracket’s cylin-
der that does not have the adjustment screws while pulling
the chrome, spring-loaded tensioner on the bracket with
your fingers. Push the finder scope through the bracket
until the O-ring seats just inside the front opening of the
bracket cylinder. Now, release the tensioner and tighten
the two black nylon screws a couple of turns each to
secure the finder scope in place.
13. Insert the base of the finder scope bracket into the dove-
tail slot on the top of the focuser housing. Lock the bracket
into position by tightening the knurled setscrew on the
dovetail slot.
14. Remove the cover cap on the end of the focuser. Insert the
chrome barrel of the star diagonal into the focuser and
secure with the thumbscrew on the drawtube.
15. Then insert an eyepiece into the star diagonal and secure
it in place with the thumbscrews on the diagonal. (Always
loosen the thumbscrews before rotating or removing the
diagonal or an eyepiece.)
16. Remove the objective lens dust cover and slide the metal
lens shade over the front of the objective lens cell. The
end of the lens shade with the 3 felt tabs should seat
directly on the lens cell.
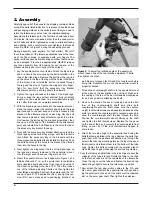
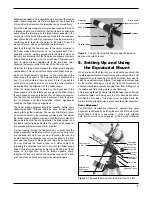
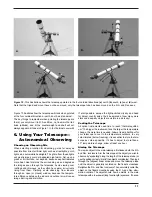
17. Install the polar axis finder scope into its housing inside
the R.A. axis of the equatorial mount (Figure 3). First
loosen the three setscrews on the housing, which is locat-
ed at the rear of the R.A. axis. Remove the rubber O-ring
from the finder and seat it in the groove that is just inside
the housing’s opening. Insert the front end of the polar
finder (the end without the eyeguard) into the housing and
through the O-ring so only about 1" of the polar finder
extends from the back of the housing. Do this slowly and
with a twisting motion to prevent the O-ring from becom-
ing unseated. If it does become unseated, you can
remove the entire housing from the mount to locate the O-
ring and reseat it. This is done by rotating the entire
housing counterclockwise. Once the polar axis finder
scope is in the housing, tighten the three setscrews on the
housing. These setscrews will be used later to align the
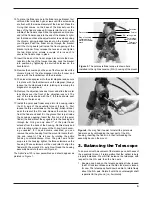
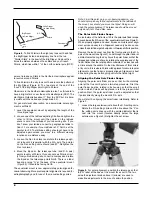
finder with the mount’s R.A. axis. Now thread the housing
assembly back into the mount (Figure 4).
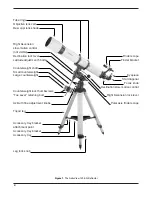
The AstroView 120 is now assembled and should appear as
pictured in Figure 1.
3. Balancing the Telescope
To ensure smooth movement of the telescope on both axes of
the equatorial mount, it is imperative that the optical tube is
properly balanced. We will first balance the telescope with
respect to the R.A. axis, then the Dec. axis.
1. Keeping one hand on the telescope optical tube, loosen
the R.A. lock lever. Make sure the Dec. lock lever is locked,
for now. The telescope should now be able to rotate freely
about the R.A. axis. Rotate it until the counterweight shaft
is parallel to the ground (i.e., horizontal).
Setscrew
Pointer
R.A. setting circle
Polar scope
alignment screw
Polar axis
finder scope
Figure 3. The polar axis finder scope is shown here
installed in the right ascension (R.A.) housing of the mount.
Date circle
Ring of housing
containing time
meridian indicator
mark
Figure 4. You may find it easier to install the polar axis
finder scope by unthreading the rear part of the R.A.
housing, inserting the finder in it, then rethreading the
assembly back on the mount.