9
is equivalent to one turn of the coarse focus knobs (11:1), so
much finer adjustment is possible than with just the coarse
focus knobs alone. You’ll find this is a great convenience,
especially when attempting to focus at high magnifications.
With either telescope, if you have trouble focusing, rotate the
coarse focusing knob so the drawtube is inward as far as it
will go. Now look through the eyepiece while slowly rotating
the coarse focusing knob in the opposite direction. You should
soon see the point at which focus is reached. The thumbscrew
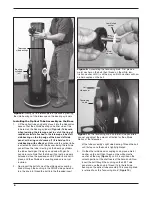
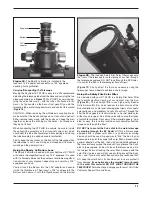
on the bottom of the focuser body
(Figure 14b) will lock the fo-
cuser drawtube in place, if desired (XT8 and XT10 PLUS). This
is usually not necessary, however. Before focusing, remember
to first loosen this thumbscrew.
The following applies to the XT8 and XT10 PLUS focusers only:
If you find the drawtube tension when focusing is either too
tight (i.e., focus knob is difficult to turn) or too loose (i.e., draw-
tube moves by itself under the weight of the eyepiece), you
can adjust it by tightening or loosening the drawtube tension-
ing setscrew on the focuser, which is located just below the
focus lock thumbscrew (see
Figure 14b). Adjust this setscrew
with the included 2.5mm hex key. Do not loosen the setscrew
too much as there must be some tension to keep the drawtube
secure within the focuser. The other setscrew below the draw-
tube tensioning setscrew does not affect drawtube tension and
should not be adjusted.
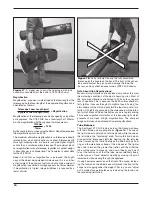
If an image does not come into focus with a particular eye-
piece because you run out of outward focus travel, you may
need to use the included 2" extension adapter. This adapter
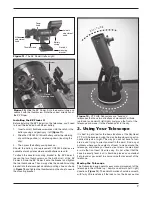
threads onto the focuser drawtube. First, you’ll need to remove
the 2" accessory collar from the drawtube by unthreading it
(
Figure 15a). Then thread the 2" extension adapter into the
drawtube (
Figure 15b). Insert a 2" eyepiece into the exten-
sion adapter and secure it with the two thumbscrews. Or, to
use 1.25" eyepiece with the extension adapter, insert the 1.25"
adapter into the extension adapter, then insert the eyepiece
into the 1.25" adapter.
Using the EZ Finder II
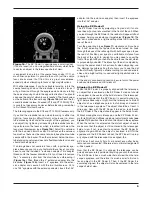
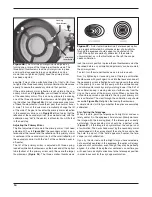
The EZ Finder II works by projecting a tiny red dot (it’s not a
laser beam!) onto a lens mounted in the front of the unit. When
you look through the EZ Finder II, the red dot will appear to float
in space, helping you locate your target object (
Figure 16). The
red dot is produced by a light-emitting diode (LED) near the
rear of the unit.
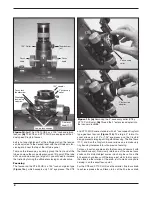
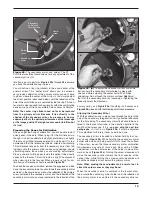
Turn the power knob (see
Figure 11) clockwise until you hear
the “click” indicating that power has been turned on. Look
through the back of the reflex sight with both eyes open to see
the red dot. Position your eye at a comfortable distance from
the back of the sight. In daylight you may need to cover the
front of the sight with your hand to be able to see the dot, which
is purposefully quite dim. The intensity of the dot is adjusted by
turning the power knob. For best results when stargazing, use
the dimmest possible setting that allows you to see the dot
without difficulty. Typically a dimmer setting is used under dark
skies and a bright setting is used under light-polluted skies or
in daylight.
At the end of your observing session, be sure to turn the power
knob counterclockwise until it clicks off.
Aligning the EZ Finder II
When the EZ Finder II is properly aligned with the telescope,
an object that is centered on the EZ Finder II’s red dot should
also appear in the center of the field of view of the telescope’s
eyepiece. Alignment of the EZ Finder II is easiest during day-
light, before observing at night. Aim the telescope at a distant
object such as a telephone pole or roof chimney and center it
in the telescope’s eyepiece. The object should be at least ¼
mile away. Now, with the EZ Finder II turned on, look though
the EZ Finder II. The object should appear in the field of view.
Without moving the main telescope, use the EZ Finder II’s azi-
muth (left/right) and altitude (up/down) adjustment knobs
(see
Figure 11) to position the red dot on the object in the eyepiece.
When the red dot is centered on the distant object, check to
make sure that the object is still centered in the telescope’s
field of view. If not, re-center it and adjust the EZ Finder II’s
alignment again. When the object is centered in BOTH the
eyepiece and the EZ Finder’s red dot, the EZ Finder II is prop-
erly aligned with the telescope. Once aligned, the
EZ Finder II will usually hold its alignment even after being
removed and remounted. Otherwise, only minimal realignment
will be needed.
Now that the EZ Finder II is aligned, the telescope can be
quickly and accurately pointed at anything you wish to observe.
The EZ Finder II has a much wider field of view than the tele-
scope’s eyepiece, and therefore it is much easier to first cen-
ter an object in the EZ Finder II. Then, if the EZ Finder II is
accurately aligned, the object will also be centered in the tele-
scope’s field of view.
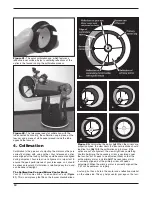
Figure 16.
The EZ Finder II superimposes a small red dot
(it’s not a laser!) on a non-magnified field of view, which helps
to center an object in the telescope’s field of view.


