Page 5
If you don’t have a ruler handy
, another method of setting
the belt tension is to install the belt first. Do this by placing it
round the platter and then pull it onto the pulley, taking care
that there is no twist in the belt.
Now, lift the belt off the pulley and let it lose it’s tension
almost completely whilst still holding it gently - With no
tension whatsoever in the belt, you should stretch it approx
25mm to fit over the pulley. If this is not the case, move the
pod to achieve correct pulley position.
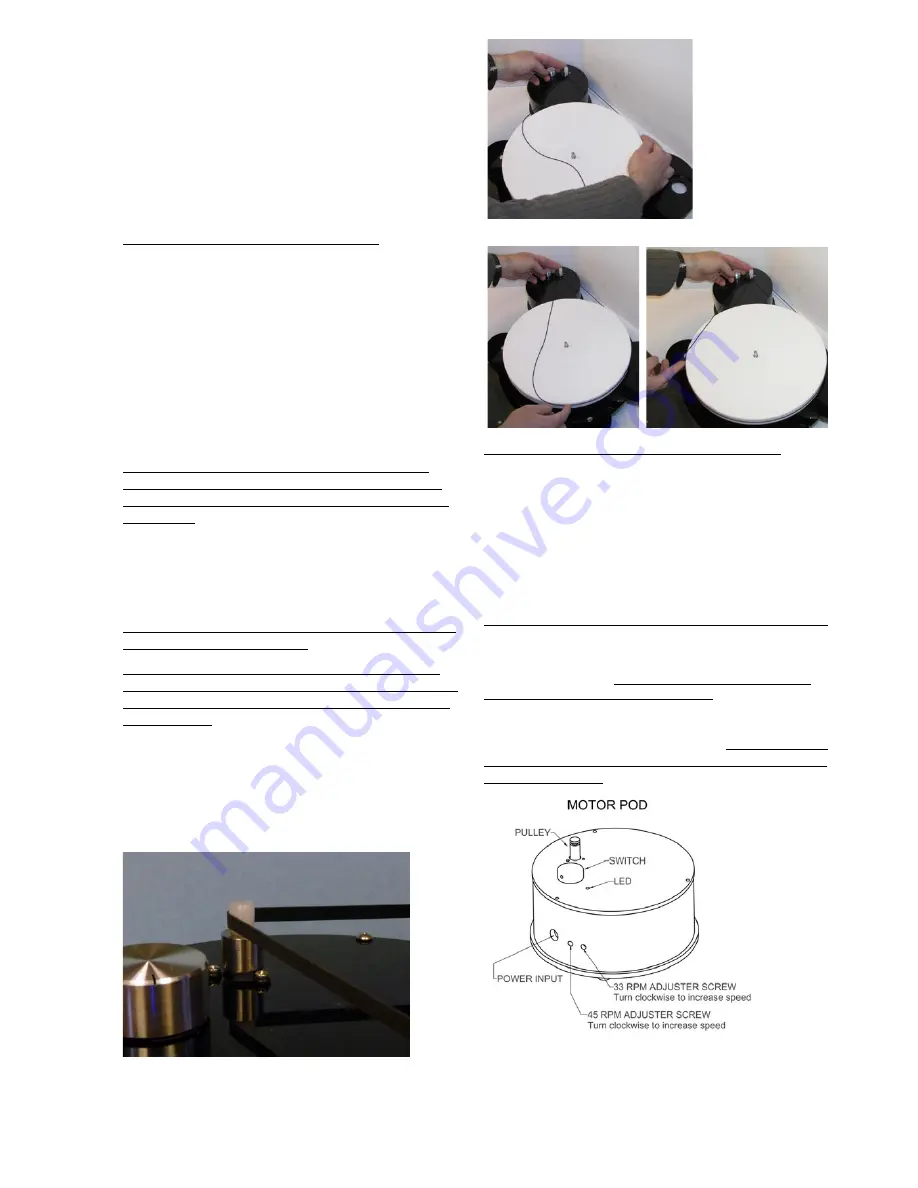
Alternative method of belt fitting (greyed text).
Refer to photos showing belt being fitted - Fit the belt over
the motor pulley and outer rim of platter. This is most
easily carried out by placing the belt over the pulley and then
holding it there loosely with one finger of your left hand.
Whilst retaining the belt on the pulley, hold the belt onto the
rear rim of the platter with the index finger of your right hand.
Now rotate the platter slowly clockwise with your right hand
index, all the time pressing the belt on the rim, till the belt is
completely on. Allow the motor pulley to rotate under your
finger whilst retaining the belt on the pulley and maintaining
slight tension on the belt between the pulley and rear of
platter.
The belt has an ideal tension for best performance - too
tight and motor bearing friction increases causing possible
speed instability and increased wear plus a decrease in sonic
performance. The correct distance is not hypercritical to
performance and the above dimensions may need to be
increased after a year of use due to belt stretch. Experiment
with different distances if you wish for best sound but you will
need to adjust speed between different distance settings, as
speed varies slightly with different belt tension.
You can fine tune this just by listening to the sound with the
pod in slightly different positions.
If the belt falls off the platter on start up you may need to
lower the turntable if the feet are adjusted too far down. Also
you can try increasing belt tension by moving the pod away
from the platter.
Insert the power supply jack plug into the pod’s largest side
hole. The LED on the top of the pod will light up. Note: green
LED is advanced supply and Blue LED is Ultra supply.
Sometimes the pulley has 2 curved surfaces to run on - this is
not for an additional belt ( which is not an advantage on OL
decks) but is to allow for different deck heights.
BELT ON PULLEY
Do not plug the power supply into mains conditioners, filters
or anything with surge protection - this can be disastrous
to performance. The aforementioned items will not harm
the pod, but they almost always results in performance
degradation.
The location of the motor pod should preferably be kept
away from strong electromagnetic fields typically generated by
transformers, amplifiers, power supplies etc.
S E T T I N G T H E M O T O R S P E E D
You will need to set the motor speed yourself. In the first 72 hours
of continuous running the motor, the speed tends to drift but then
settles down permanently.
Motor running should be carried out
with platter turning (no faster than 45rpm).
The thin output wires from the transformer only carry a very
low voltage and are therefore safe to handle. Voltages inside the
transformer are dangerous so the transformer case must not be
unscrewed or opened.
(At front or rear)
When the rotary switch on the pod is turned fully anti-
clockwise and the line on the knob aligns to the LED, the
motor is off.
Содержание Aurora MKII
Страница 9: ...Page 9...


