


3
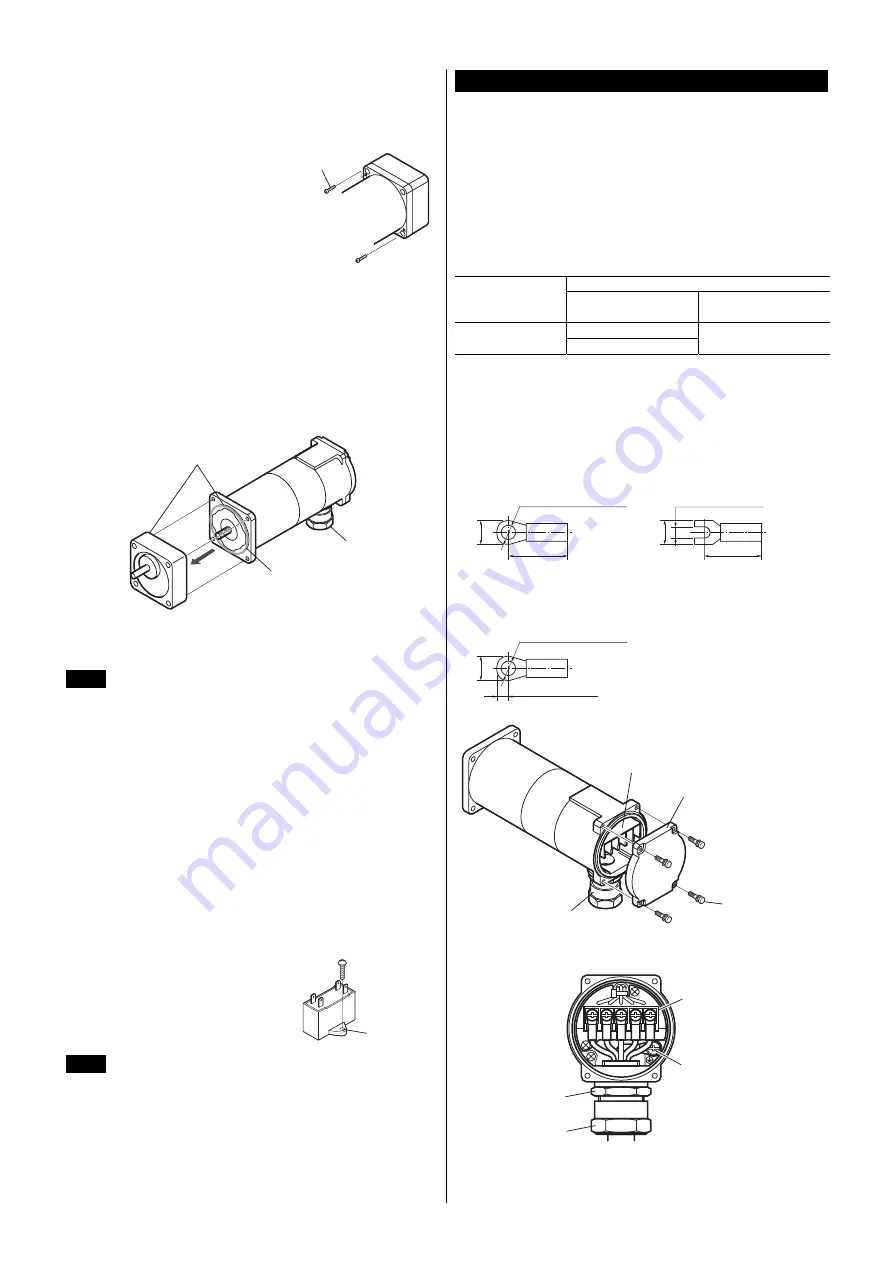
Installing/removing the gearhead
The gearhead can be removed and the cable gland position changed to a
desired 90° direction. The same procedure is followed when replacing the
gearhead.
1.
Remove the hexagonal socket head
screws (2 pcs.) assembling the motor
and gearhead and detach the motor
from the gearhead.
Hexagonal socket
head screw
2.
Using the pilot sections of the motor and gearhead as guides, install the
gearhead to the motor.
At this time, the cable gland position can be changed to a desired 90°
direction. When installing the gearhead, slowly rotate it clockwise/
counterclockwise to prevent the pinion of the motor output shaft from
contacting the side panel or gear of the gearhead.
This flange surface is constructed to hold a O-ring. If this O-ring comes
out of the flange groove, reseal it correctly on the flange groove.
Also confirm that no gaps remain between the motor flange surface and
the end face of the gearhead’s pilot section.
Gearhead
Motor
Pilot
O-ring
Cable gland
After assembling the motor with the gearhead, install the motor/gearhead
assembly using mounting screws by referring to the explanation under
“Combination type”.
Note
•
Do not forcibly assemble the motor and gearhead. Also,
do not let metal objects or other foreign matters enter the
gearhead. The pinion or gear of the motor output shaft
may be damaged, resulting in noise or shorter service
life.
•
Do not allow dust to attach to the pilot sections of the
motor and gearhead. Grease may leak from inside the
gearhead.
•
The hexagonal socket head screws used to assemble
the motor and gearhead together only tentatively secure
the two components. Always use the four supplied
mounting screws when installing the motor/gearhead
assembly.
Pinion shaft type
Pinion shaft type motors are used with a gearhead assembled.
Refer to figure above.
Mounting the capacitor (only for single-phase motors)
Before mounting the provided capacitor,
check that the capacitor’s capacitance
matches that stated on the motor’s name
plate. Mount the capacitor securely by using
M4 screws (not provided).
Ø4.3 mm
(Ø0.169 in.)
Note
•
Do not let the screw tightening torque exceed 1 N·m
(8.8 lb-in) to prevent damage to the mounting foot.
•
Mount capacitor at least 10 cm (3.94 in.) away from the
motor. If it is located closer, the life of the capacitor will
be shortened.
Connection
Insulate all the wire connections, such as the connection between the motor
and the capacitor connection.
For safety’s sake, install a breaker or fuse in the power line.
Ground the motor using a Protective Earth Terminal.
The rotation direction is as viewed from the side of the motor’s output shaft.
The motor rotates in a clockwise (CW) and counterclockwise (CCW) direction.
Rotating direction of the gearhead output shaft
The rotating direction of the gearhead output shaft may be opposite that of
the motor shaft, depending on the gear ratio. Before performing wiring, be
sure to check the rotating direction of the gearhead output shaft to be used
and determine the desired direction of motor rotation.
Gear ratio
Gearhead model
∗
Same as the rotating
direction of motor shaft
Opposite the rotating
direction of motor shaft
3 to 18
2GN S
50 to 180
25 to 36
∗
The box ( ) of the model will be filled with the numeral to represent the
gear reduction ratio.
Connection method to a terminal box
When connecting the cable (not supplied), use the following crimp terminal.
•
Applicable crimp terminal [unit: mm (in.)]
For terminal block
Insulated round terminal
Ø3.6 (Ø0.142) or more
18 (0.71) or less
7.2 (0.283) or less
Insulated fork terminal
3.6 (0.142) or more
18 (0.71) or less
6.4 (0.252) or less
For Protective Earth Terminal
Insulated round terminal
Ø4.1 (Ø0.161) or more
4.5 (0.177) or less
9 (0.354) or less
Terminal block
Terminal cover
Terminal cover
installation screw
(With spring washer)
Cable gland
•
Layout of terminals
Tightening nut
Nipple
Protective Earth
Terminal (M4)
Terminal block (M3.5)