Warning: The troubleshooting portion of this manual requires that the unit power be “ON” for
much of the servicing portion of troubleshooting. When working on the unit under power, use all
of the standard precautions in working with any electro-mechanical device that contains line
voltage, high voltage, and rotating elements. Failure to follow standard safety procedures can
cause electrical shock, personal injury or property damage.
Initially:
1.
Plug the unit into a proper outlet.
2.
Check the unit on all speeds to see if the blower and motor are operating properly. The
power supply light should not operate on the “fan” selection mode.
Problem Being Checked:
1.
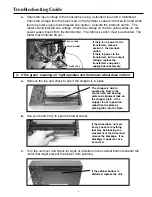
If the motor and blower do not operate:
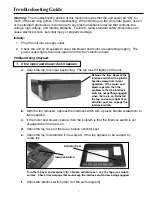
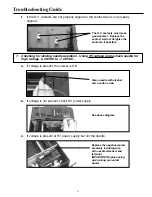
a. Check the top for proper positioning. The top must fit tightly on the unit.
b. With the top removed, depress the interlock switch with a plastic handle screwdriver to
test operation.
c. If the motor and blower operate, then the problem is that the interlock switch is not
engaged when the top is on.
d. Check the top to see if there is a broken activator post.
e. Check the top to determine if it is warped. If the top appears to be warped, try
a new top.
f.
Check the interlock switch (item 3 of the parts diagram).
5
Troubleshooting Guide
Remove the top. Depress the
interlock switch with a plastic
handle screwdriver to test
operation. If the motor and
blower operate, then the
problem is that the interlock
switch is not gettting engaged
when the top is on. Reinstall
the top and ensure tight fit so
activator post can engage the
interlock switch.
Interlock Switch
Turn the top over and examine it for a broken activator post. Lay the top on a smooth
surface. Check it for warpage that could keep the interlock switch from being engaged.
Activator Post

