background image

Read this instuction manual carefully before using the machine and keep it as a reference. 

The engine manual is included as a set with the owners manual.

 Please read both manuals carefully

 For any questions about this manual, please contact your OREC dealer, the

OREC distributor in your country, or go to : http://www.orecamerica.com

0268-77000

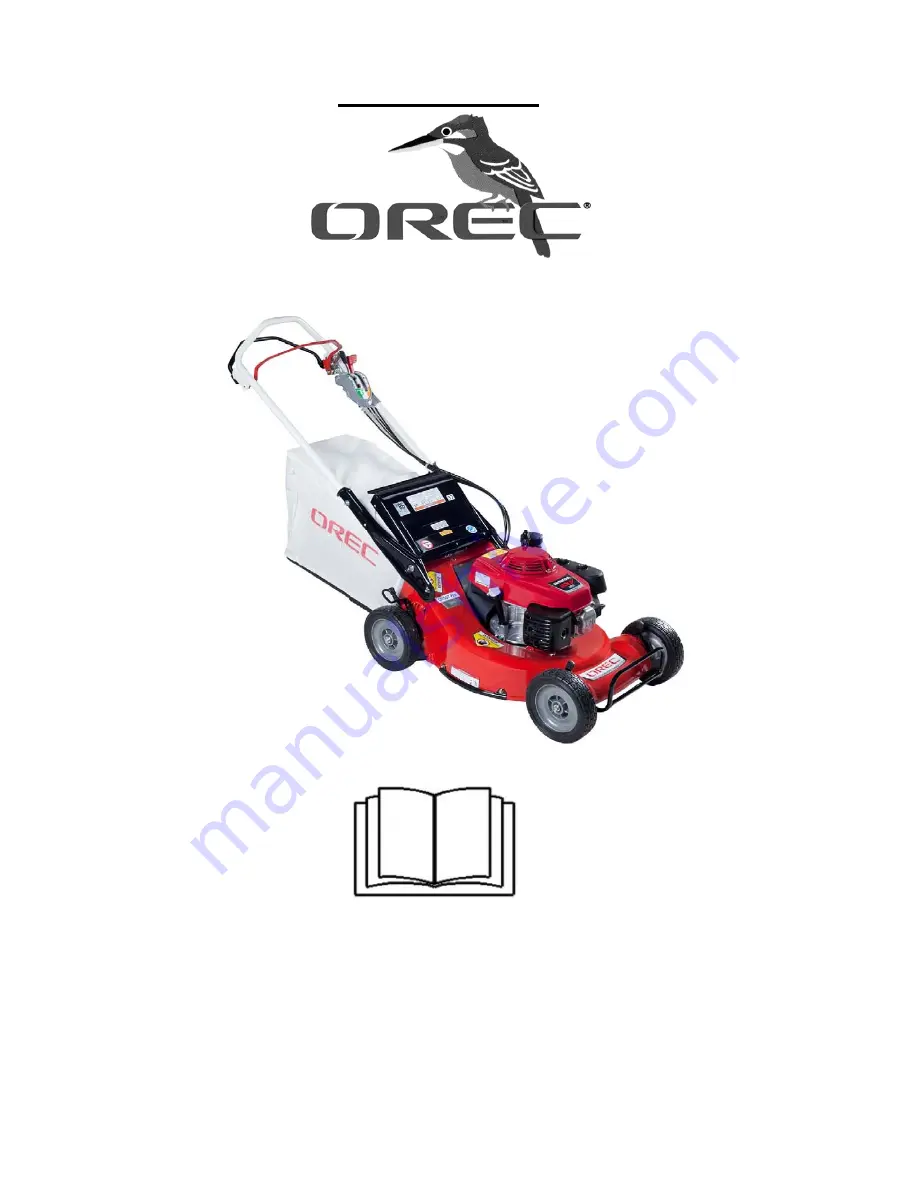
OWNER’S MANUAL

GR537Pro/GRH537Pro

Grassland walk behind mower

1

Содержание GR537Pro

Страница 1: ...e manual is included as a set with the owners manual Please read both manuals carefully For any questions about this manual please contact your OREC dealer the OREC distributor in your country or go to http www orecamerica com 0268 77000 OWNER S MANUAL GR537Pro GRH537Pro Grassland walk behind mower 1 ...

Страница 2: ...ese instructions Machine Regulations This product is designed for lawn mowing and may not provide a sufficient cut for overgrown weeds and brush Definitions and Signs In these instructions the following signs and definitions are used to indicate the level of danger that exists Please obey the following warnings and have a full understanding of the meaning of the signs Indicates an imminently hazar...

Страница 3: ... Inspection Replacement and Lubrication 2 Cleaning the air filter 3 Checking and adjusting the spark plug 4 Spark Arrester optional equipment 5 Adjusting each wire 6 Inspecting and replacing blades 7 Regarding Long term Storage 8 Specifications 9 Consumable Parts List 10 Optional Equipment 11 Periodic Voluntary Inspection Table 12 Self Diagnosis Table 13 Troubleshooting 14 LIMITED WARRANTY 22 30 C...

Страница 4: ...e to fully understand the meaning of each warning sign before operating this machine Remove all objects that Read the safety and could be thrown by the operating manual mower blades Beware of thrown objects Always wear safety glasses or goggles and ear Do not use on slopes of protection while more than 15 operating the machine Keep body parts away from the mower blades For the Engine Read Engine i...

Страница 5: ...uide the new operator until they have a comprehensive understanding of the machine s operation and safety guidelines Furthermore the owner should lend these instructions to the new operator together with the machine When lending this machine to a person who can not read English the owner should take responsibility for completely explaining its safe operation Before lending this machine to another ...

Страница 6: ...T modify the engine as this could cause fire malfunction or other accidents Orec assumes no liability for accidents or injuries resulting from modification or addition to the machine Any additions or modifications will also void warranty claims DO NOT try to alter the position of the engine governor or change the set rotation speeds DO NOT run the engine in a place that is poorly ventilated Engine...

Страница 7: ...on slip shoes Gloves Helmet Ear protectors In particular avoid wearing items such as cuffs hems of loose clothing and jewelry Such items can become entangled in the machine causing injury and accidents Long hair should be tied up inside a helmet Ensure that no part of your body comes into contact with the moving blades of this machine There is the possibility of serious injury such as the severing...

Страница 8: ...ing injury and accidents Be careful when approaching blind corners bushes and trees which block your line of sight Such obstructions can hide children and animals from view DO NOT drive this machine in the direction of rivers and drop offs people and buildings Accidents can be caused by falls and collisions When moving the machine backwards check that there are no people or obstacles behind you an...

Страница 9: ... 100 feet of distance between the machine and children DO NOT allow children to come into the area where you are working Make sure that young children are securely in the care of an adult other than the operator Switch off the engine immediately if children enter the area where you are working DO NOT allow children to operate the machine Furthermore check and obey local law which may place age lim...

Страница 10: ...fitted covers could open during operation and cause serious injury Please make sure that all components such as nuts and bolts have been properly secured after maintenance Perform comprehensive inspection and adjustment of such parts as drive clutch blade clutch brake throttle and gear change Be sure to check that the bolts in the wheels and blades are tightly fastened Make sure that the detachabl...

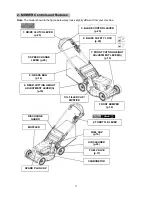
Страница 11: ...5 SPEED CHANGE LEVER p 20 3 BLADE CONTROL LEVER p 20 FRONT BUMPER p 14 4 THROTTLE LEVER 6 REAR CUTTING HEIGHT ADJUSTMENT LEVER S p 19 2 BLADE SAFETY LOCK p 20 8 GRASS BAG p 14 DISCHARGE GUARD 7 FRONT CUTTING HEIGHT ADJUSTMENT LEVER S p 19 SPARK PLUG CAP MUFFLER OIL FILLER CAP DIPSTICK CARBURETOR FUEL VALVE p 17 FUEL CAP p 16 AIR CLEANER p 24 11 ...

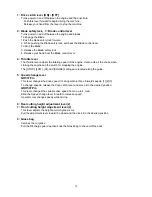
Страница 12: ... when starting the engine and the switch for stopping the engine The STOP LOW HI and CHOKE settings are located along the guide 5 Speed change lever GR537Pro This lever changes the drive speed It can operate in three forward speeds 1 2 3 To change speeds release the drive clutch lever and move it to the desired position GRH537Pro This lever changes the variable drive speed from 0 up to 4 mph Slide...

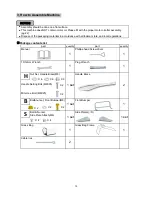
Страница 13: ...and local regulations Package contents list Manual Phillips head Screw driver 10 12mm Wrench Plug Wrench Nut Set Handle Brace M8 Handle Brace Handle Setting Bolt M8X35 Mini Hex Bolt M8X25 Bolt nut set Front Bumper M8 Front Bumper Bolt Nut set Side Plate L R Side Plate Attach M6 Grass Bag Grass Bag Frame Cable ties 1 1 1 1 part quantity part quantity 1 1 set 2 1 1 set 1 set 1 set 1 2 NOTICE X 6 X 6...

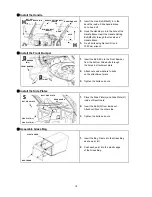
Страница 14: ...nuts and washers to bolts on the attachiment plate 3 Tighten the bolts and nuts Install the Side Plates 1 Place the Side Plate L and Side Plate R inside of Rear Guard 2 Insert the Bolts S from inside out Attach nut S on the other side 3 Tighten the bolts and nuts Assemble Grass Bag 1 Insert the Bag Frame into the Grass Bag as shown at left 2 Push each point into the plastic edge of the Grass Bag B...

Страница 15: ...eaks Look for signs of damage Check each control for proper operation Check the blades for wear Replace as necessary pg 28 Check that the blade bolts are tight Make sure there are no tears or other damage to the grass bag Check that all nuts bolt and screws are tightened Check your mowing area Anything that can be picked up by the blades and thrown is a potential hazard to you and others Look for ...

Страница 16: ...e and allow it to cool down There is a danger of suffering burns When refueling be sure not to fill the fuel tank over the maximum level If you do overfill the fuel tank remove fuel until it sits below the maximum level Over fueling can cause fire and other accidents After refueling securely close the fuel cap and store the machine in a safe place with no sources of flame There is a danger of fire...

Страница 17: ... 2 minutes with throttle in LOW position 4 Grip the starter knob pull slowly until you feel tension and then pull strongly from this position Immediately after the engine has started slowly return the start knob to its original position 2 30 seconds after the engine starts move the throttle lever to HI position when mowing or LOW position when idle Push the throttle lever all the way forward to se...

Страница 18: ...ch the hot engine immediately after switching off Allow time for it to cool down as there is a burn danger Shift the throttle lever to the Stop position to stop the engine Shift the fuel valve to the OFF position 2 1 WARNING STOP OFF 18 ...

Страница 19: ...ht Attach Remove the Grass bag During normal use the grass bag material is subject to deterioration and wear Frequently inspect the grass bag for tears holes and excessive wear Check for necessary replacement Make sure the new bag meets the original specifications Set all four Adjustment Levers to the same height 1 Attach Hang the hook of the bag frame on the edge of the deck Make sure it is stabl...

Страница 20: ... surroundings after checking that the area around you is safe Always be sure to release the blade clutch OFF when turning Not doing so may cause injuries or accidents DO NOT try to change speeds with the drive clutch lever ON as this can cause injuries and accidents 3 2 1 Start the engine then slide the throttle lever to the HI position Choose your desired speed GR537Pro 3 speeds GRH537Pro Vary th...

Страница 21: ...harp and spin at a high speed Spinning blades can cut you severely and can amputate fingers and toes Wear protective footwear Keep your hands and feet away from the mower deck while the engine is running Stop the engine before performing any adjustments inspection or maintenance Slopes Mow across slopes not up and down Avoid steep slopes steeper than 15 degrees and be careful when changing directi...

Страница 22: ...environment Dispose of used oil at a certified recycling center or according to your state and local regulations When performing engine oil lubrication or replacement wait for at least 10 minutes for the engine to cool down and proceed with caution to avoid burns Change engine oil after 5 hours of actual use or 1 month of ownership After initial oil change change oil after every 50 hours of use or...

Страница 23: ...ayed After changing the oil please dispose of waste oil appropriately Transmission oil inspection change and refill This machine contains transmission oil when shipped Replace transmission oil after the first 20 hours of operation and after approximately every 100 hours thereafter Use 0 07 qt 0 07L SAE 80w 90 Gear oil 1 Close the fuel valve 2 Place an oil pan under the transmission 3 Take off the ...

Страница 24: ...amage the machine This product is shipped from the factory pre filled with ISO 46 hydraulic HST oil 1 Take off the Mini Hex Bolt M6 and remove the Transmission cover 2 Close the fuel valve Push the machine on to its right side 3 Take off Mini Hex Bolt M10 with 14mm wrench Never loosen the other bolt As this so may cause damage to transmission 4 Push the machine on to its right side to drain the HS...

Страница 25: ...ginal position Paper Tap the element several times on a hard surface to remove dirt or blow compressed air not exceeding 30 psi 207 kPa through the filter from the inside Never try to brush off dirt brushing will force dirt into the fibers Foam Clean in warm soapy water and rinse or clean in non flammable solvent and allow to dry Excess oil will restrict air flow through the foam element and may t...

Страница 26: ...k plug can damage the threads in the cylinder head 4 Spark Arrester optional equipment Your lawn mower engine is not factory equipped with a spark arrester In some areas it is illegal to operate an engine without a spark arrester Check local laws and regulations An optional USDA approved spark arrester is available The spark arrester must be serviced every 100 hours to keep it functioning as desig...

Страница 27: ...wheels do not lock when you pull the lever or unlock when stress is put on the machine Move the Adjuster towards B 2 If the wheels lock even when you release the drive clutch lever or the unit does not stop properly Move the Adjuster towards A Throttle wire Slide the Throttle lever up to the choke position and then back to the HI position 1 If it does NOT push the choke arm enough Move the Adjuste...

Страница 28: ...lacing the blades be sure to also replace the nuts and bolts which tighten the blades This prevents accidents caused by wear and tear on the nuts and bolts Never use nuts and bolts that are not recommended for this specified purpose 1 Stop the engine and remove the spark plug cap 2 Close the fuel valve and then push the machine on to its right side 3 Inspect the blades for cracks bending and wear ...

Страница 29: ...r around the carburetor and inside the belt cover by blowing air through them to remove dirt and dust To avoid getting water in the air cleaner clean the engine by hand Remove rust from affected areas and apply anti corrosion paint If you continue to operate with an accumulation of grass and dust in the machine the engine can become clogged causing it to overheat and possibly catch fire Refuel and...

Страница 30: ...GR537 Pro Name 1 5 3 5 inch 38 89mm GRH537 Pro 64 6 22 2 41 3 1640 564 1050 20 9 530mm 127 8 lb 58kg 9 in φ240mm Lifting Blade 0 6 0 1 3 0 2 3 7 3 4 4 BBC 2 27 bushels 80L 8 in φ223mm Forward MPH 132 3 lb 60kg Blade Clutch system Blade Size of Tire Weight Grass bag capacity UH2 SFY1 R280 HONDA GXV160 Clutch system Drive Dog Clutch Engine Oil 4 0 Kw 5 5Ps Speed 0 74 qt 0 7L Power PS Type Model Maxi...

Страница 31: ...e Oil seal and gasket are not leaking oil ゝ ゝ ゝ Fuel leakage Fuel is not leaking ゝ ゝ ゝ Fuel filter blockage Not noticeably dirty deformed or clogged ゝ ゝ Fuel quantity quality There is fuel in the engine and it is of good quality Loosening damage to Harness connections are suitable not electrical wire connections loose or damaged Spark Plug There are no cracks in the ceramic the electrodes are not ...

Страница 32: ...oose or missing nuts and bolts Rattling strange noise Mounted parts do not rattle or are missing ゝ ゝ Damage Warning labels and nameplate are attached and not damaged If labels are damaged or unreadable please contact your retailer Charges apply Inspection Content Body Body No cracking deformity corrosion Cover Levers Wires Nuts and bolts are not loose or missing There is no debris in the tires ゝ ゝ...

Страница 33: ...ar position is misaligned Adjust speed change wire Mission is in poor condition Repair transmission Blade is poorly balanced Repair blade Blade is broken Replace with a new blade or repair PTO shaft is bent engine Replace the PTO shaft BBC Bearing is broken Replace BBC Engine revolution speed is too low Increase engine revolution You are moving the machine too fast Reduce your own speed of operati...

Страница 34: ...lity fuel Overfilled with engine oil Adjust to correct fuel level Air filter element is clogged Clean the element Return the choke bar completely Put it in the position Overfilled with engine oil Adjust to correct fuel level Cylinder or piston ring is worn out Replace the ring Return the choke bar completely Put it in the position Poor quality fuel Replace with good quality fuel Defective ignition...

Страница 35: ...arranty Expendable components including but not limited to such as belts blades filters spark plugs bags wheels hoses cables wires brake pads and flappers are excluded from the warranty This warranty does NOT cover tire replacement or repair caused by punctures from outside objects such as nails thorns stumps or glass During the warranty period the warranty holder is responsible for equipment tran...

Страница 36: ...ttp www orecamerica com warranty Warranty Claim Procedure Should this Orec product fail due to a defect in materials and or workmanship the owner should use the following procedure to make a warranty claim 1 The owner must take the machine to the dealer from whom they purchased the machine or to an authorized Orec America dealer 2 The owner must present the warranty registration sheet or the invoi...

Страница 37: ...uest for replacement parts after this period has passed please consult with us for availability and prices If you have any questions please talk to staff at the point of purchase or at our head office At that time please inform us of your machine s model type serial number and engine type Engine serial number _____________________________________ Frame serial number _______________________________...

Отзывы: