background image

Graphiti 

– User Manual


 Version 1.0 

Orbit Research  


10 


To power Off the device, follow the steps mentioned below.  
 
The device can be turned off by pressing the power button for 2 seconds. On 
pressing the power button, the device 

1. 

Emits two short vibrations  

2. 

Displays 

“shutting down” message for 5 seconds and then disappears.  

(Please note, the power off time is 15-20 seconds after the message 
disappears.) 

3. 

Sets all the pins on the display to home position (below the surface).  

The unit emit vibration pulses once every two seconds while powering off. After 
the device is shut down completely, it again gives two short vibrations and turns 
off the green LED.  
 
The unit will enter the ghost mode if the charger is plugged and you turn off the 
device. During Ghost mode, the device will automatically shut down once it is 
fully charged or if the charger is removed. 
 
Pressing the power off key for 10 seconds will turn off the device forcefully. 

6.1  Reset 

Following are the ways to reset or turn off the system. 

To… 

Do this on the Device 

Reboot System (Up to unit -11) 

Press and hold the Down Arrow key and 
tap the Dot 8 key 

Reboot System (Unit -12 and later 
units) 

Press and hold the Dot 8 key and tap the 
Power button 

Turn Off the System Forcefully 

Press Power key for 10 seconds 

6.2  Sleep 

This feature puts the device into the low power consumption mode if there is no 
user activity for 50 minutes while in standalone mode. Device can be put in sleep 
mode manually by tapping the power button while in remote or standalone mode.   
 
Sleep time-out is configurable from the preference menu.   
 
Once the device enters sleep mode, it clears the display content and turns off the 
green LED with a single short vibration. However, you can configure settings in 
preference menu to retain the display content as and when the device enters 
sleep mode. 
 
To exit the sleep mode, tap the power button. The LED turns green with a single 
long vibration pulse. The device resumes its last activity or shows the last 
opened file from the storage media if it was in local mode. Similarly, if it was in 
USB HID, VCP (Serial) or HDMI mode, it will display the last opened file.  
 
Note:  

Содержание GRAPHITI

Страница 1: ...GRAPHITI User Manual 25th October 2021 Version 1 0 ...

Страница 2: ...7 CHARGING THE DEVICE 11 7 1 BATTERY 11 8 MESSAGE BAR 12 9 VIBRATION INDICATION 12 10 PREFERENCE MENU 13 10 1 KEY CONTROLS FOR THE PREFERENCE MENU 13 10 2 MENU ITEMS 13 11 CLOCK CONFIGURATION 18 12 TOUCH FEATURES 18 12 1 TOUCH GESTURES 18 12 2 DRAW FEATURE 18 12 2 1 Erasing 20 12 2 2 Saving drawings 20 12 2 3 Automatic File Saving 20 12 2 4 Reviewing drawings 21 12 2 5 Creating a new image 21 12 2...

Страница 3: ...1 IMAGE PROCESSING ALGORITHM VARIANTS 32 15 2 COMMANDS FOR REVIEWING IMAGES 32 16 REVIEWING CSV FILES FOR CUSTOM DRAWINGS 34 16 1 FILE FORMAT 34 17 REVIEWING PDF FILES 35 17 1 USER INDICATION 36 18 REMOTE OPERATIONS WITH ORION TI 84 PLUS 36 18 1 REVIEW ORION TI 84 PLUS SCREEN ON GRAPHITI 36 18 2 IMPORTANT NOTES 36 19 SLIDESHOW MODE 36 20 FIRMWARE UPGRADE 37 21 BIST MODE 37 22 SYSTEM LOG 38 23 LIMI...

Страница 4: ... Alone Mode Graphical content stored on an SD card is read in one of two ways 1 Copied from PC to the device 2 Drawn on the device and stored on the SD card In Stand Alone mode Graphiti displays the graphical contents of files stored on an SD card 2 2 Remote Mode Connect the device to a computer and then do one of the following 1 Browse the image on the PC application to see on the device 2 Create...

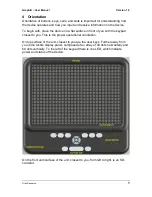
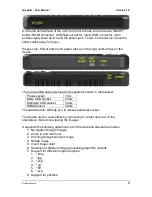
Страница 5: ...t surface in front of you with the keypad closest to you This is the proper operational orientation On top surface of the unit closest to you are the user keys Further away from you is the tactile display panel composed of an array of 40 dots horizontally and 60 dots vertically To the left of the keypad there is one LED which indicate power and status of the device On the front vertical face of th...

Страница 6: ...hown in table below Power socket 1 dot Micro USB socket 2 dots Standard USB socket 3 dots HDMI Socket 4 dots These tactile dots will help you to access particular socket The device can be used either by connecting to a host device or in the standalone mode for reviewing the images It supports the following operations in both remote and standalone modes 1 Navigation through images 2 Zoom in and Zoo...

Страница 7: ...he Space bar The Dot 7 input key is to the left of the Space Bar and the Dot 8 input key is to the right of the Space Bar Above the three keys is a navigation pad in the middle between the Braille Input keys and Space bar The navigation pad contains four directional arrow buttons Up Down Left Right and the Select button The six traditional braille input keys are aligned horizontally above the navi...

Страница 8: ...ormation refer HDMI section 5 5 Bluetooth Graphiti has a Bluetooth interface that provides wireless communication between the hosts For example between PC or a mobile device and Graphiti Once paired and connected with the host you can review images using the currently available PC software GUI or through a custom GUI using the standard API Refer Bluetooth for more details 5 6 External Storage Medi...

Страница 9: ...rtain conditions For example the up down arrow keys are used to scroll through image list as well as navigate the pan window after applying the zoom function on the image Note that the PC utility needs to be active in order to use PC keyboard with the device 6 Powering ON and OFF To power On the device follow the steps mentioned below 1 Plug the power cord into the power jack and turn on the main ...

Страница 10: ...to reset or turn off the system To Do this on the Device Reboot System Up to unit 11 Press and hold the Down Arrow key and tap the Dot 8 key Reboot System Unit 12 and later units Press and hold the Dot 8 key and tap the Power button Turn Off the System Forcefully Press Power key for 10 seconds 6 2 Sleep This feature puts the device into the low power consumption mode if there is no user activity f...

Страница 11: ...ion pulse when the charger is connected or unplugged respectively Note The device shows these messages only when it is On If the device is OFF when the charger is connected or disconnected then the device will emit a single short vibration and will show charging indication by Red LED The device can be used while charging 7 1 Battery The power percentage can be checked from the Menu The Menu will s...

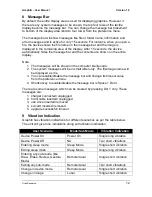
Страница 12: ...ll be displayed as it is 3 You can enable disable the message bar and change its timeout value from the preference menu 4 Shortcut key to enable disable the message bar is Space Dot 3 There are some messages which can be cleared by pressing Dot 7 only These messages are 1 charger connected unplugged 2 hdmi cable inserted unplugged 3 usb drive inserted removed 4 sd card inserted removed 5 upgrade s...

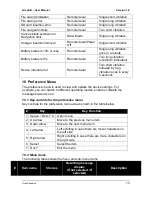
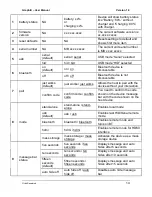
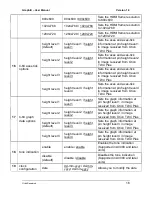
Страница 13: ...followed by long vibration once in every 5 seconds 10 Preference Menu The preference menu is used to view and update the device settings For example you can switch to different operating modes enable or disable the message bar and so on 10 1 Key controls for the preference menu Key controls for the preference menu are as shown in the table below Key Key Function 1 Space Dots 7 8 Open menu 2 Up arr...

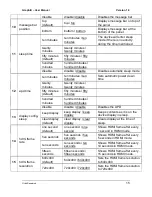
Страница 14: ...s the host to pair with the device without your interaction confirm code confirm code confirm code You need to confirm the code shown on the device message bar with the code shown on the host device 8 mode stand alone stand alone stand alone Enables local mode usb default usb usb Enables last HID Serial remote mode bluetooth bluetooth bluetooth Enables remote mode and turns on BT hdmi hdmi hdmi En...

Страница 15: ...utes fifty minutes default fifty minutes fifty minutes hundred minutes hundred minutes hundred minutes disable disable disable Disables the APD 13 display config sleep keep display keep display keep display Keeps contents as it is on the device display in sleep clear display default clear display clear display Clears display at the time of sleep 14 hdmi frame rate one second default one second one...

Страница 16: ...level 4 Sets the axes and axes tick information at pin height level 4 in image received from Orion TI 84 Plus 17 ti 84 graph data options height level 1 height level 1 height level 1 Sets the graph information at pin height level 1 in image received from Orion TI 84 Plus height level 2 height level 2 height level 2 Sets the graph information at pin height level 2 in image received from Orion TI 84...

Страница 17: ...they were accessed ascend default name ascend name ascend Arranges files from first to last This option applies to Name Date Size and Last options descend name descend name descend Arranges files from last to first This option applies to Name Date Size and Last options General notes 1 The device clears the display on entering the preference menu 2 By default the Menu shows the first menu item on t...

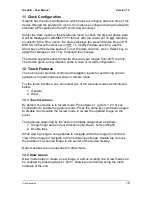
Страница 18: ...Features The touch panel provides control and navigation inputs for performing various operations in local mode as well as in remote mode For the touch interface you can select one of the two sub modes as mentioned below 1 Gesture 2 Draw 12 1 Touch Gestures By default the device is in review mode Press Space g Dots 1 2 4 5 key combination to enable the gesture mode Press the same key combination a...

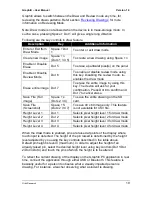
Страница 19: ...ace s Dots 2 3 4 To save the entire drawing on the SD card Save File Screenshot Space S Dots 2 3 4 7 To save 40 x 60 image only This feature is not available for CSV file Height Level 1 Dot 1 Selects pixel height level 1 for draw mode Height Level 2 Dot 2 Selects pixel height level 2 for draw mode Height Level 3 Dot 3 Selects pixel height level 3 for draw mode Height Level 4 Dot 4 Selects pixel he...

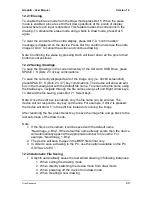
Страница 20: ...essage bar with the default file name To rename the file name using the braille keys navigate through the file names using Left and Right Arrow keys To discard the file saving press Dot 7 Select keys Note Once the edit box is enabled only the file name can be entered The device will not respond to any key commands For example if Dot 2 is pressed the device will show 1 in the edit box instead of zo...

Страница 21: ...ew mode to review the drawing patterns during or after drawing operations This locks the display and disables touch input After reviewing press Dot 6 again to go back to the draw mode 12 2 5 Creating a new image To create a new image enable the draw mode using keys SPACE Dots 1 3 4 5 space n The device provides blank display for new drawing Note The new image will be created in local mode only wit...

Страница 22: ...extended by a single line or group of lines in any direction left right above or below using the appropriate keys Canvas drawing up to 25 Mega pixels can be created On exiting draw mode all operations like zooming rotating inverting etc can be performed on the image made by the canvas drawing as explained in the Reviewing Images section 12 2 8 1 Extending Image Size Graphiti provides an option of ...

Страница 23: ... Add a canvas block to the right side of current block after navigation limit Jump to already existing right block Space Right Add a canvas block to the left side of the current block after navigation limit Jump to already existing left block Space Left Canvas drawing can be added at any zoom level Once the navigation limit is reached for example left side the device will give a long vibration ind...

Страница 24: ...e will emit If Single short vibration pulse Canvas block or row or column added successfully Long vibration pulse There is insufficient memory Single short vibration pulse once every 2 seconds The device is saving the current drawing General notes 1 Canvas drawing can be added in draw mode only 2 After adding a canvas in default view i e zoom out max the device considers the final resolution of th...

Страница 25: ...e following modes 1 USB Serial Mode 2 USB HID Mode 3 USB Mass Storage Mode Press Space Dot 7 to select USB HID mode or Space Dot 8 to select VCP Serial mode Keep the unit in HDMI mode for HDMI operations and in Bluetooth mode for Bluetooth operations For USB Serial USB HID and Bluetooth Graphiti requires an application running on the host device to communicate with it using standard Graphiti APIs ...

Страница 26: ...ng HDMI cable and press SPACE Dot 6 for HDMI mode 2 For windows PC go to Advanced display settings Multiple displays Duplicate these display and press apply button 3 In most of the cases the host will change its screen resolution to VGA automatically but If it is not changing the monitor resolution then you can set it manually from Display setting Device adaptor properties Adaptor setting List All...

Страница 27: ...key commands Limitations 1 The system does not process audio from HDMI source 2 The system does not support the CEC consumer electronics control channel 3 For HDMI video if the frame rate is less than 5 seconds then the device updates the display without displaying the previous frame completely 13 3 Bluetooth Feature The device supports Bluetooth SPP profile Here the device should be paired with t...

Страница 28: ...ommunicate with Graphiti using Bluetooth A custom application is required on the host side that uses this standard API to send an image to the unit 2 The Graphiti PC application software also can be used in Bluetooth mode 13 3 4 General Guide 1 The device Bluetooth discovery can be enabled or disabled from the preference menu 2 On power up Bluetooth in the device is on discoverable mode by default...

Страница 29: ...to different height levels height level 0 to 4 before sending the raw pixel data to the device 2 Send the original image file e g BMP PNG etc In this method the application directly sends a supported image file to the device for display 14 Standalone Operation In this mode the device accesses images from external storage media such as SD card and or USB drive The device shows external storage medi...

Страница 30: ...lection to the last file in the current folder Close a file or folder Dot 7 Not Available If you are already in the File Management mode press Dot 7 to move to parent directory If you are in File Viewer mode then currently opened file will be closed If you are at the root level Dot 7 does nothing Scroll through file information Left Arrow Right Swipe This command moves through the file information...

Страница 31: ...ssing Dot 7 key the device asks for Confirm action Press Dot 8 to cancel or Dot 7 to continue paste operation The device will show the message sd wr protected if write protection is enabled 15 Reviewing Images Once an image is displayed on the device from any source like a PC storage media HDMI the device provides the following functionality responds with an Edit Box containing the original file o...

Страница 32: ...thms on the input image The supported image variants are 1 1 Bit Monochrome 2 2 Bit Grayscale 3 8 Bit Grayscale 4 8 Bit Sharpen level 1 5 8 Bit Sharpen level 2 6 8 Bit Sharpen level 3 7 8 Bit Sharpen level 4 This processing includes different levels of gray scaling and sharpening of the image after resizing it to the device s native pin grid size 40 x 60 15 2 Commands for Reviewing Images The key ...

Страница 33: ...avigates the pan window in the right direction by 25 percent of display size Right Right Arrow Right Arrow Left Swipe Navigates the pan window in the left direction by 25 percent of display size Left Left Arrow Left Arrow Right Swipe Navigates the pan window by a single pixel in the upward direction Not Available Ctrl Up Arrow Space Up Arrow Not Available Navigates the pan window by a single pixel...

Страница 34: ...Dot 4 5 6 Not Available Centers the pan window to the desired location Not Available Not Available Not Available Double Tap Inverts the image Invert tick box Ctrl I Dot 8 5 Not Available Loads the image with latest timestamp from the current folder Only supported in operations with GUI Not Available F5 Not Available Not Available 16 Reviewing CSV Files for custom drawings The device supports and s...

Страница 35: ...g once every 5 seconds Pixel height 0 0 0 0 0 0 4 4 4 0 0 4 4 4 0 0 4 4 4 0 0 0 0 0 0 Blinking rate 0 0 0 0 0 0 0 0 0 0 0 0 50 0 0 0 0 0 0 0 0 0 0 0 0 17 Reviewing PDF Files Review the Pdf files on the device in the standalone mode The supported file types are 1 PDF 2 PDF a The device shows the pdf page converted to image on the device display After the image is displayed you can perform the image...

Страница 36: ...nterface mode Orion TI 84 Plus announces Braille display connected message 6 After Orion TI 84 Plus completes the announcement Graphiti will display it Graphiti displays any screen image provided by TI 84 Plus after processing it 18 1 Review Orion TI 84 Plus Screen on Graphiti As the image resolution sent by Orion TI 84 Plus is larger than Graphiti screen Graphiti down samples it and shows the pro...

Страница 37: ...esent working directory 20 Firmware Upgrade Graphiti firmware can be upgraded by copying the firmware binary to SD card and following the upgrade procedure The firmware binary can be copied to SD card using the following ways 1 Copying the new binary into SD card using an SD card reader 2 Attaching the unit to a PC in mass storage mode and copying the new binary Once the SD card is inserted into t...

Страница 38: ...y The reviewing finger may switch to drawing finger anytime 4 The device will not show progress for file and folders cut copy and paste operations 5 The device will save the drawn pattern on the PC in the form of a CSV file 6 Recent file feature will not work when SD card is write protected 24 Compatibility In Graphiti the USB interface VCP Serial and HID mode are tested and verified with Windows ...

Страница 39: ...r option under System Tools Open the Ports section 3 A port named PI USB to Serial COMx should be generated If no such port is generated try using a different USB port on the PC or restart the PC by following the normal startup procedure 3 SD Mode 1 If the device shows SD error message then remove and insert the SD card again 2 If the error persists then do the device power cycle 4 Bluetooth Mode ...

Страница 40: ...ed details for PDF feature undo redo and create new file in draw mode demo mode file filter and file rename Modification for zoom and pan in section Reviewing Images 0 14 9th April 2018 Modified for new features support 0 15 10th April 2018 Edits 0 16 16th April 2018 Added Battery section renamed Demo mode to Slideshow mode and updated preference menu section 0 17 18th April 2018 Edits 0 18 26th A...

Страница 41: ...us Interface details 0 27 25th October 2018 Updated preference menu for Orion TI 84 Screen Settings and modified zoom in max key 0 28 24th November 2018 Minor Edits 0 29 26th December 2018 Added disable sleep option in preference menu 0 30 18th March 2019 Updated vibration and power off section 1 0 25th October 2021 Minor edits for public release ...

Отзывы: