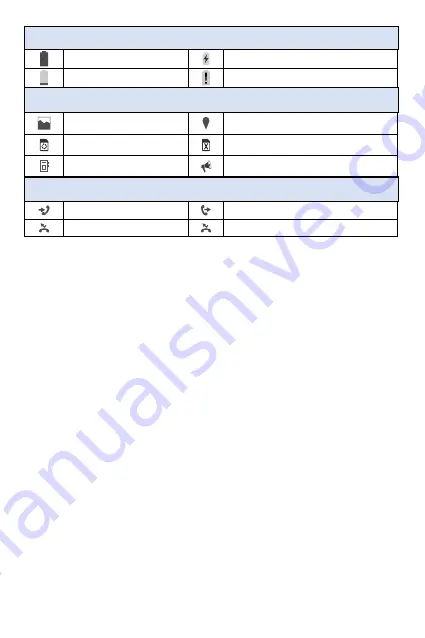
Orbic JOURNEY V Скачать руководство пользователя страница 21

20.

  Battery icons

Notifications

Notification icons are displayed on the Status Bar displaying 

calendar events, device status, and much more. The status bar will 

display the notification icon when you receive a notification. 

The Notifications view shows a list of all your recent notifications. 

You may hear a sound, see a light, or feel the phone vibrate 
depending on your settings.

To Open the Notification View

From the Home screen > press the 

Down

 navigation key to open 

the Notification view. 

A list of all your current notifications appears in the 

Notifications 

view, organized by ongoing and event-based notifications.

Full battery

Charging battery

Low battery

Empty battery

 Other icons

Gallery/Screenshot

Location

Activating phone

Activating phone unsuccessful

System update available

Emergency Alert

  Call logs icons

Incoming call

Outgoing call

Missed call

Rejected call

21.

Содержание JOURNEY V

Страница 1: ...User Manual...

Страница 2: ...Battery 14 Quick Volume Adjustment 23 Deleting Text Number Entered 28 Removing the Battery 15 Capturing a Screenshot 24 Initiating a Phone Call From the Internet 28 Charging the Battery 16 Switching...

Страница 3: ...s 36 Deleting a Contact 30 Editing a Contact 30 Answer a Call 36 Storing Number with Pauses 31 End Reject a Call 37 Adding Contacts to Group 33 Create a New Group 32 Message 39 In Case of Emergency IC...

Страница 4: ...Ringtone 43 World Clock 46 Timer 47 Stop Watch 47 Bluetooth 51 Speech Rate 54 Color Correction 55 Calculator 48 Teathering and Mobile Hotspot 52 Speed Pitch 54 Persistant Alerts 55 Notepad 49 Cellula...

Страница 5: ...8 Wallpaper 61 Navigation Keys 63 Alarm Sound 58 Display Backlight 61 Storage 64 Master Volume 58 Key Backlight 62 USB connection 64 Security 65 Phone Ringtone 59 Font Size 62 Transferring Music and P...

Страница 6: ...Quick Responses 68 Speed Dial 68 Voicemail 69 Blocked Calls 69 Call Timer 70 Call Forwarding 70 Auto Redial 69 Fixed Dialing Numbers 70 Assisted Dialing 70 About Phone 71 Software Update 72 6...

Страница 7: ...on your purchase of the Orbic Journey V Tracfone This guide helps you to learn how best to use your device We recommend you read the Quick Start Guide that you have received along with your device for...

Страница 8: ...PWR Camera Numeric Keypad Vibrate Mode Key Home screen Navigation Clear Microphone Soft Keys Earpiece Softkeys Allows you to hear the caller and automated prompts Allows you to select the correspondi...

Страница 9: ...out of menus one level at a time Transmit your voice to the caller or for voice acti vated functions e g Voice commands To scroll through menu items and highlight fields or objects To select options...

Страница 10: ...s and active functions USB Charger Port Volume Key Headset jack Connects the phone to the USB charger or other compatible accessories Allows you to adjust the volume Allows you to plug in an optional...

Страница 11: ...Back View Camera Speaker 1 1 Exterior Screen Camera Speaker Displays messages and notifications To take pictures Allows you to hear sounds emitted from your phone as well as media content for example...

Страница 12: ...M Card Slot Back Cover Micro SD Card Slot Battery SIM Card Slot Back Cover Allows you to insert an optional Micro SD card for external memory storage 1400 mAh Battery Nano SIM card slot Protects the i...

Страница 13: ...to select the item displayed at the bottom left of the screen Press the keypad key that corresponds to the item you want to be displayed in the list Press the top bottom or sides of the Navigation key...

Страница 14: ...ingernail into the cutout located on the bottom of the back cover and gently lift the cover 2 Place the battery making sure the gold contacts are lined up 3 Push in and press down gently to secure 4 P...

Страница 15: ...tery 1 With the phone facing down insert your fingernail into the cutout located on the bottom of the back cover and gently lift the cover 2 Lift the battery out of the battery compartment by using th...

Страница 16: ...to the device port 2 Connect the USB cable to the charging head then plug the charging head into a standard electrical outlet 3 When charging is complete unplug the charging head from the power outlet...

Страница 17: ...d tray down to unlock the tray 3 The SIM is now accessible by opening the tray Inserting a Memory Card 1 Remove the back cover as demonstrated in the previous instructions 2 Position the microSD card...

Страница 18: ...eful when inserting removing or handling it The device can support up to a 128GB microSD card To remove the microSD card follow the similar steps from the Removing the Battery section Turning Your Pho...

Страница 19: ...y Settings press 2 Wallpaper Clock Format In Settings app press 4 Display Settings press 6 Main Clock Status Bar The Status Bar appears at the top of every screen A notification icon appears on the le...

Страница 20: ...G 3G 3G No connected Wi Fi No SIM card Airplane mode Downloading Uploading Connectivity icons Mobile Hotspot on USB connected Bluetooth connected Bluetooth on Headset connected Headset with microphone...

Страница 21: ...one vibrate depending on your settings To Open the Notification View From the Home screen press the Down navigation key to open the Notification view A list of all your current notifications appears i...

Страница 22: ...otifications listed with a brief description Press the OK key to open and view the details of the highlighted notification Press the Left soft key to dismiss or delete a highlighted notification Press...

Страница 23: ...ds could disrupt others From the Home screen press and hold the Volume down key to set your phone to vibration Press the Volume down key again to set the Alarm Press the Volume down key one more time...

Страница 24: ...This action puts the first call on hold Press Send key again to return to the first call Three Way Call This feature enables a three way conversation on your wireless phone with two people at the same...

Страница 25: ...select a new message Left soft key Press to change the text input mode Shift Press to change capitalization Lowercase Initial cap Caps lock Key Space Press to insert a space Clear Press to delete a s...

Страница 26: ...to view your open tabs and allow you to switch between them 3 Press the OK key View to go to the web address 4 Press the Clear key to go back to the previous page in your browsing history 5 Press the...

Страница 27: ...eb address 3 Press the OK key Go to visit the web address Navigating through the Internet There are several ways in which on screen items appear Links embedded in the content You can act on options or...

Страница 28: ...ing Text Number Entered When entering text or numbers press the Clear key to clear the last number letter or symbol Initiating a Phone Call From the Internet You can make a phone call from the Interne...

Страница 29: ...Navigation key to scroll to the phone number type field enter the number 7 Use the Navigation key to scroll to other fields and enter additional contact information if required 8 Press the OK key Save...

Страница 30: ...the Right soft key 4 Use the Navigation key to select the highlighted entry Delete Navigation key to confirm the delete Editing a Contact 1 From the Home screen press the Left soft key Contacts 2 Use...

Страница 31: ...phone waits two seconds To store a number using the Pause feature 1 From the Home screen enter the phone number press the Right soft key 2 Use the Navigation key to highlight Add 2 sec pause or Add w...

Страница 32: ...the Left soft key Once you have added the Contacts to your Favorites list you will see the following options OK key View Left soft key Message Right soft key Options to choose Add Remove Groups You ca...

Страница 33: ...Navigation key to highlight a group press the OK key to view the highlighted group You can either edit or delete a group in the View mode Speed Dial A speed dial is a shortcut that you assign to spec...

Страница 34: ...five emergency entries from your Contacts list It is these numbers that someone may use on your behalf in the event of an emergency regardless of whether the phone is locked Assigning Emergency Conta...

Страница 35: ...e Left soft key Contacts 2 Use the Navigation key to highlight the In Case of Emergency options press the OK key to view 3 Use the Navigation key to highlight the Personal information press the OK key...

Страница 36: ...y scroll down using Navigation button 2 Press Call key to initiate the call 36 Answer a Call When a call is received the phone rings and the caller s phone number or name is displayed if it is stored...

Страница 37: ...ed calls Outgoing calls All calls All calls that are missed received and dialed 3 Use the Navigation key to highlight a call and choose from the options below Press the Left soft key Message to send a...

Страница 38: ...to view the Call logs 3 Press the Right soft key Options select Delete multiple with the navigation key select the calls you want to delete press Select on each call record Delete Yes to confirm the d...

Страница 39: ...lect Message or 2 From the Home screen press the Right soft key select Message 3 View conversation threads and send messages 4 Use the Navigation key to highlight a conversation thread press the OK ke...

Страница 40: ...picture will be automatically saved to the Gallery Share Pictures You can choose up to three photos to share To share the file s select Share to open the available options such as Message Email Bluet...

Страница 41: ...3 Use the Navigation key to highlight a desired photo 4 Press the Right soft key Options press the 2 key to assign the photo 5 Use the Navigation key to select the Wallpaper or Contact photo press the...

Страница 42: ...r 3 Use the Navigation key to select a song in the Music library Repeat Set the repeat mode OFF One song or All songs Shuffle On Set the shuffle mode toggle it ON or OFF Add to playlist Organize your...

Страница 43: ...e Home screen press the OK key Menu press right down press OK key 2 Press 3 key for Sound settings 3 Press 3 Key for Phone ringtone 4 Use the Navigation key to highlight a ringtone 5 Press the OK key...

Страница 44: ...OK key 2 Press the 2 key to access the Calendar 3 Use the Navigation key to highlight the scheduled day 4 Press the Left soft key for creating New event 5 Enter the Event name scroll down to set the...

Страница 45: ...s 4 Press the Left soft key Edit to edit the calendar entry Alarm Set an alarm to ring at a specific time 1 From the Home screen press the OK key down down Tools press OK key 2 Press the 3 key Alarm 3...

Страница 46: ...t key to Dismiss or the Right soft key to Snooze To edit the alarm 1 From the Alarm clock list use the Navigation key to highlight the alarm you want to edit 2 Press the OK key Edit and make the requi...

Страница 47: ...tions Add 4 Use the Navigation key to enter the amount of time you want to set press OK key to Set 5 Press the OK key Start to start the timer 6 Press Left soft key to reset press OK key to Stop Start...

Страница 48: ...to get the value you want To clear entered items press the CLR key Clear 4 Use the Navigation key to enter an operation between numbers press the OK key to view the result Note To insert a decimal pre...

Страница 49: ...arch File Manager The File manager app allows you to manage your folders and files on your phone easily The File Manager opens up all the folders that are stored in your phone s internal storage 1 Fro...

Страница 50: ...Wi Fi network press the OK key Connect to connect to it Follow the options listed below step 4 4 Press the Right soft key Options to access the following options to manage your Wi Fi connections Pres...

Страница 51: ...rtificates from storage Press the 6 key WPS Push button Provides information to connect to a secured Wi Fi network with a WPS button Press the 7 key WPS Pin Entry Provides the WPS PIN to connect to a...

Страница 52: ...ey USB tethering to enable the option to connect via the USB This option is grayed out when not connected via USB Press the 2 key for Mobile Hotspot and press 2 key in the next menu for Setup Mobile H...

Страница 53: ...and Monthly usage cycle Press the 3 key Data roaming access Enable this option to allow data roaming Press the 4 key Network mode Allows you to search for networks as well as set automatic network sel...

Страница 54: ...een press 1 key 2 Use the Navigation key to select ON OFF and press Set Speech Rate 1 From the Accessibility menu screen press the 2 key 2 Use the Navigation key to select Slow Normal or Fast 3 Press...

Страница 55: ...anomaly red green Protanomaly red green or Tritanomaly blue yellow press the OK key to set the color Persistent Alerts 1 From the Accessibility menu screen press the 7 key Persistent alert 2 Select se...

Страница 56: ...r hear send and receive a text message through TTY equipment TTY HCO Users who can hear but cannot talk send a text message and receive voice through TTY equipment TTY VCO Users who can talk but canno...

Страница 57: ...en of the phone for the TTY icon 4 Connect the TTY equipment to the power source and turn it ON 5 Connect the phone to the desired number 6 Once connected use the TTY equipment to type in and send a t...

Страница 58: ...et the tone for new notifications 2 Use the Navigation key to highlight the desired sound press the OK key Set to select it Alarm Sound 1 From the Sound settings menu screen press the 6 key Alarm soun...

Страница 59: ...rom the Sound settings menu screen press the 8 Keypad tone 2 Use the Navigation key to select type press OK key Set to select it Battery Charging Tone 1 From the Sound Settings menu screen press the 0...

Страница 60: ...m the Sound settings menu screen press the key Emergency tone Off This allows you to disable the alert related to emergency dialing Alert This allows you to set an alert tone same as the volume level...

Страница 61: ...y Set Wallpaper 1 From the Display menu screen press the 2 key Wallpaper 2 Select a Wallpaper type and highlight your preference using the Navigation key press the OK key Select crop and save the imag...

Страница 62: ...y Set Font Size 1 From the Display settings menu screen press the 5 key Font size to set the font used for the phone software 2 Use the Navigation key to highlight your choice press the OK key Set Mai...

Страница 63: ...nguage to set the language for your phone software 2 Use the Navigation key to select your choice press the OK key Set to select it Navigation Keys Shortcuts are available from the Home screen To set...

Страница 64: ...ransferring Music and Photos 1 From the Phone settings menu screen press the 4 key USB mode 2 Use the Navigation key to highlight media device press the OK key 3 Connect your phone to a PC using the U...

Страница 65: ...ions indoors and much more When in Airplane Mode services supporting Location ON functionality will be suspended Security 1 From the Phone settings menu screen press the 6 key Security to secure your...

Страница 66: ...te time options and set them as required NOTE By default the Auto date time and Auto time zone options are enabled To activate the manual setting option s turn OFF the Auto option s select Set date Se...

Страница 67: ...n press the 2 key Any key answer to turn ON OFF which enables to set how the phone will answer an incoming call 2 Use the Navigation key to select the setting s you want to use press the OK key Set to...

Страница 68: ...the Navigation key to highlight a quick message Speed Dial 1 From the Call settings menu screen press the 6 key Speed dial setup to add view change or move and remove your speed dial numbers 2 Use th...

Страница 69: ...om the Call settings menu screen press the 8 key Blocked calls to allow you to view and manage your blocked calls list 2 Select the action you want 3 Press the OK key Add to add numbers Manually enter...

Страница 70: ...nable call forwarding and enter the designated telephone number 3 Press the 2 key OFF to disable call forwarding Call Timer 1 From the Call settings menu screen press the key Call timer to view call d...

Страница 71: ...re information and Software information 1 From the Home screen press the OK key right down Settings press OK key 2 Press the 7 key About phone Press 1 key for My Phone Number Press 2 key for Status Pr...

Страница 72: ...en press the right down Settings press OK key 2 Press the 8 key Software update 3 The options shown are Check for updates Show update history and Use Upgrade Assistant 4 Press the 1 key Check for upda...

Отзывы: