
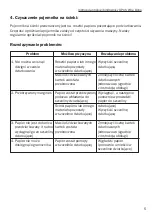


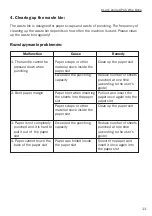


2. Punching:
NOTE! Before punching set the pressing slot adjustment knob in PUNCHING
position!
• Insert the document into the paper slot, so that
it touches back of the slot. Press the handle down
to punch the sheets.
• Please check paper position before punching
official documents
• Do not exceed recommended max punching capacity!
• Punch all the documents completely at one time
3. Binding:
NOTE! The pressing lot adjustment knob should be set in a position suitable
to the chosen comb size
• Adjust the comb size to the document thickness.
Put the wire comb on the wire hooks and insert
punched paper on the wire comb.
• If the comb size is not defined, use the diagram
of comb size placed inside the waste bin.
• Pull the comb with the documents of the wire
hooks and insert it into the pressing slot
•Pull the handle backward to close the wire comb.
Take the document off the comb plate.
The documents are ready!
10
User’s guide OPUS Wire Bono
User
’
s guide Wire Bono
Instrukcja obsługi b
indownicy Wire Bono
Punching
NOTE! Before punching set the pressing slot adjustment knob in PUNCHING
position!
Insert the document into the paper slot, so that it
touches back of the slot. Press the handle down
to punch the sheets.
Please check paper position before punching
official documents
Do not exceed recommended max punching
capacity!
Punch all the documents completely at one time
3. Binding
NOTE! The pressing lot adjustment knob should be set in a position suitable
to the chosen comb size.
Adjust the comb size to the document thickness.
Put the wire comb on the wire hooks and insert
punched paper on the wire comb.
If the comb size is not defined, use the diagram of
comb size placed inside the waste bin.
Pull the comb with the documents of the wire
hooks and insert it into the pressing slot
Pull the handle backward to close the wire
comb. Take the document off the comb plate. The
documents are ready!
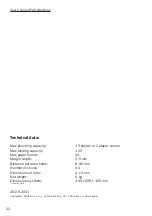
Comb size
4,8 6,4
8
9,5 11
12,7
14,3
Max sheets number
20 35 50 65 80
90
120
9
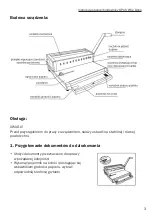
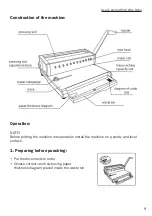
Budowa urządzenia
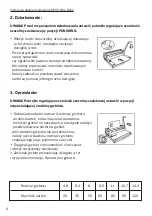
Obsługa
UWAGA! Przed przystąpieniem do pracy z urządzeniem, należy ustawić na
stabilnej i równej powierzchni.
1. Przygotowanie dokumentów do dziurkowania
Ułożyć dokumenty przeznaczone do oprawy
w pożądanej kolejności
Wysunąć pojemnik na ścinki i posługując się
wskaźnikiem
grubości
papieru,
wybrać
odpowiednią średnicę grzbietu
2
User
’
s guide Wire Bono
Instrukcja obsługi b
indownicy Wire Bono
Punching
NOTE! Before punching set the pressing slot adjustment knob in PUNCHING
position!
Insert the document into the paper slot, so that it
touches back of the slot. Press the handle down
to punch the sheets.
Please check paper position before punching
official documents
Do not exceed recommended max punching
capacity!
Punch all the documents completely at one time
3. Binding
NOTE! The pressing lot adjustment knob should be set in a position suitable
to the chosen comb size.
Adjust the comb size to the document thickness.
Put the wire comb on the wire hooks and insert
punched paper on the wire comb.
If the comb size is not defined, use the diagram of
comb size placed inside the waste bin.
Pull the comb with the documents of the wire
hooks and insert it into the pressing slot
Pull the handle backward to close the wire
comb. Take the document off the comb plate. The
documents are ready!
Comb size
4,8 6,4
8
9,5 11
12,7
14,3
Max sheets number
20 35 50 65 80
90
120
9
Budowa urządzenia
Obsługa
UWAGA! Przed przystąpieniem do pracy z urządzeniem, należy ustawić na
stabilnej i równej powierzchni.
1. Przygotowanie dokumentów do dziurkowania
Ułożyć dokumenty przeznaczone do oprawy
w pożądanej kolejności
Wysunąć pojemnik na ścinki i posługując się
wskaźnikiem
grubości
papieru,
wybrać
odpowiednią średnicę grzbietu
2
Comb size 4,8 6,4 8 9,5 11 12,7 14,3
Max sheets numer 20 35 50 65 80 90 120


