background image

10

5     OPERATING

Destroying disks 

1. Place the handle (1) in the fully open position horizontally to the back of the equip-

ment.

2. Slide out the work table (2).

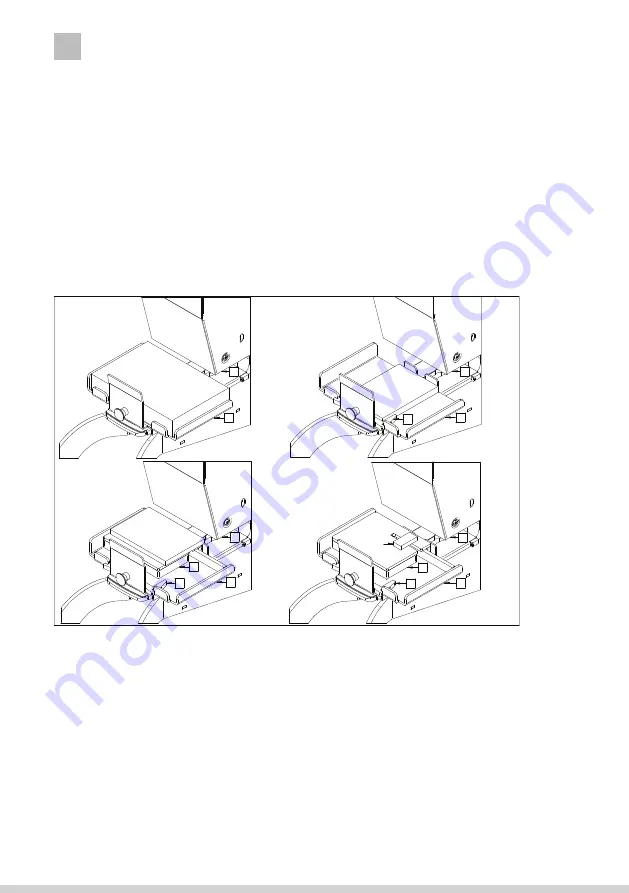
3. Depending on the type of disks being destroyed, install the correct tool to the

  Equipment for instance tool (6) for 3.5 “and 2.5” HDD drives, (7) for SSD drives

  and pendrives. 4. Insert the disk drive a. Place the 3.5 “HDD directly on the work 

table (2). b. For 2.5” HDD, install the adapter (4) as shown in the diagrams below, 

and then place the disk in the middle between the tabs of the adapter. The disk in 

the casing is located on the opposite side of the connector, so the disk

  should be placed with the connector slot towards the operator.

c. Use the adapter (4) and (3) for the SSD and pendrive. The discs should be placed 

across to the slot.

The diagrams below show the correct position of the disks

5. Slide in the work table (2). 

6. Pull the handle (1) down until it pierces the disc drive and stops. If the disc is not pierced/

cut completely, repeat the process again. 

7. Put the handle (1) to the fully open position with the handle horizontally at the back, 

then remove the damaged disk.

Destroying phones and tablets (without batteries)

1. Place the handle (1) in the fully open position horizontally to the back of the equip ment.

2. Remove the work table (2) from the main body.

3. Place the phone or tablet directly on the main body of the equipment.

4. Pull the handle (1) down until it pierces the phone or tablet and stops. If the phone / 

tablet is not pierced completely, repeat the process again. 

5. Place the handle (1) in the fully open position horizontally to the back of the equip ment, 

then remove the damaged phone / tablet.

27.07.2020

HDD 3,5"

HDD 2,5"

4

4

4

SSD

pendrive

3

3

2

2

2

2

6

6

7

7

Содержание dataPREDATOR

Страница 1: ...Instrukcja obs ugi z ociarki OPUS MasterPress 02 OPUS dataPREDATOR Instrukcja obs ugi Instrukcja obs ugi PL dataPREDATOR PL...

Страница 2: ...z dzenia W przypadku zauwa enia jakichkolwiek nieprawid owo ci w pracy nale y skontaktowa si z autoryzowanym serwisem Urz dzenie nale y obs ugiwa zawsze zgodnie z og lnymi zasadami BHP Wszelkich napra...

Страница 3: ...odpadki 6 Narz dzie do perforacji dysk w HDD telefon w kom rkowych i tablet w 7 Narz dzie do przecinania dysk w SSD i pendrive Zestaw zawiera dodatkowo Okulary ochronne 1 sztuka Klucz imbusowy 3 mm do...

Страница 4: ...la dysku SSD i pendrive wykorzystaj przystawk 4 oraz 3 Dyski nale y umie ci poprzecznie wzgl dem szczeliny Prawid owe umieszczenie dysk w pokazuj rysunki poni ej 5 Wsu st roboczy 2 6 Poci gnij rami 1...

Страница 5: ...sk w HDD 3 5 i 2 5 H3 No nik zdeformowany dla dysk w SSD i pendrive E2 No nik poci ty na cz ci Wymiary W x S x G 370 x 180 x 578 mm Waga netto 15 kg Waga brutto 23 kg 1 Ustaw rami 1 w pozycji otwartej...

Страница 6: ......

Страница 7: ...OPUS dataPREDATOR User guide Instrukcja obs ugi z ociarki OPUS MasterPress 02 dataPREDATOR EN User guide EN...

Страница 8: ...nt may only be carried out by an authorized person during the guarantee warranty period The pressure force on the device handle may not exceed 40 kg Exceeding 40 kg may damage the equipment and cancel...

Страница 9: ...HDD adapter 5 Waste tray 6 HDDs mobile phones and tablets perforation tool 7 SSDs and pendrives perforation tool Includes with the unit Safety glasses 1 Allen key for changing tools 3 mm 1 Allen key f...

Страница 10: ...ced across to the slot The diagrams below show the correct position of the disks 5 Slide in the work table 2 6 Pull the handle 1 down until it pierces the disc drive and stops If the disc is not pierc...

Страница 11: ...ll block the movement and may damage the unit Always ensure the screw is in and tight 3 As standard the locking screw A can be found on the right but it can be on the left 12 01 2021 OPUS Sp z o o ul...

Отзывы: