background image

www.optomany.com  


15


2


Logging On 

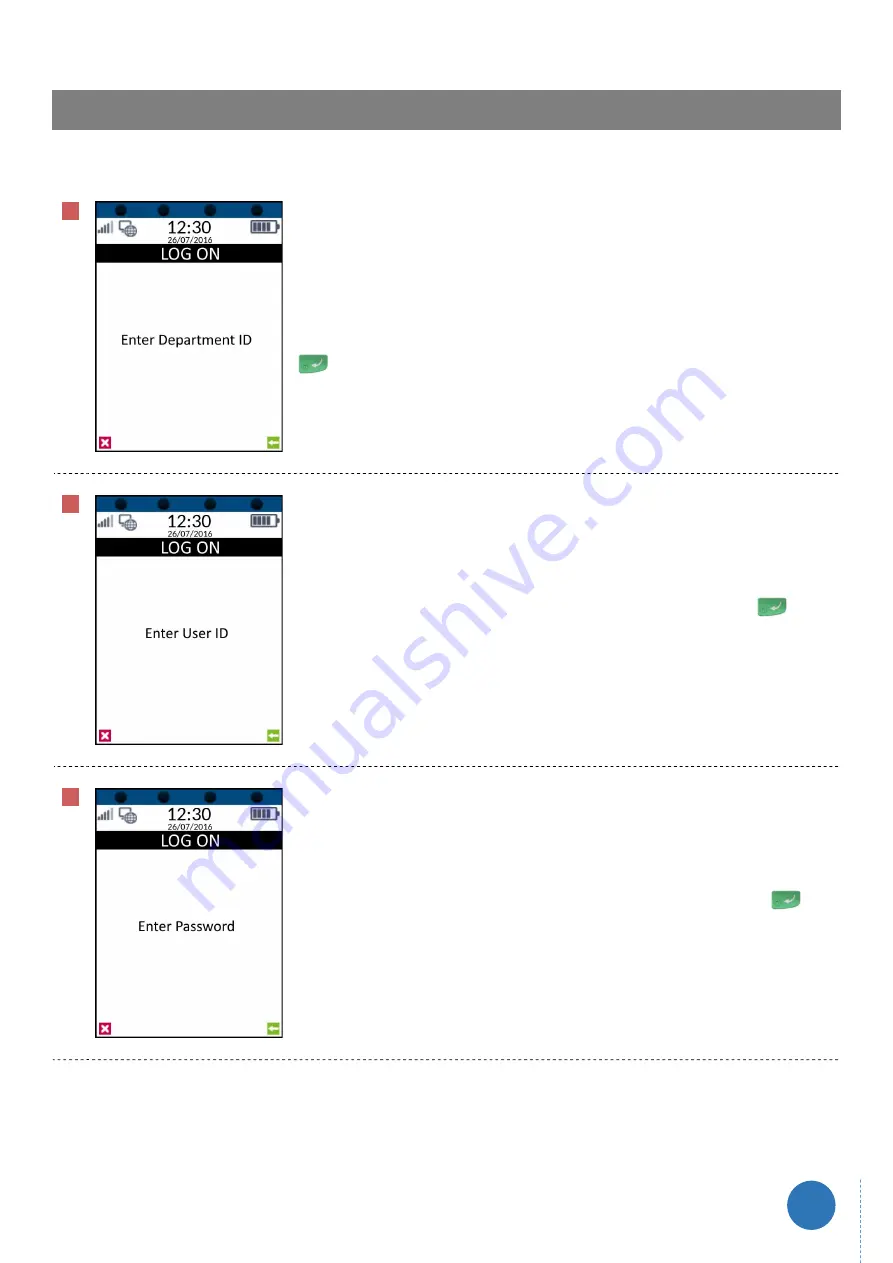
Now set-up and activation are complete, axept® S900 is ready for the first logon. 

01


Once axept® S900 has completed the start-up process, it will prompt for the entry of 

the Department ID. 


Enter the Department ID sent to you by Optomany using the keypad and press the 

 button on the keypad to continue. 

02


Enter the User ID sent to you by Optomany using the keypad and press the 

 button 

on the keypad to continue. 

03


Enter the password sent to you by Optomany using the keypad and press the 


button on the keypad to continue. 

Содержание axept S900

Страница 1: ...axept S900 User Guide Version 0 5 June 2016 ...

Страница 2: ...ed Transactions 28 7 Processing a Cardholder Not Present CNP Sale 30 7 1 Cardholder Not Present CNP Results 36 8 Processing a Cardholder Not Present CNP Refund 37 9 Reprinting Receipts 42 10 The Terminal 44 10 1 Reports 44 Available Reports 45 10 2 Supervisor 46 Network Settings 46 Terminal Update 56 Deactivate Update 56 Software Rollback 56 Diagnostic Receipts 56 Flight Mode 56 10 3 Upload Stored...

Страница 3: ...uable reporting and other functionality backed by the Optomany Control Centre OCC web portal This user guide is designed to provide users of axept S900 with everything needed to set up register and process transactions Should you have any queries on anything in this guide please do not hesitate to contact Optomany s customer support team using the details on page 68 Welcome ...

Страница 4: ...al External AC Power Adapter External AC Power Cable Thermal Paper Roll Battery Quick Start Guide IMPORTANT PLEASE CONFIRM THAT THE TAMPER BAG AND TERMINAL SERIAL NUMBER MATCHES EMAIL NOTIFICATION S FROM OPTOMANY If anything is missing or damaged or you experience issues during the installation activation please contact Optomany on 020 8102 8102 or via email customersupport optomany com ...

Страница 5: ...www optomany com 4 1 1 Terminal Overview An overview of the axept S900 terminal ...

Страница 6: ...Connection Present Wi Fi Signal Indicator GPRS Signal Indicator Flight Mode Enabled Transaction data stored on the Terminal not displayed once data uploaded Terminal Configuration Download Required Confirmation option Cancel Option Ready for Card Chip and PIN Contactless or Swipe Green Contactless LED Blinks when idle incrementally lights up if card is being read Contactless LED Unable to read car...

Страница 7: ... ExpressPay Discover DPAS ISO IEC 14443 Type A B Mifare Felica NFC Communication GPRS 3G WCDMA EVDO Wi Fi Peripheral Ports 1 x Mini USB 1 x RS232 1 x power charge 1 x base interface Printer Fast thermal printer 18 LPS or faster depending on font size Paper roll width diameter 58mm 38mm Audio Speaker 90dB Battery Li ion batteries 1850mAh 7 4V Voltage Input 100 240VAC 0 3A 50Hz 60Hz Output 9VDC 1A O...

Страница 8: ...oll leaving at least 1cm exposed and close the cover 03 To insert the battery turn the axept S900 terminal over so the battery cover latch is visible Pull the latch down and towards you and carefully remove the battery cover away from the terminal 04 Place the battery into the battery compartment making sure the contact points of the battery align with the connectors of the terminal as highlighted...

Страница 9: ...www optomany com 8 05 Once the battery is in place clip the battery cover back onto the terminal ...

Страница 10: ...omany s Support Team Power on the axept S900 by pressing and holding the button on the keypad for a few seconds until the terminal screen lights up the start up process may take a few minutes Wi Fi 01 Once the loading process is complete the Network Configuration menu will appear Highlight WiFi using the and keys on the keypad and press the button on the keypad to continue 02 axept S900 scans for ...

Страница 11: ...ue 04 Enter the Wi Fi password To use alpha characters press the numeric key containing the alpha character required multiple times until it is displayed Press the button on the keypad to continue 05 axept S900 supports Dynamic Host Configuration Protocol DHCP which automatically obtains all network settings To use this service press the button on the keypad to continue ...

Страница 12: ...that the Wi Fi network used is secure and requires authentication axept S900 requires WPA2 PSK encryption to be available WPA2 PSK is a method of securing your network using WPA2 with the use of the Pre Shared Key PSK authentication axept S900 supports the use of the 802 11G Wi Fi Band If a fixed IP address is required rather than using DHCP please refer to section 10 2 1 2 for more information ...

Страница 13: ...cedure outlined below 01 Once the loading process is complete the Network Configuration menu will appear Highlight GPRS using the and keys on the keypad and press the button on the keypad to continue 02 Please wait whilst the connection is validated 03 axept S900 confirms that the GPRS network configuration is successfully completed ...

Страница 14: ...cence Key sent to you by Optomany To use alpha characters press the numeric key containing the alpha character required multiple times until it is displayed Press the button on the keypad to continue 02 Using the keypad enter the Merchant Store Key provided by Optomany Press the button on the keypad to continue 03 Please wait for the activation procedure to complete as this may take a few minutes ...

Страница 15: ...now needs to download the account specific information from the Optomany axept platform Press the button on the keypad to continue 05 Please be patient whilst the Configuration Download starts as this may take a few minutes 06 Once the configuration download has completed axept S900 will apply the configuration settings ...

Страница 16: ...l prompt for the entry of the Department ID Enter the Department ID sent to you by Optomany using the keypad and press the button on the keypad to continue 02 Enter the User ID sent to you by Optomany using the keypad and press the button on the keypad to continue 03 Enter the password sent to you by Optomany using the keypad and press the button on the keypad to continue ...

Страница 17: ...xept S900 processes the log on details 05 Once the log on has been completed the main menu will be displayed INFO If this is still the correct Department ID press the button on the keypad to continue If the Department ID needs to be changed press the button on the keypad and enter the new Department ID Once entered press the button on the keypad to continue ...

Страница 18: ...button on the keypad 02 Enter the amount of the sale using the keypad axept S900 will automatically enter the decimal place for you Press the button on the keypad to continue 03 If required enter the reference for the transaction If a reference is not needed press the button on the keypad to skip To use alpha characters press the numeric key containing the alpha character required multiple times u...

Страница 19: ...resented 05 Insert the card with the Chip of the card on top facing towards you into the Chip and PIN card slot at the base of the terminal 06 Once the card is inserted axept S900 will process the card Please wait and do not remove the card whilst this is in progress ...

Страница 20: ...k them to enter their PIN After the PIN has been keyed in the cardholder will then need to press the button on the keypad to continue 08 axept S900 will provide a PIN OK confirmation if the PIN has been correctly entered 09 axept S900 will attempt to authorise the transaction with your chosen acquirer ...

Страница 21: ...00 will confirm that the payment is complete if authorisation is successful 11 Once the payment is complete and the Remove Card message is displayed remove the card 12 Once the card is removed the Merchant Receipt will begin printing ...

Страница 22: ...pt S900 terminal and press the button on the keypad to continue 14 The cardholder receipt will then begin printing and can be torn off once printing has completed 15 The payment processing procedure is now complete and axept S900 will return to the main menu ...

Страница 23: ...t option 2 Refund Press the button on the keypad 02 Enter the amount of the refund using the keypad axept S900 will automatically enter the decimal place for you Press the button on the keypad to continue 03 If required enter the reference for the transaction If a reference is not needed press the button on the keypad to skip To use alpha characters press the numeric key containing the alpha chara...

Страница 24: ... card with the Chip of the card on top facing towards you into the Chip and PIN card slot at the base of the terminal 06 As the refund is verified by validating the cardholder s signature the card needs to be removed from the terminal The transaction will continue once the card is removed ...

Страница 25: ...t receipt will then be printed Ask the cardholder to sign where indicated on the receipt 09 Once the cardholder has signed the receipt check that it matches the signature on the back of the card If it matches press the button on the keypad to continue If not press the button on the keypad to cancel ...

Страница 26: ...www optomany com 25 10 If the signature is confirmed as valid axept S900 will begin to print the cardholder s refund receipt axept S900 will return to the main menu once the printing is completed ...

Страница 27: ...ck of funds in the cardholder s account or that the card may have been reported as stolen The below shows the screens that will appear during a declined transaction 01 In this example axept S900 displays the Not Authorised message meaning the acquirer has not been able to authorise the transaction 02 axept S900 will prompt for the card to be removed 03 axept S900 will then print both the Merchant ...

Страница 28: ...www optomany com 27 04 axept S900 will prompt for the card to be presented again ...

Страница 29: ...iding you with all of the information that will be requested 01 Once the referral result has been received axept S900 will request that the card is removed 02 axept S900 will display a summary of the referral details Once the Authorisation Centre has been contacted and the details provided press the button on the keypad to continue 03 If the acquirer gives authorisation press the button on the key...

Страница 30: ... Authorisation Code to be entered To use alpha characters press the numeric key containing the alpha character required multiple times until it is displayed Press the button on the keypad to continue 05 axept S900 will then print both the Merchant s and Cardholder s ...

Страница 31: ... as securely as possible axept S900 will require the entry of the Card Security Code CSC House Number and Post Code AVS The process for these transactions are detailed below 01 From the main menu select option 3 Other Transactions Press the button on the keypad 02 Select the type of order that is being processed This example will use Mail Order but the process is the same no matter which option is...

Страница 32: ...y enter the decimal place for you Press the button on the keypad to continue 05 If required enter the reference for the transaction If a reference is not needed press the button on the keypad to skip To use alpha characters press the numeric key containing the alpha character required multiple times until it is displayed Press the button on the keypad to continue ...

Страница 33: ...igit Month and Year The is automatically entered by axept S900 Enter the card s expiry date and press the button on the keypad to continue 08 axept S900 will prompt for the card s CSC Card Security Code usually a 3 digit number on the signature strip of the card this is a four digit number located on the front of the card for AMEX cards Enter the card s CSC and press the button on the keypad to co...

Страница 34: ...keypad to skip if you do not wish to validate the information 10 Enter the numbers of the Post Code in the cardholder s billing address and press the button on the keypad to continue Alternatively press the button on the keypad to skip if you do not wish to validate the information 11 axept S900 will attempt to process and authorise the transaction with your acquirer ...

Страница 35: ...Press the button on the keypad to accept the transaction or the button to reject See section 7 1 of this document for a breakdown of what the result symbols mean 13 The Merchant s Approved or Declined receipt will begin printing depending on whether the transaction was approved or rejected 14 Tear off the receipt from the terminal and press the button on the keypad to continue ...

Страница 36: ...oved or Declined receipt will begin printing based on whether the transaction was approved or rejected and can be torn off once printing has completed 16 The payment processing procedure is now complete and axept S900 will return to the main menu ...

Страница 37: ...the outcome of the CSC and AVS checks This allows the accept or reject decision to be made by the user with all the required information The results are displayed using a symbol to portray the result of each check Below are the symbols you may encounter and their meaning Data Matched Data Partially Matched Data Not Checked Data Does Not Match ...

Страница 38: ...ot Present refund procedure 01 From the main menu select option 3 Other Transactions Press the button on the keypad 02 Select the type of order that is being processed This example will use Mail Order but the process is the same no matter which option is selected Select option 1 Mail Order Press the button on the keypad 03 Select option 2 Mail Order Refund Press the button on the keypad ...

Страница 39: ... the reference for the transaction If a reference is not needed press the button on the keypad to skip To use alpha characters press the numeric key containing the alpha character required multiple times until it is displayed Press the button on the keypad to continue 06 axept S900 will prompt for the card number PAN Enter the card number no spaces and press the button on the keypad to continue ...

Страница 40: ...d by axept S900 Enter the card s expiry date and press the button on the keypad to continue 08 axept S900 will attempt to process and authorise the transaction 09 Since the refund is performed offline there are no CSC and AVS results available this is shown on screen as not checked Press the button on the keypad to continue ...

Страница 41: ...begin to print the Merchant s Refund Receipt 11 Tear off the receipt from the terminal and press the button on the keypad to continue 12 The cardholder s refund receipt will then begin printing and can be torn off once printing has completed ...

Страница 42: ...www optomany com 41 13 The Cardholder Not Present CNP refund processing procedure is now complete and axept S900 will return to the main menu ...

Страница 43: ...ipts to be printed again after the transaction The following demonstrates how to reprint additional receipts 01 From the main menu select option 4 Reprint Press the button on the keypad 02 Select whether an additional Merchant or Customer receipt is required by pressing for Merchant or for Customer 03 The receipt will begin printing once a selection has been made DUPLICATE RECEIPT will be printed ...

Страница 44: ...nce printing has completed please tear off the receipt and press the button on the keypad to continue 05 axept S900 will return to the reprint menu You can reprint another receipt or press the button to return to the main menu ...

Страница 45: ...e main menu The following provides an overview of the functions and settings available 10 1 Reports A number of default reports are available to allow reconciliation to be performed via the terminal 01 To access the reports from the main menu select option 5 Menu Press the button on the keypad 02 To display the available reports select option 1 Reports Press the button on the keypad ...

Страница 46: ... the shift and will clear down the totals Current Day Report Report which provides totals of the transactions processed during the Current Day Running this report provides a running total and does not clear down the totals End of Day Report Report which provides totals of the transactions processed during the Current Day Running this report ends the trading day and will clear down the totals Syste...

Страница 47: ... have been configured to connect to the chosen network s during the installation However should these details need to be updated e g Network updated this can be reconfigured within the Network Settings menu If axept S900 has been installed with both Wi Fi and GPRS settings for both communication modules are included 01 From the main menu select option 5 Menu Press the button on the keypad 02 To di...

Страница 48: ... Network Settings Press the button on the keypad 04 Select the communication method which you wish to re configure using the and keys on the keypad or press the or button on the keypad depending on which method you require and press the button on the keypad to continue ...

Страница 49: ...es the IP details automatically 01 From the Network Settings menu highlight WiFi using the and keys on the keypad or press the button on the keypad and press the button on the keypad to continue 02 axept S900 scans for available Wi Fi networks 03 The Wi Fi networks available are displayed Using the and keys on the keypad select the network required and press the button on the keypad to continue ...

Страница 50: ...acter required multiple times until it is displayed Press the button on the keypad to continue 05 axept S900 supports Dynamic Host Configuration Protocol DHCP which automatically obtains all network settings To use this service press the button on the keypad to continue 06 Please wait whilst the connection is validated ...

Страница 51: ...ork settings INFO To meet PCI DSS guidelines please ensure that the Wi Fi network used is secure and requires authentication axept S900 requires WPA2 PSK encryption to be available WPA2 PSK is a method of securing your network using WPA2 with the use of the Pre Shared Key PSK authentication axept S900 supports the use of the 802 11G Wi Fi Band ...

Страница 52: ...Fi connection using a fixed IP rather than DHCP follows the same flow as the previous section 10 2 1 1 until step 4 01 To use a fixed IP rather than DHCP press the button 02 Enter the IP address To enter a dot press the button twice on the keypad 03 Enter the subnet mask for the network ...

Страница 53: ...www optomany com 52 04 Enter the Gateway for the network 05 Enter the IP address for the Preferred DNS server 06 Enter the IP address for the Alternative DNS server ...

Страница 54: ...ork settings INFO To meet PCI DSS guidelines please ensure that the Wi Fi network used is secure and requires authentication axept S900 requires WPA2 PSK encryption to be available WPA2 PSK is a method of securing your network using WPA2 with the use of the Pre Shared Key PSK authentication axept S900 supports the use of the 802 11G Wi Fi Band ...

Страница 55: ...ure outlined below 01 From the Network Settings menu highlight GPRS using the and keys on the keypad or press the button on the keypad and press the button on the keypad to continue 02 Please wait whilst the connection is validated 03 axept S900 confirms that the GPRS network configuration is successfully completed ...

Страница 56: ...www optomany com 55 04 axept S900 will restart to configure network settings ...

Страница 57: ...for use Diagnostic Receipts This feature is currently not available for use Flight Mode axept S900 has a flight mode feature which when enabled will de activate all network connections The following describes the process to enable disable Flight Mode 10 2 6 1 Enable Flight Mode The following describes the process to enable Flight Mode 01 From the main menu select option 5 Menu Press the button on ...

Страница 58: ...rminal menu select option 2 Supervisor Press the button on the keypad 03 To enter Flight Mode settings select option 6 Flight Mode Press the button on the keypad 04 To enable Flight Mode select option 1 On Press the button on the keypad ...

Страница 59: ... want to enable Flight Mode Press the button on the keypad to confirm or the button to cancel 06 axept S900 will confirm Flight Mode is enabled and the terminal will restart INFO The Flight Mode icon will be displayed on the status bar to indicate Flight Mode is enabled ...

Страница 60: ...rocess to disable Flight Mode 01 From the main menu select option 5 Menu Press the button on the keypad 02 From the Terminal menu select option 2 Supervisor Press the button on the keypad 03 To enter Flight Mode settings select option 6 Flight Mode Press the button on the keypad ...

Страница 61: ... 2 Off Press the button on the keypad 05 axept S900 will ask for confirmation that you want to disable Flight Mode Press the button on the keypad to confirm or the button to cancel 06 axept S900 will confirm Flight Mode is enabled and the terminal will restart ...

Страница 62: ...ept S900 screen shows that data is stored by displaying the offline transaction icon with the number of transactions shown underneath Once internet connection is restored the data will begin uploading automatically However axept S900 also allows this process to be started manually as described in the following steps 01 From the main menu select option 5 Menu Press the button on the keypad 02 To in...

Страница 63: ...ble to view the information via the support portal Logs should only be uploaded when requested by Optomany as part of a support case The following steps describe how to upload the log data if required 01 From the main menu select option 5 Menu Press the button on the keypad 02 Select option 4 Upload Log Press the button on the keypad 03 Select either option 1 Upload Last Hour or option 2 Upload La...

Страница 64: ...restart the axept S900 terminal 04 The progress of the upload will be displayed once an option is selected The time required for the upload will depend on your connection speed and the amount of data to be transferred 05 The Log Upload Complete message will be displayed and axept S900 will return to the Upload Log menu ...

Страница 65: ...s such as the merchant reference into axept S900 Key Number of Key Presses Output 1 2 3 4 5 6 7 8 9 10 11 12 1 1 2 2 A B C a b c 3 3 D E F d e f 4 4 G H I g h i 5 5 J K L j k l 6 6 M N O m n o 7 7 P Q R S p q r s 8 8 T U V t u v 9 9 W X Y Z w x y z The zero 0 button allows a greater number of characters and these are Key Number of Key Presses Output 1 2 3 4 5 6 7 8 9 10 11 12 0 0 _ Key Number of K...

Страница 66: ...ata storage or special purpose processing used to validate personal identification numbers PINs authorise purchases verify account balances and store personal records In some cases the memory in the card is updated every time the card is used e g an account balance is updated CNP Customer Not Present A feature that enables merchants to take transactions over the telephone or by mail order You must...

Страница 67: ...lder to have his purchases directly charged to funds on his account at a deposit taking institution may sometimes be combined with another function e g that of a cash card or cheque guarantee card DHCP Dynamic Host Configuration Protocol is a client server protocol that automatically provides an Internet Protocol IP host with its IP address and other related configuration information such as the s...

Страница 68: ...n their behalf While payment processors typically provide acquiring services payment processors are not considered acquirers unless defined as such by a payment card brand PCI Acronym for Payment Card Industry PCI DSS Acronym for Payment Card Industry Data Security Standard PED Acronym for PIN Entry Device PIN Acronym for Personal Identification Number A secret numeric password known only to the c...

Страница 69: ...f Monday to Friday 9 00 am to 5 00 pm Upon receipt an Optomany helpdesk ticket is used to track and record the request detail A ticket is automatically generated on receipt of an email to customersupport optomany com A unique reference number is allocated to each ticket this is automatically notified to the email sender by return email This unique reference should then be quoted in all further ema...

Отзывы: