background image

22

English

User Controls

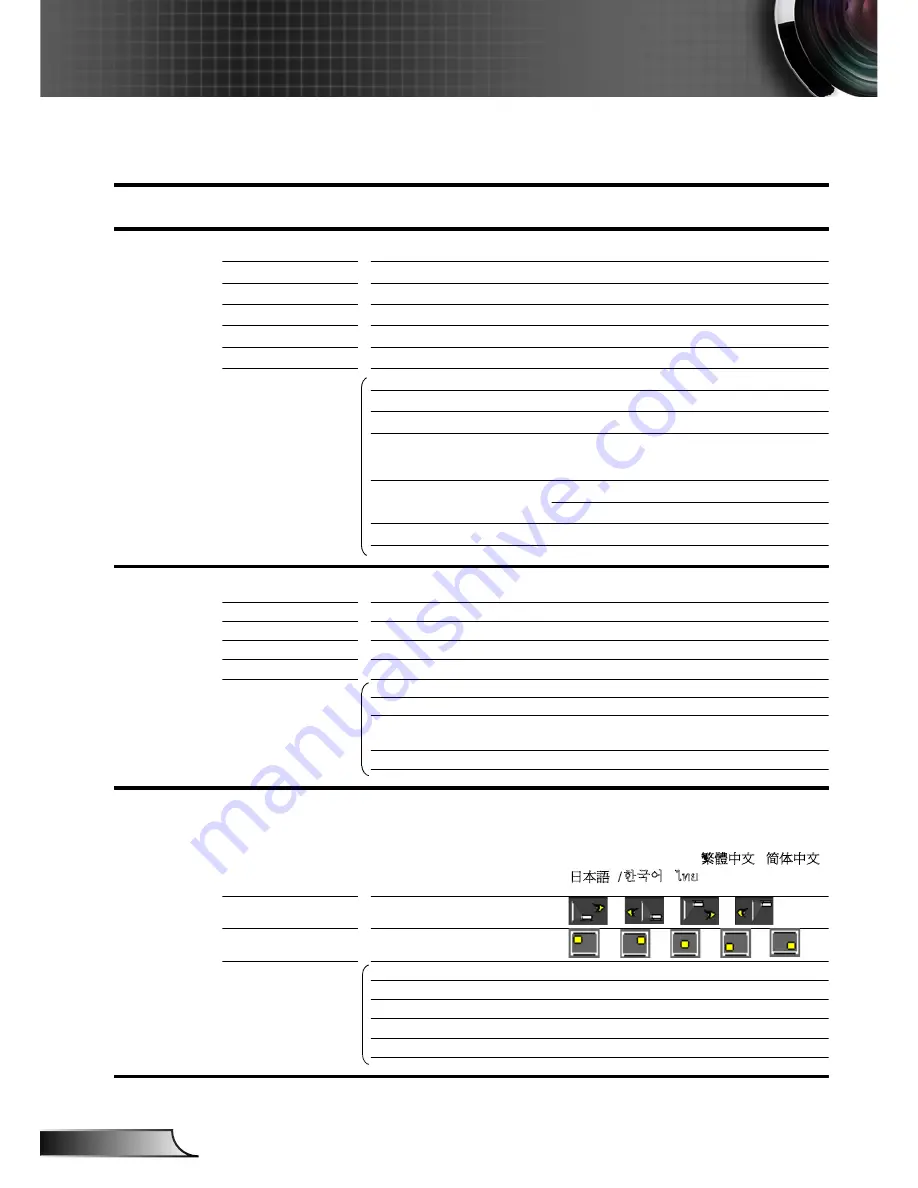
Menu Tree

GT750 OSD Menu Tree.xls

Main Menu

Sub Menu

Settings

Image

Display Mode

Brightness

-50 ~ +50

Contrast

-50 ~ +50

Sharpness

1~15

Color

-50 ~ +50

Tint

-50 ~ +50

Advanced

Gamma

Film / Video / Graphics / Standard

0~10

Color Temp.

Warm / Medium / Cold

Color

Color Space

AUTO / RGB / YUV
AUTO / RGB (0-255) / RGB (16-235) / YUV

Input Source

VGA / S-Video / Video / HDMI 1 / HDMI 2

Exit

Display

Format

Edge Mask

0~10

Zoom

-5 ~ +25

V Image Shift

-50 ~ +50

V Keystone

-40 ~ +40

3D

3D Mode

3D -> 2D

3D / L / R

3D Format

3D Sync. Invert

On / Off

Exit

Setup

Language

Projection

Menu Location

Signal

Automatic

Enable / Disable

Frequency (VGA)

-5~5

Phase (VGA)

0~63

H. Position (VGA)

-5~5

V. Position (VGA)

-5~5

Exit

ʳ

Cinema / Bright / Presentation / Game / 

Blackboard / Classroom / 3D / User

#1

#1

BrilliantColor™ 

Red Gain / Green Gain / Blue Gain / Red 

Bias / Green Bias / Blue Bias / Cyan / 

Magenta / Yellow / Reset / Exit

#2

4:3-I / 4:3-II / 16:9 / 16:10 / LBX / Native / 

AUTO

DLP-Link / VESA 3D

Auto / SBS / Top and Bottom / Frame 

Sequential

#3

English / Deutsch / Français / Italiano / 

Español / Português / Svenska / 

Nederlands / Norsk/Dansk / Polski / 

Suomi / 

Ɋɭɫɫɤɢɣ

 / 

İȜȜȘȞȚțȐ

 / Magyar / 

ý

eština / 

̶γέΎϓ

 /  

ϲΑήϋ

 /

᜗᧯խ֮

ʳ

亞᫿խ֮

ʳ

ֲء፿!0

ᾂ᝖᱑

ʳ

ࡷࡎ࡙

/ Türkçe

#4

Содержание GT750E

Страница 1: ...sting the Projector s Focus 16 Adjusting Projection Image Size 16 User Controls 18 Control Panel Remote Control 18 Control Panel 18 Remote Control 19 On screen Display Menus 21 How to operate 21 Menu Tree 22 IMAGE 24 IMAGE Advanced 26 DISPLAY 28 DISPLAY 3D 30 SETUP 31 SETUP Security 33 SETUP Signal 35 SETUP Audio Settings 36 OPTIONS 37 OPTIONS Advanced 38 OPTIONS Lamp Settings 39 Appendices 40 Tro...

Страница 2: ... do not place the projector on a crowded coffee table sofa bed etc Do not put the projector in an enclosure such as a book case or a cabinet that restricts air flow 2 Do not use the projector near water or moisture To reduce the risk of fire and or electric shock do not expose the projector to rain or moisture 3 Do not install near heat sources such as radiators heaters stoves or any other apparat...

Страница 3: ... Please be sure to change the lamp when it shows warning messages Warning Reset the Lamp Reset function from the on screen display OPTIONS Lamp Settings menu after replacing the lamp module refer to page 38 Warning When switching the projector off please ensure the cooling cycle has been completed before disconnecting power Allow 90 seconds for the projector to cool down Warning Do not use lens ca...

Страница 4: ... long period of time Do not Block the slots and openings on the unit provided for ventilation Use abrasive cleaners waxes or solvents to clean the unit Use under the following conditions In extremely hot cold or humid environments Ensure that the ambient room temperature is within 5 35 C Relative Humidity is 5 35 C 80 Max non condensing In areas susceptible to excessive dust and dirt Near any appl...

Страница 5: ... used in a classroom adequately supervise students when they are asked to point out something on the screen In order to minimize the lamp power use room blinds to reduce ambient light levels Product Features WXGA 1280x800 Native resolution HD compatible 1080p supported BrilliantColorTM Technology Security Bar and Kensington Lock RS232 control Rapid shutdown Built in speaker ...

Страница 6: ... each Country some regions may have different accessories Power Cord 1 8m IR Remote Control Package Overview Unpack and inspect the box contents to ensure all parts listed below are in the box If something is missing please contact your nearest customer service center 2 AAA Batteries Projector with lens cap VGA Cable 1 8m VGA RCA Adaptor ...

Страница 7: ...7 English Introduction Product Overview 1 Control Panel 2 Focus Ring 3 Lens 4 IR Receivers 5 Tilt Adjustment Feet 6 Security Bar 7 Input Output Connections 8 Power Socket 6 7 5 2 5 4 3 1 4 8 Main Unit ...

Страница 8: ...oduction POWER 8 6 2 4 5 3 7 11 10 9 1 12 1 AV Mute 2 Menu 3 Source 4 Enter 5 Re Sync 6 Power 7 Keystone Correction 8 Four Directional Select Keys 9 On Standby LED 10 Lamp LED 11 Temp LED 12 IR Receiver Control Panel ...

Страница 9: ...ignal Component Video Input HDTV YPbPr 2 HDMI 1 Connector 3 HDMI 2 Connector 4 S Video Input Connector 5 Composite Video Input Connector 6 Audio Output Connector 3 5mm Mini Jack 7 3D Sync Out 5V 8 Power Socket 9 RS 232 Connector 9 pin 10 Left RCA Audio Input Connector 11 Right RCA Audio Input Connector 12 KensingtonTM Lock Port 13 Security Bar 7 5 4 2 9 12 13 8 1 10 11 3 6 ...

Страница 10: ...Brightness 7 Vol 8 Enter 9 Re Sync 10 VGA Source 11 Video Source 12 HDMI 2 Source 13 S Video Source 14 HDMI 1 Source 15 Menu 16 Source 17 3D 18 3D format 19 Mode 20 LBX 21 4 3 I 22 4 3 II 23 16 10 24 Four Directional Select Keys 1 2 3 4 5 6 10 11 14 18 19 20 23 13 21 22 12 8 9 24 16 15 17 7 7 ...

Страница 11: ... SYNC Out 5V AUDIO OUT RS 232 HDMI 1 HDMI 2 AUDIO IN R AUDIO IN L E 6 2 4 0 5 S P R 1 2 3 4 1 Power Cord 2 DVI HDMI Cable 3 VGA Cable 4 RS232 Cable 5 Audio Input Cable 6 Emitter cable Due to the difference in applications for each country some regions may have different accessories Optional accessory 5 6 ...

Страница 12: ...Sources 1 Power Cord 2 HDMI Cable 3 VGA RCA Adaptor 4 S Video Cable 5 Composite Video Cable 6 Audio Cable Jack RCA 7 Emitter cable Composite Video Output DVD Player Set top Box HDTV receiver S Video Output 1 3 2 5 6 Due to the difference in applications for each country some regions may have different accessories Optional accessory Audio Output 4 6 7 ...

Страница 13: ...artup screen will display in approximately 10 seconds The first time you use the projector you will be asked to select the preferred language and power saving mode 4 Turn on and connect the source that you want to display on the screen computer notebook video player etc The projector will detect the source automatically If not push menu button and go to OPTIONS Make sure that the Source Lock has b...

Страница 14: ...assistance Powering off the projector 1 Press the button on the remote control or on the control panel to turn off the projector The following message will be displayed on the screen Press the button again to confirm otherwise the message will disappear after 15 seconds When you press the button for the second time the projector will display countdown timer and will shut down 2 The cooling fans co...

Страница 15: ...ed with elevator feet for adjusting the image height 1 Locate the adjustable foot you wish to modify on the underside of the projector 2 Rotate the adjustable ring clockwise to raise the projector or counter clockwise to lower it Repeat with the remaining feet as needed Tilt Adjustment Feet Tilt Adjustment Ring ...

Страница 16: ... series The projector will focus at distances from 1 64 to 16 40 feet 0 5 to 5 0 meters Focus Ring Adjusting Projection Image Size WXGA series Projection Image Size from 34 0 to 322 0 0 8 to 8 2 meters Width Height Diagonal Top View Side View Projection Distance D Projection Distance D Screen Screen Screen W Screen H Offset Hd ...

Страница 17: ... 87 31 80 0 93 3 05 0 10 0 33 70 00 1 51 0 94 59 35 37 10 1 09 3 56 0 12 0 38 80 00 1 72 1 08 67 83 42 40 1 24 4 07 0 13 0 44 90 00 1 94 1 21 76 31 47 69 1 40 4 58 0 15 0 49 100 00 2 15 1 35 84 79 52 99 1 55 5 09 0 17 0 55 120 00 2 58 1 62 101 75 63 59 1 86 6 10 0 20 0 66 150 00 3 23 2 02 127 19 79 49 2 33 7 63 0 25 0 82 180 00 3 88 2 42 152 62 95 39 2 79 9 16 0 30 0 99 250 00 5 38 3 37 211 98 132...

Страница 18: ...launch the on screen display OSD menu To exit OSD Press Menu again AV MUTE Momentarily turns off on the audio and video Four Directional Select Keys Use to select items or make adjust ments to your selection Keystone Use to adjust image distortion caused by tilting the projector 40 degrees Lamp LED Indicate the projector s lamp status Temp LED Indicate the projector s temperature status ON STAND B...

Страница 19: ...1280x720 aspect ratio 16 10 Scale the image at a 16 10 1280x800 aspect ratio LBX Enable the viewing of the letterboxed nonan amorphically enhanced movie at full screen width Part of the original image will be lost if the image aspect ratio is less than 2 35 1 Native The input source will be displayed without scaling Brightness Adjust the brightness of the image Contrast Control the degree of diffe...

Страница 20: ...or exit the on screen display menus for projector HDMI 1 Press HDMI 1 to choose source from HDMI 1 connector HDMI 2 Press HDMI 2 to choose source from HDMI 2 connector VGA Press VGA to choose source from VGA SCART YPbPr connector S Video Press S Video to choose S Video source Video Press Video to choose Composite video source Four Directional Select Keys Use to select items or make adjustments to ...

Страница 21: ...yed use keys to select any item in the main menu While making a selection on a particular page press or Enter key to enter sub menu 3 Use keys to select the desired item and adjust the settings using key 4 Select the next item to be adjusted in the sub menu and adjust as described above 5 Press Enter to confirm and the screen will return to the main menu 6 To exit press MENU again The OSD menu wil...

Страница 22: ...3D L R 3D Format 3D Sync Invert On Off Exit Setup Language Projection Menu Location Signal Automatic Enable Disable Frequency VGA 5 5 Phase VGA 0 63 H Position VGA 5 5 V Position VGA 5 5 Exit ʳ Cinema Bright Presentation Game Blackboard Classroom 3D User 1 1 BrilliantColor Red Gain Green Gain Blue Gain Red Bias Green Bias Blue Bias Cyan Magenta Yellow Reset Exit 2 4 3 I 4 3 II 16 9 16 10 LBX Nativ...

Страница 23: ...etup Security Security On Off Security Timer Month Day Hour Change Password ʳ Exit Projector ID 0 99 Audio Settings Internal Speaker On Off Mute On Off Volume 0 10 Audio Input Default Audio HDMI Exit Options Source Lock On Off High Altitude On Off Information Hide On Off Keypad Lock On Off Background Color Black Red Blue Green White Test Pattern None Grid White Pattern Advanced Direct Power On On ...

Страница 24: ...rojecting onto a blackboard green Classroom This mode is recommended for projecting in a classroom User User s settings 3D Recommended setting for 3D mode enabled Any further ad justments by the user in 3D will be saved in this mode for further use Contrast The contrast controls the degree of difference between the lightest and darkest parts of the picture Press the to decrease the contrast Press ...

Страница 25: ...rease the amount of saturation in the image Tint Adjust the color balance of red and green Press the to increase the amount of green in the image Press the to increase the amount of red in the image Sharpness Adjust the sharpness of the image Press the to decrease the sharpness Press the to increase the sharpness Color and Tint functions are only supported under Video mode ...

Страница 26: ...rd the maximum setting For a smoother more natural image adjust toward the minimum setting Gamma This allows you to set up gamma curve type After the initial setup and fi ne tuning is completed utilize the Gamma Adjustment steps to optimize your image output Film for home theater Video for video or TV source Graphics for image source Standard for standardized setting Color Temp If set to cold temp...

Страница 27: ...t Choose Yes to return the factory default settings for color adjustments Color Space Select an appropriate color matrix type from AUTO RGB RGB 0 255 RGB 16 235 or YUV Input Source Use this option to enable disable input sources Press to enter the sub menu and select which sources you require Press Enter to finalize the selection The projector will not search for inputs that are not selected For H...

Страница 28: ...ormat is for non 16x9 letterbox source and for users who use external 16x9 lens to display 2 35 1 aspect ratio using full resolution Native This format displays the original image without any scaling AUTO Automatically selects the appropriate display format Aspect ratio source detected Resize image WXGA model 4 3 I 960 x 720 center 4 3 II 1066 x 800 center 16 9 1280 x 720 center 16 10 1280 x 800 c...

Страница 29: ...orphic DVD and HDTV film source that support anamorphic wide is enhanced for 16x9 Display in a wide 2 35 1 image In this case there are no black bars Lamp power and vertical resolution are fully utilized Zoom Press the to reduce the size of an image Press the to magnify an image on the projection screen Edge Mask Edge mask function removes the noise in a video image Edge mask the image to remove v...

Страница 30: ...SA 3D images For 3D emitter please refer to page 13 3D 2D 3D Display left and right frames of 3D content L Left Display the left frame of 3D content R Right Display the right frame of 3D content 3D Format Auto When a 3D identification signal is detected the 3D for mat is selected automatically SBS Display 3D signal in Side by Side format Top and Bottom Display 3D signal in Top and Bottom format Fr...

Страница 31: ...ferred language Press Enter to finalize the selection Projection Front Desktop This is the default selection The image is projected straight on the screen Rear Desktop When selected the image will appear reversed Front Ceiling When selected the image will turn upside down Rear Desktop and Rear Ceiling are to be used with a translucent screen ...

Страница 32: ...ar reversed in upside down position Menu Location Choose the menu location on the display screen Projector ID ID definition can be set up by menu range 0 99 and allow user control an individual projector by RS232 Refer to pages 50 53 for the complete list of RS232 commands ...

Страница 33: ...ou will be requested to enter your password again Change Password First time 1 Press to set the password 2 The password has to be 4 digits 3 Use number button on the remote to enter your new password and then press key to confirm your password Change Password 1 Press to input old password 2 Use number button to enter current password and then press to confirm 3 Enter new password 4 digits in lengt...

Страница 34: ...34 English User Controls If the incorrect password is entered 3 times the projector will automatically shut down If you have forgotten your password please contact your local office for support ...

Страница 35: ...n Phase Synchronize the signal timing of the display with the graphic card If the image appears to be unstable or flickers use this function to correct it Frequency Change the display data frequency to match the frequency of your computer s graphic card Use this function only if the image appears to flicker vertically H Position Press the to move the image left Press the to move the image right V ...

Страница 36: ...the On to turn mute on Choose the Off to turn mute off Volume Press the to decrease the volume Press the to increase the volume Audio Input The default audio settings are on the back panel of the projector Use this option to reassign any of the Audio Inputs to the current image source AUDIO Audio connector port HDMI HDMI connector port ...

Страница 37: ...ching message Keypad Lock When the keypad lock function is On the control panel will be locked however the projector can be operated by the remote control By selecting Off you will be able to reuse the control panel Background Color Use this feature to display a Black Red Blue Green or White screen when no signal is available Test Pattern Display a test pattern There are Grid White pattern and Non...

Страница 38: ...rol Auto Power Off min Sets the countdown timer interval The countdown timer will start when there is no signal being sent to the projector The projector will automatically power off when the countdown has finished in minutes Sleep Timer min Sets the countdown timer interval The countdown timer will start with or without a signal being sent to the projector The projector will automatically power o...

Страница 39: ...lamp Brightness Mode STD Choose STD to dim the projector lamp which will lower power consumption and extend the lamp life BRIGHT Choose BRIGHT to increase the brightness Image AI Image AI improves the contrast of the picture by optimizing the brightness of the lamp according to the picture content Image AI helps to ensure that details in dark scenes are visible whilst maintaining bright and vivid ...

Страница 40: ...ing a PC For Windows 95 98 2000 XP Windows 7 1 Open the My Computer icon the Control Panel folder and then double click on the Display icon 2 Select the Settings tab 3 Verify that your display resolution setting is lower than or equal to UXGA 1600 1200 4 Click on the Advanced Properties button If the projector is still not projecting the whole image you will also need to change the monitor display...

Страница 41: ...e screen of the Notebook or PowerBook computer is not displaying your presentation If you are using a Notebook PC Some Notebook PCs may deactivate their own screens when a second display device is in use Each has a different way to be reactivated Refer to your computer s manual for detailed information Image is unstable or flickering Use Phase to correct it See page 35 for more information Change ...

Страница 42: ...l stretched you will also need to adjust the aspect ratio by referring to the following Please setup the display format as 16 9 wide aspect ratio type on your DVD player Image is too small or too large Move the projector closer to or further from the screen Press Menu button on the remote control or projector panel go to DISPLAY Format and try the different settings Image has slanted sides If poss...

Страница 43: ...e a loud popping sound If this happens the projector will not turn on until the lamp module has been replaced To replace the lamp follow the procedures in the Replacing the Lamp section on pages 44 45 LED lighting message Steady light No light Message ON STANDBY LED Temp LED Lamp LED Green Amber Red Red Standby State Input power cord Amber Power on Warming Flashing Green Lamp lighting Green Power ...

Страница 44: ...eck the operating angle of the remote control is within 15 both horizontally and vertically of one of the IR receivers on the projector Make sure there are not any obstructions between the remote control and the projector Move to within 7 m 0 of the projector Make sure the batteries are inserted correctly Replace batteries if they are exhausted ...

Страница 45: ...own for at least 30 minutes before changing the lamp Warning Lamp compartment may be hot Allow it to cool down before changing the lamp Warning To reduce the risk of personal injury do not drop the lamp module or touch the lamp bulb The bulb may shat ter and cause injury if it is dropped Warning If ceiling mounted please use caution when opening the lamp access panel It is recommended to wear safe...

Страница 46: ...le slowly and carefully 4 To replace the lamp module reverse the previous steps 8 Turn on the projector and use Lamp Reset after the lamp module is replaced Lamp Reset i Press Menu ii Select OPTIONS iii Select Lamp Settings iv Select Lamp Reset v Select Yes 1 2 3 4 The screws on the lamp cover and the lamp cannot be removed The projector cannot be turned on if the lamp cover has not been placed ba...

Страница 47: ... 48 10 48 10 SVGA 800 600 75 75 46 90 46 90 SVGA 800 600 120 120 XGA 1024 768 60 60 48 40 48 40 XGA 1024 768 70 70 56 50 56 50 XGA 1024 768 75 75 60 00 60 00 XGA 1024 768 120 120 WXGA 1280 800 60 60 49 68 49 64 SXGA 1280 1024 60 60 63 98 63 98 1366 768 60 60 1440 900 60 60 55 94 55 94 1680 1050 60 60 SXGA 1400 1050 60 60 63 98 63 98 UXGA 1600 1200 60 60 75 00 75 00 WSXGA 1680 1050 60 60 65 00 65 0...

Страница 48: ...480 66 66 34 98 MAC II 13 640 480 66 68 35 00 MAC 16 832 624 74 55 49 73 MAC 19 1024 768 75 60 24 MAC 1152 870 75 06 68 68 MAC G4 640 480 60 31 35 i MAC DV 1024 768 75 60 00 i MAC DV 1152 870 75 68 49 NTSC M 3 58MHz 4 43 MHz PAL B D G H I M N SECAM B D G K K1 L SDTV HDTV 480i p 576i p 720p 50Hz 60Hz 1080i p 50Hz 60Hz ...

Страница 49: ...equential SVGA 800x600 120 76 3 73 25 Ϥ Ϥ X X Ϥ XGA 1024x768 120 97 6 115 5 Ϥ Ϥ X X Ϥ 720p 1280x720 120 60 Ϥ Ϥ X X Ϥ Side by Side half 1080i 1920x1080 50 25 33 75 74 25 Ϥ Ϥ X X Ϥ 1080i 1920x1080 60 30 33 75 74 25 Ϥ Ϥ X X Ϥ Top Bottom half 1080i 1920x1080 50 25 33 75 74 25 Ϥ Ϥ X X Ϥ 1080i 1920x1080 60 30 33 75 74 25 Ϥ Ϥ X X Ϥ VGA 1 3 3D timing Formats Modes Resolution Pixel Rate DLP link VESA 3D Au...

Страница 50: ...50 English Appendices RS232 Pin Assignments Pin no Spec from projector side 1 N A 2 RXD 3 TXD 4 N A 5 GND 6 N A 7 N A 8 N A 9 N A 1 2 3 4 5 6 7 8 9 RS232 Commands and Protocol Function List ...

Страница 51: ...0 50 XX30 n Yellow Gain n 50 50 XX31 n Magenta Gain n 50 50 XX32 n Reset n 1 XX33 n n 0 10 XX34 n P F Gamma Film n 1 XX35 n P F Video n 2 XX35 n Graphics n 3 XX35 n PC Standard n 4 XX35 n Color Temp Warm n 1 XX36 n P F Medium n 2 Cold n 3 Color Space Auto n 1 XX37 n P F RGB RGB 0 255 n 2 RGB 16 235 n 4 YUV n 3 Input Source Filters HDMI 1 n 1 XX39 n P F HDMI 2 n 7 VGA 1 n 5 S Video n 9 Video n 10 D...

Страница 52: ...uto Power Off min n 0 180 XX106 n P F Sleep Timer min n 000 995 XX107 n P F Lamp Hour n 1 XX108 n F Lamp Reminder On Off n 1 n 0 2 XX109 n P F Brightness Mode Bright STD n 1 n 2 XX110 n P F Lamp Reset Yes n 1 XX111 n P F No n 2 Reset Yes n 1 XX112 n P F No n 2 Information from Projector Automatically when Standby Mode a 0 Warming up a 1 Cooling Down a 2 Out of Range a 3 Lamp Fail a 4 Thermal Switc...

Страница 53: ... Projection Mode n 1 XX129 n Output 3D State n 0 1 2D 3D XX503 ˍ ː ˆ 4 3 16 9 I 16 9 II 16 10 Window LBX Native AutoAuto235 Super wide 4 3 II Oka a 1 2 3 5 6 7 10 for 4 3 16 9 I 16 9 II 16 10 LBX Native A uto 4 3 II Oka a 0 1 2 Warm Medium Cold Front Desktop Rear Desktop Front Ceiling Rear Ceiling Oka a 0 1 2 3 for Front Desktop Rear Desktop Front Ceiling Rear Ceiling Okn ...

Страница 54: ...ctor meet the following specifications Screw type M3 3 Maximum screw length 10mm Minimum screw length 7 5mm Warning 1 If you buy a ceiling mount from another company please be sure to use the correct screw size Screw size will vary depending on the thickness of the mounting plate 2 Be sure to keep at least 10 cm gap between the ceiling and the bottom of the projector 3 Avoid installing the project...

Страница 55: ...rd Hertfordshire WD18 8QZ UK 44 0 1923 691 800 www optoma eu 44 0 1923 691 888 Service Tel 44 0 1923 691865 service tsc europe com France Bâtiment E 33 1 41 46 12 20 81 83 avenue Edouard Vaillant 33 1 41 46 94 35 92100 Boulogne Billancourt France savoptoma optoma fr Spain C José Hierro 36 Of 1C 34 91 499 06 06 28522 Rivas VaciaMadrid 34 91 670 08 32 Spain Deutschland Wiesenstrasse 21 W 49 0 211 50...

Страница 56: ...815 KOREA 82 2 34430005 Japan 東京都足立区綾瀬3 25 18 株式会社オーエスエム info osscreen com サポートセンター 0120 46 5040 www os worldwide com Taiwan 5F No 108 Minchiuan Rd 886 2 2218 2360 Shindian City 886 2 2218 2313 Taipei Taiwan 231 R O C services optoma com tw www optoma com tw asia optoma com Hong Kong Unit A 27 F Dragon Centre 79 Wing Hong Street 852 2396 8968 Cheung Sha Wan 852 2370 1222 Kowloon Hong Kong www opto...

Страница 57: ...f this device does cause harmful interference to radio or television reception which can be determined by turning the device off and on the user is encouraged to try to correct the interference by one or more of the following measures Reorient or relocate the receiving antenna Increase the separation between the device and receiver Connect the device into an outlet on a circuit different from that...

Страница 58: ...ice may not cause harmful interference and 2 This device must accept any interference received including interference that may cause undesired operation Notice Canadian users This Class B digital apparatus complies with Canadian ICES 003 Remarque à l intention des utilisateurs canadiens Cet appareil numerique de la classe B est conforme a la norme NMB 003 du Canada Declaration of Conformity for EU...

Отзывы: