background image


Contents 

Safety Instructions


1


Specification 


Overview 


Connection 


Charging the Battery   


Содержание HBB056

Страница 1: ...HBB056 Mobile Power Bank User Guide ...

Страница 2: ...Contents Safety Instructions 1 Specification 3 Overview 4 Connection 5 Charging the Battery 8 ...

Страница 3: ...such as a cell phone or magnet 5 Do not drop the battery from high places 6 Keep the battery out of children s reach and prevent them from biting or swallowing the battery 7 Keep the battery in dry places Do not put the battery in the damp place or immerse the battery in the water 8 Keep the battery in cool places Do not use the battery near the fire stove or any heated equipments eg microwave ove...

Страница 4: ...battery do not place it in the environment described above in the instruction no 6 Otherwise it will cause the battery to be out of function 13 Please charge the battery by following the steps in the section below Please stop charging when you see the LED indicator turn green Do not overcharge the battery or it will cause the battery to be out of function 14 When the battery is not going to be use...

Страница 5: ...eries Spec Lithium Ion Battery Pack Input 19V 2A Output DC 9 12 6V 2 5A USB 5V 2A Capacity 5200mAh 11 1V Ambient Conditions Charge Temperature 0 45 Discharge Temperature 20 60 Humidity 65 20 Overcharged Detection Voltage 13 05 0 025 V Overdischarged Detection Voltage 6 9 0 05 V ...

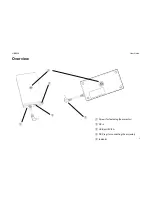
Страница 6: ...HBB056 User Guide 4 Overview Screw for fastening the projector DC in USB port 5V 2A DC Plug for connecting the projector Indicator ...

Страница 7: ...ector to a complete discharge of the battery then recharge it completely Follow the steps below to connect the battery to the projector 1 Place the projector above the battery and make sure the screw on the battery is in line with the screw hole on the back of the projector Note To facilitate the positioning of the screw fit the extended area of the screw hole into the gap on the ring around the s...

Страница 8: ...ry together Turn the screw clockwise and tighten it Plug the DC plug into the DC jacket on the projector and then you can start using the projector 3 You can still connect the tripod to the projector through the screw hole at the bottom of the battery ...

Страница 9: ...r of the main menu The icon will show the capacity of the battery It will start blinking when the capacity is too low Later when you see the warning message below please power the projector with the power adapter or start charging your battery The projector will be off in three minutes Battery Full Low Capacity Warning ...

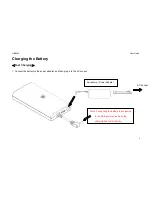
Страница 10: ...attery Fast Charging 1 Connect the battery to the power adapter and then plug it to the AC socket AC Socket Accessory Power Adapter Note Connecting the battery to any device to the USB port may increase the charging time for the battery ...

Страница 11: ...r will turn red when the battery is being charged It takes about 4 hours for the battery to fully charge The indicator will turn green when the battery is fully charged Red the battery is being charged Green the battery is fully charged ...

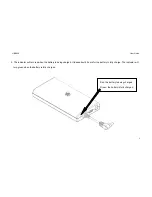
Страница 12: ... You can also charge the battery when the battery is connected to the projector You can use the projector while the battery is being charged The indicator will be green when the battery is fully charged AC Socket Accessory Power Adapter ...

Отзывы: