10
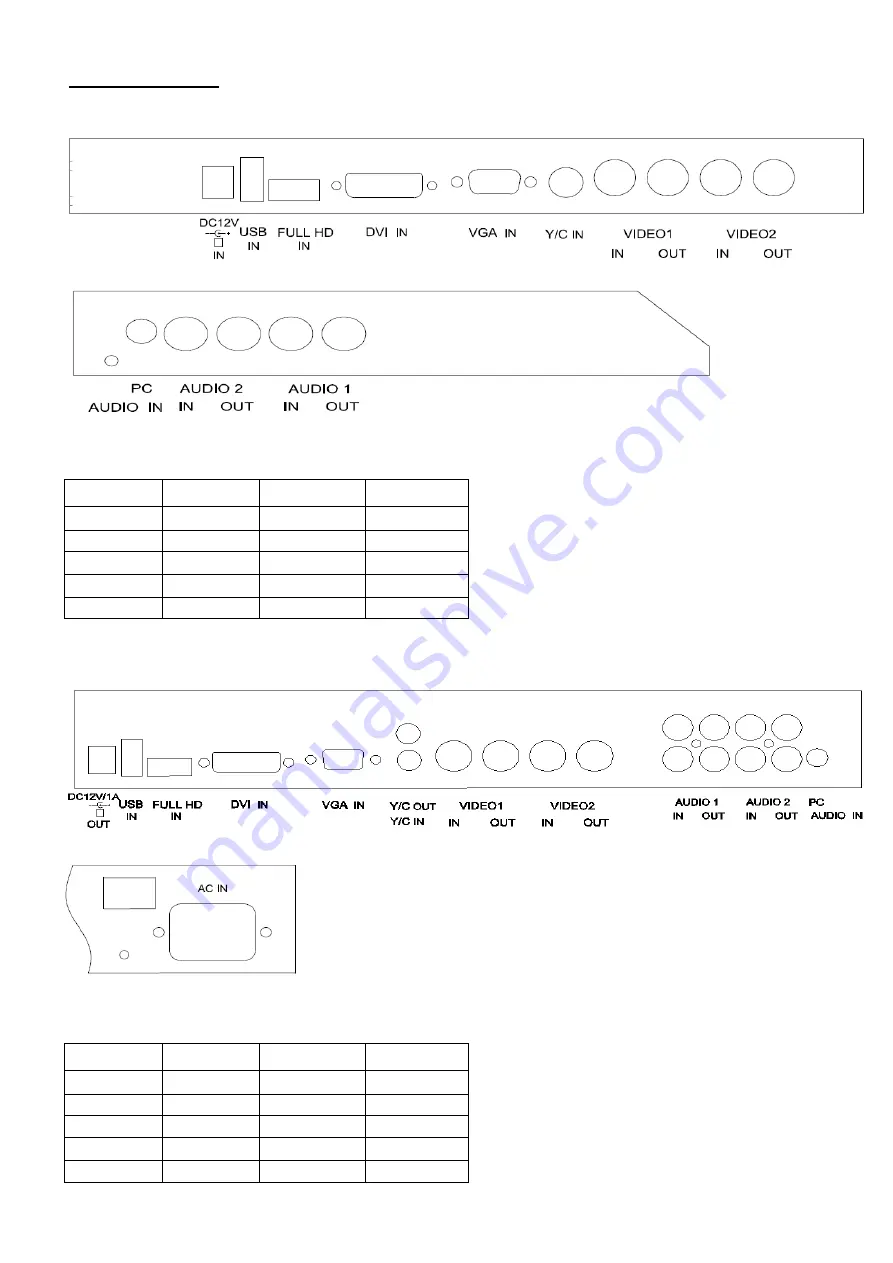
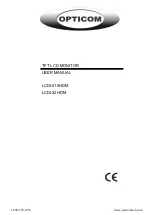
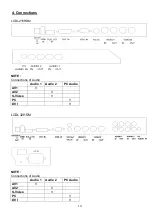
4. Connections
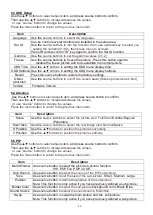
LCDI-215HDM
NOTE :
Connections of Audio
Audio 1
Audio 2 PC Audio
AV1
V
AV2
S-Video
PC
DVI
SLM-2610N,SLM-3200N,SLM-4200N
LCDI-32HDM
Страница 1: ...1 800 578 1853 www opticomtech com TFT LCD MONITOR USER MANUAL LCDI 215HDM LCDI 32HDM...
Страница 2: ...REDUCE THE RISK OF FIRE OR ELECTRIC SHOCK DO NOT EXPOSE THIS PRODUCT TO RAIN OR MOISTURE DO NOT INSERT ANY METALLIC OBJECT THROUGH VENTILATION GRILLS Caution Explanation of Graphical Symbols Danger T...
Страница 3: ...er there is no guarantee that interference will not occur in a particular installation If this equipment does cause harmful interference to radio or television reception which can be determined by tur...
Страница 4: ...d items be missing do not operate the appliance and contact your local dealer Never attempt to repair the appliance yourself This should only be done by qualified service personnel Improper handling o...
Страница 5: ...8 OK Menu Press this button to call up the OSD menu This button is also used as Exit Note The menu button is also used to return to the previous menu 9 Select Directional buttons up down 10 Display Pr...
Страница 6: ...atalog 1 Press USB Key into the JPEG Menu 2 Press MENU Key into the USB Main menu 3 Press Left or Right key to select the JPEG MP3 DRIVE function 4 Press Up Down Key to select play file 5 Press Right...
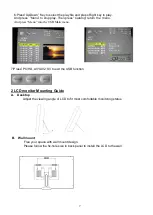
Страница 7: ...t comfortable monitoring status B Wall mount Free your space with wall mount design Please follow the fix hole size in back panel to install the LCD to the wall 6 Press Up Down Key to select the play...
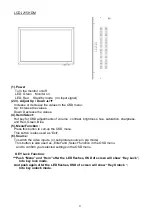
Страница 8: ...8 C VESA Bracket 3 Monitor controls LCDI 215HDM LCDI 215HDM LCDI 32HDM...
Страница 9: ...ess and Red Green Blue 5 Menu Function Press this button to call up the OSD menu This button is also used as Exit 6 Source To switch the video inputs or sub picture source in pip mode This button is a...
Страница 10: ...Connections LCDI 215HDM NOTE Connections of Audio Audio 1 Audio 2 PC Audio AV1 V AV2 V S Video V PC V DVI V LCDI 32HDM NOTE Connections of Audio Audio 1 Audio 2 PC Audio AV1 V AV2 V S Video V PC V DV...
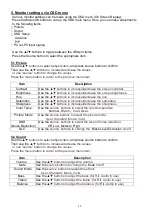
Страница 11: ...e decrease the saturation Sharpness Use the buttons to increase decrease the sharpness Color Temp Use the source buttons to select the color temperature Normal Warm Cool User Picture Mode Use the sour...
Страница 12: ...e buttons to increase decrease the values or use source button to change the values Press the menu button to return to the previous menu item Item Description Scale Use the source buttons to select th...
Страница 13: ...the source buttons to Adjust the best image PC timing Mode Resolution 1 800 x 600 60 2 800 x 600 72 3 800 x 600 75 4 1024 x 768 60 5 1280 x 1024 60 6 1360 x 768 60 7 1440 x 900 60 8 1920 x 1080 60 6...
Страница 14: ...eo input output 2x 2x Composite BNC S Video input 1x 4 Pin Mini Dim Full HD input 1x Full HD A Type Audio input output 2x 2x RCA PC input 1x VGA input D Sub 15 pin 1x DVI D input 1x Audio input Speake...
Страница 15: ...tortion 1 Is the signal cable connected to the unit 2 Is the video input signal within the unit s specified frequency range 1 Make sure the signal cable has been properly connected to the unit 2 Make...