background image

6.  Cycling Between Working Modes

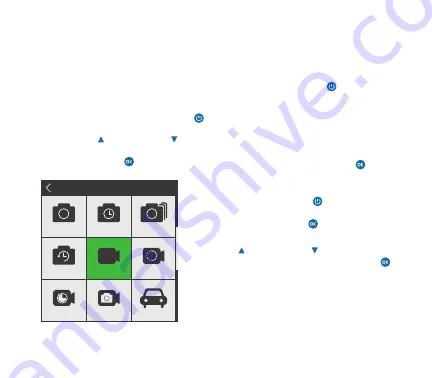
The camera has 9 Working Modes: photo, 
timer photo, burst photo, auto photo, normal 
recording, slow recording, lapse recording, 
rephoto and dashcam. After the 
power is on, press the Power/Mode button   
to enter the Working Mode Menu. Using the 
WiFi Up button   and Down button   select 
the mode you would like to use, then press 
the Shutter/OK button   to enter the mode.

Note: 

Once in a working mode you can quick 

access the Working Mode Menu by pressing 
the Power/Mode button  . 

7.  Working Mode Settings

In Working Mode Settings you can adjust the 
video and camera’s resolution, recording size, 
setting functions and much more.

To access the Working Mode Settings press 
and hold the Shutter/OK button   for 3 
seconds while in a Working Mode.

Once in Working Mode Settings use the 
Power/Mode button   to toggle through 
video, photo, gear or exit icons and press the 
Shutter/OK button   to select.

After selecting an icon, use the WiFi Up button 

 and Down button   to toggle the secondary 

menu and press the Shutter/OK button   
to select.

Note: 

Working Mode Settings can only be 

accessed while in a Working Mode. It cannot 
be accessed in Playback Mode or Working 
Menu Mode.

OPERATING INSTRUCTIONS

Working Mode Menu

Photo

Timer Photo

Burst Photo

Auto Photo

Normal Rec

Slow Rec

Lapse Rec

Rec+Photo

DashCam

Working Mode

Содержание SAFARI 5

Страница 1: ...by OPTEX ACCESSORIES 1 2 SUPER SMOOTH BUILT IN STABILIZATION...

Страница 2: ......

Страница 3: ...sunlight or high temperature 4 Please store your camera in a dry and protective area 5 Lithium battery inside Do not try to open the product and do not expose to heat water moisture or direct sunligh...

Страница 4: ...ower Mode Button 4 HD LCD Display Screen 5 Charging Indicator 6 Busy Indicator 7 Micro USB Port 8 Microphone 9 Micro SD Card Slot 10 Micro HDMI Port 11 Down Button 12 WiFi Up Button 13 Speaker 14 WiFi...

Страница 5: ...en press the Shutter OK button Note This feature is not compatible with all computers Charging Mode is used to charge the camera To select the Charging Mode press the Down button twice and then press...

Страница 6: ...Mode button for 3 seconds when the camera is in the idle state to turn it off 4 Busy Indicator The Busy Indicator light will flicker blue when the camera is recording videos shooting photos and etc W...

Страница 7: ...djust the video and camera s resolution recording size setting functions and much more To access the Working Mode Settings press and hold the Shutter OK button for 3 seconds while in a Working Mode On...

Страница 8: ...for 3 seconds to bring up the Settings menu d Press the Power Mode button twice to toggle down to the cogged wheel icon The icons on the left will be highlighted blue when selected e Use the WiFi Up...

Страница 9: ...t Card Reset Language Format successfull Format Card Reset Language English Notice Format SD Quick format Cancel Confirm F R L Form Notice Format SD Quick format Cancel Confirm Format Card Reset Langu...

Страница 10: ...ng 1 Video icon indicating that the camera is in video recording mode 2 Text indicating recording time of a video 3 SD icon indicating that the Micro SD card is inserted in the camera 4 Microphone ico...

Страница 11: ...s or HD 720p 120fps To set the recording size go into the Working Mode Settings menu Lapse Rec This mode records time lapse video at 10 30 or 60 seconds and 200 300 500 minutes To set the recording ti...

Страница 12: ...icon indication that the camera is in photography mode 2 Text indicating how much space is left on the inserted memory card 3 SD icon indicating that the Micro SD card is inserted in the camera 4 Micr...

Страница 13: ...button and toggle to timer burst or auto photo mode Once in the select mode press the Shutter OK button to take a photo Timer Photo This mode takes a photo with a delayed timer of 1 3 5 10 or 30 seco...

Страница 14: ...appear on the images toggle to the items that you wish to delete and press the Shutter OK button to select it Then toggle back to the trash can icon and press the Shutter OK button again You will be p...

Страница 15: ...he WiFi press the WiFi Up button for 2 seconds 4 Enable the WiFi function of the mobile phone or tablet and wait for the Safari5K network to appear select the connection and enter the password that ap...

Страница 16: ...APP FOR ANDROID AND IOS ATTENTION This APP requires Android 4 1 or more and iOS 7 or more Search Safari Connect 5K...

Страница 17: ...ruction Manual Frame Cage With Clip Mount Straps Quick Release Mount by OPTEX ACCESSORIES 1 2 SUPER SMOOTH BUILT IN STABILIZATION Microfibre Cloth Helmet Mounts Waterproof Housing Angle Adapter Tripod...

Страница 18: ...16 9 1080p 90fps 60fps 30fps 16 9 720p 120fps 16 9 Format MP4 H 265 H 264 Microphone and Speaker built in SLOW MOTION 2K 60fps 1080p 90fps 720p 120fps PHOTO Sony CMOS sensor 16MP Burst timed and auto...

Страница 19: ......

Страница 20: ...Distributed in Canada by Gentec International gentec intl com by OPTEX safaricam ca...

Отзывы: