background image

2

E113211#1

50

6

ca. 3.5 mm

Construction Manual

1. Sand (5) each of the 12 plywood segments (1) on 

two opposing sides as depicted. Then use the other 

sandpaper (4) to smooth the edges.

.

2. Paint the segments’ surface according to your taste. 

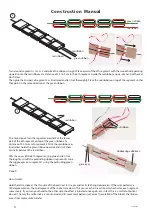
3. EiEach single snake segment consists of two wooden segments. The wooden segments are connected by satin 

ribbons. The gap between two segments should be 3,5 cm to 4 cm. 


Hint: 

  Glue both smooth sides before attaching the ribbon as instructed. Then double-check the location and press the 

segments together. 

4. Cut the red ribbon in half using scissors!

red ribbon 

red ribbon

green ribbon 

red ribbon 

green ribbon 

Front view:

green ribbon 

red ribbon 

red ribbon 

red ribbon 

green ribbon 

A

B

After the glue has set, guide the red ribbons under-

neath segment 1, so that both red ribbons point in 

the same direction like the green ribbon

Glue the two red ribbons as illustrated to the bottom of the 2. segment keeping the same distance like with seg-

ment 1. Pull back the green ribbon centered underneath the segment and glue it between the red ribbons. Glue the 

smooth side of the cover onto the bottom and pull back the green ribbon on the upper side (cf. illustrations).

Hint:

 The gap between two segments should be 3,5 cm to 4 cm!

View from above

View from above

protrusion

Содержание Rattle Snake

Страница 1: ...nnection 2 Satin Ribbon green 1 650 Segment Connection 3 Sandpaper fine 1 120x65 Sandpaper coarse 1 120x65 Please note The OPITEC handicraft packs are not toys in a typical off the shelf sense but rather additional teaching and learning material for educational purposes This craft pack may only be constructed by children and adole scents under the guidance and supervision of experi enced adults No...

Страница 2: ...red ribbon in half using scissors red ribbon red ribbon green ribbon red ribbon green ribbon Front view green ribbon red ribbon red ribbon red ribbon green ribbon A B After the glue has set guide the red ribbons under neath segment 1 so that both red ribbons point in the same direction like the green ribbon Glue the two red ribbons as illustrated to the bottom of the 2 segment keeping the same dis...

Страница 3: ...the second part of segment 3 as illustrated Let the glue set thoroughly Then lie the red ribbons over the segment so that they point in the same direction as the green one green ribbon green ribbon red ribbon red ribbon D red ribbon Turn around segment 1 2 3 Place the ribbons on the segment Put the lower part of the 4th segment onto the green ribbon at a distance of 3 5 to 4 cm to segment 3 Stick ...

Страница 4: ... distance of 3 5 to 4 cm to segment 5 Stick the red ribbons as illustrated Guide the green ribbon upwards and stick them centrally between the red ribbons Affix the cover of the 6th segment using glue and let it set thoroughly Cut off the protruding ribbons segment 6 Glue the wiggle eyes onto segment 1 using the protruding green ribbon Done glue eyes How it works Hold the rattle snake at the thin ...

Отзывы: