Opitec Grand Prix Racing Скачать руководство пользователя страница 7

22

23

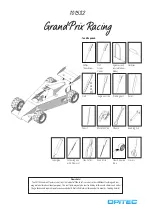
Connect the bent steering finger mount (7a) to the steering finger (7b) 

with a screw (18) and two nuts (21) as shown. Counter nuts for fixing. 

Then connect to the tie rod (6) with a screw (18) and a nut (21).

Position the curved perforated sheet metal strip with two screws (18) 

and two nuts (21) in the intended position as shown.

18

21

7a

7b

18

21

6

24

25

Fasten the finished front axle on both sides to the lower part with one 

screw (19), two nuts (21) and a cap nut (22). Lock upper cap nut and 

nut. 

Tighten the two stub axles with one screw (18) and two nuts (21) at 

both ends of the tie rod. Counter nuts.

14

14

21

21

18

18

2x

2x

19

21

21

22

26

27

Align and fix the handlebar (12) by fastening the two nuts (21). Fasten 

head-on with a cap nut (22).

Screw a nut (21) onto the handlebar (12). Guide the other end of the 

handlebar through the steering finger (7b). Then at this end, also 

unscrew a nut. Then thread the ends of the handlebar into the holes 

in the perforated plate (31).

7b

21

12

31

22

21

12

Instruction 101.658

Grand Prix Racing

Содержание Grand Prix Racing

Страница 1: ...aterial for educational purposes This craft pack may only be constructed by children and adolescents under the guidance and supervision of experienced adults Not suitable for children under 36 months...

Страница 2: ...cer Wheels 2 Attaching wheels 14 Phillips screw 12 Screw Connection 15 Cylinder Head Screw 2 35x3 Screw Connection 16 Cylinder Head Screw 2 70x4 Screw Connection 17 Cylinder Head Screw 15 10x4 Screw C...

Страница 3: ...it to the tin sheet 4 with adhesive tape Mark the position of the holes with the piercer Drill through holes 4 and then saw out the seat with the metal saw blade jigsaw File the saw edges with the wor...

Страница 4: ...lade jigsaw File the saw edges with the workshop file Cut out the template for the construction page 13 and stick it to the tin sheet 3 with adhesive tape Mark the position of the holes with the pierc...

Страница 5: ...tall the second gear on the axle 9 as shown Insert and center the two shafts 13 9 through the holes provided in the mounting brackets as shown 9 13 24 25 21 Instruction 101 658 Grand Prix Racing Bend...

Страница 6: ...bar 7 at the dotted line and at both parts round off the sawing edges with the file as shown Saw out a long hole on the 3 hole strip from 2 holes Then turn part 7a as shown Secure the seat to the int...

Страница 7: ...r part with one screw 19 two nuts 21 and a cap nut 22 Lock upper cap nut and nut Tighten the two stub axles with one screw 18 and two nuts 21 at both ends of the tie rod Counter nuts 14 14 21 21 18 18...

Страница 8: ...e to the free switch connection Cable on Pole of the motor connect 30 Attach the upper part of the body and tighten the screws 15 as shown in the illustration 15 15 32 Screw 2 nuts 21 onto the rear tw...

Страница 9: ...e screws 15 15 3 35 For two wheels 33 insert a reducer 29 into the center bore of the rim as shown 33 29 2x 36 Attach the two wheels 33 with reducer 29 to the rear axle Attach the other two wheels 33...

Страница 10: ......

Страница 11: ...Instruction 101 658 Grand Prix Racing Template lower part M 1 1 Cutting edge...

Страница 12: ......

Страница 13: ...Instruction 101 658 Grand Prix Racing Template lower part M 1 1 Adhesive surface Cutting edge Stencil cover M 1 1 Template seat M 1 1...

Страница 14: ......

Страница 15: ...Instruction 101 658 Grand Prix Racing Template shell M 1 1 adhesive surface Cutting edge...

Страница 16: ......

Страница 17: ...adhesive surface Cutting edge Instruction 101 658 Grand Prix Racing Template shell M 1 1 Template rear spoiler M 1 1...

Отзывы: