


Pyroelectric and Photodiode Energy Sensors
StarBright User Manual
47
2.
Set
Wavelength
to the correct laser wavelength. If this sensor is a metallic type and if the
wavelength you want is not among the wavelengths listed, select one and press
Modify
. Using
the up/down keys to change each number and the right/left keys to move to the next number,
key in the wavelength you want. (The Spectral range is 190-3000.) When finished, press the
Enter
key.
Figure
8-2 Modifying the Wavelength – Pyroelectric Sensor
3.
Set
Pulse Length
to the shortest time that is longer than the expected pulse length. Select a
shorter pulse length setting for higher frequency lasers. Set a longer pulse length setting for
higher energy lasers.
Note:
Some sensors have only the one pulse length setting for all pulse lengths. In that case
N/A appears.
Warning:
Incorrect readings will result if pulse length is not set up correctly.
4.
Set
Diffuser
to
IN
or
OUT
as physically set on the sensor (relevant for sensors with the
Diffuser
option). Make sure to physically insert/remove the Diffuser before continuing measurements.
5.
Set
Threshold
as necessary to screen out false triggers due to noise. Set the hardware
threshold in the sensor to screen out noise that would otherwise be seen as energy pulses. If
the sensor triggers from ambient vibration or noise without a laser signal, raise the
Threshold
level as follows: Use the up/down buttons, raise the threshold until the false triggering stops.
If the sensor does not read the pulses at all on the lowest range, try to lower the threshold to
minimum.
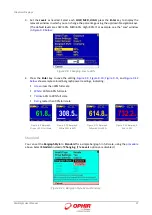
6.
Set
Average
to the period you wish to average power over, or set to
NONE
to disable.
Figure
8-3 Pyroelectric Energy Needle with Average Selection Open