background image

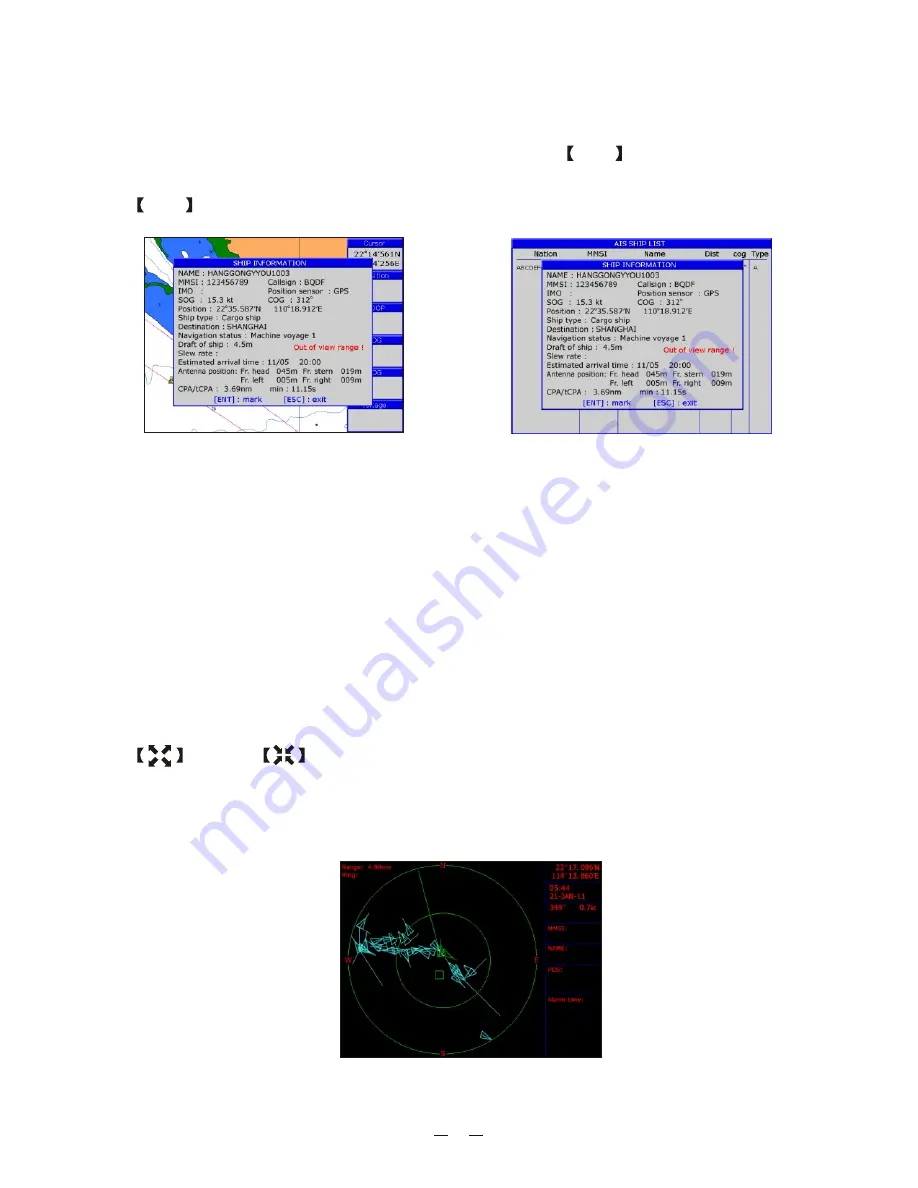
10.5  View AIS vessels' information on chart screen

There're two ways to view AIS vessels' information: one is to move the cursor to 

select AIS vessel on the charts screen, and press the

ENT

key.

The other is to select the AIS vessel from the AIS vessels list, and press the

ENT

key.

10.6  Check all AIS ships within the scope of Radar


Displays all AIS ships within the current scope of the Radar, the current location 

of the own ship is at the center of the map, appearing as a white hollow triangle, 

and the vertex angle of the triangle stands for the current direction of the own

ship, the  blue  hollow  triangle  stands  for  the  vessels  of CLASS B, the green 

hollow triangle stands for CLASS A vessels, the green hollow square stands for 

BASE STATION, and the vertex angle of the triangle stands for the direction of 

the vessel, such as round, and the circle stands for no direction.

The collision alarm setting and the current scope of radar can be displayed on 

the upper  left corner of the radar, and the scope be adjusted by pressing the


key  and


key. 

The message display frame on the upper right corner of the radar displays the 

following information: the own ship's position, the current time, the current 

speed/direction of the own ship.

(AIS screen)

51

Содержание KP-6299

Страница 1: ...KP 6299 OPERATOR S MANUAL KP 6299 MARINE GPS PLOTTER ...

Страница 2: ......

Страница 3: ...lay Range 2 2 5 Shifting the Cursor 2 3 Shifting the Display 6 2 4 Centering Own Ship s Position 6 2 5 Coordinates 6 2 6 Map data 7 2 7 Heading Line 7 2 8 Range Circle 8 2 9 Palette 8 2 10 Map Orientation 9 2 11 Perspective View 9 3 11 TRACK 3 1 11 Changing Track Plotting Interval Stopping Plotting 3 2 12 Displaying the Track 3 3 2 Creating Track Data 1 3 4 Erasing Track 13 3 5 Erasing All Backup ...

Страница 4: ...ng Routes 21 5 3 22 Erasing Routes 6 4 DESTINATION 2 6 1 Setting Destination by Cursor 24 6 2 Setting Destination by Waypoint 25 6 3 25 Setting Route as Destination 6 4 27 Setting Track Data as Destination 6 5 28 Canceling Destination 7 9 ALARM 2 7 1 Anchor Drag Alarm 29 7 2 Arrival Alarm 30 7 3 XTE Cross Track Error Alarm 1 3 7 4 Speed Alarm 1 3 7 5 Voltage Alarm 32 7 6 Time Alarm 32 7 7 Buzzer T...

Страница 5: ...cale 42 9 2 Unit of Measurement 43 9 3 Bearing Reference 44 9 4 Magnetic Variation 44 9 5 Deviation 45 9 6 Time 46 9 7 Speed for Calculating Time To Go Estimated Time of Arrival 46 9 8 GPS setting 47 10 THE AIS FUNTION 49 10 1 Vessels list 9 4 10 2 The collision alarm 9 4 10 3 Own ship s information 50 10 4 Chart Screen 50 10 5 View AIS vessels information on chart screen 51 10 6 Check all AIS shi...

Страница 6: ...racteristics 53 11 2 GPS Receiver Characteristics 54 11 3 AIS interface 54 11 4 Physical 54 11 5 Equipment List 54 12 INSTALLATION 55 12 1 Verifying the contents 55 12 2 Installing the unit 56 12 3 Table of connecting 57 12 4 Display unit size 58 MEMU TREE 59 ...

Страница 7: ... and the design for operation is professional and reasonable can be easy to use The built in Large capacity map storage space provides intuitive and accurate indication to navigation It s applicable to the navigation and position fixing of various vessels at sea and rivers as well as the information collection river management etc For the application for different types of the products please refe...

Страница 8: ...rboard position Turn the power on off adjust the back light brightness The basic input principles for the equipment Press MENU key to enter the menu setting accordingly then press the Arrow keys to move the cursor to select items press ENT to enter The required state Press Arrow keys to select the letter or number The number contains from 0 to 9 the letter contains from A to Z and a to z Press lef...

Страница 9: ...h the last used display mode logo After a few seconds Turning off the power Press and hold down the ON OFF key unit the screen goes blank about four seconds 1 3 Adjusting Brilliance and DIM You can adjust display brilliance as shown below 1 Press the POWER key The adjusting window appears BRILL DIM 1 8 1 8 EXIT ENT 3 ...

Страница 10: ...es PLOTTER SCREEN NAVIGATOR SCREEN POSITION SCREEN SATELATE SCREEN and AIS SCREEN Press the MODE key to choose a display mode Each time the key is pressed the display mode changes in the sequence shown below PLOTTER NAVIGATOR POSITION SATELATE AIS 4 ...

Страница 11: ...gitude at the top left corner of the plotter display when the cursor is on The range and bearing from own ship to the cursor appear at the top left corner of the display too 2 1 Choosing the Display Range You may press to choose display range on plotter and highway displays Cursor Turned Off Press ESC to clear the cursor Cursor position data will be disappear when the cursor is off 2 PLOTTER DISPL...

Страница 12: ...d to place the cursor at an edge of the screen The display shifts in the direction opposite to cursor pad operation 2 4 Centering Own Ship s Position Press the ESC key for centering own Ship s position 2 5 Coordinates 1 Press MENU key in PLOTTER screen 2 Choose COORDINATES and then press ENT key 6 ...

Страница 13: ...ess key 3 Choose the layer ON or OFF as appropriate and then press ENT key to finish 2 7 Heading Line 1 Press MENU key in PLOTTER screen 2 Choose HEADING LINE and then press ENT key 3 Choose OFF VARIABLE or MAX as appropriate and then press ENT key to finish K Chart C MAP 7 ...

Страница 14: ...ss ENT key 3 Choose ON if choose ON you need input the circle radius manually or OFF as appropriate and then press ENT key to finish 2 9 Palette 1 Press MENU key in PLOTTER screen 2 Choose PALETTE and then press ENT key 3 Choose the mode as appropriate and then press ENT key to finish 8 ...

Страница 15: ...N or OFF as appropriate and then press ENT key to finish Perspective View PERSPECTIVE 2 10 Map Orientation 1 Press MENU key in PLOTTER screen 2 Choose MAP DIRECTION and then press ENT key 3 Choose Normal NORTH Upward WPT Upward or BOW Upward as appropriate and then press ENT key to finish 9 ...

Страница 16: ...3 Choose the layer ON as appropriate and then press ENT key to finish 4 Choose the layer OFF as appropriate and then press ENT key to finish 10 ...

Страница 17: ...DE and then press key 3 TRACK 4 Choose TIME DISTANCE AUTO or OFF TIME Track is recorded and plotted at the time interval set DISTACNE Track is recorded and plotted at the distance interval set AUTO Plotting and recording interval changes with display range selected OFF Track is neither recorded nor plotted 5 For TIME and DISTANCE enter the recording interval as follows a Press the key b Use or sel...

Страница 18: ...Choose the color and Choose turn it ON or OFF 4 Press MENU key to finish 3 3 Creating Track Data 1 Press the MENU key twice to main menu 2 Choose TRACK RECORD and then press key 3 Choose SAVE CURRENT TRACK and then press ENT key The following window will appear Track Data can use for navigation 12 ...

Страница 19: ... Saved track 4 Choose the color that you want to erase or choose ALL if you want to erase all and then Press ENT key The following window will appear 3 5 Erasing All Backup Data 1 Press MENU twice to main menu 2 Choose ERASE and then press key 3 Choose ALL BACKUP DATA and then press ENT key The following window will appear Menu to main menu 13 ...

Страница 20: ...pad to place the cursor on the location desired for a waypoint 2 Press the ENT key The following window appears 3 This window is where you can rename edit LON and LAT choose mark shape and color and enter a comment 4 Choose SAVE to finish Entering a waypoint at own ship position 1 Momentary Press ENT key when no cursor is appear The following window appears 2 If you no need to change anything choo...

Страница 21: ...MENU key twice to main menu 2 Choose EDIT and then press key 3 Choose WAYPOINT and then press ENT key The following window will appear 4 Choose NEW then press ENT key The following window appears 5 If you no need to change anything choose SAVE to finish 15 ...

Страница 22: ...T key Choose NO saves the position as a waypoint call MOB 4 3 Displaying Waypoint Name You may display waypoint name as Follows 1 Press the MENU key on the PLOTTER SCREEN 2 Choose WAYPOINT and then press the ENT key the following window will appear 3 Choose ALL GOTO ROUTE or ALL as appropriate and then press the ENT key ALL Displays all waypoint names GOTO Displays only the GOTO waypoint name ROUT...

Страница 23: ... main menu 2 Choose EDIT and then press key 3 Choose WAYPOINT and then press the ENT key The following window will appear 4 Choose waypoint to edit and then press the ENT key The following window will appear 5 Choose objective desired and then press the ENT key 6 Change name position mark shape mark color comment as desired 7 Choose SAVE and then press ENT to finish 17 ...

Страница 24: ...ress ENT key 5 The confirm window will appear choose ERASE and then press ENT key 6 choose YES and then press ENT to finish 01 Erase All Waypoints 1 Press the MENU key twice to main menu 2 Choose ERASE and then press key 3 Choose ALL WAYPOINT MOB and then press ENT key The confirming window will appear 4 Choose YES and then press ENT to erase all wayp oints 18 ...

Страница 25: ...ng Routes 1 Press MENU key twice to main menu 2 Choose EDIT and then press key 3 Choose ROUTE and then press ENT key The following window will appear 4 Choose NEW and then press ENT key The following window will appear 19 ...

Страница 26: ...g will appear 6 Choose location e g 01 and then press ENT key Will open a new window let you choose waypoint 7 Choose the waypoint name and then press ENT key In example 001 You can also create a new waypoint if needed 8 Repeat step 6 and 7 until compete the route 20 ...

Страница 27: ...en press ENT key 4 Choose the route to edit and then press ENT key 5 Place the cursor on the waypoint to replace press the ENT to show the route options 6 Choose CHANGE and then press ENT key Will show the waypoint select window 7 Choose the waypoint name that you want to replace and then press ENT key 8 Repeat step 5 to 8 until finish edit 21 ...

Страница 28: ...press ENT key 4 Choose the route desired and then press ENT key 5 Choose the waypoint you want to delete and then press ENT key to show the route edit options 6 Choose REMOVE and then press ENT key to finish 5 3 Erasing Routes 1 Press the MENU key twice to main menu 2 Choose EDITTION and then press key 3 Choose ROUTE and then press the ENT key 22 ...

Страница 29: ...press key 3 Choose ALL ROUTE and then press ENT key The confirming window will appear 4 Choose YES and then press ENT to erase all routes 4 Select a Route then press ENT 5 The confirm window will appear choose ERASE and then press ENT 01 6 Choose YES and then press ENT to finish 23 ...

Страница 30: ...6 DESTINATION 6 1 Setting Destination by Cursor 1 Press FUN key 2 Choose GOTO CURSOR and then press ENT key 3 The cursor appears with 4 Use the cursor pad to place the cursor on the location desired for destination 5 Press the ENT key CURSOR set as destination 24 ...

Страница 31: ...stination by Waypoint 1 Press the FUN key 2 Choose GOTO WPT and then press ENT key 3 The SELECT GOTO WPT list appears 4 Choose a Waypoint and then press ENT key 6 3 Setting Route as Destination 1 Press the FUN key 25 ...

Страница 32: ...owing window appears 5 Choose Forward or Reverese in order in which to traverse the route waypoints and then press ENT key Intermediate Point 1 WPT A ROUTE 01 Intermediate Point 2 WPT B Arrival point WPT SW FORWARD REVERSE WPT 001 Starting point Intermediate point 1 WPT C Meaning of forward and reverse 26 ...

Страница 33: ...y 6 4 Setting Track Data as Destination Track Data can use for navigation 1 Press the FUN key to display the GOTO options window 4 Choose Track Log to display the following menu 5 Choose Forward or Reverese to start GOTO TRACK navigation 27 ...

Страница 34: ...two track log points stored in memory to create a track route If the receiver is turned off or satellite coverage is lost during your trip it will draw a straight line between any point where coverage was lost and where it resumed If your track s changes in distance and direction are too complex 200 waypoints may not mark your path accurately The receiver than assigns the 200 waypoints to the most...

Страница 35: ...When the alarm setting is violated the buzzer sounds and the name of offending alarm and the alarm icon appear on the display You can silence the buzzer and remove the alarm name indication by pressing any key The alarm icon remains on the screen until the reason for the alarm is cleared Alarm message 7 1 Anchor Drag Alarm 1 Press MENU key twice to main menu 2 Choose ALARM and then press key to di...

Страница 36: ...N and then press ENT key to enable the alarm 7 2 Arrival Alarm 1 Press MENU key to display MAIN MENU 2 Choose ALARM and then press key to display alarm menu 3 Choose ARRIVAL and then press ENT key The alarm options appear 4 Choose item 3 and then press ENT to setup alarm value 5 Choose ON and then press ENT key to enable the alarm 30 ...

Страница 37: ...oose item 3 and then press ENT to setup alarm value 5 Choose ON and then press ENT key to enable the alarm 7 4 Speed Alarm 1 Press MENU key twice to main menu 2 Choose ALARM and then press Key to display alarm menu 3 Choose SPEED and then press ENT key The alarm options appear 4 Choose item 3 and then press ENT to setup alarm value 5 Choose ON and then press ENT key to enable the alarm 31 ...

Страница 38: ...item 3 and then press ENT to setup alarm value 5 Choose ON and then press ENT key to enable the alarm 32 7 6 Time Alarm 1 Press MENU key to main menu 2 Choose ALARM and then press key to display alarm menu 3 Choose TIMER and then press ENT key The alarm options appear 4 Choose item 3 and then press ENT to setup alarm value 5 Choose ON and then press ENT key to enable the alarm ...

Страница 39: ... alarm setting is violated 1 Press the MENU twice to main menu 2 Choose ALARM and then press key 3 Choose BUZZER and then press key 4 Choose buzzer type desired and then Press ENT key SHORT Two short beeps LONG Three long beeps CONSTANT Continuous beeps 33 ...

Страница 40: ...ow appears 1 Press FUN key 2 Choose DRAWING and then press key 3 Choose MARK and then press ENT key The cursor appears with On the PLOTTER SCREEN 5 Edit Lat Lon or mark and then choose SAVE to finish Changing the SYMBOB and COLOR 1 Move the cursor to MARK and press ENT 2 3 to finish Use select color or symbol then press ENT Select save or 34 ...

Страница 41: ...ace name 1 Press MENU key twice to main menu 2 Choose EDIT and then press key 3 Choose DRAWING PLACENAME and then press ENT key 4 The cursor appear with a 5 Use the cursor pad place the cursor on the location desired add a name and then press ENT key On the PLOTTER SCREEN 8 2 Drawing Lines 4 The cursor appear with a 1 Press FUN key 2 Choose DRAWING and then press key 3 Choose LINE and then press E...

Страница 42: ...MENU key twice to main menu 2 Choose EDIT and then press key 3 Choose Drawing marks and then press ENT key The following window appears 4 Select a mark for edit then press ENT 5 After edit choose SAVE and then press ENT key to finish 36 ...

Страница 43: ...ey 3 Choose DRAWING LINES and then press ENT key The following window appears 4 Choose the line that you want to edit and then press ENT key The following window appears 5 Choose the point that you want to edit and then press ENT key 6 After edit choose SAVE and then press ENT key to finish 37 ...

Страница 44: ...Choose EDIT and then press key 3 Choose DRAWING PALCENAME and then press ENT key The following window appears 5 Choose the place name that you want to edit and then press ENT key The following window appears 6 After edit choose SAVE and then press ENT key tofinish ABC 38 ...

Страница 45: ...ark that you want to clear and then press ENT key The confirmation window will appears 5 Choose ERASE and then press ENT to finish Erasing All Drawing Marks 1 Press MENU key twice to main menu 2 Choose ERASE and then press Key 3 Choose ALL DRAWING MARKS and then press ENT key The confirmation window will appears 4 Choose YES to erase all drawing marks 39 ...

Страница 46: ...at you want to erase and then press ENT key The confirmation window appears 5 Choose ERASE and then press ENT to finish Erasing All Drawing Line 1 Press MENU key twice to main menu 2 Choose ERASE and then press key 3 Choose ALL DRAWING LINES and then press ENT key The confirmation window will appears 4 Choose YES to erase all drawing lines Menu to main menu 40 ...

Страница 47: ...place name that you want to erase and then press ENT key The confirmation window appears 5 Choose ERASE and then press ENT to finish Erasing All Drawing Place Name 1 Press MENU key twice to main menu 2 Choose ERASE and then press key 3 Choose ALL DRAWING NAME and then press ENT key The confirmation window will appears 4 Choose YES to erase all place names ABC 41 ...

Страница 48: ... You can change the map scale display format 1 Press MENU key twice to main menu 2 Choose SETUP and then press key 3 Choose MAP SCALE and then press ENT key 4 Choose RATIO or MILES as appropriate and then press ENT key to finish 42 ...

Страница 49: ...iles per hour 1 Press MENU key twice to main menu 2 Choose SETUP and then press key 3 Choose SPEED UNIT and then press ENT key 4 Choose nm kt km km h or sm mph as appropriate and then press ENT key to finish 5 Choose DEPTH and then press key 6 Choose Feet ft Fathom fa or Meter m as appropriate and then press ENT key to finish 43 ...

Страница 50: ...E or MAGNETIC as appropriate and then press ENT key to finish 9 4 Magnetic Variation The location of the magnetic north pole is different from the geographical North Pole This causes a difference between the true and magnetic north direction This difference is called magnetic variation and varies with respect to the observation point on earth Your unit is preprogrammed with all the earth s magneti...

Страница 51: ...s key 9 5 Deviation You can input the deviation of ship or map manually to correct the position error from GPS error or map error 1 Press MENU key twice to main menu 2 Choose SETUP and then press key 3 Choose DEVIATION and then press ENT key 4 Input the value as appropriate and then press ENT to finish To disable deviation input 0 into the value 45 ...

Страница 52: ...en press key 4 Input the time different if necessary Choose 24HOUR or 12HOUR as appropriate and then press ENT key to finish 9 7 Speed for Calculating Time To Go Estimated Time of Arrival To calculate time to go and estimated time of arrival enter your speed as below 1 Press the MENU key twice to main menu 2 Choose SETUP and then press key 3 Choose TTG ETA SPEED and thenpress ENT key 4 Choose AUTO...

Страница 53: ... default using GPS module single for position fixing On the other hand you can use external GPS data for position fixing 1 Press MENU key on the SATELATE SCREEN 2 Choose and then press ENT key OUTPUT 3 Select your desired output data press ENT to finish 47 ...

Страница 54: ...y 3 Choose your desired datum and press ENT to confirm 2 Choose POS smooth for enter position smoothing data 3 Choose SOG smooth for enter speed smoothing data 4 Choose COG smooth for enter course smoothing data 9 8 3 Smoothing You can setup position smoothing speed smoothing and course smoothing 1 Press MENU key on the SATELATE SCREEN 48 ...

Страница 55: ...essels list 1 Press MENU on the AIS SCREEN 2 Choose AIS Detail LIST and then press ENT key 10 2 The collision alarm 1 Press MENU on the AIS SCREEN 2 Select CPA Limit or TCPA limit enter value 3 Select CPAAlarm or TCPAAlarm and select ON or OFF 49 ...

Страница 56: ... the antenna height the location draught etc please consult the suppliers Before inputting the information the system may not be able to work or can only receive the information Own Ship Info On the AIS Screen press ENT key 10 4 Chart Screen Users can check all AIS vessels being received in real time on the chart screen as well as the specific position and track of the own ship on the charts The t...

Страница 57: ...he triangle stands for the current direction of the own ship the blue hollow triangle stands for the vessels of CLASS B the green hollow triangle stands for CLASS A vessels the green hollow square stands for BASE STATION and the vertex angle of the triangle stands for the direction of the vessel such as round and the circle stands for no direction The collision alarm setting and the current scope ...

Страница 58: ...not be deleted if the emergency alarm information is not read after exiting the alarm menu the emergency alarm window will pop up a little latter The warning ship displayed on the Radar will be yellow and flashing 10 8 Entry Departure setting The Entry Departure setting is for temporarily shut down or restart the collision alarm when entering the port the collision alarm will be temporarily closed...

Страница 59: ... points each let you retrace your path in both directions XTE Anchor drag arrival speed voltage proximity waypoint and time ais alarm Normal Daylight exposed to sunlight Night in dark environment NOAA paper chart colors Tide data Mercator projection Lat Lon Built in Onwa K Chart External Map SD Cards slot for C Map MAX xternal Nav Data Internal backup of user settings or e SD card 1s to 99h or 0 0...

Страница 60: ... to GPS time Dynamics Altitude 18 000m Max Velocity 500 m s Acceleration 4g Max Datum WGS 84 Interfaces NEMA 0183 input and ouput RS 232output Antenna KA 07 11 3 Size Weight Display Waterproofing Temperature range AIS interface Physical 11 5 EQUIPMENT LIST Data intput Nmea0183 Rs232 Baud rate 38400 4800 11 4 228mm H 138mm W 79mm D 0 9kg Display unit IPX5 Antenna unit IPX6 Display unit 15 to 55 Ant...

Страница 61: ... 12 INSTALLATION 12 1 Verifying the contents When opening the box please verify that all items in the following drawing are present Control Display Unit Mounting Bracket GPS Antenna Operation Manual Spare Fuses 1 1 ONWA ...

Страница 62: ...sure that the space between the rear side of the unit and the wall is more than 10cm 2 Fix the unit to the mounting bracket firmly with the knobs so as to prevent it to get out of the bracket while running 12 2 Installing the unit Notice The unit should be mounted on a flat solid surface for maximum stability Be sure to fix the mounting bracket with screws Otherwise the display unit may fall down ...

Страница 63: ...necting Antenna urple Brown 0 Red Orange Yellow Green Temp P GND Gray 0183IN 0183IN RS 422OUT A RS 422OUT B RS 232OUT 5V Power Supply Receptacle Dc input Dc input 11 to 40V FUSE DATA INPUT OUTPUT OPTION 57 Antenna ONWA ...

Страница 64: ...12 4 Display unit size 58 ...

Страница 65: ...E MAGNETIC MAG REF AUTO MANUAL DEVIATION LAT 00 000 LON 00 000 TIME 24H 00 TTG ETA SPEED AUTO MANUAL SIMULATION LANGUAGE ENGLISH VIETNAMESE MODE ON OFF SPEED 20KT LAT 30o 38 136 N ERASE ALL WAYPOINTS MOB YES NO ALL ROUTES YES NO CURRENT TRACK SAVED TRACK 1 2 3 4 5 6 7 8 ALL ALL DRAWING MARKS YES NO ALL DRAWING LINES YES NO ALL DRAWING NAME YES NO MAP SOURCE BUILT IN USER LOAD DEFAULT SETTING YES N...

Страница 66: ... OFF VOLT 8 50V TIMER MODE ON OFF TIME 050MIN BUZZER MODE SHORT LONG CONST EDIT WAYPOINT WAYPOINT EDIT MENU ROUTE ROUTE EDIT MENU DRAWING MARK MARK EDIT MENU DRAWING LINE LINE EDIT MENU DRAWING PLACENAME NAME EDIT MENU PROXIMITY PROX WPTEDIT MENU DATA IN LOADSD DATA DATA INPUT MENU DATA OUT SAVE SD DATA DATA OUTPUT MENU MAIN MENU CONTINUE 60 WARNING MESSAGE ...

Страница 67: ...WPT FUNCTION GOTO ROUTE GOTO ROUTE FUNCTION GOTO TRACK GOTO TRACK FUNCTION STOP GOTO TURN OFF GOTO TIDE TABLE TIDE TABLE FUNTION SEARCH SEARCH FUNCTION DRAWING MARK NAME LINE PLOTTER SCREEN NAVIGATOR SCREEN POSITION SCREEN SATELATE SCREEN AIS SCREEN 61 CALENDAR ...

Страница 68: ...OFF ROADS ON OFF POI ON OFF LAT LON GRID ON OFF CHART BOUNDARIES ON OFF VALUE ADDED DATA ON OFF CHART LOCK ON OFF UNDER WATER OBJ 20MT ROCKS OFF ICON ICON DEPTH OBSTRUCTION OFF ICON ICON DEPTH DIFFUSERS OFF ICON ICON DEPTH WRECKS ON OFF ALL ON OFF DISPLAY ALL GOTO ROUTE OFF DISPLAY OFF VARIABLE MAX DISPLAY ALL GOTO ROUTE OFF DISPLAY ON OFF DISPLAY NORMAL DAYLIGHT NIGHT NOAA DISPLAY NORTH UP WAT UP...

Страница 69: ...TION HDOP BEARING RANGE SOG COG XTE ETA TTG TIME VOLTAGE DESTINATION DATE LUNAR DATE MENU NAV NORTH UP WPT UP BOW UP SETUP DATA FIELD POSITION HDOP BEARING RANGE SOG COG XTE ETA TTG TIME VOLTAGE DESTINATION DATE LUNAR DATE 63 ...

Страница 70: ... TCPA ALARM ON OFF TCPA LIMIT 10MIN MENU SAT INPUT INTERNAL EXTERNAL OUTPUT OFF GGA GLL RMC NO SBAS OFF ON POS SMOOTH 010 SOG SMOOTH 060 COG SMOOTH 005 AIS SHIP LIST DATUM WGS84 LISTING GPS 64 BUAD RATE 4800 9600 19200 38400 DATA FIELD SETUP CPA STATUS ...

Страница 71: ......

Отзывы: