HOBO Pendant MX Temp (MX2201) and Temp/Light (MX2202) Logger Manual
1-508-759-9500 (U.S. and International) 2
www.onsetcomp.com
1-800-LOGGERS (U.S. only)
Logger Components and Operation
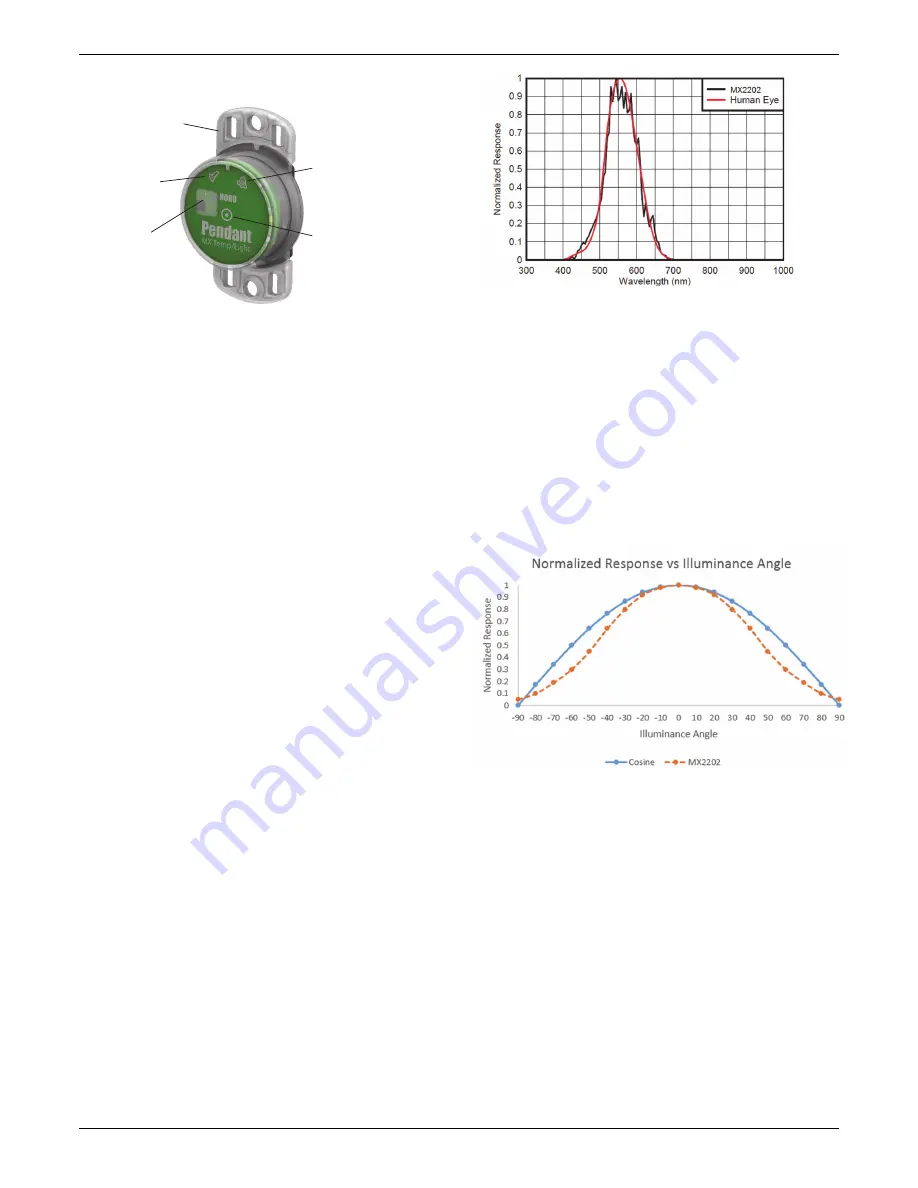
MX2202 model shown
Mounting Tab:
Use the tabs at the top and bottom of the
logger to mount it (see
Deploying and Mounting the Logger
).
Temperature and Light Sensors:
The temperature sensor
(MX2201 and MX2202) and light sensor (MX2202) are located
on the right side of the logger. See
Light Measurement
for more
details on the light sensor.
Status LED:
This LED blinks green every 4 seconds when the
logger is logging (unless Show LED is disabled as described in
Configuring the Logger
). If the logger is waiting to start logging
because it was configured to start On Button Push or with a
delayed start, it blinks green every 8 seconds. Both this LED and
the Alarm LED blink once when you press the start button to
wake up the logger before configuring it. If you select Illuminate
Logger in the app, both LEDs light up for 5 seconds (see
Getting
Started
for more details).
Alarm LED:
This LED blinks red every 4 seconds when an alarm
is tripped (unless Show LED is disabled as described in
Configuring the Logger
).
Start Button:
Press the button on the front of the logger case
for 1 second to wake up the logger (unless Bluetooth Always On
is enabled as described in
Configuring the Logger
). Both LEDs
blink and the logger moves to the top of the devices list in the
app. You may need to press the button a second time to wake
up the logger if it is logging every 5 seconds or faster and the
temperature is -10°C (14°F) or below. Press the button for 3
seconds to start or stop the logger when it is configured to start
or stop On Button Push (see
Configuring the Logger
). Both LEDs
blink four times when you press the button to start or stop
logging. Press the button for 10 seconds to reset a password.
Note:
The circle on the front of the logger represents the
button area on the logger. You will not feel an actual button
push when you press that area; this is normal.
Light Measurement (MX2202)
The logger measures light intensity in units of lumens/ft
2
or lux.
The light sensor in the MX2202 has a spectral response that
tightly matches the photopic response of the human eye. This is
shown in Plot A.
The light sensor has range of 0 to 167,731 lux (15,582 lum/ft
2
).
The resolution of the light measurement varies from 1 unit of
lux or lum/ft
2
in very dim light to 40 lux (4 lum/ft
2
) for a full
scale measurement.
Plot A
Light Measurement Accuracy
Although the MX2202 is factory calibrated to account for the
light attenuation of the plastic enclosure, you may notice a
significant difference in the MX2202 reading compared to a
commercially available lux meter. Ideally, a light meter’s
response should be proportional to the cosine of the angle at
which the light is incident. The MX2202 does not collect light
exactly according to this rule. Plot B illustrates the difference
between an ideal cosine response and the approximate
response of the MX2202. For example, given an incident angle
of 60°, the MX2202 response is 40% lower than the ideal
response. The MX2202 is calibrated to give best results for
direct illumination, but this is not always the case.
Plot B
Getting Started
Install the app to connect to and work with the logger.
1.
Download HOBOconnect to a phone or tablet from the App
Store® or Google Play™
Download the app to a Windows computer from
www.onsetcomp.com/products/software/hoboconnect.
2.
Open the app and enable Bluetooth in the device settings if
prompted.
3.
Firmly press the circular button near the center of the
logger to wake it up. Both LEDs on the logger blink once
when it wakes up.
4.
Tap Devices and then tap the logger in the app to connect
to it.
Alarm LED
Status LED
Temperature and
Light Sensors
Mounting
Tab
Start
Button


