Onlab ONDRIVE ED07 Скачать руководство пользователя страница 8

V1.1-ENG 


www.onlab.com.tr 

gets out from “Programming Mode”. Otherwise, if ESC button is pressed, device returns into 
previous menu. 


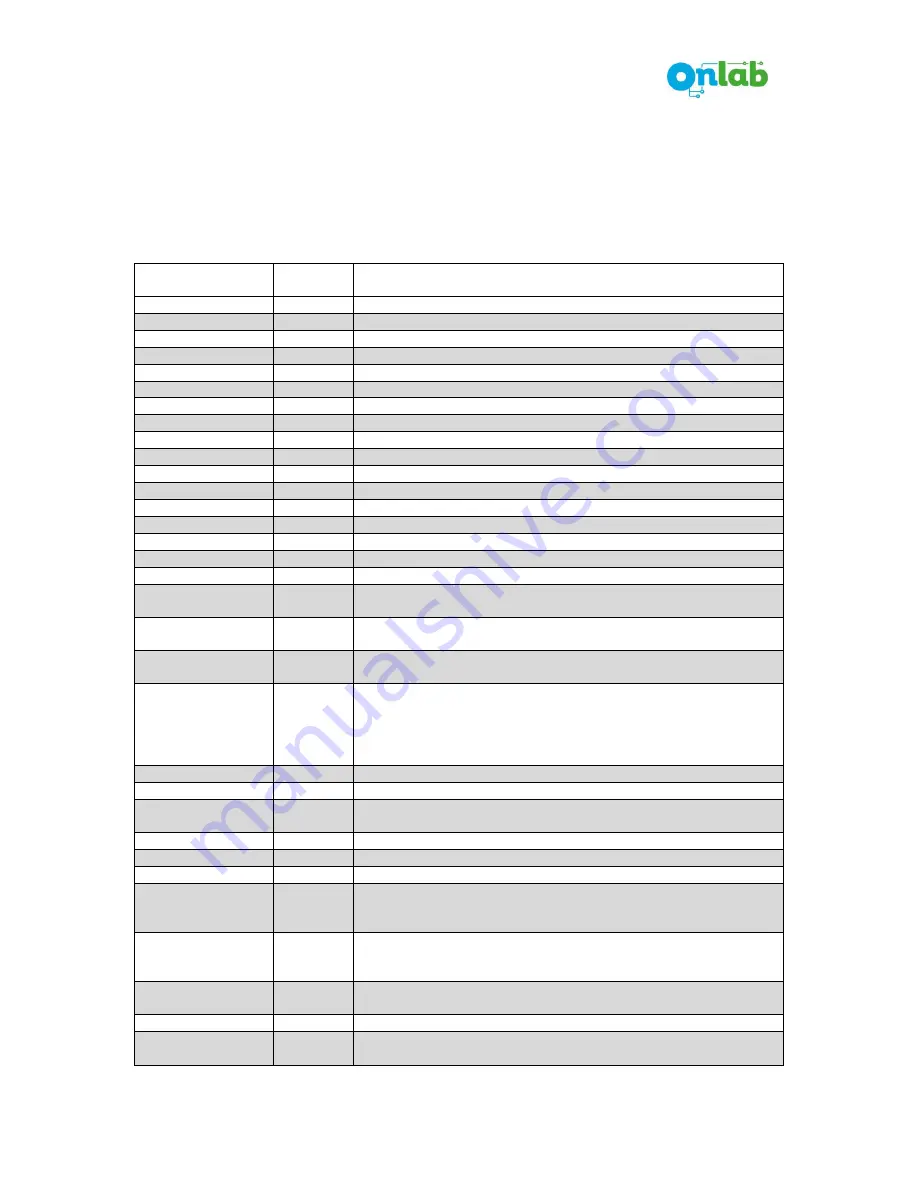
Pressing ENTER button in main menu, displayed program can be started. 


If the program has a parameter value, an arrow is displayed at the beginning of lower LCD line. 
Parameter value can be changed via DOWN and UP buttons. When ENTER button is pressed, 
displayed value is stored. Otherwise, if ESC button is pressed previously stored value is stored 
again. 

Program  

Factory 
Settings 

Parameters / Explanations 

00: Language 

Turkce 

Turkce – English 

01: Open HighSpeed 

35 cm/s 

20-80 (High speed level while opening) 

02: Open LowSpeed 

5 cm/s 

2-19 (Low speed level while opening) 

03: Op. Acc. Dist. 

20 cm 

5-90 (Total distance of acceleration region while opening) 

04: Op. Acc. Jerk 

5 cm 

1-40 (Distance of acceleration jerk region while opening) 

05: Op. Dec. Dist. 

15 cm 

5-90 (Total distance of deceleration region while opening) 

06: Op. Dec. Jerk 

5 cm 

1-40 (Distance of deceleration jerk region while opening) 

07: Op.LowSpdDist 

2 cm 

1-90 (Distance of low speed region while opening) 

08: Op.Pres.Level 

% 60 

20-100 (Pressure level while opening. % of motor nominal current) 

09: Cl.High Speed 

25 cm/s 

20-80 (High speed level while closing)  

10: Cl.Low Speed 

5 cm/s 

2-19 (Low speed level while closing) 

11: Cl.Acc.Dist. 

20 cm 

5-90 (Total distance of acceleration region while closing) 

12: Cl.Acc.Jerk 

5 cm 

1-40 (Distance of acceleration jerk region while closing) 

13: Cl.Dec.Dist. 

15 cm 

5-90 (Total distance of deceleration region while closing) 

14: Cl.Dec.Jerk 

5 cm 

1-40 (Distance of deceleration jerk region while closing) 

15: Cl.LowSpdDist 

5 cm 

1-90 (Distance of low speed region while closing) 

16: Cl.Pres.Level 

% 45 

20-100 (Pressure level during closing. % of motor nominal current) 

17: Run InputType 

Open - 

Close 

Open - Close, Close 
(Selection of door operation with inputs.) 

18: Limit Relays 

Open 

Contact 

Open Contact, Close Contact 
(Selection of limit relay operation when reached to limit) 

19: Fault Relay 

Open 

Contact 

Open Contact, Close Contact 
(Fault relay operation if an error or photocell signal is detected)  

20: Demo Mode 

0 s 

0 – 30 
(Time for demo operation. 0 means demo is cancelled. Any value other 
than 0 runs the door in demo mode in which door opens and closes 
consecutively whatever the input signals are. At opened limit and closed 
limit door waits for selected time.) 

21: SetUserPassw. 


 (User password can be set.) 

22: CancelU.Pass? 


(User password is changed with 0000 and cancelled) 

23: Cl.LowSpdPres 

% 45 

20-100 
(Pressure level at closing low speed region. % of motor nominal current) 

24: EIN1 Input 

Nudging 

Nudging / Photocell 

25: EIN2 Input 

Photocell 

Nudging / Photocell 

26: Door Type 

Telescopic 

Telescopic-Central-Internal 

27: Motor Type 


Motor 1-Motor 2- Motor 3 (This parameter cannot be modified, 
preprogrammed by Onlab according to the motor type the driver is 
matched at the production) 

28: Working Mode 

NORMAL 

NORMAL / SOFT CLOSE 
(If this parameter is selected as SOFT CLOSE, door press level does not 
exceed 150 N during closing operation) 

29: Encoder Match 

Passive 

Active-Passive (After the serial production in Onlab, encoder matching 
process is done. Drivers are sent to the customer after this operation.) 

Manufact. Set. 


CAUTION! Only the door manufacturer can reach those parameters. 

99: Factory Set ? 


(If this parameter is set, all of the parameter values will be reset to 
factory settings.) 

*Factory Setting values can be different in customer specific software.


Содержание ONDRIVE ED07

Страница 1: ...V1 1 ENG www onlab com tr ONDRIVE ED07 Automatic Door Controller User Manual ...

Страница 2: ...prior notice The latest version of this document can be reached from www onlab com tr web site Onlab is not responsible for the mistakes in this document that may cause any fault or damage Onlab Elektrik Elektronik Bilişim Sanayi ve Ticaret AŞ Sanayi Mahallesi Teknopark Bulvarı No 1 3A Z06 34906 Pendik İSTANBUL Tel 0216 504 54 21 Fax 0216 504 54 22 Web www onlab com tr E Mail info onlab com tr Mod...

Страница 3: ...BUTTON DEFINITIONS IN INSPECTION MODE AND USAGE INFORMATION 4 PROGRAMMING Ver 1 01 4 USER PASSWORD SETTINGS 6 MOTION PROFILES 6 Motor Types 6 CONNECTION TO ELEVATOR CONTROL PANEL 7 OUTPUT RELAYS AND INPUT SIGNALS MONITORING MENU 8 LEARNING THE DOOR 9 ENCODER MATCHING 10 MANUFACTURER SETTINGS 11 ERROR MESSAGES 12 ...

Страница 4: ...se signal input ENCODER PE Earth OUTPUT FL1 Common terminal of fault relay 5V supply for encoder FL2 NO terminal of fault relay GND supply for encoder OP1 Common terminal of door opened relay A A channel of encoder OP2 NO terminal of door opened relay A A channel of encoder CL1 Common terminal of door closed relay B B channel of encoder CL2 NO terminal of door closed relay B B channel of encoder Z...

Страница 5: ...oder Resolution 100 2048 ppr Encoder Voltage 5 Vdc USER INTERFACE Language Options Turkish English Screen 2x16 Character LCD Button 4 buttons Warning Sound Buzzer INPUTS Open the door Close the door Programmable input 1 Nudging Photocell Programmable input 2 Photocell Nudging OUTPUTS Fault relay 5A 250Vac or 30Vdc Door opened relay 5A 250Vac or 30Vdc Door closed relay 5A 250Vac or 30Vdc ERROR TYPE...

Страница 6: ...ble that will be used to connect ENCODER should be 8x0 22mm2 stranded wire and cable length should be smaller than or equal to 1 75m It is strongly advised to use shielded cable for encoder connection and shield of this cable can be connected to PE terminal if it is needed Encoder cable connection must be done with the correct order according to the colors given below Otherwise the device will giv...

Страница 7: ...on if the UP button is hold as pressed and door moves to opening direction if the DOWN button is hold as pressed It is needed to press ENTER button to get out from Manual Motion mode ENTER By holding this button pressed for 2 seconds Programming Mode will be active UP If this button is pressed Total Run number of the door is shown on the LCD screen for 5 seconds DOWN If this button is pressed lear...

Страница 8: ...pdDist 5 cm 1 90 Distance of low speed region while closing 16 Cl Pres Level 45 20 100 Pressure level during closing of motor nominal current 17 Run InputType Open Close Open Close Close Selection of door operation with inputs 18 Limit Relays Open Contact Open Contact Close Contact Selection of limit relay operation when reached to limit 19 Fault Relay Open Contact Open Contact Close Contact Fault...

Страница 9: ...s Ondrive device has 3 different PM synchronous motor options from different motor manufacturers When ordered Ondrive device will be preprogrammed with the appropriate motor type according to the desired motor option and will be sent to the user with that setting Motor 1 Motor 2 Motor 3 Detailed mechanical and electrical parameters of the motors can be reached from Onlab website Time sec P07 P05 P...

Страница 10: ...en the door NO contact RA RK OPEN CLOSE CONTROL PANEL 1000 24 VDC 100 24 VDC K15 K5 K3 RK Close the door NO contact EIN2 EIN1 15V GND B B Z Z EIN1 Nudging contact EIN2 Photocell contact ONDRIVE COM RA Open the door NO contact RA RK OPEN CLOSE CONTROL PANEL 1000 24 VDC 100 24 VDC K15 K5 K3 RK Close the door NO contact EIN2 EIN1 15V GND B B Z Z EIN1 Nudging contact EIN2 Photocell contact ...

Страница 11: ... normal operation menu symbol means no signal for input signals and X symbol means active for input signals Below an example of LCD screen view for input signals is given Similarly symbol means released for output relays and X symbol means operated for output relays Below an example of LCD screen view for output relays is given OPEN EIN1 CLOSE X EIN2 OP RL FLT RL CL RL X ...

Страница 12: ...pening direction and then it will move to closing direction After the completion of skate closing door learning process will end After this by pressing ESC button the device will enter to Normal Operation Mode In door learning process firstly the door should move to opening direction and then it should move to closing direction If in door learning process the door starts to move closing direction ...

Страница 13: ... pressed in Inspection mode Firstly Encoder Matching Started will be written on screen After the completion of the process Encoder Matching Completed will be written on screen Note During encoder matching process the belt driven by the motor should be removed if it is possible If it is not possible the door should not be in the limit regions of door opening and closing it should be in a point some...

Страница 14: ... 20 Speed level while opening the skate 45 SkateCloseSpe 7 cm s 1 20 Speed level while closing the skate 46 Skate Distan 6 cm 1 199 Skate length 47 Wheel Circum 80 mm 30 999 Circuimference of the wheel on the motor shaft 48 Spd Cnt Level 16 1 20 Speed control sensitivity of the motor Increasing this parameter decreases the error and oscillations in speed but increasing this parameter more than req...

Страница 15: ...cted from connector Or there can be any broken or damaged cable 4 Check the encoder it can be damaged Module Error Circuit that includes IGBT inverter detected a fault due to overcurrent or overvoltage 1 Motor can draw a huge current due to a fault in connectors windings or cables 2 Grid voltage can be high 3 Deceleration ramps of the door can be very short and steep 4 One or more of the IGBTs can...

Отзывы: