13
Recording to an MD
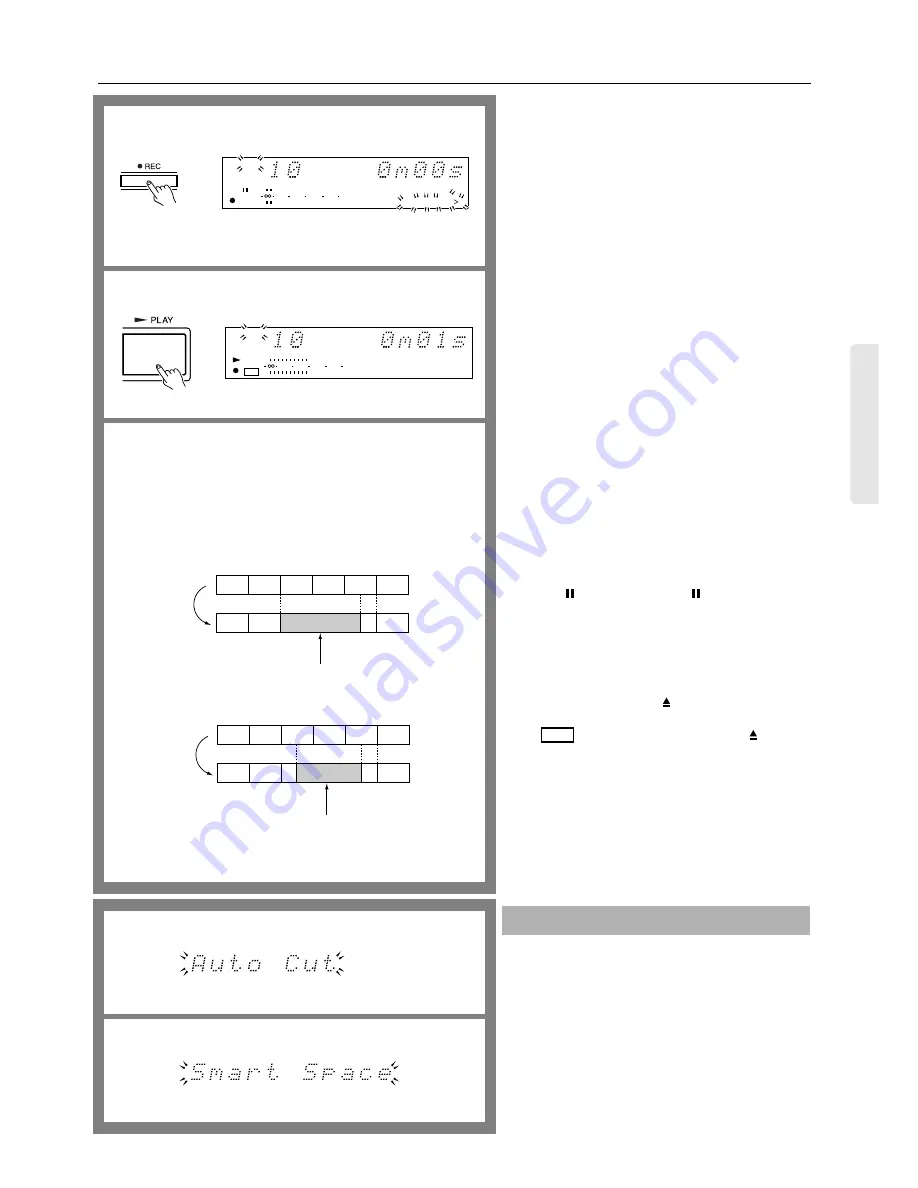
5. Press the
●
REC button.
The MD recorder is now in recording standby mode.
•
If “Protected” appears on the display, the record-pro-
tect tab of the MD is open. Before starting the record-
ing procedure, close the tab. (See page 18.)
If “D. In Unlock” appears...
The digital input source is not connected properly. Check
the connection of the digital input source.
When you record while erasing existing data, the
“TRACK” indicator and the number indicators of the
track selected in Step 4 and subsequent tracks flash.
6. Press the
®
PLAY button and start playing the
recording source immediately.
The MD recorder will automatically stop when the
recordable time on the disc expires.
If the Rec source is “CD” or “MD”, track numbers are
recorded automatically.
Note:
For automatic track number recording, the recording
source must be able to transmit digital signals, including
those for identifying the beginning and end of each track.
If your recording source does not have this capability,
track numbers will not be recorded automatically. In this
case, turn the Level Sync On.
To manually record a track number...
While recording, press the
●
REC button when you wish
to mark a track number.
If you wish to mark two or more track numbers sequen-
tially, provide a sufficient interval between each press of
the
●
REC button. Too short (about 4 seconds or less) an
interval may lead to a failure in marking track numbers.
To stop recording temporarily...
Press the PAUSE button (or the button on the remote
controller). To resume recording, press the
®
PLAY but-
ton again (or press the
®
button on the remote control-
ler).
To stop recording...
Press the
■
STOP button.
To eject the MD...
Press the
■
button, then the
EJECT button.
Caution:
The
indicator flashes: If you press the
button or
the STANDBY/ON button while the MD recorder is still
writing the recorded contents onto the disc. During this
period, do not disconnect the power cord or allow the MD
recorder to vibrate. Doing so may prevent normal record-
ing onto the MD.
If the MD recorder’s power cord is connected to the
SWITCHED service power outlet on the rear panel of
another device, do not turn off the power to the device.
If you cannot record combined data (page 13) success-
fully, switch to analog recording (page 14).
If “Auto Cut” appears during digital recording...
This message appears if the MD-2321 detects more than 30
seconds of silence on the source during digital recording. If
this occurs, the MD recorder will stop recording and enter
recording standby mode after recording about five seconds
of silence on the disc.
To resume recording, press the
®
button.
If “Smart Space” appears during digital recording...
This message appears if three to thirty seconds of silence in
the source is encountered during digital recording. If this
occurs, the MD recorder will insert about five seconds of
silence and standby to record the subsequent sound.
Useful functions for digital recording
6
TRACK
0
10
2
20
40
R
6
L
15
1
2
3
4
5
6
7
8
9
10
11 12 13 14 15
DIGITAL IN
1
TRACK
0
10
2
20
40
R
6
L
DIGITAL IN
TOC
1
2
3
4
5
6
7
8
9
10
5
1
2
3
4
5
6
↓
↓
1
2
3
4
5
↑
↑
1
2
3
4
5
6
↓
↓
1
2
5
6
↑
↑
3
4
If you stop recording while erasing the songs that follow the specified
song (overwrite recording), the unerased part will be recorded as a
new track. During overwrite recording, the “TRACK” indicator lights
up.
When you start recording from the top of a song
When you start recording in the middle of a song
Recording start point
Newly recorded song
Recording end point
Recording start point
Newly recorded song
Recording end point
TOC


