22
> Settings
|
Initial Setup
When you turn the unit on for the first time after purchasing
it, Initial Setup is automatically shown on the TV to enable
you to make settings required for startup using simple
operations following onscreen guidance.
English
Deutsch
Français
Español
Italiano
Nederlands
Svenska
Exit
Initial Setup
Language Select
Operation
:
Select the item with the cursors of the remote controller
and press ENTER to confirm your selection. To return to
the previous screen, press .
To redo Initial Setup
:
If you terminate the procedure on the way or want to
change a setting made during Initial Setup, press on the
remote controller, select "7. Miscellaneous" - "Initial Setup",
and press ENTER.
■
1� AccuEQ Room Calibration
Place the supplied speaker setup microphone in the
listening position, measure the test tones emitted by the
speakers, then the unit automatically sets the optimum
volume level for each speaker, the crossover frequencies,
and the distance from the listening position. This also
automatically adjusts the equalizers for the speakers and
enables correction of distortion caused by the acoustic
environment of the room.
•
Calibration takes several minutes to be completed.
The speakers emit the test tone at high volume during
measurement, so be careful of your surroundings. Keep
the room as quiet as possible during measurement. If
the measurement is interrupted, turn off the household
appliances.
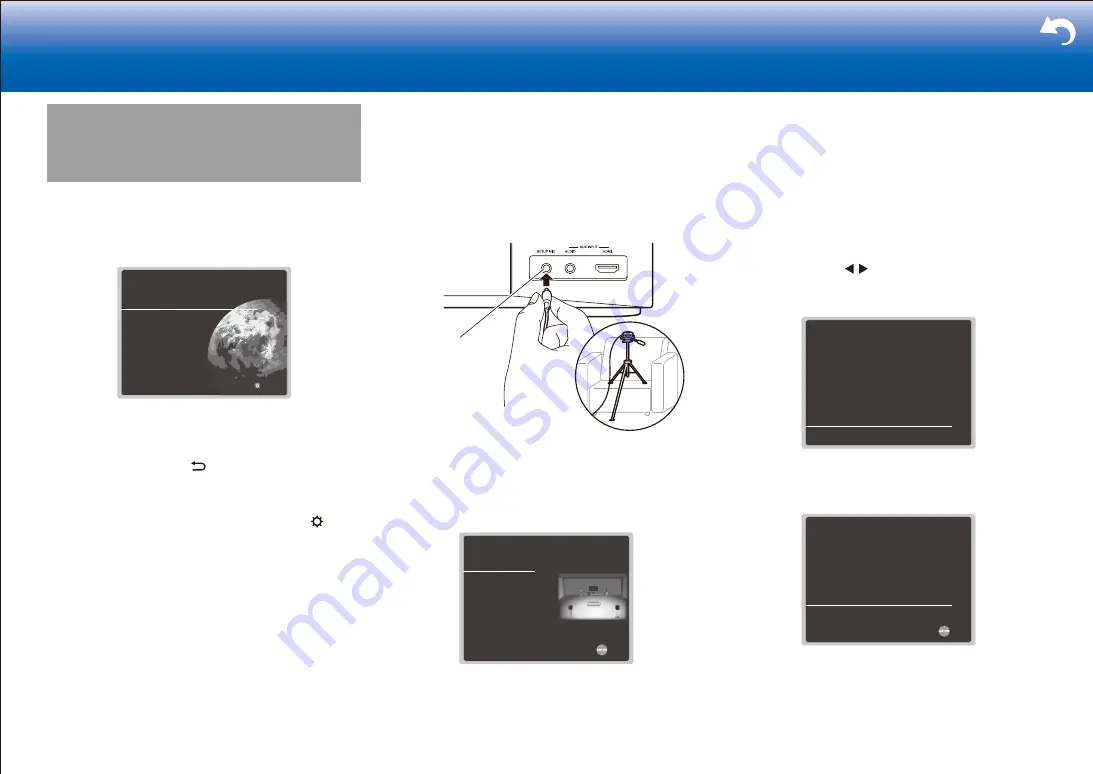
1. Place the supplied speaker setup microphone in the
listening position, and connect to the SETUP MIC jack
on the main unit.
SETUP MIC
When putting the speaker setup microphone on a
tripod, refer to the illustration when putting it in place.
2. When the screen below is displayed, press ENTER
on the remote controller without changing any of the
settings.
AccuEQ Room Calibration
Speaker Channels
Subwoofer
Height Speaker
Zone Speaker
Bi-Amp
Select how many speakers you have.
Next
5.1.2 ch < >
Yes
Bundled Dolby Speaker
No
No
•
If you have connected a subwoofer, check the power
and volume of the subwoofer. The low frequencies
played by the subwoofer may not be discernible, so
set its volume to at least halfway.
3. Test tones are emitted by the speakers, and firstly the
unit detects the speakers connected and the noise in
the environment.
4. After the results of the above measurements are
displayed, select "Next", press ENTER on the remote
controller, and the test tones are emitted again, and the
unit automatically makes settings such as the optimum
volume level and the crossover frequency.
5. When the measurement is completed, the measurement
result is displayed.
Press the cursors / on the remote controller to
check the settings. Press ENTER when "Save" is
selected to save the settings.
AccuEQ Room Calibration
Subwoofer
Front
Center
Surround
Surround Back
Height
Review Crossover
: Yes
: 100Hz
: 100Hz
: 100Hz
: ---
: 180Hz
Save
Cancel
6. Select whether to enable or disable the equalizer
function that corrects for distortion caused by the
acoustic environment of the room.
AccuEQ Room Calibration
On (All Channels)
On (Except Front Left / Right)
Off
To enable equalizer for each speakers, select "On".
Please select "All Channels", if you have same speakers for all
channels. Please select "Except Front Left / Right", if front
speakers are larger than other speakers.
Next
If this is to be enabled, then normally you should
select "On (All Channels)", and to disable just the front
speakers you should select "On (Except Front Left /
Right)".
7. Disconnect the speaker setup microphone.


