background image


7


Getting Started


—Continued


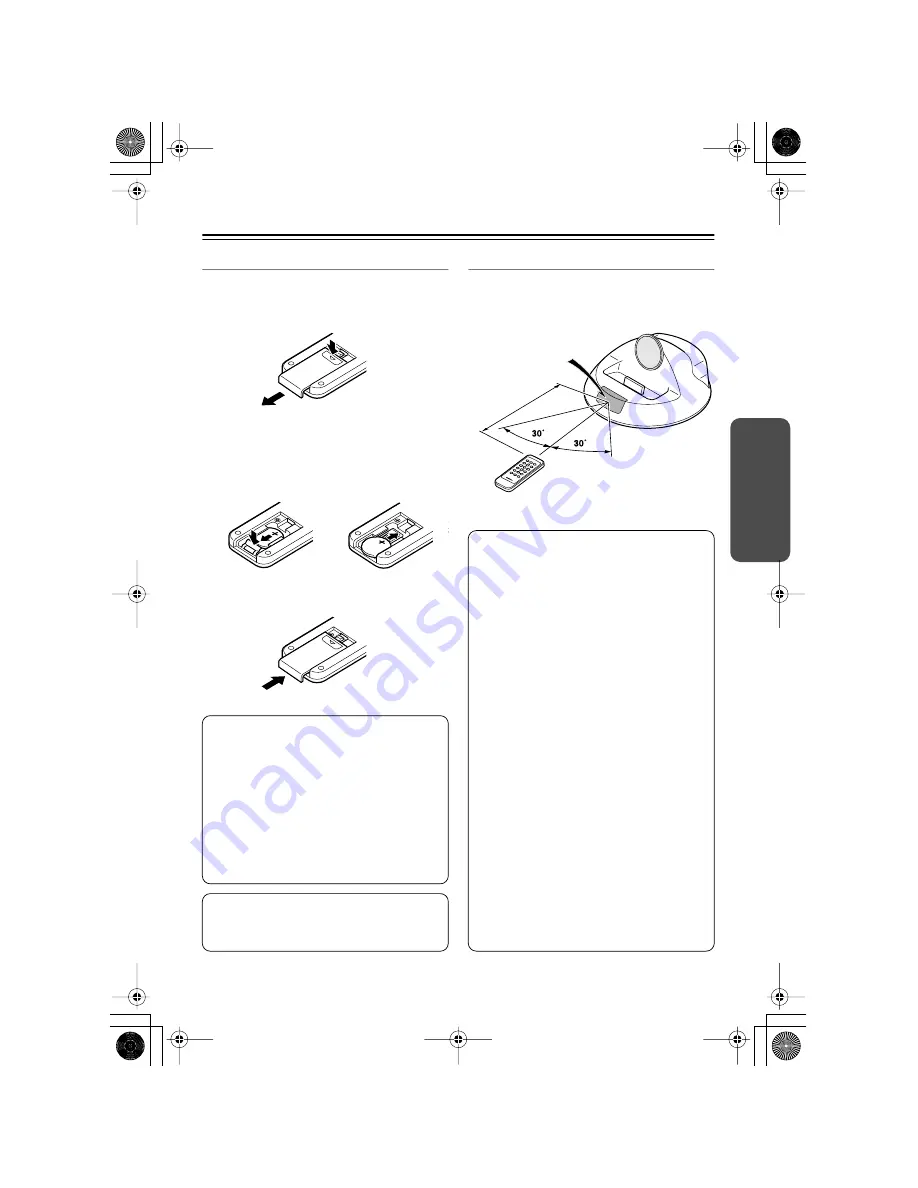
Replacing the Battery


Use only a battery of the same type (CR 2025).


1.


To open the battery compartment, press 
the small hollow and slide open the cover.


2.


While pressing the tab as shown, slide out 
the old battery.

Slide the new battery into the battery com-
partment with the positive side facing up.


3.


Slide the cover shut.


Aiming the Remote Controller


When using the remote controller, point it 
toward the RI Dock’s remote control sensor, as 
shown below.

Notes:

If the remote controller doesn’t work reli-
ably, try replacing the battery.

If you intend not to use the remote con-
troller for a long time, remove the battery 
to prevent damage from leakage or cor-
rosion.

An expired battery should be removed as 
soon as possible to prevent damage from 
leakage or corrosion.

Caution:  

Replacing the battery incorrectly 

may cause an explosion. Use only a battery 
of the same type or an equivalent.

Appro

x. 5 m 

(16 f

t.)

Remote control sensor

RI Dock

Notes:

If the RI Dock is placed on top of another 
component, the remote controller’s sig-
nal may be obstructed and the remote 
controller may not work reliably.

The remote controller may not work reli-
ably if the RI Dock is subjected to bright 
light, such as direct sunlight or inverter-
type fluorescent lights. Keep this in mind 
when installing.

If another remote controller of the same 
type is used in the same room, or the RI 
Dock is installed close to equipment that 
uses infrared rays, the remote controller 
may not work reliably.

Don’t put anything on top of the remote 
controller, such as a book or magazine, 
because a button may be pressed contin-
uously, thereby draining the batteries.

The remote controller may not work reli-
ably if the RI Dock is installed in a rack 
behind colored glass doors. Keep this in 
mind when installing.

The remote controller will not work if 
there’s an obstacle between it and the RI 
Dock’s remote control sensor.

DS-A2_En.book Page 7 Friday, July 7, 2006 9:24 AM

Содержание DS-A2

Страница 1: ...trolling Your iPod with the OSD 9 TV Display Settings 11 Setting the TV System 11 Other Functions 11 Setting the Remote Controller s ID 12 Using Your Amp s Remote Controller 13 Troubleshooting 14 Spec...

Страница 2: ...ng Service Unplug the apparatus from the wall outlet and refer servicing to quali ed service personnel under the following conditions A When the power supply cord or plug is dam aged B If liquid has b...

Страница 3: ...allation If this equipment does cause harmful interference to radio or television reception which can be determined by turning the equipment off and on the user is encouraged to try to correct the int...

Страница 4: ...navigate and select your iPod s playlists artists albums songs genres composers on your TV Control your iPod from the comfort of your sofa with the supplied remote con troller WatchiPodvideosandslides...

Страница 5: ...E MD CDR MD CD R TAPE HDD DOCK CDR HDD DOCK or MD CD R TAPE HDD DOCK HDD iPod slot Dock connector Remote control sensor RI MODE switch jack VIDEO OUT jack DC IN 12V 1A jack AUDIO OUT L R jacks Set it...

Страница 6: ...to select the page modes During play back or when the OSD mode is set to Off they select playlists H ALBUM PAGE buttons Used to page through the playlists artists albums songs genres composers dis pl...

Страница 7: ...y of the same type or an equivalent Approx 5 m 16 ft Remote control sensor RI Dock Notes If the RI Dock is placed on top of another component the remote controller s sig nal may be obstructed and the...

Страница 8: ...TAPE MD CDR IN jacks and also want to connect the RI Dock s VIDEO OUT jack to your amp Connect the RI Dock s VIDEO OUT jack to an unused video input on your amp When you want to watch an iPod slidesh...

Страница 9: ...When the OSD mode is set to On and your iPod is inserted in the RI Dock playlists artists albums songs genres composers will be dis played on your TV Playing Songs 1 Use the Up and Down arrow but tons...

Страница 10: ...SELECT but ton Resume Function With the Resume function you can resume playback of the song that was playing when you removed your iPod from the RI Dock or changed the OSD mode to Off 1 Select and pl...

Страница 11: ...ct NTSC or press the VOLUME Down but ton for more than 3 seconds to select PAL Functions Depending on your amp and generation of iPod you may also be able to use the following functions System On Func...

Страница 12: ...ore you select another input source stop iPod playback to prevent your amp from selecting the iPod input source by mistake If any accessories are connected to your iPod your amp may not be able to sel...

Страница 13: ...use Next song Next Selects the next iPod song Previous song Previous Restarts the current iPod song Press it twice to select the previous song Fast forward Fast Forward Press and hold to fast forward...

Страница 14: ...properly inserted in the RI Dock If your amp s remote controller has remote mode buttons make sure you ve selected the right mode Check the RI Dock s RI MODE switch setting When you use your amp s rem...

Страница 15: ...e same regardless of color The operating instructions in this manual apply to the iPod as of July 2006 and may change with future upgrades to the iPod software The AC adapter supplied with the RI Dock...

Страница 16: ...Fax 201 785 2650 http www us onkyo com ONKYO EUROPE ELECTRONICS GmbH Liegnitzerstrasse 6 82194 Groebenzell GERMANY Tel 49 8142 4401 0 Fax 49 8142 4401 555 http www eu onkyo com ONKYO EUROPE UK Office...

Страница 17: ...8511 TX 8011 TX 2100 A 9211 AV receivers TX DS494 TX DS595 TX DS696 TX DS797 TX DS898 TX SR302 TX SR303 TX SR401 TX SR402 TX SR500 TX SR501 TX SR600 TX SR601 TX SR700 TX SR701 TX SR800 TX SR900 DVD re...

Отзывы: