background image

Operation

Operation with Auto Pattern

•  Do not leave the machine to operate unattended if you know that there are pets, 

children or people in the vicinity.

Operation with Manual Pattern

•  Avoid operating the appliance in wet grass.

•  Do not operate the appliance when barefoot or wearing open sandals.

•  Always wear substantial footwear and long trousers.

•  Always be sure of your footing on slopes.

•  Use extreme caution when reversing the appliance towards you.

•  Always switch on the mower according to instructions with feet well away from the 

blade.

Warning: Danger of injuries 

Keep your hands and feet away from the rotating blade. Never put your hands or 

feet close to or under the body when the motors are running.

Preparation

•  Ensure the correct installation of the virtual wire delineation system as instructed.

•  Periodically inspect the area where the appliance is to be used and remove all stones, 

sticks, wires, bones, and other foreign objects especial the objects‘ height is less than 

6 cm.

•  Periodically visually inspect to see that the blades, blade bolts and cutter assembly are 

not worn or damaged. Replace worn or damaged. blades and bolts in sets to preserve 

balance.

Starting the mower

1.  Take the mower to start point.

2.  Turn the key switch on.

3.  Clockwise rotate Emergency switch,

4.  The mower start.

Note: You must not start the mower if there is a problem with the virtual cable 

or the charging station.

Stopping mower /Turn off mower

1.  Press power button from remote control. Mower stops, the blade motor stops, mower 

43

Содержание 10011554

Страница 1: ...Rasenmähroboter 10011554 10011555 10011556 ...

Страница 2: ...ernehmen wir keine Haftung Technische Daten 2 Sicherheitshinweise 3 Lieferumfang 5 Funktion 8 Einrichtung 10 Fernbedienung 18 Bedienung 19 Wartung und Aufbewahrung 21 Fehlerbehebung 23 Entsorgung 25 Konformitätserklärung 25 Technische Daten Artikelnummer 10011554 10011555 10011556 Stromversorgung Ladestation 220 240 V 50 60 Hz Leistung 85 W Maße Mähroboter B x H x T 52 x 24 x 60 cm Maße Ladestatio...

Страница 3: ...e der Ladestation Sprühen Sie kein Wasser in den Andockbereich der Ladestation oder deren Bedienfeld Der Rasenmäher hat scharfe Rotorblätter Seien Sie aufmerksam wenn das Gerät den Rasen mäht falls ein Unfall mit Verletzungen passiert Halten Sie das Gerät in einem einwandfreien Betriebszustand indem Sie die Wartungen ausführen die in dieser Bedienungsanleiung beschrieben werden Eine optimale Wartu...

Страница 4: ... Sie Hände und Füße fern und versuchen Sie nicht den Mähroboter zu reinigen Setzen Sie sich nicht auf dem Mähroboter Warnung Dies ist ein gefährliches Elektrowerkzeug Benutzen Sie es mit Vorsicht und befolgen Sie alle Sicherheitshinweise und Warnhinweise Lesen Sie die Bedienungsanleiutung sofgfältig durch und befolgen Sie die Sichherheitshinweise Gegenstände können während des Betriebs vom Rasemäh...

Страница 5: ...Lieferumfang 5 ...

Страница 6: ...tation 16 Virtuelle Kabel Leuchte Rot Verbindung unterbrochen Farblos gute Verbindung 17 Ladeleuchte Rot lädt Grün Voll geladen 18 Ladeterminal 19 Verbindungsterminal Wie sie das virtuelle Kabel verbinden spielt keine Rolle Es gibt keine Polung 20 Ladefläche 21 Führungsschiene 22 Stopper 23 Ladegerät Zum direkten Aufladen des Mähers 24 Virtuelles Kabel Zur Begrenzung der zu mähenden Fläche 25 Fern...

Страница 7: ...1 Abedeckung 2 Steuereinheit 3 Stromanschluss 4 Anschluss für das Begrenzungskabel 5 Unterseite 6 Kupferplatte 7 Befestigung der Kupferplatte 6 7 ...

Страница 8: ...n auf der Oberseite des Mähers Der Mäher kehrt automatisch zur Basisstation zurück sobald es regnet Anti Diebstahl Funktion Der Mäher muss per Schlüssel eingeschaltet werden und funktioniert ohne die dazugehörige Basisstation nicht Virtueller Zaun Der Mäher funktioniert ohne den virtuellen Zaun nicht Wir empfehlen Ihnen 100 300 Meter Kabel zu verwenden Es führt den Mäher zurück zur Basisstation un...

Страница 9: ...Falls so eine Situation entdeckt wird hört der Mähroboter auf zu laufen Drei Schritte um das Gerät sicher zu starten Es gibt drei sichere Schritte um den Mähroboter zu starten 1 Verbinden Sie das Begrenzungskabel mit der Ladestation und stellen Sie sicher dass es richtig angeschlossen ist Die LED für das Begrenzungskabel ist ohne Farbe 2 Verbinden Sie die Ladestation mittels Adapter mit der Stromv...

Страница 10: ...asenmäher zuerst bei 4 cm schneiden zu lassen 1 Halten Sie den Mäher an und ziehen Sie den Schlüssel 2 Drehen Sie den Mäher auf die Rückseite Lösen Sie die Schrauben auf der Klingenhalterung und entfernen Sie die Klingen 3 Es gibt zwei Arten von Klingen 4cm und 3cm Klingen 4 Wählen Sie die gewünschte Schneidehöhe und setzen Sie die Klingen ein 5 Drehen Sie danach den Mäher wieder um 10 ...

Страница 11: ...lenSiedenbestenAufstellungsort Achten darauf dass der Ort eben ist und ohne Wasser und magnetische Interferenzen ist Befestigen Sie die Ladestation auf einer ebenen Fläche Legen Sie das Begrenzungskabel durch die Ladestation Idealer Aufstellungsort für die Ladestation Relativ eben ausreichend Begrenzungskabel Pfahl 11 ...

Страница 12: ...bel Am besten vergraben Sie das Begrenzungskabel falls Sie Ihren Rasen vertikutieren möchten Falls notwendig können beide Methoden auch kombiniert werden Weitere Hinweise zur Installation des Begrenzungskabels Setzen Sie nach jedem Meter Kabel einen Dübel Führen Sie das Kabel um Ecken wie auf der Abbildung zu sehen Vergraben Sie das Begrenzungskabel im Rasen und befestigen Sie ihn mit Erdnägeln so...

Страница 13: ...s 2 5 m geradeaus Haus Wand Zaun oder anderes Hindernis das höher ist als der Rasen Durchgang oder Boden mit Rasenhöhe min gerade Linie Falls ein hohes Hindernis z B eine Mauer oder ein Zaun an den Arbeitsbereich angrenzt sollte das Begrenzungskabel in einem Abstand von 35 cm vom Hindernis entfernt gelegt werden Dies verhindert dass der Mähroboter mit dem Hindernis zusammstößt und verringert Abnut...

Страница 14: ...cm max 1 cm max 1 cm max 1 cm max 20 cm Begrenzungskabel Begrenzungskabel Wurzel Die Kabel die zur Insel hin und wieder zurückführen müssen parallel verlaufen Kreuzen Sie die Kabel nicht Wenn zur schützende Hindernisse dicht zusammenliegen umzäunen Sie die Gruppe gemeinsam Größere Inseln werden vom Mähen ausgeschlossen Die Entfernung zwischen der Ladestation und der Begrenzungschleife sollte minde...

Страница 15: ... des Begrenzungkabels um ein Schwimmbecken Abstand zum Kabel 1 m über 35 cm 45 Achtung Die Ladestation und das Ladegerät sind nicht wasserfest Am besten bringen Sie diese Kompontenten in einem Unterstand unter 15 ...

Страница 16: ... lang genug ist und verbunden werden muss Verwenden Sie dasselbe lötfreie Kupfer Es ist wasserbeständig und gewährleistet eine ordentliche elektrische Leitfähigkeit Zum Spleißen Stecken Sie beide Kabelenden in den Kuppler Drücken Sie nun den Schalter auf dem Kuppler nach unten durch Verwenden Sie eine Zange oder Ähnliches da der Schalter mit der Hand schwer nach unten zu drücken ist Falsches Legen...

Страница 17: ...ebig es gibt keinen positiven oder negativen Pol Überschüssiges Kabel muss gekürzt werden Stromanschluss 1 Schließen Sie das Netzkabel an die Ladestation an 2 Schließen Sie das Netzkabel an die Steckdose an Warnung Gefahr eines Stromschlags Das Ladegerät ist nicht wasserdicht daher muss es an einem Ort aufgestellt werden der trocken und gut belüftet ist 17 ...

Страница 18: ...hts lenken 5 Geschwindigkeit verringern 6 Nach links lenken 7 Mähroboter starten 8 Rückkehr zur Ladestation im Betrieb 9 Mähroboter starten Drücken Sie diese Taste im Bereitschaftsmodus startet der Mähroboter mit geringer Geschwindigkeit 10 Ein Ausschalten des Mähwerks 11 Batteriefach mit 2 Micro Batterien LR03 Schalten Sie die Fernbedienung aus wenn sie nicht in Benutzung ist 18 ...

Страница 19: ...und Füße vom sich drehenden Messer fern Halten Sie nie Ihre Hände und Füße unter das Gehäuse wenn der Motor läuft Vorbereitung Untersuchen Sie den Arbeitsbereich regelmäßig auf Steine Stöcke oder andere Gegen stände Überprüfen Sie regelmäßig den Zustand der Klingen Ersetzen Sie beschädigte Klingen Den Mäher starten 1 Bringen Sie den Mäher zum Startpunkt 2 Schalten Sie ihn mit dem Schlüssel ein 3 D...

Страница 20: ...r geht automatisch in den Ladezustand zurück wenn der Akku schwach ist Das Gerät muss dann neu gestartet werden Das Gerät kann auch direkt über das Ladekabel aufgeladen werden Direktes Aufladen 1 Schalten Sie das Gerät mit dem Zündschlüssel ab 2 Führen Sie das Ladekabel heinein und drehen Sie den Knopf 3 Schließen Sie das Ladekabel an die Stromversorgung an Warnung Gefahr eines Stromschlags Das La...

Страница 21: ...gerungen Stellen Sie sicher dass alle Schrauben und Muttern zu jeder Zeit fest zugezogen sind Ersetzen Sie abgenutzte oder beschädigte Bauteile Stellen Sie sicher dass nur die richtigen Ersatzteile verwendet werden Benutzen Sie nur das mitgelieferte Ladegerät und Netzteil Falsche Benutzung kann zu Stromschlägen Überhitzungen oder dem Austreten von ätzenden Flüssigkeiten aus dem Akku führen Waschen...

Страница 22: ...Akku so schnell wie möglich aufgeladen werden Lagern Sie den Lithium Ionen Akku am Besten bei einem Ladestand von 40 Prozent Bewahren Sie den Akku im Schatten auf Bitte wenden Sie sich hinsichtlich der Ordnungsgemäßen Entsorgung der Batterien an einen lokalen Recyclinghof bzw an Ihr örtliches Entsorgungsunternehmen HINWEIS Laden Sie den Akku am Ende der Gebrauchssaison auf bevor Sie das Gerät über...

Страница 23: ...g von Station zum Mäher Der Rasenmäher stoppt und piept Der Rasenmäher ist mehr als 2 cm angehoben Platzieren Sie den Mäher auf einer ebenen Fläche Schal ten Sie ihn aus und starten Sie ihn erneut Fernbedienung funktioniert nicht Zu wenig Stromzufuhr Ersetzen Sie die Batterien Der Rasenmäher stoppt und piept Schneidehöhe ist zu niedrig Passen Sie die Schneidehö he auf ein angemessenes Niveau an Kl...

Страница 24: ...ung abgeschaltet Im manuellen Modus Schalten Sie das Mähen per Fernbedienung wieder an Der Motor des Mähwerks ist beschädigt Wenden Sie sich zur Reparatur an einen qualifizierten Techniker oder den Kundendienst ihres Händlers Kurze Betriebszeit Kürzer als üblich Akku ist nicht vollständig aufgeladen Laden Sie den Akku vollständig auf Mäher erkennt die Kontakte der Ladestation nicht Der Boden vor d...

Страница 25: ... Sie Altgeräte nicht über den Hausmüll Durch die regelkonforme Entsorgung der Altgeräte werden Umwelt und die Gesundheit ihrer Mitmenschen vor möglichen negativen Konsequenzen geschützt Materialrecycling hilft den Verbrauch von Rohstoffen zu verringern Das Produkt enthält Batterien die der Europäischen Richtlinie 2006 66 EG unterliegen und nicht mit dem normalen Hausmüll entsorgt werden dürfen Bit...

Страница 26: ...y liability Technical Data 26 Safety Instructions 27 Product Overview 29 Functioning 32 Installation 34 Remote Control 42 Operation 43 Mainenance and Storage 45 Troubleshooting 47 Disposal Considerations 49 Declaration of Conformity 49 Technical Data Item number 10011554 10011555 10011556 Power supply charging station 220 240 V 50 60 Hz Power 85 W Dimensions Mower W x H x D 52 x 24 x 60 cm Dimensi...

Страница 27: ...ging pins of the mower Do no spray water directly into the docking area of the charging station or onto the operating panel of the charging station The mower has sharp rotating blades Please care the mower when it is mowing in case of serious injury occur Keep the lawn mower in perfect operating conditions by performing the maintenance procedures outlined by the manufacturer Good maintenance guara...

Страница 28: ...ep hands and feet away and do not attempt to lift mower from this area Do not ride on the machine Warning This is a dangerous power tool Use with care when operating and follow all safety instructions Read the owner operating manual carefully and follow all safety instruc tions before operating the machine Objects can be thrown from mower while operating keep a safe distance from the machine when ...

Страница 29: ...Product Overview 29 ...

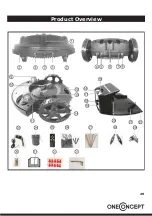
Страница 30: ...olorless good wire connecting 17 Charging light Red charging Green fully charged or idle 18 Charge terminal 19 Virtual wire terminal Connect the virtual wire randomly there is no positive and nega tive 20 Charging sheet 21 Guide channel 22 Stakes hole 23 Charger Used for directing the mower to charging station or for recharge directly 24 Virtual wire 100m Used to mark mowing area and create a virt...

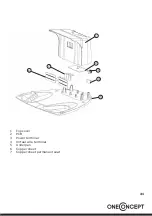
Страница 31: ...1 Top cover 2 PCB 3 Power terminal 4 Virtual wire terminal 5 Underpan 6 Copper sheet 7 Copper sheet permanent seat 1 2 3 4 5 6 7 31 ...

Страница 32: ... sensor is activated the mower will stop movement in that direction and reverse itself away from the obstacle Rain sensors There are two rain sensors on top cover of mower The mower will go back to the charging station automatically when it s raining Wireless controller To control the operate of mower in manual pattern Anti theft function The mower should be turned on by key And it can t start wor...

Страница 33: ...to reset it Two cutting modes There are two cutting modes of the mower go straight and go circle high efficiency Overload protect Each of the two blade motors and each of the two wheel driving motors are monitored continuously during operation for any situation that may cause these motors to over load In the event this is detected the mower will stop operating Three steps to safe start the applian...

Страница 34: ...nge it lower with 3cm 1 Stop the mower and take off the key 2 Turn over the mower to underside It s easy to find that there are two blades fix on the blades holder Swing the 4 screws on blades holder And take blades out 3 There are two kinds of blades 3cm blades and 4cm blades 4 Choose your cutting height 3cm or 4cm and then fix the two blades with screws 5 Turn over the mower to upside Cutting he...

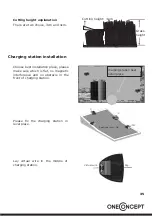
Страница 35: ...tallation Choose best installation place please make sure which is flat no magnetic interference and no obstacle in the front of charging station Please fix the charging station in level place Lay virtual wire in the middle of charging station Charging station best install place Relatively level OK Virtual wire Peg 35 ...

Страница 36: ...make adjustments to the virtual wire during the first few weeks of operation Bury the wire It is preferable to bury the virtual wire if you want to dethatch or aerate the lawn If necessary both methods can be combined so one part of the virtual wire is stapled down and the remainder is buried Dig virtual wire with pegs 1 meter per piece in straight line Dig corner as picture Add pegs in order to p...

Страница 37: ...ual wire in front of charging station House wall fence or other obstacle higher than the lawn Passage or Pool Max 1cm a ground with same level of the lawn A minimum distances of front charging station and obstacle is 2 meters And make sure the distance from corner to front of charging station is at least 2 5 meters Make sure to lay a 2 5 meters minimum straight light of virtual wire in front of ch...

Страница 38: ... the island are close together the mower can drive over the wire max 1 cm max 1 cm max 1 cm max 1 cm max 20 cm virtual wire virtual wire root The wires leading to the island and returning from it should be parallel and touding But do not cross them If protected obstacles are grouped closely together demarcate them by a single Continuous virtual island if obstacles are dose to edge leave them out o...

Страница 39: ...virtual wire on the ground which has swimming pool Distance between two wires 1 m über 35 cm 45 Beware The charging station and charger is not water proof It s best to set a rain shed above the charging station 39 ...

Страница 40: ... 90 degrees corner like follow picture shows Joining the boundary wire If the boundary wire is not long enough and needs to be spliced Use original solderless couper It is waterproof and gives a reliable electrical connection To splice Insert both cable ends in the coupler Now press down the button on top of the connector fully Use a pair of pliers or the like as the button on the connector is dif...

Страница 41: ...d on charging station randomly there is no positive and negative Redundant virtual wire must be cut Power connection 1 Insert charger to the station 2 Connect charger with power supplier Warning Danger of electric shock The charger is not water proof therefore it must be located on a place which is dry and ventilated 41 ...

Страница 42: ... 5 Speed down 6 Turn left 7 To start the mower In taskstate press it the mower starts working 8 Press it during mower is working it goes back to charging station 9 To start the mower In taskstate press it the mower starts running in low speed 10 Turn on or turn off the cutting blade 11 Battery location with 2pcs AAA battery Please turn off the power of remote control while it is idle 42 ...

Страница 43: ...e to or under the body when the motors are running Preparation Ensure the correct installation of the virtual wire delineation system as instructed Periodically inspect the area where the appliance is to be used and remove all stones sticks wires bones and other foreign objects especial the objects height is less than 6 cm Periodically visually inspect to see that the blades blade bolts and cutter...

Страница 44: ...ery Recharge current 2A The mower could goes back to recharg ing automatically if it is powerless Or press the Home button from remote control the mower also could goes back to station for recharge The mower also can recharges by charger directly Direct Recharging 1 Turn off the mower by key 2 Insert charger and screw the knob 3 Connect the charger to power supplier 4 Connect the charger to power ...

Страница 45: ...e blade use a suitable brush Clean the outside of the charging station from any accumulated residues Keep all nuts bolts and screws tight to be sure the appliance is in safe working condi tion Replace worn or damaged parts for safety Ensure that only replacement cutting means of the right type are used Ensure that batteries are charged using the correct charger recommended by the man ufacturer Inc...

Страница 46: ...is used A long season or many hours of use per week means that the battery must be replaced more regularly Storage we suggest the optimum storage of lithium battery is with 40 power and keep in the shade Storage we suggest the optimum storage of lithium battery is with 40 power and keep in the shade Note Charge the battery fully at the end of the season before winter storage 46 ...

Страница 47: ...ng and beeps Mower is lifted over 2 cm from the ground Put the mower in lever ground turn off the mower and restart it Remote control does not work Not enough power Replace the batteries Mower stops working and beeps Cutting height too low Adjust the cutting height to suitable height Blade or running wheels strike hard objects Clean the grass and make sure it is free from hard objects The mower is...

Страница 48: ...time operates less time than normal Power is not fully charged for operation Recharge the mower fully Mower does not detect the charging station contacts The ground before the charging station is not flat Reset the charging station in a flat place The robot behaves in an anomalous manner around the flower beds Virtual wire incorrectly placed Relocate the virtual wire The robot is very noisy Damage...

Страница 49: ...al and electronic equipment By ensuring this product is disposed of correctly you will help prevent potential negative consequences for the environment and human health which could otherwise be caused by inappropriate waste handling of this product For more detailed information about recycling of this product please contact your local council or your household waste disposal service Your product c...

Страница 50: ...il Données techniques 50 Consignes de sécurité 51 Contenu de la livraison 53 Fonction 56 Installation 58 Télécommande 66 Instructions 67 Maintenance et stockage 69 Fehlerbehebung 71 Recyclage 73 Déclaration de conformité 73 Données techniques Numéro de l article 10011554 10011555 10011556 Alimentation électrique station de charge 220 240 V 50 60 Hz Puissance 85 W Dimensions de la tondeuse robot L ...

Страница 51: ...ge de la station de charge Ne vaporisez pas d eau sur la zone d arrimage de la station de charge ou des autres champs de commande La tondeuse dispose de pâles de rotor affûtées Soyez attentif quand l appareil tond l herbe au cas où survienne un accident avec blessure Conservez l appareil dans un état de fonctionnement irréprochable en effectuant les entretiens décrits dans cette notice Un entretie...

Страница 52: ...z vos mains et pieds et n essayez pas de nettoyer la tondeuse robot Ne vous asseyez pas sur la tondeuse robot Avertissement Ceci est un appareil électrique électronique dangereux Utilisez le avec précaution et respectez toutes les consignes de sécurité et avertissement Lisez attentivement la notice d utilisation et respectez les consignes de sécurité Des objets peuvent être projetés pendant le fon...

Страница 53: ...Contenu de la livraison 53 ...

Страница 54: ...n en appuyant sur cette touche la tondeuse retourne à la station 16 16 Lumières du câble virtuel Rouge connexion interrompue Sans couleur bonne connexion des 17 lampes de chargement Rouge en charge Vert chargé 18 Borne de chargement 19 Borne de connexion peu importe comment vous connecter le câble virtuel Il n y a pas de polarisation 20 Surface de chargement 21 Rail de guidage 22 Butée 23 Chargeur...

Страница 55: ...1 Couvercle 2 Unité de commande 3 Connexion au courant électrique 4 Connexion pour le câble de délimitation 5 Face inférieure 6 Plaque de cuivre 7 Fixation de la plaque de cuivre 6 55 ...

Страница 56: ...r clef et ne fonctionne pas sans la station de base correspondante Barrière virtuelle La tondeuse ne fonctionne pas sans la barrière virtuelle Nous vous recommandons d utiliser 100 300 mètres de câble Il reconduit la tondeuse à la station de base et la zone de fonctionnement de la tondeuse est ainsi délimitée Choix de la hauteur de coupe Vous pouvez choisir entre 3cm et 4cm Largeur de coupe 28cm C...

Страница 57: ...re sécurisée Il y a trois étapes sécurisées pour démarrer la tondeuse robot 1 Connecter le câble de délimitation avec la station de charge et assurez vous qu il soit bien connecté La LED du câble de délimitation est sans couleur 2 Connectez la station de charge à l alimentation électrique à l aide d un adaptateur La LED de la station de charge s allume en vert 3 Tournez la clef d allumage pour all...

Страница 58: ...aute il est conseillé de laisser la tondeuse couper d abord sur 4 cm 1 Arrêtez la tondeuse et tirez la clef 2 Tournez la tondeuse sur le côté Desserrez les vis sur le support des lames et retirez les lames 3 Il y a deux sortes de lames Des lames de 4cm et de 3cm 4 Choisissez la hauteur de coupe souhaitée et insérez les lames 5 Retournez ensuite la tondeuse 58 ...

Страница 59: ... l installer Veillez à ce que l endroit soit plat et sans eau ni interférences magnétiques Fixez la station de charge sur une surface plane Faites passer le câble de délimitation par la station de charge Faites passer le câble de délimitation à travers la station de charge Endroit d installation idéal pur la station de charge Relativ eben ausreichend Câble de délimitation Pieu 59 ...

Страница 60: ...s semaines d utilisation Enterrez le câble Le mieux est d enterrer le câble de délimitation si vous voulez couper votre pelouse Si besoin les deux méthodes peuvent aussi être combinées Autres remarques quant à l installation du câble de délimitation Après chaque mètre de câble placez une cheville Placez le câble dans les coins comme indiqué sur l illustration Enterrez le câble de délimitation dans...

Страница 61: ...ins 2 5 m devant la station de charge Maison mur barrière ou tout autre obstacle plus haut que l herbe Passage ou sol avec une hauteur min gerade Linie Si un obstacle haut comme un mur ou une barrière délimite la surface de travaille le câble de délimitation doit se trouver à au moins 35 cm de l obstacle Cela évite que la tondeuse robot ne se cogne à l obstacle et diminue l usure 35 cm 61 ...

Страница 62: ...x 1 cm max 1 cm max 1 cm max 1 cm max 20 cm Câble de délimitation Câble de délimitation Racine Les câbles qui mènent à et reviennent de l îlot doivent être parallèle Ne croisez pas les câbles Quand des obstacles à protéger sont proches l un de l autre entourez le groupe ensemble Les grands îlots ne seront pas tondus La distance entre la station de charge et la boucle de délimitation doit être d au...

Страница 63: ...cement du câble de délimitation autour d un bassin Distance du câble 1 m über 35 cm 45 Attention La station de charge et le chargeur ne sont pas étanches Il vaut mieux placer ces composants sous un abri 63 ...

Страница 64: ...ation n est pas assez long et doit être rallongé utilisez le même cuivre sans soudure Il est étanche et garantit une bonne conduction électrique Pour raccorder Placez les deux extrémités du câble dans le coupleur Enfoncez maintenant l interrupteur sur le coupleur vers le bas N utilisez pas de pince ou autre car l interrupteur est difficile à enfoncer à la main Mauvais pose des coins distance supér...

Страница 65: ... fait à votre gré il n y a pas de pôle négatif ou positif Le câble en trop doit être coupé Raccordement électrique 1 Branchez le câble d alimentation sur la station de charge 2 Branchez le câble d alimentation sur la prise électrique Avertissement Risque d électrocution La station de charge n est pas étanche elle doit donc être placée à un endroit sec et bien aéré 65 ...

Страница 66: ...e 5 Diminuer la vitesse 6 Diriger vers la gauche 7 Démarrer la tondeuse robot 8 Retour à la station de charge en fonctionnement 9 Démarrer la tondeuse robot Si vous appuyez sur cette touche en mode standby la tondeuse robot redémarre à faible vitesse 10 Marche arrêt de la tondeuse 11 Compartiment à piles avec 2 micro piles LR03 Éteignez la télécommande quand vous ne l utilisez pas 66 ...

Страница 67: ...ournantes Ne placez jamais vos mains et vos pieds sous l appareil quand le moteur tourne Préparation Examinez régulièrement la surface de travail pour vérifier qu il n y ait pas de pierres bâtons et autres objets Vérifiez régulièrement les lames Remplacez les lames endommagées Démarrer la tondeuse 1 Placez la tondeuse au point de départ 2 Démarrez la avec la clef 3 Tournez l interrupteur d urgence...

Страница 68: ...ithium 29 4 V Courant de charge 2 A La tondeuse repasse automatiquement en mode charge quand la batterie est faible L appareil doit être redémarré L appareil peut aussi être rechargé directement par le câble de chargement Rechargement direct 1 Éteignez l appareil avec la clef d allumage 2 Insérez le câble de chargement et tournez le bouton 3 Branchez le câble de chargement à l alimentation électri...

Страница 69: ...ous que toutes les vis et écrous sont toujours bien serrés Remplacez les pièces usées ou endommagées Assurez vous que seules les pièces de remplacement correctes soient utilisées N utilisez que la station de charge et le bloc d alimentation inclus dans la livraison Une utilisation incorrecte peut conduire à des électrocutions des surchauffes ou au déversement de liquides corrosifs de la batterie E...

Страница 70: ...a batterie doit être rechargée aussi vite que possible Il est optimal de conserver la batterie lithium ion à un état de charge de 40 pour cent Conservez la batterie à l ombre Pour le recyclage correct des piles veuillez vous adresser au bureau de recyclage local ou à l entreprise locale de traitement des déchets Remarque Chargez la batterie à la fin de la saison d utilisation avant de ranger l ap ...

Страница 71: ...use s arrête et émet des bips La tondeuse est à plus de 2 cm du sol Placez la tondeuse sur une surface plane Éteignez la tondeuse et rallumez la La télécommande ne fonc tionne pas Pas assez d électricité Remplacez les piles La tondeuse s arrête et émet des bips La hauteur de coupe est trop basse Adaptez la hauteur de coupe à un niveau approprié Les lames ou les roues se sont cognées à un objet dur...

Страница 72: ...votre vendeur Court temps de fonction nement Plus court que d habitude En mode manuel Chargez entièrement la batterie La tondeuse ne reconnait pas les contacts de la station de charge Le sol devant la station de base n est pas plat Placez la station sur une surface plane La tondeuse se comporte de manière inhabituelle lorsqu elle contourne les parterres de fleurs Le câble de délimitation est mal p...

Страница 73: ...séparé des appareils électriques et électroniques Suivez les réglementations locales et ne jetez pas les appareils usagés dans la poubelle normale En respectant les réglementations vous préservez l environnement et la santé de vos voisins face à de possibles conséquences négatives Recycler permet de réduire l utilisation des matières premières Le produit contient des batteries soumis à la directiv...

Отзывы: