background image

00061967.DOC, Version 1.0

65/72

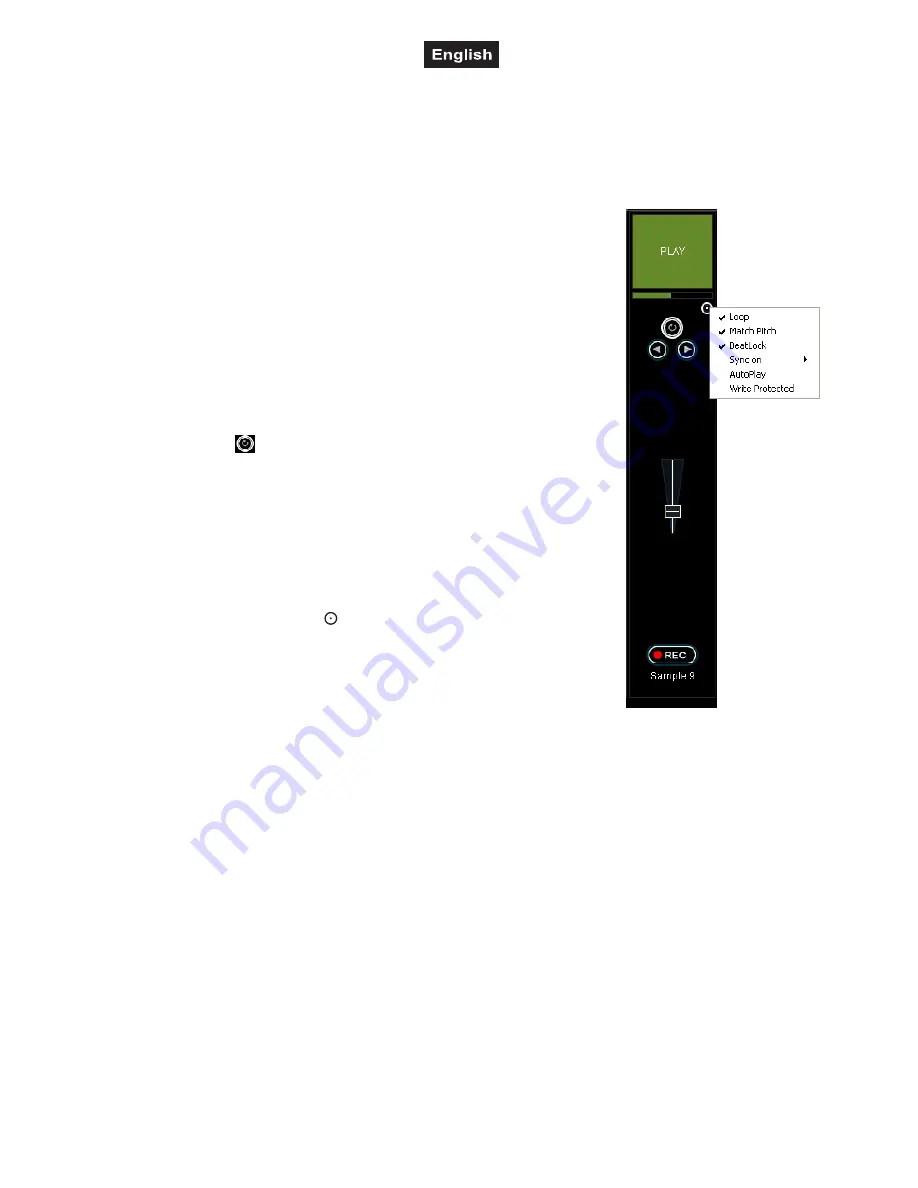
8.3 Recording samples

The title that is monitored serves for recording a sample. Thus, during a live mix, you can play a title on the
other deck and monitor the sampler operation via headphones without the audience listening in.

• The sampler mode is not controlled by the controller but with the mouse.
• With Virtual DJ LE, recorded samples are only available for the duration of a session.

1

Enter the sampler mode in Virtual DJ by clicking on the [

SAMPLER

] tab

in the center section.

2

Start playing the title and click  [

REC

] at the appropriate time to begin

recording the sample. The field is highlighted in red.

3

If the title is in a loop, the loop is captured as the sample when clicking

[

REC

] (without red indication). Otherwise, click 

[

REC

] a second

time to stop the recording. The red indication extinguishes.

4

You can set the volume of the sampled with the corresponding volume
fader.

5

To check the sample afterwards, click [

PLAY

]. The field's color changes

into green and you see the playback bar below fill gradually.

6

By clicking  [    ] you can select if the sample is played once or as a
continuous loop. In loop mode, the two arrows below adjust the sample
length by half length or double length increments respectively.

7

To delete the sample and start recording a new one, click 

[

REC

]

again.

8

The sample is stored on a fixed memory location for the duration of a
session and can be selected and played with the controller just like the
preset samples.

9

For each sample cell, there is an sample options menu available by
clicking the selector button [    ].

[Loop]: sets the sample to loop mode

[Match pitch]: matches the sample to the pitch of the title on the other
deck

[BeatLock]: matches the sample to the beat of the title on the other deck

even if you are scratching on the other deck

[Sync on]: 1 beat, ½ beat, ¼ beat

[AutoPlay]: the sample begins playing as soon as the volume is adjusted

[Write Protected] the sample cannot be recorded over

8.4 Scratch effects

Press the button [

SCRATCH

] (LED lights up) to switch on the scratch function for the  [

JOGDIAL

]. Turn the

[

JOGDIAL

] back and forth to create scratch effects. To switch off the function press the button  [

SCRATCH

]

once again (LED extinguishes).

8.5 Stutter effects

The cue points stored with the buttons [

HOT CUE 1

] to [

3

] as well as the button 

D

[

PLAY

] can be used for

creating stutter effects. Shortly press one of the buttons to create a stutter effect.

Содержание TMC-2 MK2

Страница 1: ...Copyright Nachdruck verboten Reproduction prohibited F r weiteren Gebrauch aufbewahren Keep this manual for future needs BEDIENUNGSANLEITUNG USER MANUAL TMC 2 MK2 USB MIDI CONTROLLER...

Страница 2: ...00061967 DOC Version 1 0 2 72...

Страница 3: ...llung des Mixers 27 7 5 Zwischen den Decks berblenden 28 7 6 Durchsagen ber das DJ Mikrofon 28 7 7 Vorh ren der Decks 29 7 8 Schneller Vor und R cklauf 29 7 9 Sprung zum Titelanfang oder einer bestimm...

Страница 4: ...turn to the starting point of the title or to a defined spot cueing 62 7 10 Pitch adjustment 62 7 11 Activating the master tempo function 63 7 12 Matching the beat between Deck A and Deck B 63 7 13 Pl...

Страница 5: ...genau beachten die Bedienungsanleitung als Teil des Produkts betrachten die Bedienungsanleitung w hrend der Lebensdauer des Produkts behalten die Bedienungsanleitung an jeden nachfolgenden Besitzer od...

Страница 6: ...t von Hitzequellen wie Heizk rpern oder Heizl ftern fern Das Ger t darf nicht in Betrieb genommen werden nachdem es von einem kalten in einen warmen Raum gebracht wurde Das dabei entstehende Kondensw...

Страница 7: ...TMC 2 MK2 entspricht Schutzklasse 3 Vermeiden Sie Ersch tterungen und jegliche Gewaltanwendung bei der Installierung oder Inbetriebnahme des Ger tes Achten Sie bei der Wahl des Installationsortes dar...

Страница 8: ...endungen mit separaten Lautst rkereglern und w hlbarer Quelle PC Signal oder Line Eingang Master Ausgang mit separatem Bass Regler Zus tzlicher Recording Ausgang Kopfh rerausgang mit Lautst rkeregler...

Страница 9: ...nen der Bedienelemente gelten f r den Betrieb mit der im Lieferumfang enthaltenen DJ Software Virtual DJ LE die optimal f r die Zusammenarbeit mit dem TMC 2 MK2 abgestimmt ist Der Controller verwendet...

Страница 10: ...er nderung der Wiedergabegeschwindigkeit Solange Sie die Tasten gedr ckt halten wird der Takt des Titels verlangsamt bzw erh ht 6 Tasten HOT CUE 1 3 Zum Speichern und Anw hlen von bis zu drei Cue Punk...

Страница 11: ...t den Endpunkt einer Schleife die daraufhin sofort gestartet wird Die Schleife wird solange wiederholt bis Sie die Taste erneut dr cken Tasten LOOP ADJ Stellen die Dauer der Schleife auf genau 1 2 4 8...

Страница 12: ...en des ausgew hlten Effekts Ist er Effekt aktiviert leuchtet die LED 30 Taste SYNC Zum Synchronisieren der Taktschl ge mit dem anderen Deck 31 Taste SAMPLER PLAY Zum Abspielen des angew hlten Samples...

Страница 13: ...rd abgeh rt 35 Regler X FADER CURVE Regelt f r die berblendcharaktersistik des Crossfaders linke Position weiches berblenden gleitender bergang z B f r langlaufende Mixe rechte Position hartes berblen...

Страница 14: ...ebenraum beschallung Der Ausgang liefert je nach Stellung des Umschalters PC LINE ein vom Computer kommendes Audiosignal oder das Signal einer externen Quelle am Line Eingang 44 USB Anschluss USB Ansc...

Страница 15: ...fte befindet sich der Naviagtionsbereich 1 Navigationsbereich Listet alle kompatiblen Laufwerke und Ordner des Computers in einer Baumstruktur auf 2 Suchfeld Zum Suchen von Titeln in der Datenbank des...

Страница 16: ...uf dem Mac die Datei install_virtualdj v7 dmg aus Folgen Sie nun den Anweisungen des Installationsprogramms 5 2 Installation unter Windows 1 Erlauben Sie den Installationsvorgang 3 Das Willkommensfens...

Страница 17: ...g mit Agree 5 Geben Sie Ihr Benutzerpasswort ein Die Software ist nun auf Ihrem Computer installiert ber das Icon im Programmfenster k nnen Sie Virtual DJ ffnen 2 Lesen Sie den Lizenzvertrag und klick...

Страница 18: ...ieren Hinweis Bewahren Sie die Seriennummer und die Installations CD an einem sicheren Ort auf denn Sie ben tigen diese bei einer Neuinstallation Ihres Systems oder bei einem Computerwechsel 2 Die Aut...

Страница 19: ...oren Damit Sie Software Updates und Plug ins herunterladen k nnen und um Zugriff auf weitere Funktionen zu erhalten m ssen Sie sich registrieren Rufen Sie dazu die Seite http www virtualdj com users r...

Страница 20: ...le Zuweisung der verschiedenen Software Parameter zu den Bedienelementen des Controllers erm glicht Einige bekannte Programme die ber einen MIDI Lern Funktion verf gen sind Native Instruments Traktor...

Страница 21: ...nstecker an den Kopfh rereingang HEADPHONE 1 oder ber einen 3 5 mm Klinkenstecker an den Kopfh rereingang HEADPHONE 2 an 3 Schlie en Sie ein DJ Mikrofon symmetrisch oder unsymmetrisch wahlweise ber ei...

Страница 22: ...er Stellung der Ausgangsregler MASTER CONTROL MASTER LEVEL und BOOTH VOLUME 6 Statt des vom Computer kommenden Audiosignals k nnen die Master Ausg nge und der Booth Ausgang auch das Signal einer exter...

Страница 23: ...nen allerdings nicht w hrend Virtual DJ verwendet wird 3 Die Stromversorgung des Controllers erfolgt ber den USB Anschluss des Computers Sollte der Anschluss jedoch nicht gen gend Strom liefern z B be...

Страница 24: ...rten 2 Belassen Sie das Feld Eing nge in der Grundeinstellung NONE 3 W hlen Sie im Feld Ausg nge die Einstellung HEADPHONES Es stehen dann die beiden Ausgangskan le Master Erste Karte und Kopfh rer Zw...

Страница 25: ...lversion haben Sie die M glichkeit weitere Navigationshilfen wie Play und Wartelisten zu erstellen und Filter zu setzen Mit der Funktion NetSearch k nnen sogar Titel und Videos in einer Onlinedatenban...

Страница 26: ...ken Sie mit der rechten Maustaste auf den Titel W hlen Sie dann BPM Re Analysieren bzw BPM scannen bei mehreren Titeln 2 Um ein ganzes Verzeichnis einzulesen klicken Sie im Ordnerverzeichnis links mit...

Страница 27: ...tereffekt 3 Dr cken Sie die Taste II PAUSE um die Wiedergabe zu unterbrechen gr ne LED leuchtet auf Durch mehrfaches Dr cken der Taste werden nacheinander der Titelanfang und alle gesetzten Cue Punkte...

Страница 28: ...CONTROL und MASTER LEVEL ein 7 Stellen Sie den Pegel f r den Ausgang BOOTH mit dem Regler BOOTH VOLUME ein 8 Das Aufnahmesignal am Aufnahmeausgang REC wird vor den Ausgangsreglern abgegriffen d h es w...

Страница 29: ...tst rke ein Tipp Wenn die Kopfh rerlautst rke zu laut ist obwohl Sie eine niedrige Einstellung mit dem Regler CUE LEVEL gew hlt haben k nnen Sie am Computer die Lautst rke anpassen Mit Windows XP z B...

Страница 30: ...e mit dem Jogdial exakt an und dr cken dann eine der Tasten HOT CUE 1 bis 3 Virtual DJ f gt eine Markierung in der Wellenanzeige f r jeden Cue Punkt hinzu 2 Mit den Tasten HOT CUE 1 bis 3 kann nun auf...

Страница 31: ...ktschl gen exakt zu dem Titel auf dem anderen Deck angepasst 3 F r die meisten Titel ist es empfehlenswert auch die Anf nge der 4 4 Takte zu synchronisieren Dazu m ssen die gro en Rechtecke des Schrit...

Страница 32: ...eicherpl tze k nnen ber die Software mit eigenen Samples belegt werden Alle Samples k nnen beliebig kombiniert werden 1 W hlen Sie durch Drehen des Reglers SAMPLE SELECTOR das gew nschte Sample Die zu...

Страница 33: ...uerhaft als Loop spielen soll Im Loop Modus dienen die beiden Pfeile darunter zum Anpassen der L nge des Samples 7 Um das Sample zu l schen und ein neues aufzunehmen klicken Sie wieder auf REC 8 Das S...

Страница 34: ...n oder mit dem beiliegenden Netzteil mit Strom versorgen Wenn des Problem weiterhin besteht versuchen Sie das Ger t zu deinstallieren und anschlie end neu zu installieren 1 Klicken Sie mit der rechten...

Страница 35: ...ystemsteuerung Energieoptionen 5 Stellen Sie den Energiesparplan auf H chstleistung Sollte diese Option nicht verf gbar sein klicken Sie auf Weitere Energiesparpl ne einblenden Klicken Sie auf Energie...

Страница 36: ...Seite anschlie en 10 3 Energieoptionen Moderne Computersysteme insbesondere mobile Ger te sind darauf ausgelegt so wenig Energie zu verbrauchen wie m glich Dies geht jedoch h ufig auf Kosten der Leist...

Страница 37: ...V DC 1000 mA ber mitgeliefertes Netzteil Eing nge DJ Mikrofon 3 pol XLR und 6 3 mm Klinke sym Line Stereo Cinch Ausg nge Master 3 pol Stereo XLR und Stereo Cinch Booth Stereo Cinch Rec Stereo Cinch Ko...

Страница 38: ...evice has to be qualified follow the instructions of this manual consider this manual to be part of the total product keep this manual for the entire service life of the product pass this manual on to...

Страница 39: ...drastic temperature fluctuation e g after transportation do not switch it on immediately The arising condensation water might damage your device Leave the device switched off until it has reached roo...

Страница 40: ...d was designed for indoor use only The power unit falls under protection class 2 and the TMC 2 MK2 under protection class 3 Do not shake the device Avoid brute force when installing or operating the d...

Страница 41: ...A applications with separate level controls and selectable source PC signal or line input Master output bass control Additional recording output Headphones output with level control for direct monitor...

Страница 42: ...of the control elements described below apply when using the TMC 2 MK2 with the supplied DJ software Virtual DJ LE which is designed to integrate seamlessly with the controller The TMC 2 MK2 uses the...

Страница 43: ...The function Pitch Bend creates a temporary change of speed As long as the buttons are pressed the title is played slower or faster 6 Buttons HOT CUE 1 3 To store and to call up to three cue points p...

Страница 44: ...the scratch function on and off 14 Jogdial In play mode for the function pitch bend as with the buttons PITCH BEND If the fast search mode is activated button SEARCH lights for fast forward and revers...

Страница 45: ...ers 24 Controls PARAMETER 1 and PARAMETER 2 Adjust the parameters for the selected effect 25 Indicators SAMPLE DISPLAY Indicate the selected samples 26 Control SAMPLE SELECTOR For selecting samples 27...

Страница 46: ...ed Position CUE 2 Deck B is monitored 35 Control X FADER CURVE Adjusts the characteristic of the crossfader left position smooth crossfading gradual transition e g for long mixes right position sharp...

Страница 47: ...PA application in a secondary room The output supplies an audio signal coming from the computer or the signal of an external source at the line input depending on the position of the selector switch...

Страница 48: ...On the bottom half the browser section is displayed 1 Browser section Lists all compatible drives and folders of the computer in a tree structure 2 Search field For searching titles in the data base...

Страница 49: ...7 exe under Windows or install_virtualdj v7 dmg under Mac Then follow the instructions of the installation program 5 2 Installation under Windows 1 Allow the installation to run 3 The welcome screen i...

Страница 50: ...Enter your system s password for installations Now the software is installed on your computer and you should find an icon in your Applications folder for opening Virtual DJ 2 Click Continue after read...

Страница 51: ...are Note Keep both the serial number and the installation CD in a safe place since both the serial number and the installation CD are required if you re install your system or change your computer 2 T...

Страница 52: ...ms can be found there To access software updates plug ins and further services register on the Virtual DJ website Go to http www virtualdj com users register html and create a user account You will ne...

Страница 53: ...to quickly assign the control elements of the controller to control specific parameters within the software Popular applications with MIDI learn function are Native Instruments Traktor Ableton Live Mi...

Страница 54: ...tionally via a 6 3 mm plug to input HEADPHONE 1 or a 3 5 mm plug to input HEADPHONE 2 3 You can connect a DJ microphone balanced or unbalanced optionally via an XLR plug to microphone input MIC 1 or a...

Страница 55: ...el is independent of the position of the output controls MASTER CONTROL MASTER LEVEL and BOOTH VOLUME 6 Instead of the audio signal coming from the computer the master outputs and the booth output can...

Страница 56: ...ect and disconnect the controller at any time although not when the Virtual DJ software is in use 3 The controller is supplied with power via the USB connection of the computer However if the connecti...

Страница 57: ...ion menu with the button CONFIG and select the Sound Setup tab 2 Leave control panel Inputs at NONE 3 In control panel Outputs select HEADPHONES The two output channels Master First card and Headphone...

Страница 58: ...he button ENTER FOLDER SELECT to activate the browser section after powering on Then turn the track encoder to browse the drives and folders Press the encoder to select a folder and to access titles W...

Страница 59: ...e mixing with Virtual DJ as the BPM analysis requires a lot of processing power and you computer will not respond as fast as it should Generally a BPM analysis is accurate However if a file is not pro...

Страница 60: ...ments affect the level Readjust the channel level with the GAIN control if necessary 5 Adjust the low frequencies for the output signal at the balanced master output with the control BASS LEVEL 6 Adju...

Страница 61: ...oth decks can be heard at the same volume 2 Adjust the desired headphones volume with the control CUE LEVEL Tip If the headphone volume is too high although you have selected a low setting with the co...

Страница 62: ...pot is reached fly cue or set the unit to pause at the desired spot with the button II PAUSE precisely select the desired spot with the JOGDIAL and then press one of the buttons HOT CUE 1 to 3 Virtual...

Страница 63: ...recisely matched to the title on the other deck 3 For most titles it is recommended to synchronize the beginnings of the 4 4 measure as well In this case the large squares of the CBG must overlap For...

Страница 64: ...ur own samples and assign them to the other six storage places All samples can be combined as desired 1 Turn the control SAMPLE SELECTOR to select the desired sample The corresponding LED of the SAMPL...

Страница 65: ...or as a continuous loop In loop mode the two arrows below adjust the sample length by half length or double length increments respectively 7 To delete the sample and start recording a new one click R...

Страница 66: ...ly an error indication is shown in front of the corresponding element Try to solve the problem by connecting the controller to another USB port on your computer or powering it with the included power...

Страница 67: ...gs Control Panel Power Management 2 Set the Power Scheme to Always On and set System Standby Turn off hard disks and Turn off monitor to Never 3 On laptops it is not recommended to run the laptop on i...

Страница 68: ...dio devices should only be connected to the USB ports on the left side 10 3 Power management Modern computer systems and especially mobile devices are engineered for the purpose of saving as much ener...

Страница 69: ...ack bal Line stereo RCA Outputs Master 3 pin stereo XLR and stereo RCA Booth stereo RCA Rec stereo RCA Headphones 3 5 mm and 6 3 mm jack bal USB port 2 0 type B Converter 16 bits Sample rate 48 kHz Di...

Страница 70: ...F 09 90 2F 00 B 2 PITCH BEND 09 90 43 7F 09 90 43 00 G 4 HOT CUE 1 09 90 04 7F 09 90 04 00 E 1 HOT CUE 2 09 90 69 7F 09 90 69 00 A 7 HOT CUE 3 09 90 01 7F 09 90 01 00 C 1 SEARCH 09 90 4A 7F 09 90 4A 0...

Страница 71: ...48 7F 09 90 48 00 C 5 PITCH BEND 09 90 49 7F 09 90 43 00 C 5 HOT CUE 1 09 90 01 7F 09 90 01 00 C 1 HOT CUE 2 09 90 6A 7F 09 90 6A 00 Bb 7 HOT CUE 3 09 90 40 7F 09 90 40 00 E 4 SEARCH 09 90 4B 7F 09 9...

Страница 72: ...DI CC Number MIDI Note TRACK 09 90 59 7F 09 90 5A 7F F 6 F 6 CROSSFADER 0B B0 08 7F Maximal 0B B0 08 00 Minimal 08 GAIN 0B B0 0E 7F Maximal 0B B0 0E 00 Minimal 14 HIGH 0B B0 46 7F Maximal 0B B0 46 00...

Отзывы: