Omnitronic TMC-01 Скачать руководство пользователя страница 22

00053491.DOC, Version 1.0

22/46

7.8 Wiedergabegeschwindigkeit verändern

Die Geschwindigkeit lässt sich mit dem Pitch-Schieberegler um bis zu ±100 % ändern.

1.  Der Einstellbereich für die Geschwindigkeit ist auf ±25 % voreingestellt. Durch mehrfaches Drücken der

Taste PITCH kann der Einstellbereich geändert werden: ±100 %, ±6 %, ±12 % und wieder auf ±25 %.

2.  Schieben Sie dann den Schieberegler nach oben, um die Geschwindigkeit zu verringern und nach

unten, um die Geschwindigkeit zu erhöhen. Das Display zeigt die prozentuale Änderung der

Geschwindigkeit an. Die Anzahl der Taktschläge ändert sich entsprechend.

Der Schieberegler rastet in der Mittelstellung ein. In dieser Position wird ein Titel mit Normalgeschwin-

digkeit abgespielt.

7.9 Master-Tempo-Funktion aktivieren

Mit einer veränderten Wiedergabegeschwindigkeit ändert sich auch proportional die Tonhöhe. Wird die
Master-Tempo-Funktion aktiviert, bleibt sie konstant. Drücken Sie dazu die Taste MASTER TEMPO (LED
leuchtet). Im Display leuchtet das Schlosssymbol KEYLOCK orange auf.

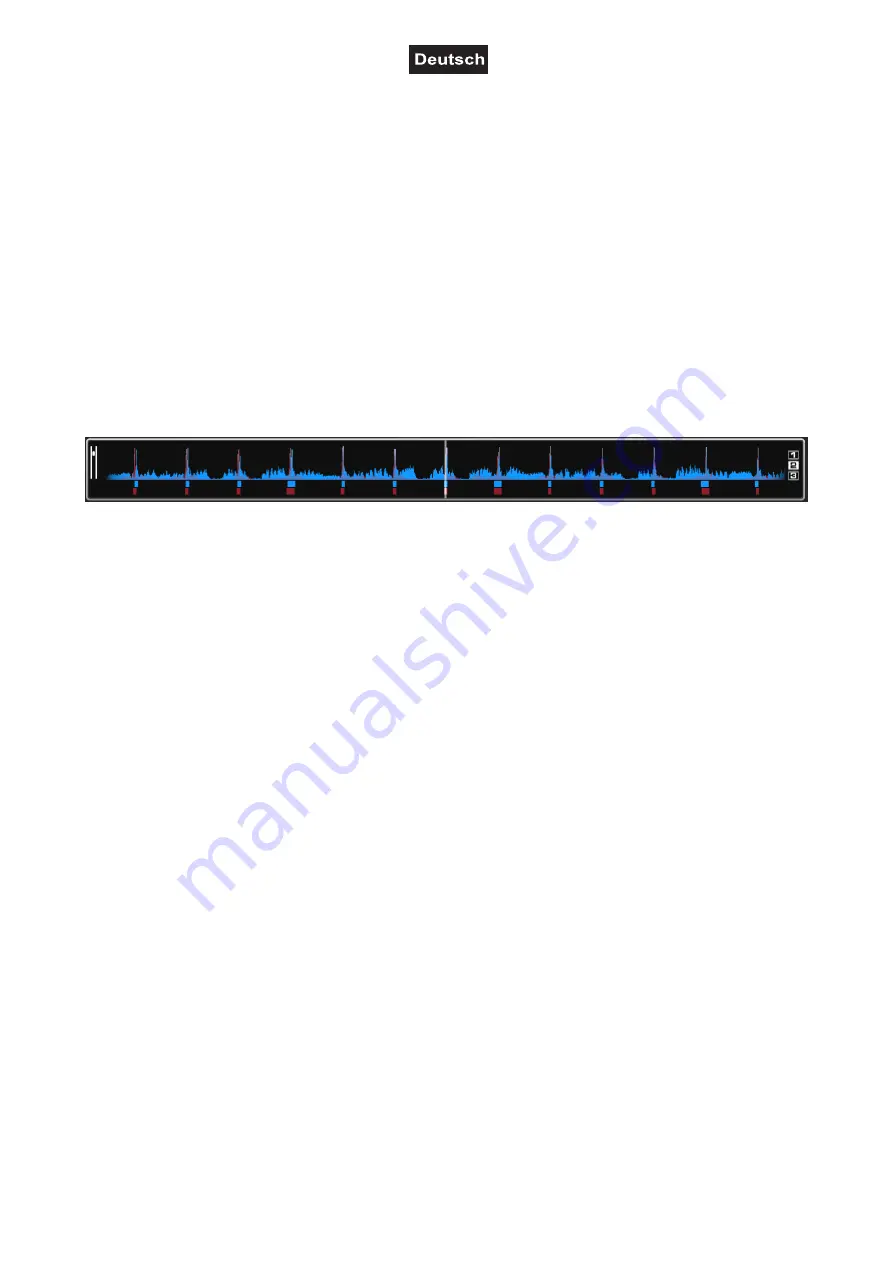
7.10 Deck A und Deck B im Takt angleichen

Die Taktschläge von zwei Titeln mit dem selben Tempo auf Deck A und B lassen sich zeitlich genau
übereinander legen (synchronisieren). Dadurch wird beim Überblenden von einem Deck zum anderen der
Rhythmus nicht unterbrochen. Als visuelle Hilfe wird im Rythmusfenster über den Decks die Geschwindigkeit
bzw. der Rhythmus der beiden Decks in Wellenform angezeigt. Die Spitzen markieren den Bassschlag. Die
Rechtecke darunter symbolisieren die Taktabstände im 4/4-Takt des Schrittweitenindikators CBG (Computer
Beat Grid). Die großen Rechtecke stehen für den Anfang des 4/4-Takts. Der Schrittweitenindikator ist
besonders hilfreich, wenn z. B. beim Intro eines Titels noch kein Bassschlag vorhanden ist. Zwei Titel sind im
Takt angepasst und laufen synchron, wenn die Spitzen beider Wellenformen und die CGB-Rechtecke
übereinander liegen.

1.  Zum Synchronisieren sollte der Titel, auf den übergeblendet werden soll, über den Kopfhörer vorgehört

werden (

s. Abschnitt 7.4).

2.  Starten Sie die Wiedergabe und drücken Sie die Taste SYNC an dem Deck, auf das übergeblendet

werden soll. Der Titel wird dadurch im Tempo und in den Taktschlägen exakt zu dem Titel auf dem

anderen Deck angepasst.

3.  Um auch die Anfänge der 4/4-Takte zu synchronisieren, müssen die großen Rechtecke des

Schrittweitenindikators übereinander liegen. Verwenden Sie dazu das Jogdial mit aktivierter Scratch-

Funktion: kurz bevor die großen Rechtecke übereinander liegen, lassen Sie das Jogdial los. Für eine

leichte Korrektur kann anschließend noch die Taste SYNC gedrückt werden.

5.  Auch durch Verwenden der Tasten PITCH BEND kann eine Taktangleichung erfolgen. Solange eine der

Tasten PITCH BEND + oder – gedrückt gehalten wird, läuft der Titel schneller bzw. langsamer.

7.11 Taktsynchrone Endlosschleife (Loop) abspielen

Ein Abschnitt innerhalb eines Titels kann beliebig oft ohne Tonunterbrechung als Endlosschleife (Loop)
wiederholt werden. Die Endlosschleifen werden durch die Smart-Loop-Funktion der Software mit dem Takt
des Titels synchronisiert (Schlosssymbol leuchtet orange).

1.  Drücken Sie während der Wiedergabe die Taste LOOP IN, wenn der gewünschte Startpunkt der Schleife

erreicht ist.

2.  Drücken Sie die Taste LOOP OUT, wenn der gewünschte Endpunkt der Schleife erreicht ist. Der

Abschnitt zwischen dem Start- und Endpunkt wird fortlaufend wiederholt.

3.  Durch Drücken der Pfeiltasten LOOP ADJ kann die Schleife auf genau 1, 2, 4, 8, 18 oder 32 Taktschläge

eingestellt werden. Über die Software lässt sich zusätzlich mit dem Drehregler SHIFT die Länge der

Schleife verdoppeln oder halbieren.

4.  Um die Schleife zu verlassen und die Musikwiedergabe normal fortzusetzen drücken Sie die Taste

LOOP OUT.

5.  Zum Programmieren einer anderen Schleife lässt sich der Start- und Endpunkt mit den Tasten IN und

OUT neu festlegen.

Содержание TMC-01

Страница 1: ... Copyright Nachdruck verboten Reproduction prohibited Für weiteren Gebrauch aufbewahren Keep this manual for future needs BEDIENUNGSANLEITUNG USER MANUAL TMC 01 USB MIDI CONTROLLER ...

Страница 2: ...00053491 DOC Version 1 0 2 46 ...

Страница 3: ...ller konfigurieren 18 7 BEDIENUNG 19 7 1 Titel aus der Datenbank des Computers laden 19 7 2 Titel abspielen 20 7 3 Grundeinstellung des Mixers 20 7 4 Vorhören der Decks 21 7 5 Zwischen den Decks überblenden 21 7 6 Schneller Vor und Rücklauf 21 7 7 Sprung zum Titelanfang oder einer bestimmten Stelle Cueing 21 7 8 Wiedergabegeschwindigkeit verändern 22 7 9 Master Tempo Funktion aktivieren 22 7 10 De...

Страница 4: ...the channels 41 7 5 Crossfading between the decks 41 7 6 Fast forward and reverse 41 7 7 Return to the starting point of the title or to a defined spot cueing 41 7 8 Pitch adjustment 42 7 9 Activating the master tempo function 42 7 10 Matching the beat between Deck A and Deck B 42 7 11 Playing a continuous loop synchronized with the beat 42 8 EFFECT FUNCTIONS 43 8 1 Switching on effects 43 8 2 Pla...

Страница 5: ... werden Nehmen Sie das Gerät aus der Verpackung 2 SICHERHEITSHINWEISE Dieses Gerät hat das Werk in sicherheitstechnisch einwandfreiem Zustand verlassen Um diesen Zustand zu erhalten und einen gefahrlosen Betrieb sicherzustellen muss der Anwender unbedingt die Sicherheits hinweise und die Warnvermerke beachten die in dieser Bedienungsanleitung enthalten sind Unbedingt lesen Bei Schäden die durch Ni...

Страница 6: ...r verwendet das MIDI Datenprotokoll und kann deshalb auch für andere MIDI gesteuerte Audio Software genutzt werden Die Stromversorgung des Controllers erfolgt über den USB Anschluss des Computers Sollte der Anschluss jedoch nicht genügend Strom liefern kann alternativ auch das mitgelieferte Netzteil verwendet werden Der Controller ist für den Anschluss an 5 V Gleichspannung 500 mA USB Schnittstell...

Страница 7: ...Regelcharakteristik Master Regler Cue Funktion mit 3 Hot Cues Stereo LED Pegelanzeige Extragroßer Track Encoder für schnelles Browsen in der Music Library Dual Player Sektion Berührungsempfindliche Jogdials mit Moduswahl Pitch Bend Scratch schnelle Suche Hochauflösende 14 Bit Pitchfader Effektive Sync Funktion automatische Taktangleichung Seamless Loop taktgenau Master Tempo Funktion für gleichble...

Страница 8: ... kann deshalb auch für andere MIDI gesteuerte Audio Software genutzt werden Wie Sie die einzelnen Funktionen den entsprechenden Bedienelementen des Controllers zuordnen wenn Sie eine andere DJ Software einsetzen entnehmen Sie bitte der Anleitung Ihrer Software 1 Regler PARAMETER 1 und PARAMETER 2 Zum Einstellen der Parameter für den ausgewählten Effekt 2 Taste EFFECT ON Zum Ein Ausschalten des aus...

Страница 9: ...er Taktschläge BPM eines Titels Dazu die Taste mehrere Male im Takt der Musik antippen 13 Tasten PITCH BEND und Die Funktion Pitch Bend erzeugt eine temporäre Veränderung der Wiedergabegeschwindigkeit Solange Sie die Tasten gedrückt halten wird der Takt des Titels verlangsamt bzw erhöht 14 Tasten HOT CUE 1 3 Zum Speichern und Anwählen von bis zu drei Cue Punkten je Titel 15 Pitch Schieberegler Zum...

Страница 10: ...OOP IN OUT und ADJ Tasten zur Wiedergabe einer taktsynchronen Endlosschleife Taste IN Bestimmt den Startpunkt einer Schleife Taste OUT Bestimmt den Endpunkt einer Schleife die daraufhin sofort gestartet wird Die Schleife wird solange wiederholt bis Sie die Taste erneut drücken Tasten LOOP ADJ Stellen die Dauer der Schleife auf genau 1 2 4 8 18 oder 32 Taktschläge ein 25 Jogdial Im Wiedergabemodus ...

Страница 11: ...ches Überblenden gleitender Übergang z B für langlaufende Mixe rechte Position hartes Überblenden abrupter Übergang z B für Scratchen und Cutten Verwenden Sie diesen Regler nicht bei laufender Musik um Lautstärkeunterschiede beim Umschalten zu vermeiden 32 Netzanschluss Anschluss für das beiliegende Netzteil zur Stromver sorgung alternativ zur USB Schnittstelle 33 Wahlschalter für die Stromversorg...

Страница 12: ...fte befindet sich der Naviagtionsbereich 1 Navigationsbereich Listet alle kompatiblen Laufwerke und Ordner des Computers in einer Baumstruktur auf 2 Suchfeld Zum Suchen von Titeln in der Datenbank des Computers Über den Auswahlknopf lassen sich verschiedene Suchkriterien abrufen 3 Datei und Suchergebnisanzeige Listet die Dateien des angewählten Ordners auf oder zeigt das Suchergebnis 4 Bedienfeld ...

Страница 13: ...f der CD ROM aus Folgen Sie nun den Anweisungen des Installations programms 5 2 Installation unter Windows A Erlauben Sie den Installationsvorgang C Das Willkommensfenster erscheint E Geben Sie den Programmpfad ein G Schließen Sie die Installation ab B Wählen Sie eine Sprache D Lesen und akzeptieren Sie den Lizenzvertrag F Starten Sie den Speichervorgang Die Sofware ist nun auf Ihrem Computer inst...

Страница 14: ... mit Agree E Geben Sie Ihr Benutzerpasswort ein Die Software ist nun auf Ihrem Computer installiert Über das Icon im Programmfenster können Sie Virtual DJ öffnen B Lesen Sie den Lizenzvertrag und klicken Sie Continue D Starten Sie die Installation mit Install F Die Dateien werden auf Ihren Computer übertragen G Schließen Sie die Installation ab ...

Страница 15: ...eriennummer die der CD ROM beiliegt ein um die Software zu aktivieren 2 Die Auto Update Anzeige erscheint Virtual DJ versucht jetzt eine Internetverbindung herzustellen um nach einer aktualisierten Version des Programms zu suchen 3 Der Initialisierungsbildschirm erscheint und das Programm wird geöffnet ...

Страница 16: ...iben Jedem Drehregler Rad Fader und jeder Taste des TMC 01 ist eine eigene MIDI Note Note no MIDI CC Control Change Nummer CC no sowie ein MIDI Kanal zugewiesen Jedes Mal wenn Sie einen Regler oder eine Taste betätigen sendet der TMC 01 MIDI Daten die von Ihrer Musiksoftware empfangen und verarbeitet werden Um die Anwendung mit dem TMC 01 zu steuern müssen Sie den Empfang von MIDI Daten des TMC 01...

Страница 17: ...h zu jeder Zeit anschließen und trennen 4 Die Stromversorgung des Controllers erfolgt über den USB Anschluss des Computers Sollte der Anschluss jedoch nicht genügend Strom liefern z B bei Anschluss an einen passiven USB Verteiler verwenden Sie das beiliegende Netzteil zur Stromversorgung Verbinden Sie die Anschlussleitung des Netzteils mit der Netzanschlussbuchse DC IN 5V 1A und stecken Sie das Ne...

Страница 18: ...endungsmöglichkeiten finden Sie in der Bedienungsanleitung der Software 1 Rufen Sie mit der Schaltfläche CONFIG das Einstellungsmenü der Software auf und konfigurieren Sie das Programm im Register Soundkarten für den Betrieb mit dem TMC 01 2 Abhängig von der Soundkarte Ihres Computers können im Feld Ausgänge verschiedene Einstellungen gewählt werden Grundeinstellung SINGLE OUTPUT ein Ausgangskanal...

Страница 19: ...en Navigationsbereich mit einem Druck auf die Taste ENTER FOLDER SELECT Drehen Sie dann den Track Encoder um ein Verzeichnis anzuwählen Drücken Sie den Encoder um Unterverzeichnisse anzuwählen Mit der Taste ENTER FOLDER SELECT kann wieder zurück auf die Hauptebene gesprungen werden Im Feld Suchergebnis werden die Titel mit verschiedenen Informationen angezeigt Titel Interpret und Taktschläge pro M...

Страница 20: ...MASTER CONTROL den Crossfader und in beiden Kanälen die Gain Regler und die Klangregler in die Mittelposition 2 Stellen Sie die beiden Kanalfader für ausreichend Reglerweg auf ca 2 3 des Maximums ein 3 Spielen Sie einen Titel auf Deck A ab und steuern Sie das Deck mit dem zugehörigen Gain Regler anhand der Pegelanzeige aus Optimale Aussteuerung liegt vor wenn bei durchschnittlich lauten Passagen P...

Страница 21: ...Stelle im Signaldiagramm oder im Positionsring um den Plattenteller 7 7 Sprung zum Titelanfang oder einer bestimmten Stelle Cueing Um schnell zu einer bestimmten Stelle zu springen lassen sich mit den Tasten HOT CUE 1 bis 3 drei Startpunkte Cue Punkte permanent speichern Die Cue Punkte bleiben auch nach dem Beenden des Programms erhalten und können jederzeit überschrieben werden Mit der Taste CUE ...

Страница 22: ...enn die Spitzen beider Wellenformen und die CGB Rechtecke übereinander liegen 1 Zum Synchronisieren sollte der Titel auf den übergeblendet werden soll über den Kopfhörer vorgehört werden s Abschnitt 7 4 2 Starten Sie die Wiedergabe und drücken Sie die Taste SYNC an dem Deck auf das übergeblendet werden soll Der Titel wird dadurch im Tempo und in den Taktschlägen exakt zu dem Titel auf dem anderen ...

Страница 23: ...spielen Im Display wird das Auswahlfenster grün markiert Das Sample wird solange abgespielt bis Sie den Regler erneut drücken Bei Bedarf können weitere Samples in gleicher Weise zugeschaltet werden 3 Stellen Sie mit dem Regler SAMPLER VOLUME die Lautstärke der Samplereinheit ein Über die Software kann mit den Pfeiltasten auch die Taktlänge angepasst werden 4 Die Taste SAMPLER PLAY lässt sich für S...

Страница 24: ...ndler jederzeit gerne zur Verfügung 10 TECHNISCHE DATEN Typ USB MIDI Controller Spannungsversorgung 5 V DC 500 mA über USB Anschluss oder 5 V DC 1000 mA über mitgeliefertes Netzteil USB Anschluss Typ B 2 0 Wandler 16 Bit Abtastrate 48 kHz Maße 360 x 260 x 70 mm Gewicht 1 7 kg Mindestanforderungen PC Windows XP SP2 Vista 7 Pentium IV 1 6 GHz Prozessor 1 GB RAM USB Anschluss Internetverbindung Mehrk...

Страница 25: ...S This device has left our premises in absolutely perfect condition In order to maintain this condition and to ensure a safe operation it is absolutely necessary for the user to follow the safety instructions and warning notes written in this user manual Important Damages caused by the disregard of this user manual are not subject to warranty The dealer will not accept liability for any resulting ...

Страница 26: ...w virtualdj com or http www omnitronic com The controller uses the MIDI data control and can therefore also be used for other MIDI controlled audio software The controller is supplied with power via the USB connection of the computer However if the connection should not supply sufficient power the supplied power unit can be used The controller is allowed to be operated with a direct current of 5 V...

Страница 27: ...annel Ultra smooth crossfader with adjustable curve Master control Cue function with 3 hot cues Stereo LED level display Extra large track encoder for quick music library browsing Dual player section Touch sensitive jog dials with mode selector pitch bend scratch fast search High resolution 14 bit pitch faders Dedicated sync function auto beatmatching Master Tempo tonal pitch remains constant Beat...

Страница 28: ... you would like to use the controller with another DJ program refer to that software s user manual to learn how to map the control elements to various functions within the application 1 Controls PARAMETER 1 and PARAMETER 2 Adjust the parameters for the selected effect 2 Button EFFECT ON Switches the selected effect on and off With the effect activated the LED will light up 3 Button EFFECT SELECTOR...

Страница 29: ...a title manually For this press the button several times to the beat of the music 13 Buttons PITCH BEND and The function Pitch Bend creates a temporary change of speed As long as the buttons are pressed the title is played slower or faster 14 Buttons HOT CUE 1 3 To store and to call up to three cue points per title 15 Pitch slide control Sets the speed if the button MASTER TEMPO lights up the tona...

Страница 30: ...nd ADJ Buttons for playing a continuous loop synchronized to the beat button IN Sets the starting point of a loop button OUT Sets the end point of a loop which is instantly started The loop will continue to play until the button is pressed once again buttons LOOP ADJ Set the length of the loop to exactly 1 2 4 8 18 or 32 beats 25 Jogdial In play mode for the function pitch bend as with the buttons...

Страница 31: ...der left position smooth crossfading gradual transition e g for long mixes right position sharp crossfading abrupt transition e g for scratching and cutting Do not use this control while a signal is present as this may cause a sudden change in volume 34 USB port USB jack type B for connecting a computer The controller sends and receives audio and MIDI data via the USB connection and is supplied wi...

Страница 32: ...e On the bottom half the browser section is displayed 1 Browser section Lists all compatible drives and folders of the computer in a tree structure 2 Search field For searching titles in the data base of the computer Via the selector button several search criteria can be selected 3 File and search result window Lists all files of the selected folder or displays the search results 4 Control panel D...

Страница 33: ...he file install_virtualdj V6 exe Then follow the instructions of the installation program 5 2 Installation under Windows A Allow the installation to run C The welcome screen is displayed E Enter the application path G Finish the installation B Select your language D Read and accept the license agreement F Start copying files Now the sofware is installed on your computer and you should find an icon...

Страница 34: ... Enter your system s password for installations Now the software is installed on your computer and you should find an icon in your Applications folder for opening Virtual DJ B Click Continue after reading the License Agreement D Click Install to perform the installation F Files will now copy onto your system G Click Close to finish the installation ...

Страница 35: ...d enter the serial number supplied with the CD ROM to activate the software 2 The Auto Update indication comes on Virtual DJ will now try to connect to the internet to check if a new version of the software is available 3 The initialization screen is shown and the program is opened ...

Страница 36: ... the TMC 01 is assigned with its own unique MIDI note Note no or Continuous Controller CC number CC no and MIDI channel Each time you turn a control push a button turn a wheel or move a fader the TMC 01 sends out MIDI data that is received and interpreted by your music software To control your music software with the TMC 01 make sure the program is configured to receive MIDI data generated by the ...

Страница 37: ...causing conflicts You may connect and disconnect the controller at any time 4 The controller is supplied with power via the USB connection of the computer However if the connection should not supply sufficient power e g when connected to a non powered USB hub use the supplied power unit Connect the cable of the power unit to the power input DC IN 5V 1A and the power unit to a power outlet Set the ...

Страница 38: ...onitoring the decks via headphones Please refer to the software s Quick Guide for further setup examples 1 Call the software s configuration menu with the button CONFIG and configure the program for operation with the TMC 01 in the tab Sound Setup 2 Depending on the computer s sound card various output configurations can be selected in control panel Outputs basic setting SINGLE OUTPUT one output c...

Страница 39: ... videos on the internet 2 Shortly press the button ENTER FOLDER SELECT to activate the browser section Then turn the track encoder to select a directory Press the encoder to select subdirectories With the button ENTER FOLDER SELECT you can jump back to the main directory The search result window lists the titles with various information title artist and beats per minute Virtual DJ PRO displays fur...

Страница 40: ...h channels the controls GAIN and the equalizers to mid position 2 Advance the two channel faders approx to 2 3 of the maximum for sufficient way for fading in and out 3 Play a title with Deck A and control the deck with the respective gain control according to the level indication An optimum level control is obtained if level values in the 0 dB range are shown at average volume If the red LEDs of ...

Страница 41: ...gram or in the position ring around the turntable platter 7 7 Return to the starting point of the title or to a defined spot cueing To quickly jump to a defined spot three starting points cue points can be stored permanently for the buttons HOT CUE 1 to 3 The cue points well be kept even after closing the program and can be overwritten at any time With the button CUE you can return to the beginnin...

Страница 42: ...eforms and the CGB squares occur at the same time 1 To synchronize the title to crossfade to should be monitored via headphones s section 7 4 2 Start the playback and press the button SYNC of the deck to which crossfading is desired Thus the speed and the beats of the title are precisely matched to the title on the other deck 3 In order to synchronize the beginnings of the 4 4 measure the large sq...

Страница 43: ...e control to play the sample In the display the selector panel is highlighted green The sample is played until you press the control once again If required further samples can be activated and played in the same way 3 Adjust the level of the sampler unit with the control SAMPLER VOLUME Via the software s arrow buttons the sample length can be adjusted by half length or double length increments 4 T...

Страница 44: ...ECIFICATIONS Type USB MIDI controller Power supply 5 V DC 500 mA via USB port or 5 V DC 1000 mA via supplied PSU USB port type B 2 0 Converter 16 bits Sample rate 48 kHz Dimensions 360 x 260 x 70 mm Weight 1 7 kg Minimum system requirements PC Windows XP SP2 Vista 7 Pentium IV 1 6 GHz processor 1 GB RAM USB port Multichannel sound card Minimum system requirements Mac Mac OS X 10 4 11 Core Duo 1 66...

Страница 45: ...A CC12 0c hex Pitch A CC14 0e hex HIGH A CC21 15 hex MID A CC22 16 hex LOW A CC23 17 hex GAIN A CC20 14 hex MIX CC29 1D hex XF SHAPE CC31 1F hex FILTER switch A Note E 6 58 hex FILTER A Note F 6 59 hex FILTER A Note F 6 5A hex LIST Note G 6 5C hex LIST Note A 6 5D hex SELECT switch A Note A 5 52 hex SELECT A Note B 5 53 hex SELECT A Note C 6 54 hex Touch A Note C 3 30 hex Wheel A jog mode touch on...

Страница 46: ...HIGH B CC25 19 hex MID B CC26 1a hex LOW B CC27 1b hex GAIN B CC24 18 hex MAIN CC28 1C hex VOL CC30 1E hex FILTER switch B Note F 7 66 hex FILTER B Note G 7 67 hex FILTER B Note G 7 68 hex LIST switch Note A 5 51 hex SELECT switch B Note C 6 55 hex SELECT B Note D 6 56 hex SELECT B Note D 6 57 hex Touch B Note C 3 31 hex Wheel B jog mode touch on CC17 11 hex Wheel B touch off time stretch off Note...

Отзывы: