background image

Butt Fusion Data Logger

Type 

SPG 2.0 

Ser. No. 202037204  ||||||||||||||||||||||||||||||

Input 

230V 50/60Hz

Manufacturer 

O.M.I.S.A. S r l


Via Verga 9/11


20845 Sovico (MB), Italy


Ph: +39 039 2323028

Versión de Junio de 2020

ES

 7

Manual de instrucciones SPG 2.0

O . M . I . S . A .   S   r   l

Via Verga 9/11

20845 Sovico (MB), 

Italia

2.8  Identifi cación del producto

La máquina está identifi cada por medio de una placa indicadora que nom­
bra el modelo (“Type”), el número de serie (“Ser. No.”) y el fabricante. Los 
primeros dos dígitos del número indican el año de fabricación.

Descripción del producto

3.1  Descripción de la unidad

El SPG 2.0 es un sistema de protocolo que elabora protocolos de solda-
dura documentando los procesos realizados con una máquina de soldar 

a tope para uniones de componentes termoplásticas, con tres funciones 

principales:

•  Mandar y ayudar al soldador en la realización del proceso;
•  Controlar/monitorizar  todos  los  parámetros  aplicables  durante  el 

proceso de soldadura;

•  Almacenar el proceso en un protocolo que lo documenta.

El producto puede conectarse a las máquinas destinadas al uso en el taller 
o en la obra y, en principio, es compatible con toda máquina de soldar a 
tope. Introducidos el tipo de material plástico, el diámetro del tubo y la 
espesor de su pared, la unidad calcula, teniendo en cuenta la máquina de 
soldar seleccionada, todos los parámetros que regirán el proceso de solda-
dura. El proceso integral se almacena automáticamente en la memoria y 
entonces puede ser exportado de diversas maneras, después del proceso, 

para facilitar diferentes tratamientos ulteriores.

Los datos que caracterizan la unión de piezas y su trazabilidad pueden 

introducirse con las teclas de cursor (véase la primera Info del capítulo 4.1) 

o ser leídos con un escáner para códigos de barra o un lector de tarjetas 
RFID.

El SPG 2.0 tiene un menú de confi guraciones permitiendo la personalización 
de su funcionamiento (véase el capítulo 4.2).

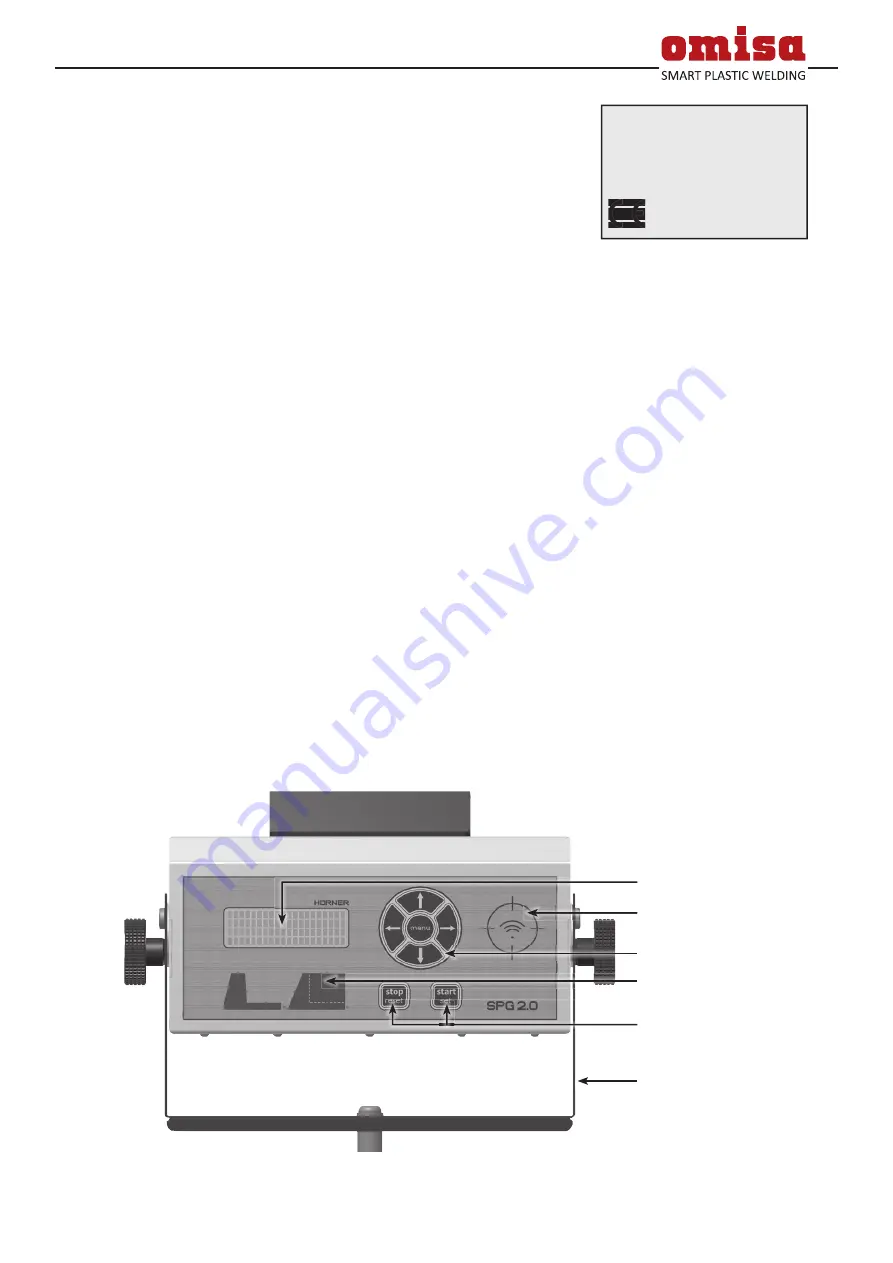
3.2  Panel de control

Pantalla

Diagrama del proceso

Soporte de fijación para 

colocación por la unidad 
hidráulica

Teclas START/SET y 
STOP/RESET

Lector de tarjetas RFID

Teclas MENÚ y de cursor

Содержание WHITELINE SPG 2.0

Страница 1: ...SPG 2 0 Versione Giugno 2020 O M I S A S r l Via Verga 9 11 20845 Sovico MB 39 039 2323028 info omisa it http www omisa it Manuale d uso User s Manual Bedienungsanleitung Manual de instrucciones...

Страница 2: ...man version of the manual enclosed herein is the original copy reflected in the translations herein Inliegende deutsche Fassung der Anleitung ist der Urtext welchen inliegende bersetzungen wiedergeben...

Страница 3: ...ll operatore 12 4 3 2 Immissione o modifica del numero commessa 13 4 3 3 Immissione o modifica del numero di saldatura 13 4 3 4 Immissione o modifica di ulteriori dati sulla tracciabilit dei component...

Страница 4: ...one di saldatura dipen de dalla corretta applicazione dei parametri di pressione temperatura e tempi Il valore di pressione corretto dipende dalla sezione del cilindro della saldatrice Prima di effett...

Страница 5: ...re il diritto di copiare o riprodurre in stampa o forma elettronica e distribuire nonch per tradurre sono riservati e sog getto al previo consenso scritto 2 2 Spiegazione delle icone Le seguenti espre...

Страница 6: ...are a intervalli ragionevoli se la macchina gestita dagli operatori come previsto e conforme alle linee guida adeguate alla sicurezza sul lavoro Il sistema deve essere messo in funzione solo se perfet...

Страница 7: ...Generare un protocollo per documentare il processo di saldatura Il prodotto pu essere utilizzato sia con macchine da cantiere sia da labo ratorio e pu essere collegato fondamentalmente a qualsiasi sa...

Страница 8: ...la tensione dell alimentazione alla quale collegata la macchina testa testa corrisponde alla tensione no minale della macchina Inoltre quando si utilizzano prolunghe deve essere rispettato quanto segu...

Страница 9: ...ssi bile selezionare le opzioni sullo schermo e accedere quindi al sottomenu premendo nuovamente il tasto MENU Nel sottomenu Dati macchina il tipo di macchina la sua designazione e la sua sezione cili...

Страница 10: ...e e per selezionare l opzione di impostazione desiderata Utilizzare il tasto freccia per attivare disattivare tra on e off quell opzione Se viene visualizzata una M accanto a un opzione di impostazion...

Страница 11: ...ono stampate automaticamente dopo la saldatura con la stam pante per etichette opzionale se collegata Norma M indica che premendo il tasto MENU si pu accedere a un sottomenu per selezionare la la norm...

Страница 12: ...a stampare una o pi etichette con riferimento a una data operazione di saldatura con la stampante per etichette opzionale Angolo M indica che premendo il tasto MENU si pu accedere ad un sottomenu per...

Страница 13: ...ssa appropriato Nell esempio del Display 3 l operazione di saldatura successiva verr salvata nel protocollo di saldatura numero 72 mentre il giunto stesso il numero 2 del lavoro attuale Info La prima...

Страница 14: ...volta Se i codici tubo sono stati precedentemente inseriti nei dati di tracciabilit per il giunto la macchina presenta automaticamente i parametri di salda tura contenuti nei codici tubo da confermare...

Страница 15: ...zione della pressione massima e fase di accostamento Dopo la piallatura il controllo dell allineamento dei tubi e la conferma dei parametri di saldatura il processo di saldatura vero e proprio inizia...

Страница 16: ...scaldamento Alla fine della fase di riscaldamento spostare il carrello mobile da parte Quindi rimuovere il termoelemento dai tubi Il conto alla rovescia del tempo di riscaldamento deve essere completo...

Страница 17: ...e i 50 C Temp ambiente alta La temperatura esterna fuori dal range compreso tra i 10 C e i 50 C Alimentazione difettosa all ultima saldatura La saldatura precedente rimasta incompleta la saldatrice st...

Страница 18: ...data e l ora della saldatura e i parametri di saldatura con una valutazione della qualit della stessa vedere Display 33 Per chiamare il report ViewWeld di un protocollo di saldatura premere il tasto...

Страница 19: ...a di fine o il primo e l ultimo protocollo che definiscono un intervallo di date o un intervallo di protocolli di cui i protocolli devono essere scaricati Quando si preme il tasto START SET si conferm...

Страница 20: ...i Importante La mancata osservanza di questa disposizione dispenser il pro duttore da qualsiasi garanzia e responsabilit per il prodotto e qualsiasi danno conseguente 7 Contatti per l assistenza e la...

Страница 21: ...eability Data 12 4 3 1 Entering the Welder ID Code 12 4 3 2 Entering or Changing the Commission Number 13 4 3 3 Entering or Changing the Joint Number 13 4 3 4 Entering oder Changing Further Data on Co...

Страница 22: ...ution The success of the jointing operation de pends on the proper pressures times and temperatures used in the process The cor rect pressure value depends on the section of the cylinder of the weldin...

Страница 23: ...ich explain the different functions of the product All rights in particular the right to copy or reproduce in print or electronic form and distribute as well as to translate are reserved and subject t...

Страница 24: ...perating owning organization engages to check at reasonable intervals if the system is operated by the welders as intended and under proper guidelines of occupational safety The system must be operate...

Страница 25: ...ding pro cess Generating a protocol to report the welding process The product can be used both with on site and with in shop machines and it can in principle be connected to any welding machine Upon e...

Страница 26: ...Off switch Caution It has to be ensured that the voltage of the power source the machine is connected to corresponds to the rated voltage of the machine Also the following has to be respected when usi...

Страница 27: ...nd cursor keys in the menu that appears Display 4 you can select a menu option then access the selected sub menu by pressing the MENU key again In the Machine Data sub menu the type of machine its des...

Страница 28: ...of the configuration menu use the and arrow keys to select the desired set up option Use the arrow key to toggle between on and off for that set up option If a M is shown next to a set up option this...

Страница 29: ...ag printer if such a printer is connected Standard M means that by pressing the MENU key the user can access a sub menu for selecting the standard guideline norma tive scheme applicable to the welding...

Страница 30: ...le M means that by pressing the MENU key the user can access a sub menu for entering the angle in degrees between the two components that are going to be welded Info All data that are available in the...

Страница 31: ...while the joint itself is joint number 2 of the current job commission Info The first joint of a commission for which no joint has been saved to memory so far always receives no 1 If the memory alrea...

Страница 32: ...for confirmation 4 4 1 Facing the Pipe Butts To ensure that the pipe butts are level insert the pipe facing tool between the machine carriages and turn it on Then have the pipes close in on the facin...

Страница 33: ...r butt facing pipe alignment check and confirmation of the welding parameters are done the welding process proper starts by setting the maximum pressure that will be reached during the process in the...

Страница 34: ...also aborts welding and displays an error message 4 4 6 Change over Stage Info An audible signal indicates the imminent change over during the last 10 seconds of the heat soaking stage At the end of...

Страница 35: ...t welding is incomplete The welding unit was disconnected from the power supply voltage while it was in progress To go on using the unit this error has to be acknowledged by pressing the STOP RESET ke...

Страница 36: ...uality of the joint welding operation see Display 33 To call the ViewWeld abstract of a welding report press the key in the start screen see Display 3 To print a tag of this operation press the START...

Страница 37: ...aded or the cursor keys can be used see first info in Sect 4 1 to enter a start date and an end date or the first and the last report that define a range of dates or a range of reports of which the re...

Страница 38: ...ty and safety are maintained Important Non compliance with this provision will dispense the manu facturer from any warranty and liability claims for the product and any consequential damage 7 Service...

Страница 39: ...g 11 4 3 Eingabe von normierten und frei definierbaren R ckverfolgbarkeitsdaten 12 4 3 1 Eingabe des Schwei ercodes 12 4 3 2 Eingabe oder nderung der Kommissionsnummer 13 4 3 3 Eingabe oder nderung de...

Страница 40: ...n Vorsicht Die ordnungsgem e Schwei naht h ngt da von ab dass die korrekten Dr cke Zeiten und Temperatur eingehalten werden Die korrekten Druckwerte h ngen vom Zylinderquerschnitt der Schwei maschine...

Страница 41: ...ren Alle Rechte insbesondere das Recht der Vervielf ltigung oder Reproduk tion in jeglicher Form Druck oder Datenerfassung und Verbreitung so wie der bersetzung bleiben vorbehalten und bed rfen der sc...

Страница 42: ...lviert haben Der Betreiber verpflichtet sich sich in angemessenen Abst nden davon zu ber zeugen dass die Schwei er mit dem System bestimmungsgem und unter Wahrung der Arbeitssicherheit arbeiten Das Sy...

Страница 43: ...r w hrend des Schwei vor gangs Protokollierung des Schwei vorgangs Das Produkt ist sowohl mit Werkstatt als auch mit Baustellenmaschinen einsetzbar und kann prinzipiell an jede Schwei maschine angesch...

Страница 44: ...it dem Hauptschaltschalter eingeschaltet Vorsicht Es ist darauf zu achten dass die Spannung der Stromversorgung derjenigen entspricht die die Maschine ben tigt Bei Verwen dung von Verl ngerungskabeln...

Страница 45: ...MEN Taste ffnet sich das zugeh rige Untermen Im Untermen Maschinendaten muss angegeben werden an welchen Maschinentyp Bezeichnung und zugeh riger Zylinderquerschnitt Steuer und Protokolliereinheit an...

Страница 46: ...hlte Konfigurationseinstellung von ein auf aus geschaltet und umgekehrt Steht bei einer Konfigurationseinstellung ein M so kann durch Dr cken der MEN Taste ein Untermen aufgerufen werden Wichtig Auf b...

Страница 47: ...er den optionalen Etikettendrucker ausgegeben werden sollen falls ein solcher ange schlossen ist Richtlinie M bedeutet dass durch Bet tigen der MEN Taste das Untermen zur Wahl des f r der Schwei ung g...

Страница 48: ...usdruck eines mehrerer Etikett en zu einer Schwei ung mit dem optionalen Etikettendrucker aufgerufen wird Winkel M bedeutet dass durch Bet tigen der MEN Taste das Un termen zur Eingabe des Winkels in...

Страница 49: ...e 3 wird die n chste Schwei ung im Protokoll mit der laufenden Nummer 72 abgespeichert und diese Schwei ung ist Naht Nr 2 der aktuellen Kommission Hinweis Die erste Naht einer Kommission f r die im Sp...

Страница 50: ...nter den zuvor eingelesenen R ckverfolgbarkeitsdaten die Rohrcodes waren bietet die Maschine automatisch die Rohrkenndaten aus den ein gelesenen Codes zur Best tigung an 4 4 1 Hobeln Zum Hobeln muss d...

Страница 51: ...Angleichphase Nach Hobeln Versatzkontrolle und Best tigung der Schwei kenndaten beginnt der eigentliche Schwei prozess mit der Einstellung des Gesamt drucks d i der h chste Druck der w hrend des gesam...

Страница 52: ...in akustisches Signal zeigt in den letzten 10 Sekun den der Anw rmphase die nahende Umstellphase an Am Ende der Anw rmphase sind die Spannwerkzeuge der Maschine aus einanderzufahren Nehmen Sie anschli...

Страница 53: ...e w hrend ihr von der Versorgungsspannung getrennt Um weiter arbeiten zu k nnen muss die Meldung durch Dr cken der STOP RESET Taste quittiert werden Au entemperatur zu hoch Au entemperatur au erhalb d...

Страница 54: ...d eine Beurteilung der Naht Schwei ungsg te vgl Anzeige 33 Das ViewWeld Kurzprotokoll wird vom Anfangsbildschirm vgl Anzeige 3 durch Dr cken der Taste aufgerufen Um ein Etikett auszudrucken dr cken Si...

Страница 55: ...llen ausgew hlt werden oder es kann durch Eingabe mit den Pfeiltasten vgl Hinweis in Abschn 4 1 eines Anfangs und Enddatums bzw des ersten und letz ten Protokolls ein Datums bzw ein Protokollbereich b...

Страница 56: ...sind durchgef hrt werden Dies garantiert einen gleichbleibend hochwertigen Ger te und Sicherheitsstandard Wichtig Bei Zuwiderhandlung erlischt die Gew hrleistung und Haftung f r das Produkt und eventu...

Страница 57: ...roducci n o edici n del n mero de obra 13 4 3 3 Introducci n o edici n del n mero de soldadura 13 4 3 4 Introducci n o edici n de otros datos de trazabilidad 13 4 4 Realizaci n de la soldadura 14 4 4...

Страница 58: ...ecta depiende de la aplicaci n de las presiones tiempos y temperaturas cor rectos El par metro de presi n debe calcularse en funci n de la secci n del cilindro de la m quina de soldar Antes de iniciar...

Страница 59: ...tulos destinados a explicar el funcionamiento del producto Todos los derechos en particular el derecho de copia y reproducci n en cualquier forma sobre papel o digital y la distribuci n as como la tra...

Страница 60: ...o haber seguido una formaci n adecuada El explotador se compromete a verificar en intervalos regulares que los soldadores utilizan la m quina debida mente y cumpliendo los reglamentos de seguridad la...

Страница 61: ...oceso de soldadura Almacenar el proceso en un protocolo que lo documenta El producto puede conectarse a las m quinas destinadas al uso en el taller o en la obra y en principio es compatible con toda m...

Страница 62: ...onando el interruptor Encendido Apagado Atenci n Se debe asegurar que el voltaje de la fuente de alimentaci n es correspondiente al voltaje de la m quina Se debe tener en cuenta lo siguiente utilizand...

Страница 63: ...ci n deseada y luego acceder al submen de sta presionando la tecla MEN otra vez Pantalla 4 En el submen de Informaci n M quina se define el tipo de la m quina su designaci n y secci n de cilindro que...

Страница 64: ...ad necesarios para que aparezcan en los informes de soldaduras El submen deseado se selecciona mediante las teclas y y se acceden presionando el bot n MEN En ambas partes del Men de Configuraciones ut...

Страница 65: ...mero inventario M significa que presionando la tecla MEN el usuario accede a un submen para establecer el n mero de la m quina seg n el inventario de la empresa propietaria explotadora N mero etiqueta...

Страница 66: ...ta opci n N mero etiquetas M significa que presionando la tecla MEN el usua rio accede a un submen para para iniciar la impresi n de etiquetas referenciadas a un ciclo de soldadura en concreto por la...

Страница 67: ...de la comisi n obra actual cuyo n mero previamente introducido Por ejemplo en la Pantalla 3 vemos que la pr xima soldadura en la memoria de la m quina es el No 72 mientras el n mero de uni n o cord n...

Страница 68: ...os componentes hay que colocar el refrentador entre los dos y ponerlo en marcha Ponga los extremos en contacto con el refrentador y espere hasta que se forme una viruta continua que de la vuelta dos a...

Страница 69: ...sion totale et phase d galisation avant retrait Despu s de refrentado la comprobaci n de alineaci n de los componen tes y la confirmaci n de los par metros t cnicos el proceso de soldadura comienza co...

Страница 70: ...a soldadura con un mensaje de error 4 4 6 Fase de cambio y puesta en contacto Info Una se al ac stica sonar durante los ltimos 10 segundos de la fase de calentamiento indicando que habr que retirar el...

Страница 71: ...icante o un taller autorizado para verificaci n y reparaci n Fallo reloj El reloj interno de la m quina est defectuoso reiniciarlo en el Men de Configuraciones Fallo de fuente de alimenta ci n en la l...

Страница 72: ...zaci n de la funci n ViewWeld para visualizaci n de los protocolos e impresi n de etiquetas La funci n ViewWeld permite la visualizaci n del informe protocolo de la ltima soldadura e impresi n de una...

Страница 73: ...cursor y v ase la primera Info del cap tulo 4 1 para elegir el n mero de obra de los disponibles en la memoria o utilice todas las teclas de cursor para introducir el primero y el ltimo registro del...

Страница 74: ...ra se garantiza un nivel superior constante de calidad y de seguridad para su producto Importante L incumplemiento de esta disposici n releva al fabricante de todas las responsabilidades y garant as a...

Страница 75: ...ntos de nor malizaci n Conformit CE Conformidad CE Dir 2012 19 UE Dir 2014 30 UE Dir 2014 35 UE Dir 2006 42 CE inquanto applicabile por lo que aplicable Dir 2011 65 UE Altre norme Otras normativas EN...

Страница 76: ...19 EU Dir 2014 30 EU Dir 2014 35 EU Dir 2006 42 EG insofar as applicable soweit anwendbar Dir 2011 65 EU Other Standards Andere Normen EN 61000 6 2 DIN EN 60529 EN 61000 6 3 ISO 12176 2 EN IEC 60335...

Отзывы: