manualshive.com logo in svg
background image


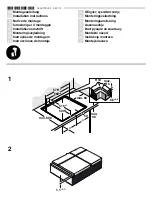
INSTALLATION OF BUILT IN COOKTOP 

In order to prevent leakage of any liquids on the counter, a special sealing tape is supplied together with your 

cooktop.  Apply this seal around the bottom edge of the cooktop (see below).  The brackets are installed to 

hold the cooktop in place.


This appliance can be installed into a workbench 30-40mm thick.  

When cutting the hole in the work bench, keep in mind the correct space and ventilation which are shown in the diagrams below. 


Cut out a hole in the bench top as shown below.  Place the cooktop (controls to the front) in the hole and fix in 
position using the brackets. 


The bottom of the cooktop reaches temperatures above 95°C.  A board must be placed a minimum of 130mm 
below the cooktop that prevents anyone from touching the underside of the cooktop. Take care that there is 
adequate ventilation for air exchange to the inductive elements. 

Содержание OI63Z

Страница 1: ...INSTALLATION OPERATION AND MAINTENANCE INSTRUCTIONS Induction Cooktop OI63Z...

Страница 2: ...g an electrical appliance it is vital that the appliance is installed correctly by an authorised person and that you read the safety instructions carefully to avoid misuse and hazards It is important...

Страница 3: ...d down and is turned off Failure to clean properly can damage the unit Do not use a steam jet or any other high pressure cleaning equipment to clean the appliance 15 When the appliance is not being us...

Страница 4: ...ound on the rating plate identification plate affixed to the underside of the appliance Type Total Power Induction 6200W SIZES Due to continual product development Omega reserves the right to alter sp...

Страница 5: ...f you have any doubts call in a licensed electrician to check the system The manufacturer declines all responsibility for damage resulting from an installation which has not been correctly earthed WAR...

Страница 6: ...cially by the technician who will position the appliance CHOOSING A LOCATION FOR THE APPLIANCE There are several points to pay attention to when choosing a location for your cooktop Make sure to take...

Страница 7: ...k When cutting the hole in the work bench keep in mind the correct space and ventilation which are shown in the diagrams below Cut out a hole in the bench top as shown below Place the cooktop controls...

Страница 8: ...ssful operation acoustically On all Heat Level Displays a 0 will appear and all Decimal Points of the Heat Level displays will flash 1 second on 1 second off If there is no operation within 20 seconds...

Страница 9: ...imultaneously pressing the and buttons after which a beep signal sounds and 0 appears in the Heat Level Display B Reduction of the heat setting to 0 by operating the button When this happens the assoc...

Страница 10: ...g button a second time or decreasing the time to 0 will turn off the timer functions Child Lock The child lock is used to set the appliance up so when it is first turned on it is in a locked mode whic...

Страница 11: ...residual heat stored in the appliance the related residual heat indicator lamp will be on In order to avoid burns let the appliance cool down Remove all spilt food and fat with a clean damp warm slig...

Страница 12: ...2 A division of Shriro Australia Pty Ltd 104 Vanessa St Kingsgrove NSW 2208 IN AUSTRALIA 1300 795 572 IN NEW ZEALAND 09 415 6000 www omegaappliances com au IM Ref OI63Z 12 2015 09FC FOR INDOOR USE ONL...

Отзывы: