background image

8

   EN

Quick Start 

Guide

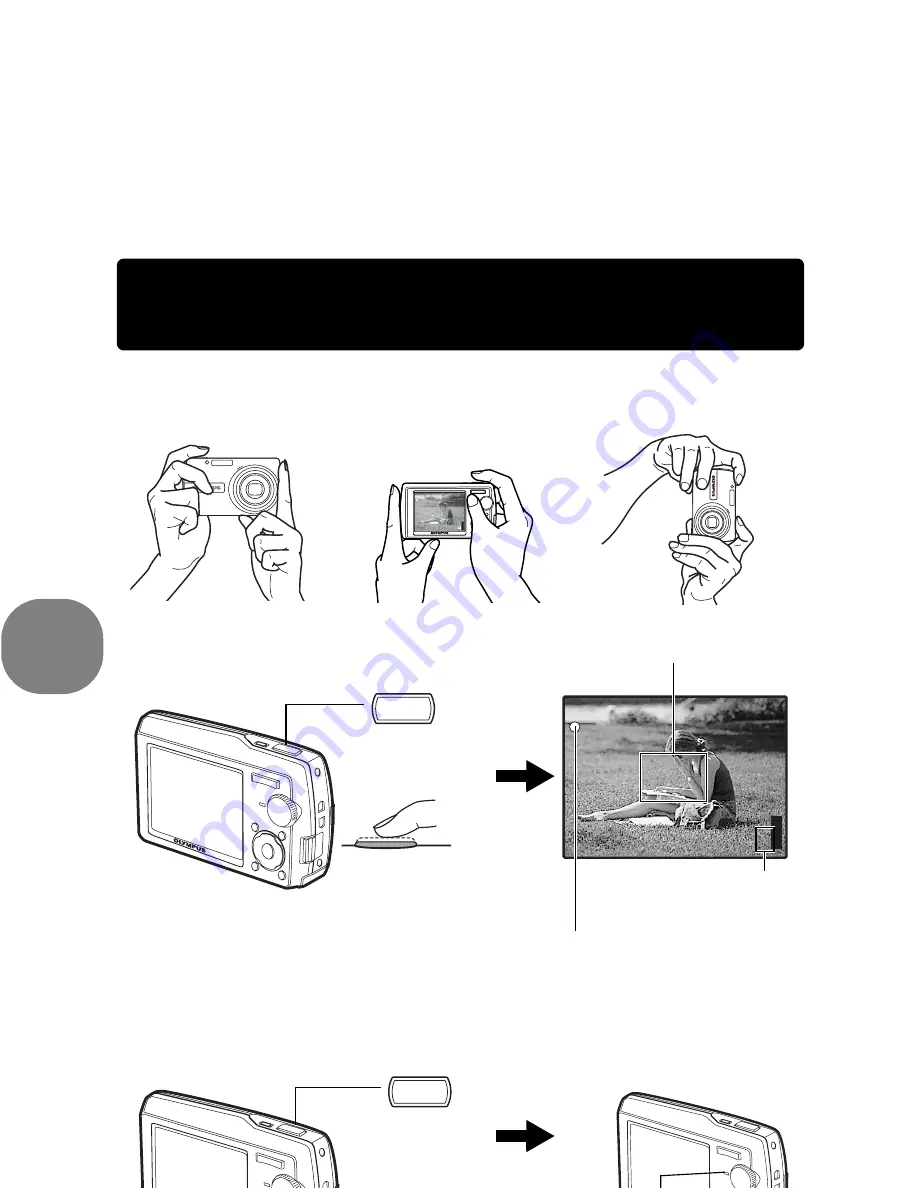
Take a picture

a. Hold the camera

c. Shoot

Horizontal grip

Vertical grip

b. Focus

The card access lamp blinks.

Shutter Button

(Pressed 

halfway)

P

P

HQ

HQ 3648

3648

×

2736

2736

[IN

IN]

44

[

]

The green lamp indicates the focus and 

exposure are locked.

Place this mark over your 

subject.

The number of remaining 

still pictures is displayed.

(Pressed 

completely)

Shutter Button

Содержание Stylus 1000

Страница 1: ...operations Button operations Printing pictures Using OLYMPUS Master Getting to know your camera better DIGITAL CAMERA Quick Start Guide This manual will help you get started using your camera right a...

Страница 2: ...about camera operations and how to take better pictures Read about convenient functions and safety precautions on how to use your camera more effectively Learn about the menus that control the functi...

Страница 3: ...l Camera Strap LI 12B Lithium Ion Battery LI 10C Battery Charger USB Cable AV Cable OLYMPUS Master Software CD ROM Items not shown Advanced Manual this manual Basic Manual and warranty card Contents m...

Страница 4: ...rt the battery in the camera Charging Indicator Light On Red Charging Light On Green Charging complete Charging time Approx 2 hours AC Wall Outlet 2 1 Power Cable Battery Charger Lithium Ion Battery 3...

Страница 5: ...s function allows you to shoot pictures by selecting a scene according to the shooting condition g This function allows you to set the target items by following the shooting guide displayed on the scr...

Страница 6: ...s of the year are fixed b Press the 3 button About the date and time setting screen MENU CANCEL X Y M D Y M D Y Y M D D T I M E T I M E Y M D Year Month Day Exits a setting Minute Date formats Y M D M...

Страница 7: ...the 1F button and the 2Y but ton to select Y M D j After all items have been set press the o button For precise time setting press the o button as the time signal strikes 00 seconds 2006 2006 11 11 26...

Страница 8: ...p Vertical grip b Focus Shutter Button Pressed halfway P P HQ HQ 3648 3648 2736 2736 IN IN 4 4 The green lamp indicates the focus and exposure are locked Place this mark over your subject The number o...

Страница 9: ...the picture you want to erase b Press the S button c Press the 1F button to select YES and press the o button to erase the image 12 30 12 30 06 11 26 06 11 26 100 0001 100 0001 1 HQ HQ IN IN t Mode D...

Страница 10: ...hot Compose your picture with the focus locked and then completely press the shutter button to shoot a picture When the green lamp blinks the focus is not adjusted properly Try locking the focus again...

Страница 11: ...isplay the shooting guide again To change the setting without using the shooting guide set the shooting mode to another one Shooting guide settings can be reverted to their defaults by pressing m or c...

Страница 12: ...continuous shooting P 21 ESP n Changing the area for measuring the brightness of a subject P 21 Displays the Top Menu Shooting mode Zooming in and out on your subject 4 Arrow pad 1243 5 o button OK F...

Страница 13: ...30 12 30 06 11 26 06 11 26 100 0004 100 0004 4 HQ HQ IN IN t 1 1 2 3 4 5 6 7 8 9 IN IN IN IN IN IN Close up playback Press T to incrementally enlarge the picture up to 10 times the original size Pres...

Страница 14: ...ng digital image stabilization This function reduces the blur caused by a moving subject or camera movement When shooting in a dark environment ISO is automatically increased which may increase electr...

Страница 15: ...in playback mode and press h g EASY PRINT P 35 In playback mode select the picture you want to erase and press S Select YES and press o Once erased pictures cannot be restored Check each picture befor...

Страница 16: ...HQ HQ 3648 3648 2736 2736 ISO 1600 ISO 1600 n i P HQ HQ 3648 3648 2736 2736 2 0 2 0 k IN IN 4 4 R l 12 30 12 30 06 11 26 06 11 26 100 0004 100 0004 4 HQ HQ IN IN t ISO 400 ISO 400 12 30 12 30 06 11 26...

Страница 17: ...t the bottom of the monitor Follow these guides to navigate the menus About the menus Operation guide MENU button o button Arrow pad 1243 Mode Dial SCN OK MENU SET EXIT SCN SCN SETUP SETUP SETUP SILEN...

Страница 18: ...lection The menu item is set and the previous menu is displayed Press m repeatedly to exit the menu To cancel changes and continue menu operation press m before pressing o Using the menus Shooting mod...

Страница 19: ...ding text to a picture 2304 1728 2048 1536 SQ2 1600 1200 Standard compression This is useful for postcard sized prints This is useful for viewing pictures on a computer 1280 960 1024 768 This is usefu...

Страница 20: ...res by holding down the shutter button After shooting the pictures select the ones you want to erase by marking them with a R and press S to erase them 3 s Scene Selecting a scene mode according to th...

Страница 21: ...ht shooting of clear sharp pictures The higher the value the better the camera s light sensitivity and ability to shoot with a fast shutter speed and in low light conditions However high sensitivity i...

Страница 22: ...ber the frame displayed on the monitor as a rough indication then compose the shot so that the edges of the previous picture in the frame overlap with the next shot AF MODE Changing the focusing area...

Страница 23: ...ORDER PRINT ORDER SILENT SILENT MODE MODE SILENT MODE MOVIE MOVIE PL PLAY MOVIE PLAY OK MENU SET EXIT P ALBUM ALBUM ALBUM SLIDE SLIDE SHOW SHOW SLIDE SHOW EDIT EDIT EDIT ERASE ERASE ERASE SETUP SETUP...

Страница 24: ...12 30 06 11 26 06 11 26 100 0004 100 0004 00 00 00 36 00 00 00 36 IN IN 1 Increases the volume 2 Reduces the volume 3 Each time you press the button the playback speed changes in the following order...

Страница 25: ...se or counterclockwise and press o Use the arrow pad and the zoom button to adjust the position and size of the picture and press o to finish This function lets you select a label integrate the label...

Страница 26: ...them as a new picture INDEX containing thumbnails of each frame Use 43 to select a movie and press o Use the arrow pad to select the first frame and press o Select the last LAYOUT Making a layout of...

Страница 27: ...ASE but they are all erased by formatting Select the picture with 43 and protect it by selecting ON with 12 You can protect several frames in succession 9 is displayed when the picture is protected Pi...

Страница 28: ...ET EXIT MENU YES CANCEL I N R IN IN OK MENU SET BACK ALBUM ENTRY SEL IMAGE SET CALENDAR SET ALL OK MENU SET BACK SEL ALBUM SEL ALBUM SEL ALBUM 1 Select the album entry method Select an album to add th...

Страница 29: ...pictures SEL IMAGE Erase by selecting the single frame ALL ERASE Erase all the pictures in the internal memory and the card Album playback menus MENU S SEL IMAGE I N GO BACK OK P EDIT EDIT EDIT SETUP...

Страница 30: ...n When the selection is completed press o for a while UNDO ALL Undo all pictures in the album LABEL IMAGE Selecting the label image album cover 3 CLOSE ALBUM SETUP menus OK OK SET EXIT HOLD SEL IMAGE...

Страница 31: ...on screen display Available languages vary depending on the area where you purchased this camera You can add other languages to your camera with the provided OLYMPUS Master software You can set the vo...

Страница 32: ...FF The picture being recorded will not be displayed This is useful when you want to prepare for your next shot quickly ON The picture being recorded will be displayed temporarily on the monitor This i...

Страница 33: ...tor VIDEO OUT Playing back pictures on a TV NTSC PAL OK SET MENU BACK s 1 Brightens the monitor 2 Darkens the monitor Press o to confirm your selection Connect to the TV s video input yellow and audio...

Страница 34: ...ded with the date and time set in X ON Switches to the date and time set in DUALTIME When setting the dual time select ON and then set the time Pictures are recorded with the date and time set in DUAL...

Страница 35: ...ed STANDARD All printers that support PictBridge have standard print settings If STANDARD is selected on the settings screens P 37 pictures are printed according to these settings Refer to the printer...

Страница 36: ...the USB cable from the printer 1 Display the screen indicated on the right according to the procedure 1 and 2 in P 35 and press o 2 Select CUSTOM PRINT and press You can use EASY PRINT even when the c...

Страница 37: ...or the card MULTI PRINT Prints one picture in multiple layout format ALL INDEX Prints an index of all the pictures stored in the internal memory or the card PRINT ORDER Prints the pictures according t...

Страница 38: ...ngs DPOF OK SET MENU BACK PRINT INFO 1 WITHOUT WITHOUT DATE FILE NAME P x I N Sets the number of prints You can select up to 10 prints DATE If you select WITH pictures are printed with the date FILE N...

Страница 39: ...printable at all photo stores To use print services without using DPOF Pictures stored in the internal memory cannot be printed at a photo store The pictures need to be copied to a card before taking...

Страница 40: ...IME All pictures are printed with the shooting time 4 Select SET and press o You can reset all the print reservation data or just for selected pictures 1 Select top menu PRINT ORDER and press o Playin...

Страница 41: ...the OLYMPUS Master software gP 44 Download image files to the computer gP 45 Disconnect the camera from the computer gP 46 Using OLYMPUS Master What is OLYMPUS Master Prepare the following items befo...

Страница 42: ...installed automatically Macintosh OS Mac OS X 10 2 or later CPU Power PC G3 500 MHz or later RAM 128 MB or more at least 256 MB is recommended Hard disk capacity 300 MB or more Connector USB port Mon...

Страница 43: ...LYMPUS Master instruction manual If this screen is not displayed Adobe Reader is already installed on your computer To install Adobe Reader click OK 5 Follow the on screen instructions The screen conf...

Страница 44: ...s application and start OLYMPUS Master Note The camera functions are disabled while the camera is connected to a computer Connecting the camera to a computer via a USB hub may cause unstable operation...

Страница 45: ...ng images 1 Transfer Images button Downloads images from the camera or other media 2 Browse Images button The Browse window is displayed 3 Online Print button The online print window is displayed 4 Pr...

Страница 46: ...lick the message that is displayed 3 When a message saying that the hardware can be ejected safely click OK Macintosh 1 The trash icon changes to the eject icon when the Untitled or NO_NAME icon on th...

Страница 47: ...n the Browse window OLYMPUS Master switches to view mode and the first frame of the movie is displayed 2 To play back the movie click the playback button at the bottom of the screen The names and func...

Страница 48: ...Time 5 Select the thumbnail image that you want to print and click Add A preview of the selected image is displayed on the layout 6 Select the number of copies 7 Click Print Printing starts To return...

Страница 49: ...nection is displayed 4 Select PC and press o 5 Click OK OLYMPUS Master will recognize the actual Version of your camera now Click Check for latest Version and the Software is searching at the Olympus...

Страница 50: ...o turn the camera on The mode dial is set to q This is the playback mode for displaying pictures on the monitor Set the mode dial to a shooting mode The mode dial is in the position of g No pictures c...

Страница 51: ...cus on the subject and then recompose your picture Set AF MODE to iESP g AF MODE Changing the focusing area P 22 The subject is moving quickly Focus the camera on a point roughly the same distance awa...

Страница 52: ...ures With the digital zoom part of the image is cropped and enlarged The greater the magnification the grainier the picture appears g DIGITAL ZOOM Zooming in on your subject P 21 Increasing the ISO se...

Страница 53: ...ce of the subject appearing dark is effective for shooting against backlight and under fluorescent and other artificial lightening g 3 button Flash shooting P 13 There are two ways to record the pictu...

Страница 54: ...ng the internal memory or card P 31 Image quality Image size Number of storable still pictures Internal memory Using a 512 MB card With sound Without sound With sound Without sound SHQ 3648 2736 5 5 1...

Страница 55: ...PRINT ORDER ALBUM ALBUM ENTRY UNDO ENTRY LABEL IMAGE FORMAT BACKUP Lamp indicators Lamp Status Self timer lamp The lamp lights for approximately 10 seconds blinks for approximately 2 seconds and then...

Страница 56: ...the settings to default settings execute RESET g RESET Restoring default settings P 19 The monitor may be difficult to see and the exposure difficult to confirm when shooting under bright light Press...

Страница 57: ...the picture certain red eyes may not be correctable Also areas other than the eyes may be wrongly corrected In addition the digital image stabilization mode cannot be activated when the USB cable is c...

Страница 58: ...zoom button to view the pictures as thumbnails index display or in a calendar format calendar display g Zoom button Zooming while shooting close up playback P 12 Once sound is added to a picture it i...

Страница 59: ...O PICTURE There are no pictures in the internal memory or on the card The internal memory or the card contains no pictures Record pictures r PICTURE ERROR There is a problem with the selected picture...

Страница 60: ...en operated while changing settings on the camera Do not operate the printer while changing settings on the camera PRINT ERROR There is a problem with the printer and or camera Turn off the camera and...

Страница 61: ...ons with restrictions in scene modes P 62 Functions available in shooting modes Functions available in shooting modes and scene modes Shooting mode K s n Function P AUTO F 9 9 9 9 Flash 9 9 9 9 9 Y 9...

Страница 62: ...picture quality is fixed to 640 x 480 4 Excluding s Function B C N V g F D G U W c R S X j P d i e f Flash 9 9 9 9 4 9 9 1 9 9 1 9 1 9 9 9 Y 9 9 9 9 9 9 9 9 Optical zoom 9 9 9 9 9 9 9 9 9 ESP n 9 9 9...

Страница 63: ...s where chemical products are handled since this may result in corrosion This camera uses one Olympus lithium ion battery LI 12B or LI 10B No other type of batteries can be used Power consumption by t...

Страница 64: ...rea The part where the data transferred from the camera enters the card Compatible cards xD Picture Card 16MB 1GB Using the internal memory or card You can confirm on the monitor whether the internal...

Страница 65: ...multi adapter CB MA1 accessory is required Do not use any other AC adapter with this camera Note Do not remove or load the battery or connect or disconnect the AC adapter or the multi adapter while t...

Страница 66: ...ttery Compartment Card Cover 2 1 CAUTION TO REDUCE THE RISK OF ELECTRICAL SHOCK DO NOT REMOVE COVER OR BACK NO USER SERVICEABLE PARTS INSIDE REFER SERVICING TO QUALIFIED OLYMPUS SERVICE PERSONNEL An e...

Страница 67: ...bject s eyes could cause a momentary loss of vision Keep young children and infants away from the camera Always use and store the camera out of the reach of young children and infants to prevent the f...

Страница 68: ...and do not use them Do not use a battery if it is cracked or broken If a battery leaks becomes discolored or deformed or becomes abnormal in any other way during operation stop using the camera If a b...

Страница 69: ...bject is viewed diagonally in the camera the edges may appear zigzagged on the monitor This is not a malfunction it will be less noticeable in playback mode In places subject to low temperatures the m...

Страница 70: ...B digital device pursuant to Part 15 of the FCC Rules These limits are designed to provide reasonable protection against harmful interference in a residential installation This equipment generates us...

Страница 71: ...service station within the business area of Olympus Imaging Europa GmbH as stipulated on the website http www olympus com During the one year period of the World Wide Warranty the customer may turn t...

Страница 72: ...if the Warranty Certificate is duly completed by Olympus or an authorized dealer or other documents contain sufficient proof Therefore please make sure that your name the name of the dealer the serial...

Страница 73: ...range 0 6 m 1 9 ft to W T normal 0 3 m 0 9 ft to W 0 5 m 1 6 ft to T macro mode 0 1 m 3 9 in to 0 6 m 23 6 in W only super macro mode Monitor 2 5 TFT color LCD display 230 000 pixels Flash charge time...

Страница 74: ...F operation 0 C to 30 C 32 F to 86 F storage Dimensions 32 46 10 mm 1 3 1 8 0 4 in Weight Approx 30 g 1 oz Battery charger LI 10C Power requirements AC 100 to 240 V 50 to 60 Hz 11 VA 100 V to 17 VA 24...

Страница 75: ...utton P 12 Mode Dial P 5 11 m Button MENU P 12 Arrow Pad 1243 P 12 o Button OK FUNC P 12 Strap Eyelet P 3 Battery Compartment Card Cover P 4 64 Tripod Socket Connector Cover P 33 35 44 Multi Connector...

Страница 76: ...8 ISO ISO 100 ISO 400 ISO 1600 etc P 21 9 Drive i P 21 10 Spot metering 5 P 21 11 Macro mode Super macro mode P 13 12 Image quality SHQ HQ SQ1 SQ2 SQ 16 9 P 19 13 Image size 3648 2736 2560 1920 640 48...

Страница 77: ...4 7 etc P 16 10 Shutter speed 4 to 1 1000 P 16 11 Exposure compensation 2 0 2 0 P 14 12 White balance WB AUTO 5 3 1 w y P 20 13 ISO ISO 100 ISO 400 ISO 1600 etc P 21 14 Date and time 06 11 26 12 30 P...

Страница 78: ...MERA MENU 18 20 Camera movement indication t 57 Card 22 30 63 64 Card access lamp 46 55 65 75 CCD 32 Close up playback U 13 Cloudy day 3 20 COLOR 31 Compression 19 Connector cover 33 35 44 75 CUSTOM P...

Страница 79: ...till pictures R 22 Remaining length 54 Remaining recording time 11 RESET 19 Resizing Q 24 S SATURATION 26 s Scene 5 11 20 SCREEN SETUP 31 SEL ALBUM 29 SEL IMAGE 28 29 30 Selecting a language W 31 Self...

Страница 80: ......

Отзывы: