background image

173

Ch
ap
ter 7: 

Cu
sto

m

iz

in

g

 yo

u

r camera

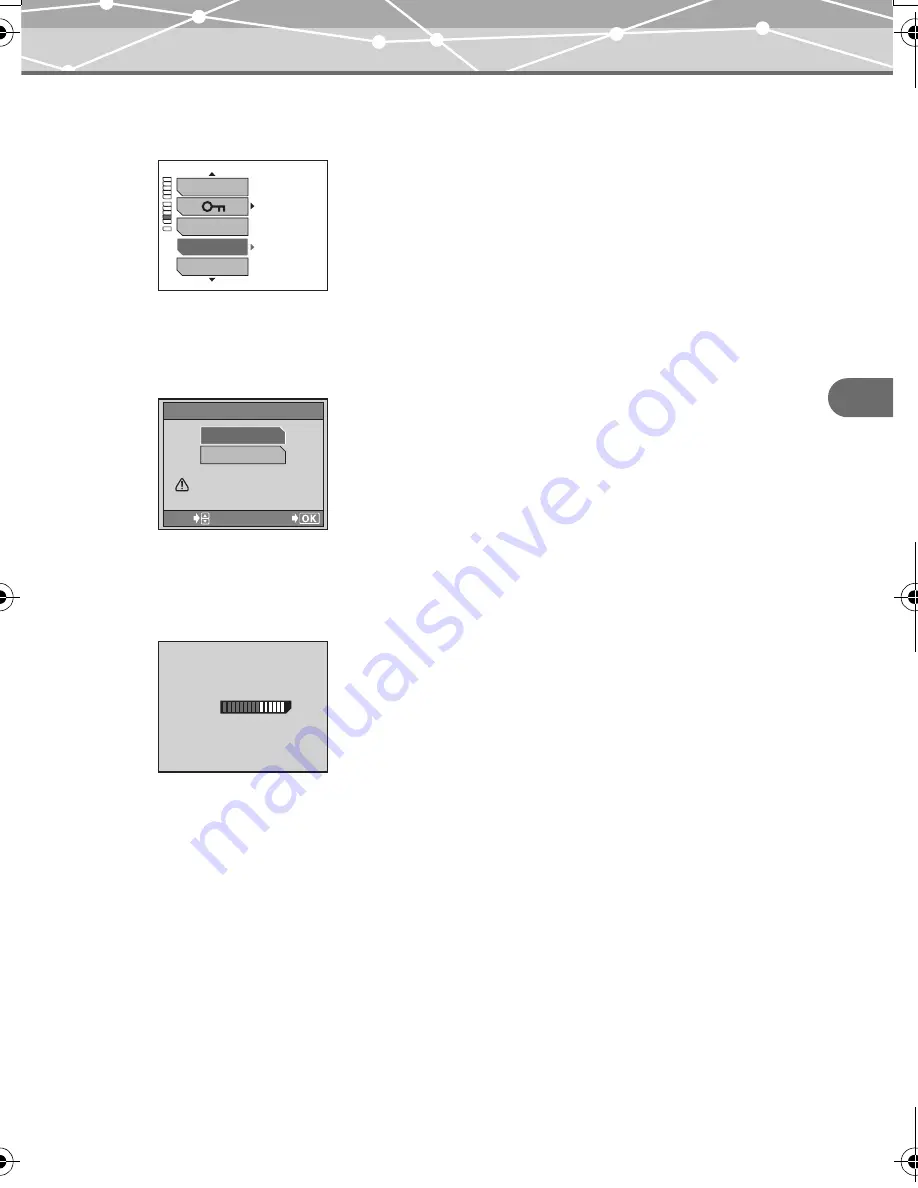
Formatting a card (FORMAT)

2

Press 

p

.

Press 

a

/

c

 to select “FORMAT.”

3

Press 

d

 to enter the format settings.

Press 

a

/

c

 to select “YES.”

4

Press 

9

.

The camera starts formatting the card. When formatting is complete, the screen returns to 

the original mode.

OFF

EDIT

ERASE

FORMAT

ALBUM ENTRY

The still image playback menu is displayed.

GO

SELECT

CAUTION ERASING ALL

NO

YES

FORMAT

BUSY

00E Adam .book  Page 173  Tuesday, November 9, 2004  3:24 PM

Содержание IR-500

Страница 1: ...REFERENCE MANUAL Digital Camera IR 500...

Страница 2: ...Class B digital device pursuant to Part 15 of the FCC Rules These limits are designed to provide reasonable protection against harmful interference in a residential installation This equipment genera...

Страница 3: ...ations to use the camera immediately after purchase Basic Manual Contains instructions for setup and some for basic operations We recommend first time users read this manual first Reference Manual CD...

Страница 4: ...per use of this product Olympus accepts no responsibility for any damage due to a loss of image data resulting from malfunction of this product repair by a third party not authorized by Olympus or oth...

Страница 5: ...or LCD and lens protection and easy portability Shoot subjects from high or low angles adjusting the angle of the multi swing display A choice of 17 shooting modes for any situation Sharp images ensur...

Страница 6: ...is manual What do the icons mean This manual uses the following icons Icons Indication Tip Indicates useful information for convenient camera operation Note Indicates important instructions and cautio...

Страница 7: ...he battery and card 30 Inserting the battery and card 31 Charging the battery 33 Power on off 36 How to use the multi swing display 37 Setting the date and time 38 Chapter 3 Basic shooting and playbac...

Страница 8: ...of the subject and background differ METERING 5 79 Changing the focus range AF MODE 81 Panorama shooting PANORAMA 83 Stitching together two images 2 IN 1 87 Recording sound with still pictures R 90 C...

Страница 9: ...pictures into an album ALBUM ENTRY 136 Viewing the pictures in the albums 139 Reordering the pictures in an album REARRANGE 140 Releasing pictures from the albums UNDO ENTRY 142 Releasing all the pict...

Страница 10: ...ng various clock functions from the clock menu 174 Choosing the clock style CLOCK STYLE 174 Setting the alarm ALARM SET 176 Setting the type of alarm sound and sound level ALARM SOUND 179 Chapter 8 Pr...

Страница 11: ...5 Transferring and storing the camera images on a computer 215 Viewing still images movies 218 Printing images 220 Transferring and storing camera images to a computer without using OLYMPUS Master 222...

Страница 12: ...Keep out of the reach of children Care should be taken to prevent the following accidents Strangulation caused by wrapping the strap round the neck Swallowing of small accessories such as the battery...

Страница 13: ...bjects get inside the camera Should the camera be dropped in water or water get into the internal parts it could result in fire or electric shock Remove the battery immediately and contact your neares...

Страница 14: ...of the following and contact your nearest dealer or Olympus service center If the plug or cable is hot there is a smell of burning or smoke is emitted If the plug or cable is damaged or ruptured or t...

Страница 15: ...with the camera set the camera may fall out of the cradle Do not pick up by the camera only when it is set on the cradle Keep the camera away from things susceptible to damage from magnetism such as...

Страница 16: ...gged edges will disappear when the picture is played back In general the lower the temperature the longer it takes the monitor to turn on Pictures may also appear temporarily discolored Keep the camer...

Страница 17: ...charge the battery according to the specified method Failure to do so may result in fire or injury Thoroughly read the instruction manual of the battery and use the battery correctly Do not expose th...

Страница 18: ...Wipe with a dry cloth The battery becomes hot after prolonged use of the camera Do not attempt to remove it immediately This could result in burns In general as the temperature falls battery performa...

Страница 19: ...erature and high humidity or where there is a lot of dust Do not wet it Do not touch or apply any metal objects onto the terminals Do no turn off the power shake the camera nor attempt to remove the c...

Страница 20: ...the dealer where you purchased the camera 1 The shape of the plug differs from country to country 2 Not supplied in some areas Digital camera Strap Card xD Picture Card Lithium ion battery LI 12B Crad...

Страница 21: ...this first Names of parts Names of parts Digital camera The illustrations below show the camera with the multi swing display turned 360 degrees OPEN QUICK VIEW OK OPEN POWER N M O P Q R T S U I J H K...

Страница 22: ...u button p E Flash S Arrow pad a Y b c z d F Microphone T OK button 9 G Cradle connector U Erase button S H Power lamp V Camera connector dial I Power switch W Camera connector J Monitor X QDock Done...

Страница 23: ...3 Chapter 1 Read this first Names of parts Monitor indications Shooting mode 4M 2 0 2 0 G F I J K L N M O P Q R B C A D E 2 0 2 0 G F H J K L N Q R B A E When shooting still images When shooting movie...

Страница 24: ...macro mode P 54 G Flash mode u Only when shooting movies P 51 H Image stabilizer i P 92 I Sequential shooting o j P 69 J Self timer Y P 55 K Recording sound with still images Recording sound with mov...

Страница 25: ...ore information see Switching the information display mode INFO g page 110 4M 4M 100 00 0009 0009 2 0 2 0 04 12 03 14 03 04 12 03 14 03 9 SIZE 2288 SIZE 2288 1712 1712 10 10 10 10 B C A K J L M N F G...

Страница 26: ...image data is stored to the storage unit P 129 F Print order The number of print copies 10 P 185 G Protect 9 P 126 H Sound H P 91 P 95 I Record mode Still image Movie z4M x2M 1M fVGA 3 4 6 P 65 J Res...

Страница 27: ...The rate of battery consumption varies greatly depending on the operating conditions In some cases the battery may run out of power before it shows the low battery warning Charge the battery in that c...

Страница 28: ...of the memory gauge changes as follows according to the shooting conditions When the memory gauge is fully lit wait until the gauge goes off before you resume shooting Memory gauge Cannot shoot Fully...

Страница 29: ...orce This may cause the strap to break Attach the strap correctly following the steps above Olympus is not responsible for any damages if the strap is attached incorrectly and the camera is dropped OK...

Страница 30: ...n be transferred processed and edited on a computer Compatible cards xD Picture Card 16 to 512MB What is xD Picture Card The xD Picture Card is an miniature storage device developed specially for digi...

Страница 31: ...ong orientation or at an angle the contact area could be damaged or you may not be able to remove the card Do not apply excessive force to the battery card cover as it may be damaged PUSH O K PUSH O K...

Страница 32: ...o not open the battery card cover disconnect the AC adapter or remove the camera from the cradle while the camera is operating or communicating with a computer Such actions could destroy all the data...

Страница 33: ...d Set the camera on the supplied cradle to charge the battery before using the camera Note If you release your finger quickly after pushing the card in or flick the card to remove it the card may jump...

Страница 34: ...Select the mark by turning the camera connector dial according to the desired camera orientation USB USB A V OUT MONO DC IN 5V Cradle AC adapter A511 To DC input terminal To a wall outlet Power cord T...

Страница 35: ...gain If you hold the cradle upside down with the camera set the camera may fall out of the cradle Do not pick up by the camera only when it is set on the cradle Tips We recommend using an AC adapter f...

Страница 36: ...ers the sleep mode standby mode to save battery power and the power lamp goes off To cancel the sleep mode press any button You can select how long the camera is on before it enters the sleep mode For...

Страница 37: ...t may reflect off the monitor and get into the shot image QUICK VIEW P AU TO VI VI D SCEN E OK QUICK VIEW P AU TO VI VI D SCEN E OPEN QUICK VIEW P AU TO VI VI D SCEN E OK Turn the multi swing display...

Страница 38: ...ot images and available for printing images 1 Turn the mode dial to q The setup menu appears 2 Press a c to select W then press d to enter the date and time settings Tip If the date and time are not s...

Страница 39: ..._Y_M_D 4 Press d to go to the year field Press a c to set the year After setting the year press d to go to the month field Repeat the above steps to set the time Tips The first two digits of the year...

Страница 40: ...e you press 9 Note The date and time settings will be canceled if the camera is left with the battery removed for more than one day under the standard Olympus testing conditions If this occurs set the...

Страница 41: ...era correctly Hold the camera firmly with both hands bracing your elbows against your side to prevent camera movement while taking a picture Extending your arms may cause camera movement which can cau...

Страница 42: ...and taking a shot 1 Turn the mode dial to j 2 Aim the camera at the subject and compose the image Look at the image on the monitor and position the AF target mark on the subject OPEN QUICK VIEW OPEN...

Страница 43: ...e and hold down the shutter button until the green indicator lights up 4 When the green indicator lights up press the shutter button all the way This is the full press position of the shutter button T...

Страница 44: ...at the same distance as the intended subject Focus Lock recompose your shot then take the picture Subject with an extremely bright area in the center of the frame Focus on an object with high contras...

Страница 45: ...ou want to focus on 2 Press the shutter button halfway 3 Recompose your shot while keeping the shutter button pressed halfway 4 Press the shutter button all the way to take a picture Tip When shooting...

Страница 46: ...see Recording sound with movies R g page 94 The camera can compensate for small camera movement which may occur while shooting movies For details see Compensating for camera movement IMAGE STABILIZER...

Страница 47: ...is being stored onto the card You cannot shoot another movie if the card access lamp is blinking even if you have finished shooting Tip It is possible to keep auto focusing without locking the focus...

Страница 48: ...ng back movies g page 97 To play back the recorded sound during single frame playback press 9 During single frame playback each turn of the zoom lever to T U magnifies the image 1 5 times 2 times 2 5...

Страница 49: ...mages Erasing an image using the S button 1 Display the image you want to erase then press S The ERASE screen appears 2 Press a c to select YES 3 Press 9 The selected image is erased OPEN QUICK VIEW O...

Страница 50: ...de angle W T This camera has an optical zoom up to 2 8 40 to 112 mm 1 6 to 4 4 35mm film format equivalent Tip With the combined optical and digital zoom functions images can be zoomed up to an approx...

Страница 51: ...n in dark places The red eye reduction flash mode reduces this phenomenon by emitting pre flashes before firing the regular flash fill in flash The flash fires regardless of the available light This m...

Страница 52: ...n o or l 2 Press d to display the flash setting screen Note Since a slow shutter speed is automatically selected in low light situations take care to avoid camera shaking a blinks when camera movement...

Страница 53: ...n the screen when a flash mode other than AUTO is set Flash effective range The appropriate shooting distance when using the flash is shown below Shooting distance in wide angle W approx 0 3 4 3 m 1 0...

Страница 54: ...wer The camera takes longer than usual for focusing when taking close ups In such cases select the macro mode so that you can obtain faster focusing 1 Turn the mode dial to j k i n o l or n 2 Press b...

Страница 55: ...the self timer Y In the self timer mode the picture is taken approximately 12 seconds after the shutter button is pressed 1 Turn the mode dial to j k i n o l or n 2 Press a Y to display the self time...

Страница 56: ...sed Tips The self timer lamp lights for about 10 seconds after the shutter button is pressed Then the self timer lamp blinks for two seconds before the picture is taken The self timer mode is automati...

Страница 57: ...scene mode selections Settings such as tone brightness and shutter speed are pre determined for each type of scene which allows for easy shooting with just one press of the shutter button 1 Turn the m...

Страница 58: ...e of the selected scene mode appears 4 Press 9 to confirm the selected scene mode The selected scene mode is assigned to the l position of the mode dial Press p to resume the shooting mode with the ne...

Страница 59: ...lso be selected by turning the mode dial to n For shooting landscapes Vivid reproduction of blues and greens For shooting both main subject and background Vivid reproduction of blues and greens For sh...

Страница 60: ...background in evening or at night Uses a slower shutter speed than in normal shooting For shooting both main subject and background indoors Background is reproduced clearly Suitable for shooting firew...

Страница 61: ...n also be selected by turning the mode dial to i SELF PORTRAIT o Can also be selected by turning the mode dial to o For shooting setting rising sun Vivid reproduction of reds and yellows For taking a...

Страница 62: ...ENE SELECT CUISINE G DOCUMENTS d SPORT J For still life photography Vividly reproduces colors of fruit vegetables flowers etc For shooting documents etc Increases contrast between letters and backgrou...

Страница 63: ...ILABLE LIGHT PORTRAIT e For shooting snow capped mountains landscapes white sand sea scapes etc For shooting under candlelight Warm colors are reproduced For shooting sensitive subjects in low light c...

Страница 64: ...itions Selecting a scene mode according to the subject SCENE SELECT BEHIND GLASS v VIVID 7 Can also be selected by turning the mode dial to k For shooting a subject through glass Vividly reproduce col...

Страница 65: ...ast adjustment and red eye correction HIGH 2M 1600 1200 32 Suitable for postcard size prints Also suitable for image editing on a computer such as superimposing letters on images and rotating images B...

Страница 66: ...amount of data larger so the number of pictures that can be saved will be fewer Resolution and image size on a computer screen When a picture is transferred to a computer the size of the picture on th...

Страница 67: ...continuous recording time with sound with a 16 MB card Max continuous recording time without sound with a 16 MB card FINE 640 480 15 frames sec 17 sec 17 sec STANDARD 1 320 240 30 frames sec 34 sec 35...

Страница 68: ...rd mode 3 Press 9 to confirm the selected record mode The selected record mode is set Press p to start shooting with the new settings Tip To save the selected record mode for the next time you use the...

Страница 69: ...1 Turn the mode dial to j k i o or l Tips The R recording sound with still images function panorama shooting and 2 IN 1 shooting cannot be selected while the camera is in sequential shooting mode The...

Страница 70: ...select ON 3 Press 9 The camera enters the sequential shooting mode To exit the setting screen and resume shooting mode press p Tips Press the shutter button fully and keep it pressed The camera will...

Страница 71: ...he brightness of the subject and the brightness of the background you can adjust the brightness using the exposure compensation feature You can adjust the brightness between 2 0 and 2 0 in 1 2 steps 1...

Страница 72: ...ades For the same reason adjust towards when shooting dark subjects We recommend that you return the exposure compensation value to 0 0 after taking a picture with an adjusted exposure compensation To...

Страница 73: ...er but to use the digital zoom DIGITAL ZOOM must be set to ON When using the digital zoom the picture can be enlarged up to 11 times 1 Turn the mode dial to j k i n o l or n Tip The digital zoom enlar...

Страница 74: ...l zoom DIGITAL ZOOM 2 Press p to display the shooting menu Press a c to select DIGITAL ZOOM 3 Press d to enter the digital zoom settings then press a c to select ON 0 0 DIGITALZOOM WB OFF OFF AUTO SUP...

Страница 75: ...on of the digital zoom is 5 5 times In movie recording mode the maximum magnification of the digital zoom is 4 times regardless of the picture quality setting To save the digital zoom setting for the...

Страница 76: ...usted to suit the lighting so that white objects appear white in the picture This adjustment function is called white balance Choose from one of the following white balance settings according to the t...

Страница 77: ...ce 4 Press 9 to confirm the selected white balance The selected white balance is set Press p to start shooting with the new settings Tip To save the selected white balance for the next time you use th...

Страница 78: ...ns such as when multiple lights are used If you set a white balance mode other than AUTO play back the picture and check the colors on the monitor When the flash is fired with a white balance setting...

Страница 79: ...POT metering in such situations will ensure that the subject is clear regardless of the background light 1 Turn the mode dial to j k i n o or l AUTO Meters the center of the screen and the area around...

Страница 80: ...METERING settings then press a c to select SPOT 3 Press 9 METERING is set to SPOT Press p to start shooting with the new settings Tip To save the selected metering method for the next time you use th...

Страница 81: ...be set in movie shooting mode AUTO SPOT Even if the subject is out of the AF target mark not in the center of the monitor the camera will find the subject and focus on it Hold the shutter button half...

Страница 82: ...MODE Press d to enter the AF MODE settings then press a c to select SPOT 3 Press 9 AF MODE is set to SPOT Press p to start shooting with the new settings Tip To save the selected AF mode method for t...

Страница 83: ...MPUS Master software contained on the supplied CD ROM 1 Turn the mode dial to j k i n o or l Notes The panorama mode is only available when using the Olympus xD Picture Card Your computer s memory may...

Страница 84: ...he panorama settings 3 On the monitor use the arrow pad to choose the direction you want to take the pictures in d Takes pictures from left to right b Takes pictures from right to left a Takes picture...

Страница 85: ...d shots are taken so that they overlap part A The second and third pictures are taken so that they overlap part B Remember the image in the frame so that you can compose the next picture Tip Focus and...

Страница 86: ...RAMA 6 When you have finished taking pictures press 9 to exit panorama shooting 7 The composite photograph is created by combining the images on a computer using the OLYMPUS Master software contained...

Страница 87: ...succession next to each other and store them as a single picture You can combine two different subjects in one picture 1 Turn the mode dial to j k i n o or l Tip 2 IN 1 cannot be set in movie shootin...

Страница 88: ...hen press a c to select 2 IN 1 Press d to enter the 2 IN 1 settings 3 Take the first shot using the monitor Tips To cancel shooting in 2 IN 1 shooting mode press p The screen returns to the menu If yo...

Страница 89: ...o shooting conditions 4 Take the second shot The first shot and second shot are combined and stored onto the card as a single picture After storing is complete the screen returns to the normal shootin...

Страница 90: ...about 4 seconds When this function is enabled sound is automatically recorded after a picture is taken This is useful for adding an audio comment to the picture 1 Turn the mode dial to j k i n o or l...

Страница 91: ...OFF For details see Saving the settings ALL RESET g page 148 Notes If the source of the sound you are recording is more than 1 m 3 3 ft from the microphone the recorded sound may not be very clear You...

Страница 92: ...of the subject before recording the image The picture shot using the image stabilizer function is slightly enlarged 1 Turn the mode dial to n 2 Press p to select the shooting menu then press a c to se...

Страница 93: ...E STABILIZER setting for the next time you use the camera set ALL RESET to OFF For details see Saving the settings ALL RESET g page 148 This feature may not compensate for large movement and some othe...

Страница 94: ...ooting a movie with the new settings Recording sound with movies R This function lets you record the sound during movie shooting 1 Turn the mode dial to n Tips R recording sound with movies cannot be...

Страница 95: ...movies function is set to on the focus and optical zoom are locked during movie recording FULLTIME AF cannot be selected while the R recording sound with movies function is enabled To save the record...

Страница 96: ...Changing the sleep timer duration SLEEP g page 153 Note If you do not operate the camera for 3 minutes the camera turns off the monitor and enters the sleep mode If you leave the camera for another 10...

Страница 97: ...ou how to play back recorded movies 1 Turn the mode dial to q after shooting a movie and the card access lamp goes off The last movie taken appears on the monitor Tip You can play back the picture you...

Страница 98: ...to display the playback menu The movie being played back pauses Press a c to select STOP 2 Press d to end movie playback The movie being played ends The camera remains in playback mode OK 100 00 001...

Страница 99: ...3 13 WB AUTO WB AUTO SIZE 320 SIZE 320 240 240 OK Volume up Volume down OK Hold down this button for 2 speed playback Hold down during 2 speed playback for 20 speed To return to normal playback releas...

Страница 100: ...sume normal movie playback from the current frame Press 9 Movie playback starts from the selected frame Tip You can play back the picture you have just taken by pressing h For details see Easy playbac...

Страница 101: ...e Playing back movies g page 97 2 Turn the zoom lever to T U The picture is enlarged to 1 5 times Tip To revert the picture to the original size regardless of the degree of magnification turn the zoom...

Страница 102: ...s at once Index playback You can display several pictures at once This function lets you view several thumbnail pictures on the monitor at once 1 Play back a picture See Playing back still images g pa...

Страница 103: ...image frame by frame When you press this button while the upper left image is selected the display will return to the previous page Advances to the next image frame by frame When you press this button...

Страница 104: ...display 30 30 31 31 32 32 33 33 30 30 31 31 32 32 33 33 34 34 35 35 36 36 37 37 38 38 39 39 40 40 41 41 42 42 43 43 44 44 45 45 38 38 30 30 31 31 33 33 34 34 35 35 36 36 37 37 32 32 Zoom lever Each t...

Страница 105: ...fied at its center and returns to standard size by degree CHECKERBOARD The next picture is displayed with a veil The veil gradually disappears allowing the picture to become apparent BLINDS The succee...

Страница 106: ...mode dial to q 2 Press p to display the playback menu Press a c to select m 3 Press d to enter the slide show settings then press a c to select the desired slide show effect OPEN QUICK VIEW OPEN POWER...

Страница 107: ...ide show is running in the index display Tips We recommend that you use the AC adapter when running a slide show for a long period of time If the battery is used the camera will end the slide show aft...

Страница 108: ...counterclockwise 1 Turn the mode dial to q 2 Play back the image you want to rotate 05 07 10 12 41 05 07 10 12 41 46 46 100 0046 100 0046 4M 4M 05 07 10 12 41 46 100 0046 4M 05 07 10 12 41 05 07 10 1...

Страница 109: ...gs then press a c to select 90 or 90 Notes Movies cannot be rotated Protected images cannot be rotated Cancel the protection setting before rotating For details see Protecting pictures 0 g page 126 Pi...

Страница 110: ...e dial to q 2 Play back the image on which you want to display information Tip Information appears for about 3 seconds if you set INFO to DETAIL or STANDARD 4M 4M 100 00 0009 0009 2 0 2 0 04 04 12 03...

Страница 111: ...the information display settings then press a c to select STANDARD DETAIL or NO INFO 4 Press 9 The information in the selected mode appears Press p to resume playback mode Tip To save the selected in...

Страница 112: ...onnect the supplied AV cable to the TV Connecting to a TV 1 Turn off the camera and TV then connect the cradle and TV 2 Set the camera on the cradle with the multi swing display opened USB USB A V OUT...

Страница 113: ...playback 1 Turn the mode dial to q Tips The camera s monitor goes off while the AV cable is connected to the camera For information on your TV audio video input jacks refer to your TV s instruction ma...

Страница 114: ...the playback menu then press a c to select INDEX PLAY 4 Press d to enter the INDEX PLAY settings The movie being played is displayed in time frames in the index display Select the desired frame by pre...

Страница 115: ...me black and white or sepia color or changing the picture size The edited picture is stored as a new picture separate from the original picture 1 Turn the mode dial to q 2 Play back the picture you wa...

Страница 116: ...9 Processing of the black and white picture begins When the processing is complete the created black and white picture appears Press a c to select SEPIA then press 9 Processing of the sepia picture b...

Страница 117: ...picture to which you will record sound When Q is selected Tips When you resize a picture you cannot select a size larger than the original picture Select a smaller size The created picture cannot be s...

Страница 118: ...have been recorded to an album Sound cannot be recorded when there is insufficient card storage capacity Sound cannot be recorded to pictures saved as read only using a computer You must cancel read...

Страница 119: ...the card as a new file You can also overwrite the original movie image 1 Turn the mode dial to q 2 Select a movie image you want to edit Playing back movies g page 97 3 Press p to display the playback...

Страница 120: ...ERWRITE then press 9 OK GO 00 00 00 12 56 34 00 00 00 12 56 34 00 00 00 12 56 34 Jumps to the first frame Jumps to the last frame Displays the next frame While pressed the movie is fast forwarded Disp...

Страница 121: ...nt to capture a frame as a still picture Playing back movies g page 97 Tip You cannot capture a movie frame when D record mode is set to STANDARD or EXTENDED RESET CANCEL YES EDIT GO SELECT YES Record...

Страница 122: ...ovie image is displayed as a single frame Select the desired frame by pressing a b c d 5 Press 9 INFO INDEX PLAY STANDARD EDIT CAPTURE OK 00 00 00 12 56 34 00 00 00 12 56 34 00 00 00 12 56 34 GO Jumps...

Страница 123: ...ality of a captured image may be lower than that of a still image at the same resolution A movie frame cannot be captured when there is not enough space in the card Make sure not to open the battery c...

Страница 124: ...ally according to the first frame you choose INDEX ERASE FORMAT ALBUM ENTRY OFF OK 00 00 00 12 56 34 00 00 00 12 56 34 00 00 00 12 56 34 GO OK While pressed the movie is played back Release to stop Wh...

Страница 125: ...tep 4 CANCEL Cancels the set contents and returns to the playback menu Tips The created indexes appear in 9 frame partitions The number of frame partitions is unchangeable An index cannot be created w...

Страница 126: ...d by the single frame all frame erase function 1 Turn the mode dial to q 2 Play back the picture you want to protect 3 Press p to display the playback menu then press a c to select 0 Press d to enter...

Страница 127: ...e or ALL ERASE to erase all the pictures on the card Note Formatting erases both unprotected and protected pictures Notes Even if you erase all the pictures on the card the pictures entered in albums...

Страница 128: ...ayback menu then press a c to select ERASE Press d to enter the erase settings Press a c to select ERASE or ALL ERASE then press 9 4 Press a c to select YES OPEN QUICK VIEW OPEN POWER OK Mode dial 9 b...

Страница 129: ...STORE You can set whether or not to store shot still images and movies on a separately sold Dock Done compatible storage unit in advance 1 Turn the mode dial to q The last picture taken appears on th...

Страница 130: ...elect NOT STORE the images set to NOT STORE on the card will also be erased after the images are stored onto the Dock Done compatible storage unit if ERASE STORED IMAGE is set to ON For information on...

Страница 131: ...splay or multi year display Select the desired date month or year from each calendar display Switching the calendar display You can switch the calendar display among one month display 12 month display...

Страница 132: ...ndar display and view it in a single frame 1 Display the calendar Press a b c d to select the desired date month or year 2004 2004 12 12 14 15 16 17 18 19 20 21 22 23 24 25 5 6 7 8 9 10 11 1 2 3 4 12...

Страница 133: ...If the last date of the current month is selected the next month is displayed d Moves to the preceding day If the first date of the current month is selected the preceding month is displayed Moves to...

Страница 134: ...r or album Playing back pictures from the calendar display In the case of multi year display OK 2003 2003 2004 2004 2005 2005 2003 2003 2004 2004 2005 2005 2003 2003 2004 2004 2005 2005 Moves to the p...

Страница 135: ...movies g page 119 You can erase pictures and play slide shows from the calendar menu It is possible to set INFO information display m slide show STOP stop playback INDEX PLAY 0 protect ERASE and FORM...

Страница 136: ...ntained within the supplied CD ROM you can store pictures into the albums on the card from a computer Launching OLYMPUS Master g page 213 1 Turn the mode dial to q The last picture taken appears on th...

Страница 137: ...is to be registered is confirmed and the picture selection screen appears Select THIS IMAGE or SEL IMAGE then press 9 5 Press a c to select YES When THIS IMAGE is selected SEL ALBUM REGISTERED 10 GO...

Страница 138: ...repeat this step When SEL IMAGE is selected BUSY SEL IMAGE CANCEL SELECT EXIT 10 100 05 04 10 13 20 SET 100 0024 6 SEL IMAGE SELECT EXIT 100 100 28 28 29 29 30 30 31 31 32 32 33 33 34 34 35 35 36 36...

Страница 139: ...turns to normal playback mode Viewing the pictures in the albums This section explains how to play back the pictures stored in the albums 1 Turn the mode dial to g The album selection screen appears 2...

Страница 140: ...allocate any picture as an album jacket by changing its frame number to 1 1 Play back the album for which you want to reorder pictures Viewing the pictures in the albums g page 139 Tips The index dis...

Страница 141: ...Press 9 to confirm the picture to be moved C Press b d to select the destination 4 Press 9 The images in the album are rearranged in the selected order REARRANGE GO SELECT 56 CANCEL Selected picture T...

Страница 142: ...sed from the albums remain on the card 1 Turn the mode dial to g 2 Play back a picture in the album See Viewing the pictures in the albums g page 139 3 Press p to display the album menu Press a c to s...

Страница 143: ...ess 9 The process of releasing the picture from the album begins When the process is complete the screen returns to album playback mode When THIS IMAGE is selected SEL IMAGE THIS IMAGE UNDO ENTRY GO S...

Страница 144: ...a c to select YES 7 Press 9 The process of releasing the selected picture s from the album begins When the process is complete the screen returns to album playback mode When SEL IMAGE is selected Tip...

Страница 145: ...the album remain on the card 1 Turn the mode dial to g 2 Play back a picture in the album See Viewing the pictures in the albums g page 139 3 Press p to display the album menu Press a c to select UND...

Страница 146: ...de Selecting and erasing a picture from an album ERASE You can erase a picture from a selected album The picture is erased from the card 1 Turn the mode dial to g 2 Play back a picture in the album Se...

Страница 147: ...to select YES then press 9 The selected picture is erased Then the screen returns to album playback mode Tips You can erase pictures and play slide shows from the album menu For the features you can p...

Страница 148: ...N g page 150 The ALL RESET setting applies to all modes except setup mode If ALL RESET is set to ON or OFF in either shooting or playback mode the setting applies to both OFF The settings made before...

Страница 149: ...Customizing your camera Saving the settings ALL RESET 3 Press a c to select OFF or ON then press 9 ALL RESET is set to OFF or ON then the screen returns to the setup menu OFF ON ALL RESET SCREEN SLEEP...

Страница 150: ...WB White Balance AUTO P 76 METERING AUTO P 79 AF MODE AUTO P 81 R recording sound with still pictures OFF P 90 IMAGE STABILIZER OFF P 92 FULLTIME AF OFF P 93 R recording sound with movies ON P 94 INFO...

Страница 151: ...setup menu appears 2 Press a c to select W 3 Press d to enter the language settings Tips The available display languages differ depending on the region where the camera is sold The available display l...

Страница 152: ...You can change the startup screen which appears on the monitor when the power is turned on Choose from among the following three types of screens 1 Turn the mode dial to q The setup menu appears 1 2 C...

Страница 153: ...e screen returns to the setup menu Changing the sleep timer duration SLEEP The camera enters sleep mode standby mode to save battery power after a specified period of time elapses without camera opera...

Страница 154: ...button of the camera The mode before the camera enters sleep mode resumes If you restore power by turning the mode dial the camera enters the mode you select When running the slide show with the batt...

Страница 155: ...k subject F g page 71 DIGITAL ZOOM See Enabling the digital zoom DIGITAL ZOOM g page 73 WB White Balance See Selecting the white balance according to the surrounding lighting WB 5 3 1 g page 76 METERI...

Страница 156: ...ress a c to select CUSTOM BUTTON Press d to enter the custom button settings 3 Press a c to select the function you want to register to the custom button 4 Press 9 The selected function is set to the...

Страница 157: ...to the storage unit ERASE STORED IMAGE You can let the camera automatically erase the image from the card after you store the image onto your Dock Done compatible storage unit 1 Turn the mode dial to...

Страница 158: ...rd will also be erased after the images are stored onto the Dock Done compatible storage unit For information on the settings for a Dock Done compatible storage unit see Setting images to store on a Q...

Страница 159: ...the mode dial to q The setup menu appears 2 Press a c to select 8 warning sound 3 Press d to enter the warning sound settings Press a c to select ON Tip The warning sound does not sound when OFF is se...

Страница 160: ...TTER SOUND You can select from two different sounds to use as the shutter sound You can also set the volume of each sound to HIGH or LOW To disable the shutter sound select OFF 1 Turn the mode dial to...

Страница 161: ...s reproduced 5 Press d to select the shutter sound volume LOW or HIGH The shutter sound at the selected volume level sounds 6 Press 9 The selected shutter sound and volume level are set and the screen...

Страница 162: ...can also set the volume of each sound to HIGH or LOW To disable the operation sound select OFF 1 Turn the mode dial to q The setup menu appears 2 Press a c to select BEEP 3 Press d to enter the operat...

Страница 163: ...nd and volume level are set and the screen returns to the setup menu Checking the picture you have just taken REC VIEW Rec View lets you check the picture you have just taken on the monitor When this...

Страница 164: ...etting is RESET To set serial numbers for file names select AUTO A file name and folder name for the folder containing the file are created automatically for each recorded image File and folder names...

Страница 165: ...mages on different picture cards AUTO The file and folder numbers are assigned sequentially regardless of the picture card used This prevents duplicate file names when managing different picture cards...

Страница 166: ...G Pixel Mapping checks and adjusts the CCD and image processing function at the same time The CCD and image processing function were adjusted at the factory and you do not need to perform Pixel Mappin...

Страница 167: ...When Pixel Mapping is complete the screen returns to the setup menu Adjusting the brightness of the monitor s This function lets you adjust the brightness of the monitor 1 Turn the mode dial to q The...

Страница 168: ...s confirmed and the screen returns to the setup menu Setting the playback sound volume VOLUME You can adjust the volume of the sound recorded with still pictures or movies when playing back still pict...

Страница 169: ...3 Press d to enter the playback volume settings Press a c to select the volume level 4 Press 9 The volume level for playback sound is set and the screen returns to the setup menu 04 12 03 10 20 PIXELM...

Страница 170: ...the output images will not appear properly 1 Turn the mode dial to q The setup menu appears 2 Press a c to select VIDEO OUT Press d to enter the video signal type setting 3 Press a c to select NTSC or...

Страница 171: ...dial to q The setup menu appears 2 Press a c to select MODE RESET Press d to enter Mode Reset 3 Press a c to select YES 4 Press 9 All the camera s settings are reset to default and the screen returns...

Страница 172: ...another camera must be formatted with this camera 1 Turn the mode dial to j k i n o l n t or q Notes All data stored on the card is erased when the card is formatted All the images on the card includ...

Страница 173: ...Press d to enter the format settings Press a c to select YES 4 Press 9 The camera starts formatting the card When formatting is complete the screen returns to the original mode OFF EDIT ERASE FORMAT A...

Страница 174: ...clock style CLOCK STYLE You can choose the style of the clock which appears on the monitor Select the clock style from the following two choices 1 Turn the mode dial to r Tip The date and time can als...

Страница 175: ...4 Press 9 The selected clock style is set Press p and the clock of the selected style appears Tip When the camera is in the clock mode and powered from the AC adapter the camera enters the sleep mode...

Страница 176: ...the alarm to go off If you want to cancel the alarm set the alarm to OFF 1 Turn the mode dial to r 2 Press p to display the clock menu Press a c to select ALARM SET Tip ALARM SET cannot be selected if...

Страница 177: ...ONE TIME is selected the alarm goes off only once When DAILY is selected the alarm goes off each time the set time arrives 5 Set the alarm time When ONE TIME is selected set both the date and time Whe...

Страница 178: ...alarm sound will not go off by turning the mode dial operating the zoom lever or by pressing the shutter button Turn off the camera Note If you want to let the alarm go off while the camera s power i...

Страница 179: ...lso set the volume of each sound to LOW MID HIGH or GRADUAL which increases the volume gradually 1 Turn the mode dial to r 2 Press p to display the clock menu Press a c to select ALARM SOUND 3 Press d...

Страница 180: ...ions from the clock menu 4 Press d to enter the volume level settings Press a c to select the desired volume level 5 Press 9 The selected alarm sound and volume level are set Press p to return to cloc...

Страница 181: ...ow to operate the Dock Done compatible storage unit and printer refer to their instruction manuals Using a PictBridge compatible printer Direct Print By connecting the camera to a PictBridge compatibl...

Страница 182: ...d Take the card containing this print reservation information to a DPOF photo lab for printing You can also print pictures at home if your printer is DPOF compatible There are two methods of reservati...

Страница 183: ...ct whether or not to include the shooting date and time One print will be made of each frame Use single frame reservation to reserve multiple prints of a particular frame Notes DPOF reservations for 9...

Страница 184: ...to display the playback menu then press a c to select Press d to enter the print reservation settings 3 Press a c to select When making single frame reservations OPEN QUICK VIEW OPEN POWER OK Mode di...

Страница 185: ...ages at once Index playback g page 102 5 Press b d to select the picture you want to print then press a c to select the number of prints Repeat this step to make print reservations for other pictures...

Страница 186: ...select NO DATE or TIME 5 Press 9 6 Press a c to select SET then press 9 All the pictures on the card are reserved for printing and the print reservation data is stored on the card When making an all...

Страница 187: ...gle frames can be selected from an album and all frame reservation U all pictures in an album can be selected 1 Turn the mode dial to g 2 Select the desired album and display one of the pictures you w...

Страница 188: ...t to make print reservations 6 Press 9 Tips When you enter the print reservation settings from the playback menu ALBUM is not displayed When you want to make an album reservation select a picture in t...

Страница 189: ...the pictures in the selected album To make an all frame reservation follow the procedure in When making an all frame reservation U g page 186 from step 4 Canceling print reservations This section exp...

Страница 190: ...le frame Press b d to select the picture you want to cancel When CANCEL ALL is selected The print reservations of all the images on the card will be canceled Tip When print reservation settings are se...

Страница 191: ...are canceled The screen returns to the menu Checking the print reservations You can check the information of the images to which you made print reservations 1 Turn the mode dial to q 2 Press p to dis...

Страница 192: ...ictures directly With the camera connected to the printer select the pictures you want to print and the number of prints on the camera s monitor It is also possible to print out pictures using the pri...

Страница 193: ...nter 1 Turn the printer on and plug the printer end of the USB cable into the printer s USB terminal For details on how to turn the printer on and locate the USB terminal refer to the printer s instru...

Страница 194: ...ing with a PictBridge compatible printer 2 Connect the AC adapter to the cradle USB USB A V OUT MONO DC IN 5V To DC input terminal AC adapter A511 Power cord To a wall outlet Cradle The shape of the p...

Страница 195: ...4 Press a c to select SEL PRINT then press 9 The PRINT MODE SELECT screen appears after a while Go to Procedures for printing g page 196 Notes If PC is selected accidentally start over from step 1 If...

Страница 196: ...form the procedures following the guide indicated at the bottom of the screen Select ALL IMAGES If you want to select images to be printed from the albums select ALBUM For details see When you want to...

Страница 197: ...can print the currently displayed picture or make print reservation s See Printing Making print reservations g page 199 PRINT INFO DATE FILE NAME 1 WITHOUT WITHOUT GO SELECT Choose the number of prin...

Страница 198: ...ll the pictures stored on the card MULTI PRINT Prints one picture in multiple layout format ALL INDEX Prints an index of all the pictures stored on the card PRINT ORDER Prints the pictures according t...

Страница 199: ...res SINGLE PRINT and print them all later STANDARD BORDERLESS SIZE STANDARD PRINTPAPER GO SELECT CANCEL 16 PICS SHEET SIZE STANDARD PRINTPAPER GO SELECT CANCEL PRINT MORE SINGLEPRINT SELECT 100 0009 1...

Страница 200: ...select CANCEL then press 9 Print modes and each setting Available print options such as printing modes and paper sizes vary depending on the printer you use For details refer to your printer s instru...

Страница 201: ...ELECT screen 1 Press b while PRINT MODE SELECT is displayed 2 Press a c to select EXIT in the PC PRINTER screen 3 Disconnect the USB cable from the cradle The camera turns off 4 Disconnect the USB cab...

Страница 202: ...internet You will get a lot of pleasure out of the camera Also there are various ways for presenting images which only computers can do For example you can enjoy slide show making HTML album and using...

Страница 203: ...ard to a computer For details refer to the OLYMPUS website Notes When you connect the camera to your computer with the cradle use the AC adapter whenever possible When using the battery be sure that t...

Страница 204: ...LYMPUS Master and the related sections of this manual Viewing still pictures movies You can also enjoy slide show and reproducing sound Transferring image data from the camera or a device Organizing M...

Страница 205: ...er recommended Hard disk space 300MB or greater Connector USB port Monitor 1024 768 dots or higher 65 536 colors or higher Notes This software is for use on computers with a pre installed Operating Sy...

Страница 206: ...ot originally equipped with a USB port normal operations cannot be guaranteed on computers when the camera is connected using the USB connectors QuickTime 6 or later or Safari 1 0 or later must be ins...

Страница 207: ...n 2 Select the language to be installed 3 Click OLYMPUS Master The QuickTime installation window automatically appears QuickTime is required to operate OLYMPUS Master If your computer has the QuickTim...

Страница 208: ...Next The serial number is shown on the label pasted on the CD ROM package When the DirectX license agreement window is displayed review the contents and click Yes The Adobe Reader installation dialog...

Страница 209: ...ROM drive and store it Macintosh 1 Insert the CD ROM into the CD ROM drive The CD ROM s window appears If the window is not displayed double click the icon of the CD ROM on the desktop 2 Double click...

Страница 210: ...lied USB cable and then set the camera on the cradle 1 Connect the supplied USB cable to the USB port of your computer For the location of the USB port on your computer see the manual for the computer...

Страница 211: ...ing display opened 4 When the PC PRINTER screen appears on the camera s monitor select PC then press 9 If the screen disappears turn off the camera and turn it on again or remove the camera from the c...

Страница 212: ...splayed Click OK to complete the message The computer recognizes the camera as a removable disk Windows XP When the computer has been connected to the camera a window is displayed prompting you to sel...

Страница 213: ...n on the desktop The main menu window appears automatically Macintosh 1 Double click the OLYMPUS Master icon in the OLYMPUS Master folder The main menu window appears automatically The first time when...

Страница 214: ...from the camera Olympus model only or media B Upgrade button Use to display the dialog box for upgrading to OLYMPUS Master Plus C Browse Images button Use to display the browse image D Backup Images b...

Страница 215: ...ages on a computer 1 In the OLYMPUS Master main menu click the Transfer Images button The transferring source selection window appears 2 Click the From Camera button in the menu window The transferrin...

Страница 216: ...amera can be disconnected after transferring the camera images to your computer 1 Make sure that the card access lamp on the camera is not lit 2 For Windows 98SE A Double click the My Computer icon th...

Страница 217: ...NO_NAME or Untitled icon on the desktop to TRASH B The icon showing the connection with the computer turns off 3 Disconnect the USB cable from the cradle Note For Windows Me 2000 XP when the Eject Ha...

Страница 218: ...ies 1 In the OLYMPUS Master main menu click the Browse Images button The Browse Window is displayed 2 Double click the thumbnail of the still picture you want to view The display switches to view mode...

Страница 219: ...ions of the buttons on the control are as follows Item Detail A Playback slider Drag the slider to choose a desired frame B Elapsed time display The elapsed time appears during playback C Play Pause b...

Страница 220: ...lick the Print Images button The Print Menu window is displayed 2 Click the Photo button The photo print window is displayed 3 Click Settings on the Photo Print window The Printer Settings dialog wind...

Страница 221: ...our computer 5 Select the thumbnail of the picture you want to print and click Add The selected picture is displayed on the layout as a preview 6 Set the number of prints 7 Click Print To return to th...

Страница 222: ...Notes Under the environment shown below we cannot guarantee proper operation even if it is equipped with the USB connector Windows 95 NT 4 0 Windows 98 98SE when upgraded from Windows 95 Mac OS 8 6 or...

Страница 223: ...the problem persists format the card g page 172 If the card cannot be formatted use another card There is a problem with the card and it cannot be used If the card cannot be formatted use another card...

Страница 224: ...the image data on the card The card contains no pictures Record pictures before playing back Use image processing software to view the pictures on a computer If that cannot be done the image file is...

Страница 225: ...The battery is empty Charge the battery by setting the camera on the cradle or replace the battery with a fully charged battery The camera cannot be used for shooting when set on the cradle Remove the...

Страница 226: ...onnect it again correctly There is no paper in the printer Load some paper in the printer The printer has run out of ink Replace the ink cartridge in the printer The paper is jammed in the printer Rem...

Страница 227: ...oblem with the printer Turn off the camera and printer check the printer and then turn on both devices There is a problem with the printer Press 9 again to restart printing No Dock Done compatible pri...

Страница 228: ...ry performance has temporarily declined due to low temperature Use the battery after warming it by keeping it in your pocket or a warm place The camera is connected to a computer The camera will not o...

Страница 229: ...efore charging P 33 The whole memory gauge is lit Wait until the top of the memory gauge goes off P 28 The monitor has turned off The power is off The camera automatically turns off if you leave the c...

Страница 230: ...tures Let the camera stay in warm condition for example by keeping the camera inside your outfit or cloth The battery level does not appear correctly If the rate of battery consumption has changed tre...

Страница 231: ...settings are returned to the factory default settings when the camera is turned off ALL RESET is set to ON Set ALL RESET of the setup menu to OFF P 148 The picture is out of focus Subjects that are di...

Страница 232: ...screen even if the camera and TV are connected through the cradle The camera s video output signal type is set incorrectly Set the correct video signal type in accordance with the local system P 170...

Страница 233: ...enter of the composition was bright If any bright subject is in the center of the composition the whole image may become dark Adjust F exposure compensation towards P 71 The colors of pictures taken l...

Страница 234: ...t occurred Hold the camera correctly and press the shutter button gently As the shutter speed is slower camera movement more likely to occur When you take a night scene picture or shoot in flash off m...

Страница 235: ...reen P 211 The camera is not recognized by the printer The camera is set to connect with the computer Select PRINT or SEL PRINT in the PC PRINTER screen P 195 The camera or printer is not turned on Tu...

Страница 236: ...RAIT SELF PORTRAIT CUISINE DOCUMENTS SPORT BEACH SNOW CANDLE AVAILABLE LIGHT PORTRAIT BEHIND GLASS VIVID P 57 D record mode SUPER HIGH 4M HIGH 2M BASIC 1M E MAIL VGA P 65 j sequential shooting OFF ON...

Страница 237: ...ttings Item Y Settings Y Ref page D record mode FINE STANDARD EXTENDED SUPER FINE CLIP P 67 IMAGE STABILIZER OFF ON P 92 F exposure compensation P 71 DIGITAL ZOOM OFF ON P 73 WB White Balance AUTO 5 3...

Страница 238: ...order P 182 m slide show NORMAL SCROLL FADER ZOOM DOWN ZOOM UP CHECKERBOARD BLINDS SWIVEL RANDOM P 105 y image rotation 90 0 90 P 108 R recording START P 117 EDIT BLACK WHITE SEPIA Q resize 640 480 3...

Страница 239: ...INFO STANDARD DETAIL P 110 m slide show NORMAL SCROLL FADER ZOOM DOWN ZOOM UP CHECKERBOARD BLINDS SWIVEL RANDOM P 105 STOP P 98 INDEX PLAY P 113 EDIT P 119 CAPTURE P 121 INDEX P 123 0 protect OFF ON P...

Страница 240: ...osure compensation DIGITAL ZOOM WB METERING AF MODE FULLTIME AF R recording sound with still pictures R recording sound with movies IMAGE STABILIZER P 155 ERASE STORED IMAGE OFF ON P 157 8 warning sou...

Страница 241: ...nd unselectable Item Y Settings Y Still image Movie Ref page SEL ALBUM 0 0 P 139 INFO NO INFO STANDARD 0 0 P 110 m slide show NORMAL SCROLL FADER ZOOM DOWN ZOOM UP CHECKERBOARD BLINDS SWIVEL RANDOM 0...

Страница 242: ...STANDARD P 110 m slide show NORMAL SCROLL FADER ZOOM DOWN ZOOM UP CHECKERBOARD BLINDS SWIVEL RANDOM P 105 STOP P 98 INDEX PLAY P 113 0 protect OFF ON P 126 ERASE ERASE YES NO ALL ERASE YES NO P 127 FO...

Страница 243: ...0 0 macro mode 0 0 0 0 0 0 0 0 0 super macro mode 0 0 0 0 0 0 0 0 0 Y self timer 0 0 0 0 0 0 0 0 0 0 D record mode 0 0 0 0 0 0 0 0 0 0 j sequential shooting 0 0 0 0 0 0 F exposure compensation 0 0 0 0...

Страница 244: ...0 0 Y self timer 0 0 0 0 0 0 0 0 0 D record mode 0 0 0 0 0 0 0 0 0 j sequential shooting 0 0 0 0 0 0 F exposure compensation 0 0 0 0 0 0 0 0 0 DIGITAL ZOOM 0 0 0 0 0 0 0 0 0 WB White Balance 0 0 METER...

Страница 245: ...Blinks The subject is not in focus when the shutter button is pressed halfway Pictures can be taken but may be out of focus Performing long time exposure shooting Shutter speed is slower than 1 2 sec...

Страница 246: ...ll amount of lens cleaning solution to some lens cleaning paper and gently wipe the lens Monitor Wipe gently with a soft dry cloth Card Battery Wipe gently with a soft dry cloth Cleaning the cradle Bl...

Страница 247: ...order Condensation inside the camera What is condensation When it is cold outside the water vapor in the air is rapidly cooled and turns to droplets of water Condensation occurs when the camera is su...

Страница 248: ...able images SUPER HIGH 4M 2288 1712 Approx 16 HIGH 2M 1600 1200 Approx 32 BASIC 1M 1024 768 Approx 58 E MAIL VGA 640 480 Approx 99 Maximum continuous recording time of movie with a 16 MB card Image qu...

Страница 249: ...tter speed 1 2 to 1 1000 sec max 4 sec in night scene mode Shutter shooting distance 0 5 m 1 6 ft normal 0 3 m 1 0 ft in macro mode 0 03 0 5 m 0 1 1 6 ft in super macro mode Monitor 2 5 TFT color LCD...

Страница 250: ...F operation 20 to 65 C 4 to 149 F storage Operating humidity Less than 95 operation and storage Dimensions Approx 20 25 1 7 mm 0 8 1 0 0 07 W H D Cradle Terminals DC IN USB A V OUTPUT Camera connecto...

Страница 251: ...rox 300 Varies according to conditions of use Operating temperature 0 to 40 C 32 to 104 F charge 10 to 60 C 14 to 140 F operation 0 to 30 C 32 to 86 F storage Dimensions Approx 31 9 45 8 10 mm 1 3 1 8...

Страница 252: ...der to calculate the exposure You can use this function on this camera by selecting Auto in Photometry Exposure Exposure refers to how the shutter opens to take in light and the amount of light receiv...

Страница 253: ...or by halving the aperture or by doubling shutter speed the EV will increase by 1 The EV can also be derived with respect to brightness and ISO sensitivity JPEG Joint Photographic Experts Group This i...

Страница 254: ...B BASIC 1M 65 248 Battery 30 31 Battery level 27 Battery card cover 22 31 BEACH SNOW 63 BEEP 162 BEHIND GLASS 64 BLACK WHITE 116 BLINDS 105 C Calendar 131 Camera connector 22 Camera connector dial 22...

Страница 255: ...5 FILE NAME 164 File number 26 Fill in flash 51 FINE 67 248 FIREWORKS 60 Flash 51 Flash off 52 Flash standby 24 53 245 Fluorescent 76 Focus Lock 45 FORMAT 172 Full press 43 FULLTIME AF 93 G Green indi...

Страница 256: ...83 P AUTO 42 PictBridge 192 253 PIXEL MAPPING 166 Playback mode 25 Playback on a TV 112 PORTRAIT 61 Postrecording 117 Power lamp 22 36 Power switch 22 36 Print reservations 182 Printing 181 192 Protec...

Страница 257: ...RD 67 248 STANDARD INFO 110 STOP Movie playback 98 STORE 129 Strap 29 Sunlight 76 SUNSET 61 SUPER FINE CLIP 67 248 SUPER HIGH 4M 65 248 Super macro 54 SWIVEL 105 T Tungsten 76 U UNDO ALL 145 UNDO ENTR...

Страница 258: ...s or office address Phone Fax E mail Product name model Serial number located on the bottom of the product Purchase date Please provide the following information if you are using the digital camera co...

Страница 259: ...23 07 61 Goods delivery Bredowstrasse 20 22113 Hamburg Germany Letters Postfach 10 49 08 20034 Hamburg Germany European Technical Customer Support Please visit our homepage http www olympus europa co...

Отзывы: