background image

24

EN

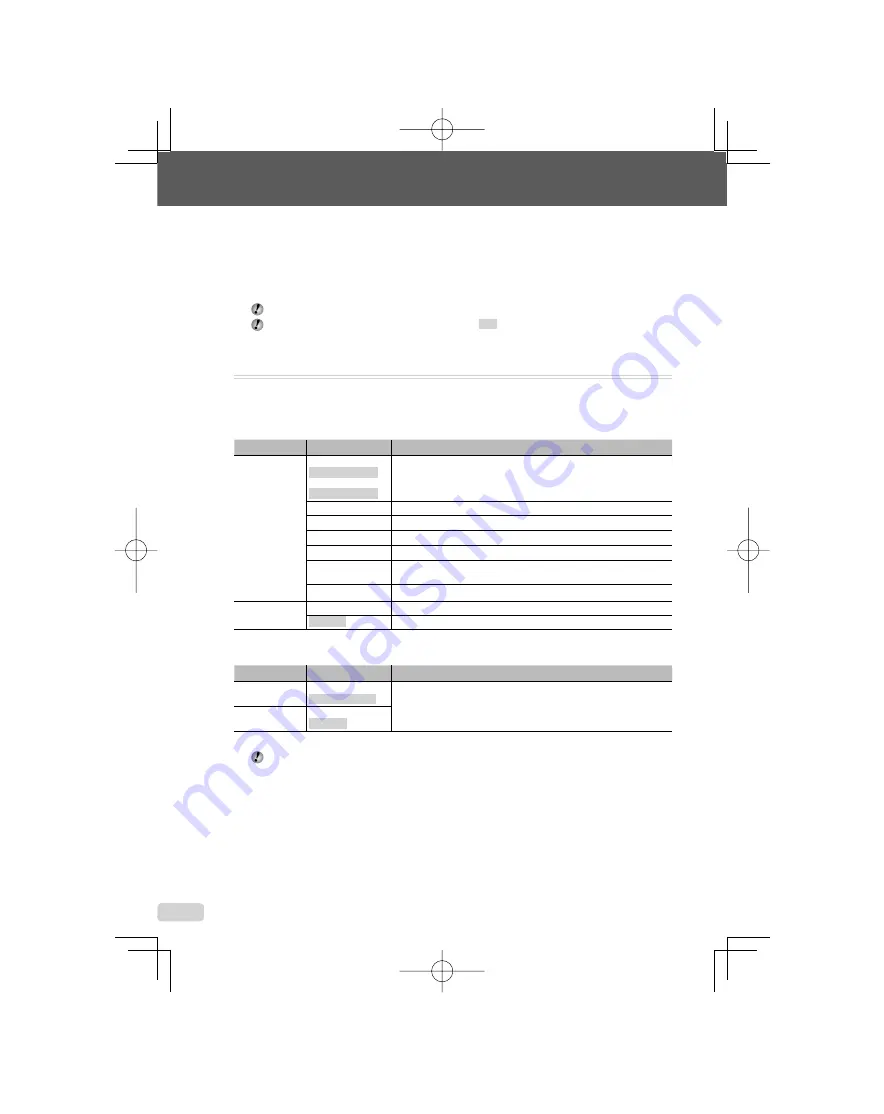
Menus for Shooting Functions

In shooting mode, settings can be adjusted.


E

 indicates the mode in which the function can be set.

  The default settings of the function are highlighted in 

.

Selecting the appropriate image quality for your application [

A

 IMAGE QUALITY]

A

 IMAGE QUALITY

E

P


G


h


s


n

Still pictures

Submenu 1

Submenu 2

Application

IMAGE SIZE

FE-3010/X-895:
12M (3968×2976)
FE-3000/X-890:
10M (3648×2736)

Suitable for printing pictures larger than A3 (11×17 in.).

5M (2560×1920)

Suitable for printing A4 (8.5×11 in.) pictures.

3M (2048×1536)

Suitable for printing pictures up to A4 (8.5×11 in.).

2M (1600×1200)

Suitable for printing A5 (5×7 in.) pictures.

1M (1280×960)

Suitable for printing pictures at postcard size.

VGA (640×480)

Suitable for viewing pictures on a TV or using pictures in emails and 
on websites.

16:9 (1920×1080)

Suitable for playing pictures on a wide screen TV.

 COMPRESSION

FINE

Shooting at high quality.

NORMAL

Shooting at normal quality.

Movies

Submenu 1

Submenu 2

Application

IMAGE SIZE

VGA (640×480) /
QVGA (320×240)

Select the image quality based on the image size and frame rate. 
Higher frame rates provides smoother movie images.

 FRAME RATE

N

 30fps

*1

/

O

 15fps

*1

*1

  frames per second

  “Number of storable pictures (still pictures)/Continuous recording length (movies) in the internal 

memory and xD-picture Card” (p. 47)

book̲d4385̲86̲en̲UA.indb   24

book̲d4385̲86̲en̲UA.indb   24

2008/12/05   14:46:08

2008/12/05   14:46:08

Содержание FE-3000/X-890

Страница 1: ... 1 2008 12 05 14 45 40 Preparing the Camera Preparing the Camera p 10 Names of Parts 6 Preparing the Camera 10 Shooting Playback and Erasing 14 Using Shooting Modes 17 Using Shooting Functions 19 Using Playback Features 23 Menus for Shooting Functions 24 Menus for Playback Editing and Printing Functions 28 Menus for Other Camera Settings 30 Printing 34 Using OLYMPUS Master 2 39 Usage Tips 41 Appen...

Страница 2: ... 1 2008 12 05 14 45 40 Preparing the Camera Preparing the Camera p 10 Names of Parts 6 Preparing the Camera 10 Shooting Playback and Erasing 14 Using Shooting Modes 17 Using Shooting Functions 19 Using Playback Features 23 Menus for Shooting Functions 24 Menus for Playback Editing and Printing Functions 28 Menus for Other Camera Settings 30 Printing 34 Using OLYMPUS Master 2 39 Usage Tips 41 Appen...

Страница 3: ...ORY FORMAT MENU EXIT Submenu 1 Please read Menu Settings p 24 to 33 while referring to this page 3 Use kl to select the desired Submenu 1 and press the B button 1 2 3 SETUP MENU EXIT SET OK POWER SAVE OFF NTSC VIDEO OUT 1 2 3 SETUP MENU SET OK BACK POWER SAVE OFF NTSC VIDEO OUT POWER SAVE OFF ON Page tab Submenu 2 To quickly move to the desired submenu press m to highlight the page tab and then us...

Страница 4: ...ORY FORMAT MENU EXIT Submenu 1 Please read Menu Settings p 24 to 33 while referring to this page 3 Use kl to select the desired Submenu 1 and press the B button 1 2 3 SETUP MENU EXIT SET OK POWER SAVE OFF NTSC VIDEO OUT 1 2 3 SETUP MENU SET OK BACK POWER SAVE OFF NTSC VIDEO OUT POWER SAVE OFF ON Page tab Submenu 2 To quickly move to the desired submenu press m to highlight the page tab and then us...

Страница 5: ...AMERA MENU WB p 25 ISO p 25 R Still images movies p 25 PANORAMA p 26 FACE DETECT p 26 3 C SWITCH SHOOTING MODES P p 14 G p 17 DIS MODE p 18 s p 17 MOVIE p 18 4 D RESET p 27 5 E SETUP MEMORY FORMAT FORMAT p 30 BACKUP p 30 W Language p 30 PIXEL MAPPING p 30 K q p 31 SAVE SETTINGS p 31 MENU COLOR p 31 BEEP p 31 s Monitor p 31 X Date time p 31 VIDEO OUT p 32 POWER SAVE p 33 6 F SILENT MODE p 33 Menu I...

Страница 6: ... p 32 34 39 3 Battery card compartment cover p 11 4 Self timer lamp p 21 Camera unit 1 3 2 6 7 5 4 8 5 Flash p 19 6 Lens p 45 57 7 Microphone p 25 29 8 Tripod socket book d4385 86 en UA indb 6 book d4385 86 en UA indb 6 2008 12 05 14 45 46 2008 12 05 14 45 46 ...

Страница 7: ...16 29 6 Shutter button p 14 7 Card access lamp p 46 8 Zoom buttons p 19 9 K button shooting switching shooting modes p 17 18 10 q button playback p 15 11 B button OK FUNC p 3 22 12 Arrow pad p 3 12 F button exposure compensation p 20 button macro p 20 Y button self timer p 21 button flash p 19 book d4385 86 en UA indb 7 book d4385 86 en UA indb 7 2008 12 05 14 45 46 2008 12 05 14 45 46 ...

Страница 8: ...ry check p 10 6 Flash standby camera shake warning flash charge p 19 41 7 AF target mark p 14 8 Recording with sound p 25 9 Number of storable still pictures remaining recording time p 14 p 18 10 Current memory p 46 11 Self timer p 21 12 Aperture value p 14 13 Shutter speed p 14 14 Exposure compensation p 20 15 Compression frame rate p 24 16 Image size p 24 17 ISO p 25 18 White balance p 25 book d...

Страница 9: ... 2 Print reservations number of prints p 37 p 36 3 Adding sound p 29 4 Protect p 28 5 Battery check p 10 6 Aperture value p 14 7 Exposure compensation p 20 8 White balance p 25 9 Image size p 24 10 File number 11 Frame number Elapsed time total recording time p 15 16 12 Current memory p 46 13 Compression frame rate p 24 14 ISO p 25 15 Date and time p 13 16 Shutter speed p 14 book d4385 86 en UA in...

Страница 10: ... use be sure to charge the battery until the charging indicator goes off for approx 2 hours If the charge indicator does not light or it blinks the battery may not be inserted correctly or the battery or the charger may be broken For details on the battery and the charger see Battery and charger p 45 When to charge the batteries Charge the battery when the error message shown below appears BATTERY...

Страница 11: ...he battery and the xD Picture Card sold separately into the camera Do not insert anything other than an xD Picture Card or the microSD Attachment into the camera 1 2 1 Battery card compartment cover 2 Battery lock knob Insert the battery by putting in the marked side first with the B marks toward the battery lock knob Damage to the battery exterior scratches etc may produce heat or an explosion In...

Страница 12: ... not touch the contact area of the microSD Attachment and or microSD card Arrow pad and operation guide The symbols 1243 displayed on various setting and movie playback screens indicate that the arrow pad be used 2009 08 26 12 30 100 0004 00 14 00 34 IN 2008 08 26 12 30 OK X Y M D TIME MENU CANCEL SET Y M D 0 0 0 3 0 7 1 0 EXPOSURE COMP Arrow pad 4 2 1 3 Operation guides displayed at the bottom of...

Страница 13: ...Y M D date order For a more accurate setting press the B button when the time signal hits 00 seconds To change the date and time adjust the setting from the menu X Date time p 31 Changing the display language The language for the menu and error messages displayed on the monitor is adjustable 1 Press the m button and press klmn to select E SETUP MENU EXIT SET OK SETUP 2 Press the B button 1 2 3 BAC...

Страница 14: ...y Shutter speed Aperture value Focusing p 43 Shooting with the optimum aperture value and shutter speed P mode In this mode automatic shooting settings are activated while also allowing changes to a wide range of shooting menu functions such as exposure compensation white balance etc as needed 1 Press the n button to turn on the camera 10M 4 IN NORM P Monitor standby mode screen Number of storable...

Страница 15: ... 2009 08 26 12 30 100 0001 NORM Playback image Number of frames 2 Use klmn to select an image Displays 10 frames before the current image Displays next image Displays previous image Displays 10 frames after the current image The display size of the images can be changed Index view and close up view p 23 To play back movies Select a movie and press the B button 2009 08 26 12 30 100 0004 4 IN MOVIE ...

Страница 16: ... Press and hold down n to play a movie and press and hold down m to play a movie in reverse Press the B button to resume playback 2009 08 26 12 30 100 0004 00 14 00 34 IN During pause To stop movie playback Press the m button Erasing images during playback Single image erase 1 Press the D button when the image to be erased is displayed ERASE ERASE OK IN NO NO YES SET CANCEL MENU 2 Press k to selec...

Страница 17: ... for the shooting scene simply by pressing the shutter button The shooting menu options cannot be specified in G mode 1 Press the K button a few times to set G The icon changes depending on the scene that the camera automatically selects 10M 4 IN NORM iAUTO The shooting mode changes in the order of P G h s A each time the K button is pressed By switching to any of other shooting modes most setting...

Страница 18: ...settings in h mode will change to the default settings of the newly selected mode Shooting movies n mode 1 Press the K button a few times to set n A mode indicator 00 34 00 34 IN QVGA QVGA 15 15 2 Press the shutter button halfway down to focus on the subject and gently press the button all the way down to start recording Press halfway Press fully 00 34 00 34 REC REC Lights up red when recording Re...

Страница 19: ...he flash fires regardless of the available light FLASH OFF The flash does not fire Using the zoom Pressing the zoom buttons adjusts the shooting range Pressing the wide W button Pressing the telephoto T button 10M P 4 IN NORM 10M P 4 IN NORM Zoom bar Optical zoom 3x digital zoom 4x Use of h mode p 18 is recommended when shooting with the telephoto zoom The zoom bar appearance identifies the status...

Страница 20: ...shoot subjects at close distances 1 Press the button P OK OK SET SET OFF OFF OFF OFF 2 Use mn to select the setting option and press the B button to set Option Description OFF Macro mode is deactivated MACRO This enables shooting as close as 10 cm 3 9 in 1 60 cm 23 6 in 2 to the subject SUPER MACRO 3 This enables shooting as close as 5 cm 2 0 in to the subject 1 When the zoom is at the widest W po...

Страница 21: ... The self timer lamp turns on for approx 10 seconds then blinks for approx 2 seconds and then the picture is taken Self timer shooting is automatically canceled after one shot To cancel the self timer after it starts Press the Y button again Increasing the brightness of the monitor Backlight boost Press in shooting mode The monitor becomes brighter If there is no operation for 10 seconds the previ...

Страница 22: ...the shooting information display The display of the screen information can be changed to best match the situation for example the need for a clear view of the screen or for making a precise composition by using the grid display 1 Press the g button The displayed shooting information changes in the order shown below each time the button is pressed Shooting mode display p 8 10M 2 0 P 4 IN ISO 400 NO...

Страница 23: ... an image and press the B button to display the selected image in single image view To scroll an image in close up view Use klmn to move the viewing area Changing the image information display Shooting information settings displayed on the screen can be changed 1 Press the g button The displayed image information changes in the order shown below each time the button is pressed 2009 08 26 12 30 4 1...

Страница 24: ...uitable for printing A5 5 7 in pictures 1M 1280 960 Suitable for printing pictures at postcard size VGA 640 480 Suitable for viewing pictures on a TV or using pictures in emails and on websites 16 9 1920 1080 Suitable for playing pictures on a wide screen TV COMPRESSION FINE Shooting at high quality NORMAL Shooting at normal quality Movies Submenu 1 Submenu 2 Application IMAGE SIZE VGA 640 480 QVG...

Страница 25: ...low light conditions However high sensitivity introduces noise into the resulting picture which may give it a grainy appearance Submenu 2 Application AUTO The camera automatically adjusts the sensitivity according to the shooting scene 100 200 400 800 1600 The value of the ISO sensitivity is fixed Recording sound when shooting still images R B CAMERA MENU X R E P h s Submenu 2 Application OFF No s...

Страница 26: ...t in the frame looked like and take the next picture so it overlaps 3 Repeat Step 2 until the number of desired frames is taken and then press the B button when finished When the g mark is displayed you cannot continue shooting any further Panorama shooting is possible for up to 10 frames Refer to the OLYMPUS Master 2 help guide for details on how to make panorama images Selecting the focusing on ...

Страница 27: ...sing the best mode for the shooting scene p 17 MOVIE Shooting movies p 18 Restoring the shooting functions to the default settings D RESET D RESET E P G h s n Submenu 1 Application YES Restores the following menu functions to the default settings Flash p 19 Exposure compensation p 20 Macro p 20 Self timer p 21 A IMAGE QUALITY p 24 s p 17 Shooting information display p 22 Menu functions in B CAMERA...

Страница 28: ...the B button The edited image will be saved as a separate image Protecting images 0 J PLAYBACK MENU X 0 Protected images cannot be erased by ERASE p 16 SEL IMAGE or ALL ERASE p 29 but all images are erased by MEMORY FORMAT FORMAT p 30 Submenu 2 Application OFF Images can be erased ON Images are protected so that they cannot be erased except by formatting of the internal memory card 1 Use mn to sel...

Страница 29: ...card into the camera When erasing pictures from the card insert a card into the camera in advance To individually select and erase images SEL IMAGE 1 Use kl to select SEL IMAGE and press the B button 2 Use klmn to select the image to be erased and press the B button to add a R mark to the image 1 4 2 5 3 6 IN OK MENU BACK GO SEL IMAGE D R mark 3 Repeat Step 2 to select the images to be erased and ...

Страница 30: ...SETUP X W Changing the display language p 13 Submenu 2 Application Languages 1 The language for the menus and error messages displayed on the monitor is selected 1 The available languages vary depending on the country and or region where the camera was purchased Adjusting the CCD and the image processing function PIXEL MAPPING E SETUP X PIXEL MAPPING This function has already been adjusted at fact...

Страница 31: ...2 30 MENU CANCEL Date order Turning on the camera with the K or q button K q E SETUP X K q Submenu 2 Application YES Pressing K turns on the camera and starts the camera in the shooting mode Pressing q turns on the camera and starts the camera in the playback mode NO The power is not turned on To turn on the camera press the n button Saving the mode when the camera is turned off SAVE SETTINGS E SE...

Страница 32: ...here the camera is sold To play back camera images on a TV 1 Connect the TV and camera Connect to the TV video input jack yellow and audio input jack white Multi connector AV cable supplied 2 Use the camera to select the same video signal system as the one of connected TV NTSC PAL 3 Turn on the TV and change INPUT to VIDEO an input jack connected to the camera For details on changing the input sou...

Страница 33: ...for approx 10 seconds the monitor automatically turns off to save battery power To resume standby mode Press any button Turning off the camera sounds F SILENT MODE F SILENT MODE Submenu 1 Application OFF Button operation sound warning sound are not muted ON The electronic sounds button operation sound warning sound are muted BEEP p 31 book d4385 86 en UA indb 33 book d4385 86 en UA indb 33 2008 12...

Страница 34: ... 1 PictBridge is a standard for connecting digital cameras and printers of different makers and printing out pictures directly The printing modes paper sizes and other parameters that can be set with the camera vary depending on the printer that is used For details refer to the printer s instruction manual For details on the available paper types loading paper and installing ink cassettes refer to...

Страница 35: ...et to the printer s standard STANDARD STANDARD PRINTPAPER SET OK MENU BACK SIZE BORDERLESS 5 Use kl to select the BORDERLESS or PICS SHEET settings and press the B button Submenu 4 Application OFF ON 1 The image is printed with a border around it OFF The image is printed to fill the entire paper ON The number of images per sheet varies depending on the printer The number of images per sheet PICS S...

Страница 36: ...ecessary repeat Steps 6 and 7 to select the image to be printed make the detailed settings and set SINGLEPRINT 9 Press the B button PRINT SET OK MENU BACK PRINT CANCEL 10Use kl to select PRINT and press the B button Printing starts When OPTION SET is selected in ALL PRINT mode PRINT INFO screen is displayed When printing is finished the PRINT MODE SELECT screen is displayed ALL PRINT PRINT MODE SE...

Страница 37: ... other device DPOF print reservations can be made for up to 999 images per card Single frame print reservations 1 Press the q button and then press the m button to display the top menu 2 Use klmn to select L PRINT ORDER and press the B button PRINT ORDER SET OK U EXIT MENU 3 Use kl to select and press the B button x 10M 2009 08 26 12 30 100 0004 4 0 NORM SET OK 4 Use mn to select the image for pri...

Страница 38: ...ting the print reservation data for selected images 1 Follow Steps 1 and 2 of Resetting all print reservation data p 38 2 Use kl to select and press the B button 3 Use kl to select KEEP and press the B button 4 Use mn to select the image with the print reservation you want to cancel Use kl to set the print quantity to 0 5 If necessary repeat Step 4 and then press the B button when finished 6 Use k...

Страница 39: ...ompletion appears Confirm the message and click OK The camera is recognized as a removable disk Macintosh If iPhoto has started exit iPhoto and start OLYMPUS Master 2 While the camera is connected to the computer shooting functions are disabled Connecting the camera to a computer via a USB hub may cause unstable operation When MTP is set for the submenu that appears by pressing n after selecting P...

Страница 40: ...amera and the computer are connected System requirements Windows Windows 2000 Professional XP Home Edition XP Professional Vista Macintosh Mac OS X v10 3 or later On a computer running Windows Vista if MTP is set for the submenu that appears by pressing n after selecting PC in Step 3 of Connecting the camera to a computer p 39 Windows Photo Gallery will become available Even if a computer has USB ...

Страница 41: ... K button to set a shooting mode Wait until flash charge stops blinking before taking pictures Monitor Difficult to see Condensation 1 may have occurred Turn off the power and wait for the camera body to become acclimated to the surrounding temperature and dry out before taking pictures 1 Dew drops can form in the camera when it is suddenly taken from a cold location into a warm humid room Vertica...

Страница 42: ...computer If the image still cannot be viewed the image file is corrupted r THE IMAGE CANNOT BE EDITED Problem with selected image Use photo retouch software etc to edit the image on a computer CARD COVER OPEN Operation problem Close the battery card compartment cover g BATTERY EMPTY Battery problem Charge the battery NO CONNECTION Connection problem Connect the camera and computer or printer corre...

Страница 43: ...ra shake Taking pictures without camera shake Taking pictures using h mode p 18 Select j SPORT in s mode p 17 The j SPORT mode uses a fast shutter speed and can reduce the blur incurred by a moving subject Taking pictures at a high ISO sensitivity If a high ISO sensitivity is selected pictures can be taken at a high shutter speed even at locations where a flash cannot be used ISO p 25 Exposure bri...

Страница 44: ...ots and color unevenness that were not in the original image can occur and the image can appear grainy The resulting image is grainier than with low ISO sensitivity as well ISO p 25 Batteries Making batteries last longer Avoid any of the following operations when not actually taking pictures because they deplete the battery power Repeatedly pressing the shutter button halfway Repeatedly using the ...

Страница 45: ... used only for LI 42B LI 40B batteries Do not charge any other type of battery with the supplied battery charger It might cause explosion leaking overheating or fire For plug in type battery charger This power unit is intended to be correctly orientated in a vertical or floor mount position Camera care Exterior Wipe gently with a soft cloth If the camera is very dirty soak the cloth in mild soapy ...

Страница 46: ...mpatible with this camera xD Picture Card 16MB to 2GB TypeH M M Standard Using a new card Before using a non Olympus card or a card that was used for another purpose in a computer or other device use MEMORY FORMAT FORMAT p 30 to format the card Checking the image saving location The memory indicator shows whether the internal memory or card is being used during shooting and playback Current memory...

Страница 47: ...n the FE 3000 X 890 only Movies IMAGE SIZE FRAME RATE Continuous recording length Internal memory Using a 1 GB xD Picture Card With sound Without sound With sound Without sound C 640 480 N 10 sec 10 sec 8 min 59 sec 9 min 5 sec O 20 sec 20 sec 17 min 48 sec 18 min 11 sec E 320 240 N 28 sec 29 sec 24 min 43 sec 25 min 28 sec O 54 sec 58 sec 48 min 2 sec 50 min 55 sec The maximum file size of a sing...

Страница 48: ...is used without observing the information given under this symbol serious injury or death may result WARNING If the product is used without observing the information given under this symbol injury or death may result CAUTION If the product is used without observing the information given under this symbol minor personal injury damage to the equipment or loss of valuable data may result WARNING TO A...

Страница 49: ... you insert a card by mistake such as a microSD card do not use force Contact authorized distributors service centers CAUTION Stop using the camera immediately if you notice any unusual odors noise or smoke around it Never remove the batteries with bare hands which may cause a fire or burn your hands Never hold or operate the camera with wet hands Do not leave the camera in places where it may be ...

Страница 50: ...lean running cold water immediately If the fluid burns your skin seek medical attention immediately Never subject batteries to strong shocks or continuous vibration CAUTION Before loading always inspect the battery carefully for leaks discoloration warping or any other abnormality The battery may become hot during prolonged use To avoid minor burns do not remove it immediately after using the came...

Страница 51: ...ght may appear on the top bottom of the monitor but this is not a malfunction When a subject is viewed diagonally in the camera the edges may appear zigzagged on the monitor This is not a malfunction it will be less noticeable in playback mode In places subject to low temperatures the LCD monitor may take a long time to turn on or its color may change temporarily When using the camera in extremely...

Страница 52: ...mation contained therein Olympus reserves the right to alter the features and contents of this publication or software without obligation or advance notice FCC Notice Radio and Television Interference Changes or modifications not expressly approved by the manufacturer may void the user s authority to operate this equipment This equipment has been tested and found to comply with the limits for a Cl...

Страница 53: ...200 220 50 BF India 230 240 50 C Indonesia 127 230 50 C Japan 100 50 60 A Korea rep 220 60 C Malaysia 240 50 BF Philippines 220 230 60 A C Singapore 230 50 BF Taiwan 110 60 A Thailand 220 50 C BF Vietnam 220 50 A C Oceania Countries Regions Voltage Frequency Hz Plug type Australia 240 50 O New Zealand 230 240 50 O North America Countries Regions Voltage Frequency Hz Plug type Canada 120 60 A USA 1...

Страница 54: ...y or any other repairs and ii make any internal or external design and or feature changes on or to its products without any liability to incorporate such changes on or to the Products For customers in North and South America For customers in USA Declaration of Conformity Model Number FE 3010 X 895 FE 3000 X 890 Trade Name OLYMPUS Responsible Party Address 3500 Corporate Parkway P O Box 610 Center ...

Страница 55: ...LITY OF THE PRODUCTS OR THEIR FITNESS FOR A PARTICULAR PURPOSE OR RELATING TO THE INFRINGEMENT OF ANY PATENT COPYRIGHT OR OTHER PROPRIETARY RIGHT USED OR INCLUDED THEREIN IF ANY IMPLIED WARRANTIES APPLY AS A MATTER OF LAW THEY ARE LIMITED IN DURATION TO THE LENGTH OF THIS LIMITED WARRANTY SOME STATES MAY NOT RECOGNIZE A DISCLAIMER OR LIMITATION OF WARRANTIES AND OR LIMITATION OF LIABILITY SO THE A...

Страница 56: ...1 Sales receipt showing date and place of purchase 2 Copy of this limited warranty bearing the Product serial number corresponding to the serial number on the Product unless it is a model on which Olympus does not place and record serial numbers 3 A detailed description of the problem 4 Sample prints negatives digital prints or files on disk if available and related to the problem When service is ...

Страница 57: ... lens 6 3 to 18 9 mm f3 1 to 5 9 equivalent to 36 to 108 mm on a 35 mm camera Photometric system Digital ESP metering system Shutter speed 4 to 1 2000 sec Shooting range 0 6 m 2 0 ft to W 1 0 m 3 3 ft to T normal 0 1 m 0 3 ft to W 0 6 m 2 0 ft to T macro mode 0 05 m 0 16 ft to super macro mode Monitor 2 7 TFT color LCD display 230 000 dots Connector Multi connector USB connector A V OUT jack Autom...

Страница 58: ...600 mA Charging time Approx 2 hours When charging the supplied LI 42B Operating environment Temperature 0 C to 40 C 32 F to 104 F operation 20 C to 60 C 4 F to 140 F storage Dimensions 62 0 mm W 23 5 mm H 90 0 mm D 2 4 0 9 3 5 in Weight Approx 65 g 2 3 oz microSD Attachment Product type Attachment for microSD card Operating Environment Temperature 10 C to 40 C 14 F to 104 F operation 20 C to 65 C ...

Страница 59: ...T 30 MENU COLOR 31 microSD Attachment 12 48 N Natural color 25 A Arrow pad 12 AV cable 32 B Backlight boost 21 BACKUP 30 Battery charger 10 45 Beep 31 Brightness Backlight boost 21 Exposure compensation 20 Monitor brightness s 31 C Card microSD Card 12 48 microSDHC card 12 48 xD Picture Card 11 46 Compression 24 Connecting PC 39 Printer 34 TV 32 CUSTOM PRINT 35 D Date and time X 13 31 DIS MODE h 1...

Страница 60: ...Protecting images 0 28 R RESETD 27 Rotating images y 28 S s mode 17 Self timer 21 Shooting 14 Shooting movies n 18 SILENT MODE F 33 SLIDESHOW G 28 Sound recording R 25 29 Strap 10 SUPER MACRO 20 SWITCH SHOOTING MODES C 27 T Turning on the camera 13 K q 31 U USB cable 34 39 Using the Menu 3 V VIDEO OUT 32 W WB 25 Z Zoom 19 book d4385 86 en UA indb 60 book d4385 86 en UA indb 60 2008 12 05 14 46 32 ...

Страница 61: ...ORY FORMAT MENU EXIT Submenu 1 Please read Menu Settings p 24 to 33 while referring to this page 3 Use kl to select the desired Submenu 1 and press the B button 1 2 3 SETUP MENU EXIT SET OK POWER SAVE OFF NTSC VIDEO OUT 1 2 3 SETUP MENU SET OK BACK POWER SAVE OFF NTSC VIDEO OUT POWER SAVE OFF ON Page tab Submenu 2 To quickly move to the desired submenu press m to highlight the page tab and then us...

Страница 62: ... 1 2008 12 05 14 45 40 Preparing the Camera Preparing the Camera p 10 Names of Parts 6 Preparing the Camera 10 Shooting Playback and Erasing 14 Using Shooting Modes 17 Using Shooting Functions 19 Using Playback Features 23 Menus for Shooting Functions 24 Menus for Playback Editing and Printing Functions 28 Menus for Other Camera Settings 30 Printing 34 Using OLYMPUS Master 2 39 Usage Tips 41 Appen...

Отзывы: