background image

89

EN

Customizing camera settings

10

Wireless remote control 

fl

 ash photography

External 

fl

 ash units that offer a remote control mode and are designated for use 

with this camera can be used for wireless 

fl

 ash photography. The built-in 

fl

 ash 

can independently control up to three groups of remote 

fl

 ash units. See the 

documentation provided with the external 

fl

 ash units for details.

1


Set the remote 

fl

 ash units to RC mode and place them as desired.

Turn each 

fl

 ash unit on, press the MODE button, and select RC mode. 

Select a channel and group for each 

fl

 ash unit.

2


Select [ON] for [

#

 RC MODE] in 

X

 Shooting menu 2 (P. 108).

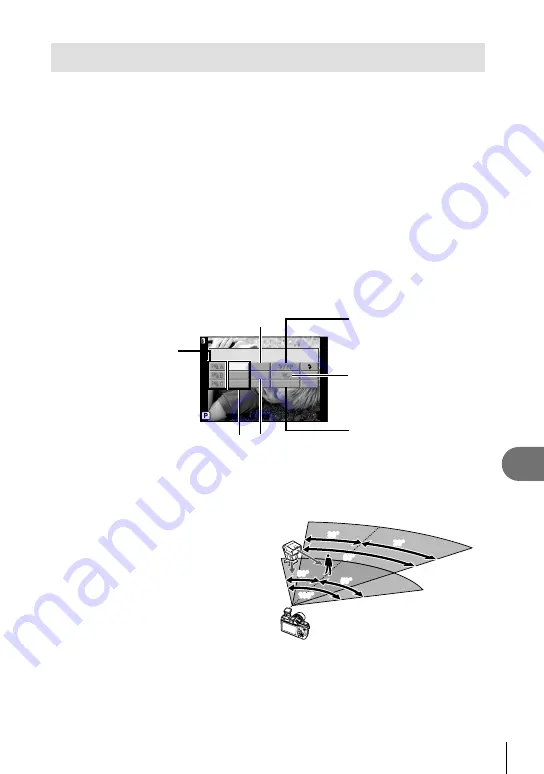
The super control panel switches to RC mode.
You can choose a super control panel display by repeatedly pressing the 

INFO


button.
Select a 

fl

 ash mode (note that red-eye reduction is not available in RC mode).

3


Adjust the settings for each group in the super control panel.

Flash intensity value

250

250 F5.6

38

38

A MODE

TTL

+1.0

M

1 / 8

LO

OFF

2

CH

0.0

0.0

Group

Select the 

fl

 ash control 

mode and adjust the 

fl

 ash 

intensity individually for 
groups A, B, and C. For 
MANUAL, select the 

fl

 ash 

intensity.

Normal 

fl

 ash/Super FP 

fl

 ash

Switch between normal 

fl

 ash and Super FP 

fl

 ash.

Communication light level

Set the communication light 
level to [HI], [MID], or [LO].

Channel

Set the communication 
channel to the same 
channel used on the 

fl

 ash.

Flash
intensity

Flash control
mode

4


Press the 

#

UP

 button to raise the built-in 

fl

 ash.

After con

fi

 rming that the built-in and remote 

fl

 ash units have charged, take a 

test shot.

„

 Wireless 

fl

 ash control range

Position the wireless 

fl

 ash units with their 

remote sensors facing the camera. The 
following illustration shows the approximate 
ranges at which the 

fl

 ash units can be 

positioned. The actual control range varies 
with local conditions.

5m

10m

100°

100°

50°

50°

50°

50°

60°

60°

30°

30°

30°

30°


#

 Caution

The built-in 

fl

 ash can not be used as a light source in RC mode.

We recommend using a single group of up to three remote 

fl

 ash units.

Remote 

fl

 ash units can not be used for second curtain slow synchronization or anti-

shock exposures longer than 4 seconds.
If the subject is too close to the camera, the control 

fl

 ashes emitted by the built-in 

fl

 ash may affect exposure (this effect can be reduced by reducing the output of the 

built-in 

fl

 ash by, for example, using a diffuser).


Содержание E-PL2

Страница 1: ...rom the actual product The contents in this manual are based on firmware version 1 0 for this camera If there are additions and or modifications of functions due to firmware update for the camera the...

Страница 2: ...Lastly pull the strap tight making sure that it is fastened securely 1 2 3 Attach the other end of the strap to the other eyelet in the same way Attaching the strap Indications used in this manual The...

Страница 3: ...rs 30 minutes Amber blinking Charging error 2 Loading the battery 2 1 3 Battery card compartment lock Battery card compartment cover Direction indicating mark Removing the battery Turn off the camera...

Страница 4: ...before loading or removing the card Removing the card Press the inserted card lightly and it will be ejected Pull out the card Caution Do not remove the battery or card while the card write indicator...

Страница 5: ...gnment mark Lens attachment mark Align the lens attachment mark red on the camera with the alignment mark red on the lens then insert the lens into the camera s body Rotate the lens in the direction i...

Страница 6: ...l be performed to remove dust from the surface of the image sensor filter To turn off the power press the ON OFF button again 2 Set the mode dial to h Mode dial ON OFF button LCD monitor L N 01 02 03...

Страница 7: ...ET MYSET PICTURE MODE K IMAGE ASPECT j 4 3 BACK SET 2 Select X in the d setup tab Use FG to select d and press I Select X and press I X W s REC VIEW FIRMWARE ENG j 0k 0 5SEC BACK SET c MENU DISPLAY d...

Страница 8: ...f timer lamp P 46 6 Lens attachment mark P 5 7 Mount Remove the body cap before attaching the lens 8 Microphone P 59 65 9 Hot shoe cover 0 Built in flash P 56 a Lens release button P 5 b Lens lock pin...

Страница 9: ...ton P 35 Q button P 20 21 Control dial j P 14 Rotate to choose an option 1 Flash switch P 56 2 Accessory port 3 LCD monitor P 22 23 4 U button P 31 36 61 5 G button P 86 P 60 61 6 q Playback button P...

Страница 10: ...ing the mode dial or turning off the power in the easy shooting modes functions with changes made to their settings are restored to the factory default settings ART Art filter P 16 SCN Scene P 17 Adva...

Страница 11: ...ter speed effects Taking photographs during movie recording To take a photograph during movie recording press the shutter button Press the R button to end recording Three files will be recorded to the...

Страница 12: ...ng the UNLOCK switch 3 4 1 2 3 2 Adjust the focus Lightly press the shutter button down to the first position press the shutter button halfway L N 01 02 03 01 02 03 Shutter speed Aperture value AF con...

Страница 13: ...e rest of the way down Recording movies Release the shutter button and press the R button to begin recording Press the R button again to end recording n 2 18 R button Tips If no operations are perform...

Страница 14: ...e playback press the U button Keep pressing the button to zoom in up to 14 Press G to return to single frame playback 2x 2x Index display Calendar display To view multiple pictures press the G button...

Страница 15: ...frame and movie playback 00 14 00 34 Erasing images Display a image you want to delete and press D Select YES and press Q D button ERASE YES NO BACK SET Protecting images Protect images from accidenta...

Страница 16: ...nu Art effects Art filters can be modified and effects can be added Pressing I in the art filter menu displays additional options Modifying filters Option I is the original filter while options II and...

Страница 17: ...SUNSET J SPORT DOCUMENTS G NIGHT SCENE s PANORAMA P 52 U NIGHT PORTRAIT FIREWORKS G CHILDREN g BEACH SNOW H HIGH KEY f f FISHEYE EFFECT I LOW KEY w w WIDE ANGLE q DIS MODE m m MACRO 2 Shoot To choose...

Страница 18: ...cts CHANGE COLOR SATURATION CLEAR VIVID FLAT MUTED Saturation contrast gradation etc CHANGE COLOR IMAGE WARM COOL Color temperature gradation etc CHANGE BRIGHTNESS BRIGHT DARK Exposure compensation gr...

Страница 19: ...cted effect will be visible in the final photograph CLEAR VIVID CLEAR VIVID FLAT MUTED FLAT MUTED CANCEL Level bar 4 Shoot Press the shutter button to shoot To clear the live guide from the display pr...

Страница 20: ...56 Flash intensity control 1 2 P 57 Metering mode 1 2 P 39 AF mode P 34 Face priority 1 2 P 37 Movie sound record P 59 ISO sensitivity P 45 1 P A S M and A modes only 2 ART and SCN only 3 n mode only...

Страница 21: ...ET The current setting is displayed Function Q j Y OFF o OFF 0 0 OFF IMAGE STABILIZER BRACKETING MULTIPLE EXPOSURE w RC MODE BACK SET j Y W j Y o 4 Use FG to highlight an option and press Q to select...

Страница 22: ...7 a dLOCK P 80 b Flash P 56 blinks charging in progress lights up charging completed c AF confirmation mark P 12 d Art filter P 16 Scene mode P 17 Picture mode P 42 e White balance P 40 f Sequential s...

Страница 23: ...2 Aspect border P 45 3 Print reservation Number of prints P 73 4 Sound record P 65 5 Protect P 15 6 Pixel count compression rate P 44 7 Record mode P 44 8 File number P 73 9 Frame number P 73 0 Aspec...

Страница 24: ...balance 40 One touch white balance 41 Processing pictures to match the subject Taking monotone pictures PICTURE MODE 42 Art filter ART 16 Focus Focusing on one area AF target 35 Zoom frame AF zoom AF...

Страница 25: ...GRID G INFO SETTINGS 80 Zooming in on photos to check focus AUTOq REC VIEW 77 mode2 q CLOSE UP MODE 61 Self portraits Self timer 46 Sequential shooting Sequential shooting 46 Extending the useful lif...

Страница 26: ...dex 24 Basic photography frequently used options 30 Switching the information display 30 Choosing shooting controls 30 Displaying information during playback 31 Other uses for the INFO button 32 One t...

Страница 27: ...ures for a panorama 52 Recording multiple exposures in a single image multiple exposure 53 Varying settings over a series of photographs bracketing 54 Flash shooting 56 Using a flash flash photography...

Страница 28: ...77 X Date time setting 77 W Changing the display language 77 s Monitor brightness adjustment 77 REC VIEW 77 c MENU DISPLAY 77 FIRMWARE 77 Customizing camera settings 78 Custom Menu 78 Displaying the C...

Страница 29: ...ons 99 Mount adapter 100 Four Thirds lens adapter MMF 2 100 OM adapter MF 2 100 Remote cable RM UC1 100 Lens attachments 101 MACRO ARM LIGHT MAL 1 101 Microphone set SEMA 1 101 Using electronic view f...

Страница 30: ...G INFO SETTINGS menu You can also opt to display a framing grid in the information display g Custom menu P 78 Choosing shooting controls Shooting options can be displayed by pressing Q You can choose...

Страница 31: ...se below the lower limit in blue and the area metered using spot metering in green Highlight Shadow display Areas above the upper limit of brightness for the image are shown in red those below the low...

Страница 32: ...ayback zoom and then press the INFO button and use FG 2x 2x INFO Tone control Exposure compensation aperture and shutter speed can be adjusted by pressing the F button The tone control dialog can be d...

Страница 33: ...and press the Q button 3 Select YES and press the Q button RESET MYSET BACK SET RESET MYSET1 SET MYSET2 SET MYSET3 SET MYSET4 SET Using MYSET 1 Select RESET MYSET in shooting menu W P 108 2 Select the...

Страница 34: ...a continues trying to focus Four Thirds system lenses focus using S AF MF manual focus This function allows you to manually focus on any subject Near Focus ring S AF MF Simultaneous use of S AF mode a...

Страница 35: ...about the same distance 1 In S AF mode position the AF target over the subject and press the shutter button halfway Make sure that the AF confirmation mark is lighting up Focus locks while the shutter...

Страница 36: ...just before the button was pressed the zoom frame will be displayed at the current focus position Use FGHI to position the zoom frame Press INFO and use FG to choose the zoom ratio Positioning the zo...

Страница 37: ...way to focus When the camera focuses on the face in the white border the border will turn green If the camera is able to detect the subject s eyes it will focus on the closer of the two eyes and the f...

Страница 38: ...iewed in the 4 split screen 1 Select ON for G INFO SETTINGS MULTI VIEW in the c Custom menu P 78 2 Press the INFO button repeatedly to display the multi view display F 0 3 0 0 0 3 0 7 SET This functio...

Страница 39: ...g to the brightness at the metered point IHI Spot metering highlight control Increases spot metering exposure Ensures bright subjects appear bright ISH Spot metering shadow control Lowers spot meterin...

Страница 40: ...in the shadows on a clear day 3 6000K For shooting outdoors on a cloudy day 1 3000K For shooting under a tungsten light 4000K For subjects lit by fluorescent lights W k For underwater photography n 55...

Страница 41: ...ngs at once ALL g Custom menu P 78 One touch white balance Measure white balance by framing a piece of paper or other white object under the lighting that will be used in the final photograph This is...

Страница 42: ...SPECT 4 3 BACK SET 2 Select an option with HI and press Q Picture modes h i ENHANCE Produces more impressive looking pictures matched to the scene mode i VIVID Produces vivid colors j NATURAL Produces...

Страница 43: ...dness of the color D D k D EFFECT i ENHANCE Sets the extent that the effect will be applied D k k D B W FILTER MONOTONE Creates a black and white image The filter color is brightened and the complemen...

Страница 44: ...d B The options available can be selected using the KSET option in the custom menus g Custom menu P 78 Image size Compression rate Application Name Pixel count SF Super Fine F Fine N Normal B Basic Y...

Страница 45: ...es P 63 ISO sensitivity Increasing ISO sensitivity increases noise graininess but allows photographs to be taken when lighting is poor The setting recommended in most situations is AUTO which starts a...

Страница 46: ...utton halfway to focus the rest of the way down to start the timer First the self timer lamp lights up for approximately 10 seconds then it blinks for approximately 2 seconds and the picture is taken...

Страница 47: ...nses that are not Micro Four Thirds or Four Thirds system lenses 1 Select the IMAGE STABILIZER item in the live control P 20 and press the INFO button P AUTO mm mm 50 WB WB AUTO AUTO j 2 Use HI to cho...

Страница 48: ...Aperture value Program shift In P and ART modes you can press the F button F and then use FG to choose different combinations of aperture and shutter speed without altering exposure This is known as p...

Страница 49: ...ecrease depth of field the area in front of or behind the focus point that appears to be in focus softening background details Smaller apertures higher f numbers increase depth of field When the apert...

Страница 50: ...ose the shutter speed You can also select the shutter speed by pressing the F button F and then using FG In this case the control dial can be used for exposure compensation Shutter speed L N 01 02 03...

Страница 51: ...t Use for landscapes and fireworks In M mode set the shutter speed to BULB BULB is displayed on the LCD monitor Tips To automatically end bulb shooting after a specified period of time BULB TIMER To f...

Страница 52: ...overlap with the previous picture 2 3 EXIT EXIT 250 250 F5 6 38 38 M EXIT EXIT A panorama may include up to 10 images A warning indicator g is displayed after the tenth shot 6 After taking the last s...

Страница 53: ...s D to delete the last shot The previous shot is superimposed on the view through the lens as a guide to framing the next shot Tips To overlay 3 or more frames Select RAW for K and use the OVERLAY opt...

Страница 54: ...is displayed in the monitor BRACKETING BACK SET WB BKT AE BKT FL BKT ISO BKT A G AE BKT AE bracketing The camera varies exposure by 0 3EV 0 7EV or 1 0EV over three shots In single frame shooting mode...

Страница 55: ...ile the shutter button is pressed The 0 indicator turns green during bracketing The size of the bracketing increment changes with the value selected for EV STEP g Custom menu P 78 BRACKETING BACK SET...

Страница 56: ...to brighten dimly lit backgrounds SLOW Slow synchronization 1st curtain Red eye reduction flash Combines slow synchronization with red eye reduction SLOW2 2nd CURTAIN Slow synchronization 2nd curtain...

Страница 57: ...era Optional external flash units designated for use with this camera support a wide variety of options for flash photography including automatic flash control super FP and wireless flash control P 89...

Страница 58: ...ution When recording a movie you cannot change the settings for exposure compensation and aperture value and shutter speed The size of each movie file is limited to 2GB With some types of media shooti...

Страница 59: ...ress the Q button 2 Select MOVIE PLAY using FG and press the Q button to begin playback The following operations can be performed during movie playback MOVIE MOVIE PLAY m BACK SET Q Pause or resume pl...

Страница 60: ...y The following operations can be performed in full frame playback H I or j View other pictures D Erase the current picture P 15 U Press the U button to zoom in on pictures P 14 G Press the G button t...

Страница 61: ...ain to view the current image full frame F G H I or j Select a picture 0 Protect the selected picture P 15 Q Index display Place a check mark v on the current picture P 64 Calendar display View the pi...

Страница 62: ...in order starting with the current picture BGM Set BGM 6 types or turn BGM OFF SLIDE Set type of slideshow to execute SLIDE INTERVAL Choose the length of time each slide is displayed from 2 to 10 sec...

Страница 63: ...o 3 2 16 9 or 6 6 After changing the aspect ratio use the arrow pad to specify the trimming position BLACK WHITE Creates black and white images SEPIA Creates sepia toned images SATURATION Sets the col...

Страница 64: ...rotections This function lets you cancel the protection of several images at one time 1 Select RESET PROTECT in the q playback menu P 108 2 Select YES and press Q Erasing images Erasing selected frame...

Страница 65: ...lts in the monitor 5 Press Q A confirmation dialog will be displayed select YES and press Q IMAGE OVERLAY RAW RAW RAW RAW RAW RAW RAW BACK SET x0 3 x0 1 x0 3 BACK SET IMAGE OVERLAY Tips To overlay 4 o...

Страница 66: ...format that matches that of the connected TV NTSC PAL VIDEO OUT g Custom menu P 78 2 Connect the TV and camera 3 Turn on the TV and change INPUT to VIDEO an input jack connected to the camera Caution...

Страница 67: ...n to 1080i HDMI output 720p Priority is given to 720p HDMI output 480p 576p 480p 576p HDMI output 576p is used when PAL is selected for VIDEO OUT You cannot shoot pictures or movies when the HDMI cabl...

Страница 68: ...JPEG SEND A PICTURE m ROTATE Z BACK SET 3 Select the destination and press Q The image will be uploaded to the receiving device If prompted to enter a PIN code enter the code for the receiving device...

Страница 69: ...on To change the host name press Q again and edit the current name in the rename dialog Creating albums Your favorite JPEG pictures can be resized and copied to an OLYMPUS PENPAL 1 Display the picture...

Страница 70: ...n screen instructions on your computer Caution If nothing is displayed on the camera screen even after connecting the camera to the computer the battery may be exhausted Use a full charged battery Mul...

Страница 71: ...nded Graphics A minimum of 64 MB video RAM with DirectX 9 or later See online help for information on using the software Macintosh 1 Insert the supplied CD in a CD ROM drive The disk contents should a...

Страница 72: ...puter s manual 2 Turn on the camera The selection screen for the USB connection is displayed 3 Press FG to select STORAGE Press the Q button 4 The computer recognizes the camera as a new device USB ST...

Страница 73: ...on for several pictures repeat this step Press Q when all the desired pictures have been selected All pictures Select U and press the Q button 3 Select the date and time format and press the Q button...

Страница 74: ...reservation data 5 Select SET and press the Q button Direct printing PictBridge By connecting the camera to a PictBridge compatible printer with the USB cable you can print out recorded pictures dire...

Страница 75: ...SELECT PRINT ALL PRINT MULTI PRINT ALL INDEX PRINT ORDER BACK SET PRINT Prints selected pictures ALL PRINT Prints all the pictures stored in the card and makes one print for each picture MULTI PRINT P...

Страница 76: ...g data in the next section Setting printing data Select whether to print printing data such as the date and time or file name on the picture when printing When the print mode is set to ALL PRINT and O...

Страница 77: ...r temperature of the electronic view finder see EVF ADJUST g Accessory port menu options P 90 REC VIEW Choose whether pictures are displayed immediately after shooting and for how long This is useful...

Страница 78: ...ct c MENU DISPLAY using FG and press I 4 Select c MENU DISPLAY using FG and press I X W s REC VIEW FIRMWARE ENG j 0k 0 5SEC 10 10 01 14 01 BACK SET c MENU DISPLAY 5 Select ON using FG and press the Q...

Страница 79: ...re and after the F button is pressed P A S M Before F Aperture value Shutter speed Shutter speed After F F Aperture value AEL AFL Assign focus or AE lock to the or R button 85 AEL AFL MEMO If ON is se...

Страница 80: ...information displayed when the INFO button is pressed qINFO Choose the information displayed in full frame playback LV INFO Choose the information displayed when the camera is in shooting mode To choo...

Страница 81: ...rgy saving mode if no operations are performed for the selected period The camera can be reactivated by pressing the shutter button halfway OFF cancels the sleep mode 8 Beep sound When set to OFF you...

Страница 82: ...hutter speed available when a flash is used 104 w F When set to ON it will be added to the exposure compensation value and flash intensity control will be performed 38 57 X K COLOR WB MENU c X Option...

Страница 83: ...UNT Y Yarge SF F N SF X W W 1 2 3 4 BACK SET Compression rate Number of pixels 44 PIXEL COUNT Choose the pixel count for X and W size images 1 Select PIXEL COUNT in the c Custom Menu P 78 X tab 2 Sele...

Страница 84: ...ng to image size CUSTOM Press I to choose a print resolution COPYRIGHT SETTINGS Add the names of the photographer and copyright holder to new photographs Names can be up to 63 characters long COPYRIGH...

Страница 85: ...lable in the selected direction The effects are not visible in the monitor To make normal adjustments to the exposure perform exposure compensation P 38 8 WARNING LEVEL Choose the battery level at whi...

Страница 86: ...AF target position is indicated by a p icon Press the button again to return to AF target mode If the camera is turned off when the home position is selected the home position will be reset MF Press...

Страница 87: ...46 4 Flash mode P 56 5 Flash intensity control P 57 6 White balance P 40 White balance compensation P 41 7 Picture mode P 42 8 Sharpness N P 43 Contrast J P 43 Saturation T P 43 Gradation z P 43 B W...

Страница 88: ...me 3 Press the shutter button all the way to begin recording REC lights up while both movie and sound are recorded simultaneously 4 Press the shutter button all the way to end recording n 2 18 Lights...

Страница 89: ...or groups A B and C For MANUAL select the flash intensity Normal flash Super FP flash Switch between normal flash and Super FP flash Communication light level Set the communication light level to HI M...

Страница 90: ...ent at a size equivalent to 1280 960 68 B OLYMPUS PENPAL ALBUM MENU B Option Description g COPY ALL All images and sound files are copied between the memory card and OLYMPUS PENPAL Copied images are r...

Страница 91: ...automatically The flash is charging On the LCD monitor the mark blinks when charging is in progress Wait for the blinking to stop then press the shutter button Unable to focus The camera can not focu...

Страница 92: ...the mode dial or turn off the power in a shooting mode other than P A S or M functions with changes made to their settings are restored to the factory default settings Image taken appears whitish Thi...

Страница 93: ...be read Card may not have been formatted Select CLEAN CARD press the Q button and turn off the camera Remove the card and wipe dry the metallic surface with a soft dry cloth Select FORMAT YES and the...

Страница 94: ...INK The printer has run out of ink Replace the ink cartridge in the printer JAMMED The paper is jammed Remove the jammed paper SETTINGS CHANGED The printer s paper cassette has been removed or the pri...

Страница 95: ...place the front and rear lens caps before putting the lens away Clean the camera after use Do not store with insect repellent Cleaning and checking the image pickup device This camera incorporates a d...

Страница 96: ...n be used with this camera SD SDHC and SDXC For the latest information please visit the Olympus website SD card write protect switch The SD card body has a write protect switch If you set the switch t...

Страница 97: ...er BCS 5 before use The normal charging time using the provided charger is approximately 3 hours 30 minutes estimated Do not attempt to use chargers not specifically designated for use with the suppli...

Страница 98: ...uivalent to double those produced by 35 mm format cameras with lenses of the same focal length producing high power lenses that are light and compact For example a Micro Four Thirds System lens with a...

Страница 99: ...tering not possible Main Specifications Items 14 42mm II 17mm 40 150mm 14 150mm Mount Micro Four Thirds mount Focal length 14 42mm 17mm 40 150mm 14 150mm Max aperture f 3 5 5 6 f 2 8 f 4 5 6 f 4 5 6 I...

Страница 100: ...Four Thirds lenses such as those used with the E 3 and E 620 Some features such as autofocus may not be available OM adapter MF 2 Use with existing OLYMPUS OM System lenses Focus and aperture must be...

Страница 101: ...ttachment for SCN mode f w or m In other modes select OFF for IMAGE STABILIZER MACRO ARM LIGHT MAL 1 Use to illuminate subjects for macro photography even at ranges at which vignetting would occur wit...

Страница 102: ...it in until it stops Insert the electronic view finder by pushing on its lower part 5 Turn on the camera 6 Each press of the u button switches between the monitor display and electronic view finder d...

Страница 103: ...ensitivity Use the flash 4000 4000 F22 F22 The subject is too bright Decrease the ISO sensitivity Use a commercially available ND filter for adjusting the amount of light A 30 30 F5 6 F5 6 The subject...

Страница 104: ...ction Flash off k k k 2nd CURTAIN Fill in flash Slow synchronization 2nd curtain 2nd curtain Always fires 60sec 1 180sec When the flash is set to the Super FP mode it detects backlight and fires with...

Страница 105: ...de A or M and choose a high f number or reduce ISO sensitivity External flash shooting With this camera you can use one of the separately sold external flash units to achieve a flash suited to your ne...

Страница 106: ...DEO OUT k SLEEP D LIVE VIEW BOOST D g FACE PRIORITY D G INFO SETTINGS D K CONTROL SETTINGS D HISTOGRAM SETTINGS k Function MYSET registration EVF ADJUST k BACKLIT LCD D MODE GUIDE k q CLOSEUP MODE k 8...

Страница 107: ...1600 1200 1 2 7 Approx 1 3 673 XF 1 4 Approx 0 9 993 XN 1 8 Approx 0 5 1893 XB 1 12 Approx 0 4 2753 WSF 1280 960 1 2 7 Approx 0 9 1044 WF 1 4 Approx 0 6 1514 WN 1 8 Approx 0 3 2884 WB 1 12 Approx 0 3...

Страница 108: ...LTIPLE EXPOSURE FRAME OFF 53 AUTO GAIN OFF OVERLAY OFF w 0 0 57 RC mode OFF 89 q Playback Menu Tab Function Default g q m START 62 BGM MELANCHOLY SLIDE ALL SLIDE INTERVAL 3 SEC MOVIE INTERVAL SHORT ED...

Страница 109: ...CTION R REC I FUNCTION G FUNCTION jY DIAL DIRECTION DIAL1 dLOCK OFF T RELEASE RLS PRIORITY S OFF 80 RLS PRIORITY C ON U DISP 8 PC HDMI HDMI OUT 1080i 80 81 HDMI CONTROL OFF VIDEO OUT G INFO SETTINGS q...

Страница 110: ...60 w F OFF X K COLOR WB NOISE REDUCT AUTO 82 83 NOISE FILTER STANDARD WB AUTO A 0 G 0 ALL ALL SET ALL RESET COLOR SPACE sRGB SHADING COMP OFF K SET PIXEL COUNT Xiddle 2560 1920 Wmall 1280 960 Y RECOR...

Страница 111: ...PLEASE WAIT 68 90 ADDRESS BOOK ADDRESS LIST 90 NEW PAIRING SEARCH TIMER 30 SEC PICTURE SEND SIZE SIZE 1 SMALL MY OLYMPUS PENPAL B OLYMPUS PENPAL ALBUM COPY ALL 90 RESET PROTECT ALBUM MEM USAGE ALBUM...

Страница 112: ...Optional Exposure control Metering system TTL metering system imager metering Digital ESP metering Center weighted averaging metering Spot metering Metered range EV 1 18 Digital ESP metering Center we...

Страница 113: ...arks or registered trademarks of HDMI Licensing LLC Battery charger BLS 5 Lithium ion battery MODEL NO BLS 5 Product type Rechargeable Lithium ion battery Nominal voltage DC 7 2 V Nominal capacity 115...

Страница 114: ...th for cleaning Never use any type of liquid or aerosol cleaner or any type of organic solvent to clean this product Attachments For your safety and to avoid damaging the product use only accessories...

Страница 115: ...NGER The camera uses a lithium ion battery specified by Olympus Charge the battery with the specified charger Do not use any other chargers Never heat or incinerate batteries Take precautions when car...

Страница 116: ...the position of the camera with the tripod head Do not twist the camera Do not leave the camera pointed directly at the sun This may cause lens or shutter curtain damage color failure ghosting on the...

Страница 117: ...n of Olympus No liability is assumed with respect to the use of the information contained in these written materials or software or for damages resulting from the use of the information contained ther...

Страница 118: ...ance with the written Handling Care and Operating instructions supplied with it during the applicable national warranty period and has been purchased from an authorized Olympus distributor within the...

Страница 119: ...caused to any lenses films other equipment or accessories used with the product or for any loss resulting from a delay in repair or loss of data is excluded Compelling regulations by law remain unaffe...

Страница 120: ...g FACE PRIORITY 37 81 8 Beep sound 81 SLOW LIMIT 82 X SYNC 82 w F 82 K SET 83 n MODE 58 8 WARNING LEVEL 85 P HOME 86 R REC 86 f FISHEYE EFFECT 17 w WIDE ANGLE 17 m MACRO 17 A Adding sound to still pi...

Страница 121: ...G 84 DPOF 73 DRAMATIC TONE o 16 Dust reduction 6 95 E Easy printing 75 Easy shooting modes 10 EDIT FILENAME 84 EFFECT 43 Electronic view finder 102 e PORTRAIT e 17 63 ERASE SELECTED 64 EV STEP 81 EVF...

Страница 122: ...nitor brightness adjustment s 77 MONOTONE J 42 MOVIE PLAY 59 MOVIER 59 85 Movie shooting n 13 58 MOVIE STILL 85 88 MTP 72 Multi view display 30 38 MULTIPLE EXPOSURE i 53 MUTED Z 42 MY OLYMPUS PENPAL 9...

Страница 123: ...e frame erase D 15 Single frame playback 60 Single frame protect 15 Single frame shooting o 46 SLEEP 81 SLIDE 62 Slideshow m 62 Slow synchronization 1st curtain SLOW 56 Slow synchronization 1st curtai...

Страница 124: ...9am to 9pm Monday to Friday ET VR274701...

Отзывы: