background image

61

4

Connecting Recorder to PC

Connecting to Your PC Using the Cradle

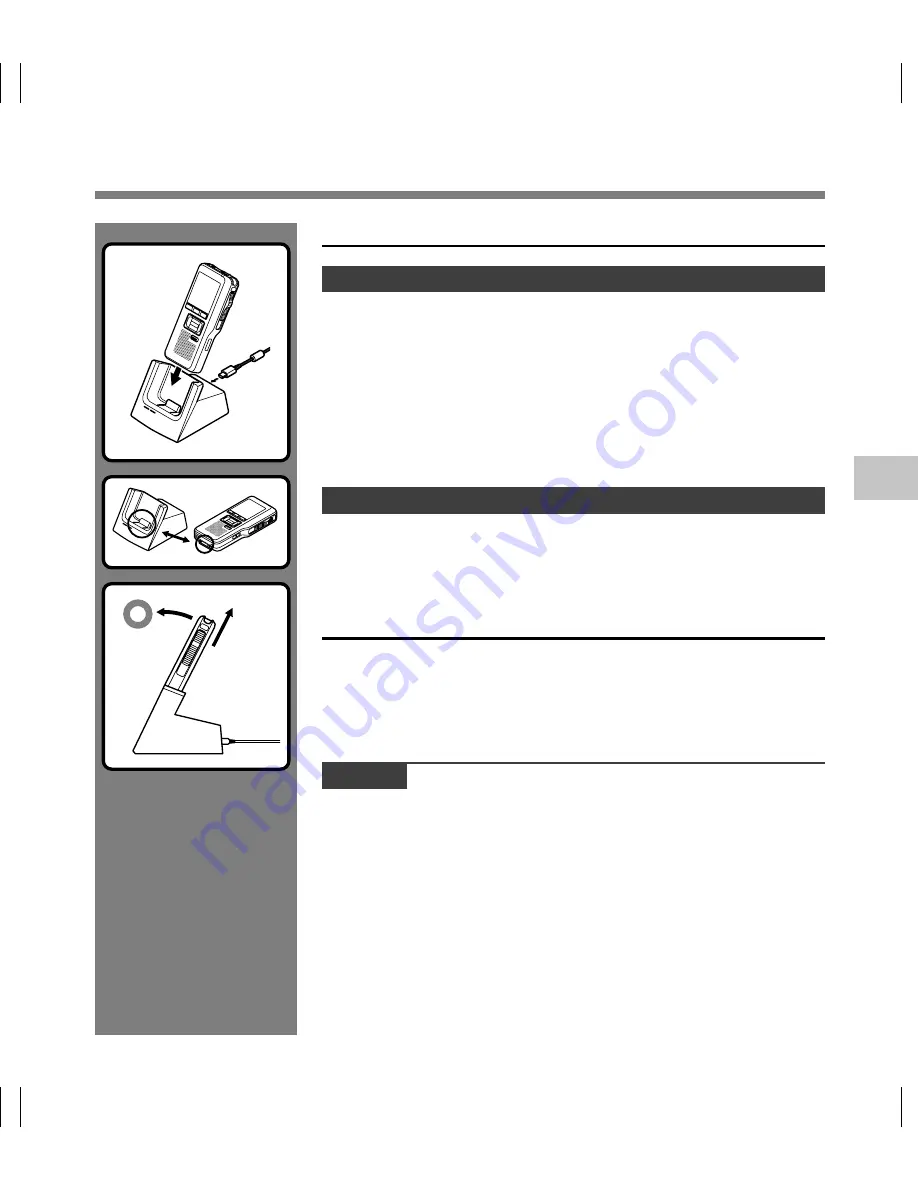
Place the recorder in the cradle

1

Connect the USB connection cable to the USB port of the
PC.

2

The USB cable is connected with cradle as shown in figure.

3

Turn ON the recorder, then set the recorder in the cradle.

If [Remote] is displayed on recorder, it indicates proper connection.

Disconnecting Recorder from PC

To avoid data corruption or loss, make sure that the recorder’s record/
play indicator light isn’t flashing, before removing the recorder from
the cradle or disconnect the cable from the recorder terminal.

Remove the Recorder from the Cradle

To prevent damage or loss of the data, confirm that the recording/
playback indicator light of this recorder is not on, and remove this
recorder and USB connection cable from the cradle.

Notes

Never touch the contact points at the bottom of the cradle, as that may cause bad
connection.

With a PC connected, the recorder cannot be operated with the foot switch (RS27/
28). When connecting the recorder to a PC via the cradle, remove the foot switch.

Connecting Recor

der to PC

Содержание DS-5000

Страница 1: ...n about using the product correctly and safely Keep the instructions handy for future reference To ensure successful recordings we recommend that you test the record function and volume before use INS...

Страница 2: ...the future without advanced notice Contact our Customer Support Center for the latest information relating to product names and model numbers The utmost care has been taken to ensure the integrity of...

Страница 3: ...ng 31 3 Advanced Operations Menu List 35 Learning to Use the Menu 39 Selecting Folders and Files 40 Displaying File Information 41 Device Lock Function 42 Setting Priority Levels Priority 45 Setting t...

Страница 4: ...operate it safely and correctly Keep this manual in an easily accessible location for future reference Important Safety Precautions Certain symbols are used in the user s manual and on this product t...

Страница 5: ...ion or during repair work It is recommended to back up and save important content to other media such as a computer hard disk Batteries Rechargeable Battery Pack Danger Do not solder lead wires or ter...

Страница 6: ...the batteries immediately while being careful not to burn yourself and 2 call your dealer or local Olympus representative for service Do not expose the rechargeable batteries to water Do not allow wat...

Страница 7: ...nzine and lacquer thinner Unplug from power outlet General Precautions Unplug from power outlet In case the internal parts of the AC adapter are exposed because it has been dropped or otherwise damage...

Страница 8: ...r Using the AC Adapter may cause fire overheating electric shock or injury Do not use or keep the AC Adapter in very hot places such as in direct sunlight in a closed car on a sunny day near a heater...

Страница 9: ...USB 2 0 High Speed which enables high speed data transmission from the recorder to your computer Five folders and up to 200 files folder for a maximum of 1000 recordings P 25 When using DSS Player it...

Страница 10: ...time may be shorter if many short recordings are made 2 Total recording time of several files The maximum recording time per file is 99 hours 59 minutes Memory Card This recorder uses dual memory in t...

Страница 11: ...erases the existing data on the card In some cases cards which have been formatted initialized by another device such as a computer cannot be recognized Be sure to format them with this recorder befor...

Страница 12: ...hone jack 8 MIC Microphone jack 9 Record Play indicator light 0 Display LCD panel VOLUME button Fast Forward 9 button OK MENU button Programmable smart button F1 F2 F3 Rewind 0 button VOLUME button Bu...

Страница 13: ...ry remaining indicator E F bar 4 Recording elapsed time 5 Remaining recording time 6 Level meter indicator 7 Button guide display 8 Microphone sensitivity indicator 9 Current file number 0 Total numbe...

Страница 14: ...ry pack charge is low the recorder shuts down and Battery Low appears on the display Notes Removing the battery pack while the recorder is in use may corrupt the file If power runs out during recordin...

Страница 15: ...he batteries Removing the batteries while the recorder is in use may corrupt the card If you are recording into a file and the batteries run out you will lose your currently recorded file since the fi...

Страница 16: ...is complete You can charge the Ni MH Rechargeable Battery Pack in the recorder using the cradle in combination with the USB cable or AC Adapter Or by directly connecting the AC Adapter or USB cable t...

Страница 17: ...erformed and the computer will not recognize it as a drive Notes Charge the battery pack often for first few uses Battery pack performs better after several full charge discharge cycles Battery packs...

Страница 18: ...age 20 C 30 C 4 F 86 F Using the battery pack outside the above temperature range may result in declining efficiency and shorter battery life In order to prevent battery leakage or rust remove the bat...

Страница 19: ...detects a DC power voltage outside of the allowable voltage allowable voltage 4 6 to 5 5 V then Power Supply Error Remove Power Plug will appear on the display and all operations will stop The record...

Страница 20: ...the recorder is ON but not in use for 10 minutes by default it will switch to power save mode automatically To reactivate the recorder again operate any button or the slide switch You can set the tim...

Страница 21: ...rd keeping it straight The card stops with a click when it is inserted all the way Inserting the card the wrong way or at an angle could damage the contact area or cause the card to jam If the card is...

Страница 22: ...y has been set as the device lock function P 42 the recorder will go to the Time Date set screen after verification unlocking BACK EXIT Time Date 1 M 14 D 2008 Y 5 00 PM 24H BACK EXIT Time Date 01 M 1...

Страница 23: ...econds If the Time Date is not correct set it using the procedure below 1 Press the or button in the menu screen and select the Time Date See P 36 38 regarding the menu 2 Press the OK MENU or 9 button...

Страница 24: ...elected or microSD Card Selected will light up on the display and it will return to the Device Menu screen If the 0 or F1 BACK is pressed the setting will be cancelled and it will return to the Device...

Страница 25: ...s can be recorded per folder Also by default the Recording Mode is QP Record Function By default the RECORD function is configured to record at the current position overwrite However that can be chang...

Страница 26: ...the slide switch to the REC position again 031 031 VERBAL DISPLY INDEX MIKE QP DICT E F 00M 10s 15H 22M 30s 031 030 FOLDER PRIOR INFO MIKE QP DICT New File E F Remain 15H 22M 40s a b c 031 031 FOLDER...

Страница 27: ...2 Move the slide switch to the REC position to start overwriting The record play indicator light glows red aRecording elapsed time bTotal recording time of the selected file 3 Move the slide switch t...

Страница 28: ...n the display 4 Move the slide switch to the STOP position to stop inserting the additional recording Notes If you place the slide switch in the STOP position for more than two seconds while moving th...

Страница 29: ...ing a file at any point 1 Select the file then move the slide switch to the PLAY position to start playback The record play indicator light glows green 2 Press the or button to adjust the volume The d...

Страница 30: ...turn on How to Cancel Move the slide switch to a position other than the STOP position The recorder starts the operation of the set position Release the button Release the button Release the slide swi...

Страница 31: ...to File Erase and erasing will start Erase Done is displayed when the file is erased File numbers will be reassigned automatically Notes An erased file cannot be restored Files cannot be erased in th...

Страница 32: ...n the files are erased Any locked files in the folder will be reassigned new file numbers in ascending order Notes The erasing process may take up to 10 seconds Do not interrupt this process Data will...

Страница 33: ...se starting point time set in step 2 and the ending point time set in this step will alternate on the display for 8 seconds If you playback to the end of file or to the start position of the Verbal co...

Страница 34: ...nt and Ending point are alternately displayed the recorder will revert to stop status An erased file cannot be restored Files cannot be Partial erased in the following cases File being set Lock P 37 F...

Страница 35: ...On Off Program contrast level 1 12 Default is 6 Menu Setting while the recorder is stopped press the OK MENU button P 37 P 37 P 45 P 46 P 37 P 37 Second layer Setting Pending Ref Page P 38 P 38 P 38...

Страница 36: ...Returns the menu settings to their initial state Device Menu P 43 P 24 P 38 P 52 P 38 P 22 P 20 P 53 P 11 Second layer Setting SD Remain Capacity microSD Remain Capacity P 38 Notes The selectable lan...

Страница 37: ...d for situations like meetings and conferences with a small number of people The setting status will appear on the display as Conference or Dictation Mic Sense Description Function Setting Description...

Страница 38: ...ish Deutsch Fran ais Espa ol Italiano Language Please see P 43 for details Fingerprint Please see P 24 for details Card Select When this is set to ON the recorder beeps to alert you to button operatio...

Страница 39: ...st flow chart P 35 and the following steps to modify or change any settings 3 Press the OK MENU or 9 button Move to the setting of the selected menu items 4 Press the or button to move to the menu ite...

Страница 40: ...Folder E EXIT FOLDER QP DICT Folder A A B C D E Folder B Folder C Folder D Folder E EXIT 001 010 FOLDER PRIOR INFO MIKE QP DICT VCVA 00M 00s 05M 00s C a b Changing File 1 Press the 9 or 0 button whil...

Страница 41: ...Work Type and Option Item edit screen 029 030 FOLDER PRIOR INFO MIKE QP DICT 00M 00s 22M 40s 029 030 File Name D S 5 0 0 0 0 0 6 D S 2 12M23D2008Y 12 23 Author ID Rec Time MIKE M P The Displayed Infor...

Страница 42: ...ng the Recorder with a Password 1 Select the numbers you want to enter by pressing the 9 or 0 button to move the cursor 2 Press the OK MENU button to select a number A will appear in the selected firs...

Страница 43: ...y Unlock Device Enter Password Device is Locked 09 59 a Connection with Author ID b No connection with Author ID Press your finger firmly at the fingerprint sensor and slide it at a constant speed Unl...

Страница 44: ...ching registration number will appear In cases where there is a connection with an author the Author ID will appear If the fingerprint does not match then Incorrect Fingerprint will appear and then it...

Страница 45: ...pe 029 030 BACK EXIT E Priority Set Cancel F2 button a Priority indicator By default F2 button is programmed with Priority function The setting can also be performed from the menu You can set a priori...

Страница 46: ...hor ID is set to DS5000 Setting an Author ID 1 Turn ON the recorder When The Author List is displayed when the power is on has been set through DSS Player P 55 the registered Author ID List will appea...

Страница 47: ...rded in the New File header information When Set in the recorder has been set for the Option Item ID within the selected Work Type it will take you to the file information input screen P 48 For more d...

Страница 48: ...8 9 BACK Reference No PQRSTUVWXZ _ABCDEFGHIJKLMNO b a Setting the Author ID and WorkType Setting the Author ID and Work Type Maximum entered character count Option Item ID 20 characters Cancelling th...

Страница 49: ...e When a file is locked or set to read only or when the SD card lock is enabled Verbal Comment cannot be erased Clear the settings before erasing When the recorder has been set to Classic DSS mode Ver...

Страница 50: ...ocate the index mark you want to clear 4 Press the ERASE button while the index number appears for approximately 2 seconds on the display The index mark is erased Index Marks F3 button 9 0 button ERAS...

Страница 51: ...roSD card inward once to unlock it and let it eject The microSD card is sometimes difficult to take out In this case pick up a card with your fingers as shown in the illustration Exercise caution when...

Страница 52: ...gs cannot be initialized The initialization of menu items should be set up through DSS Player or the recorder s Reset Settings 1 Select Device Menu from the Format screen and press OK MENU or the 9 bu...

Страница 53: ...t Done displays when formatting ends Format SD Data will be cleared Format SD Are You Sure Start Cancel Format SD Format Format SD Format Done BACK EXIT Device Menu USB Class Time Date Power Save Rese...

Страница 54: ...ngs related to the recorder s folders Changing the number of folders and folder name Auto Lock setting which locks files recorded in designated folders Encryption Password setting which encrypts files...

Страница 55: ...ctation to addresses specified through e mail and FTP Windows only Automatic transmission of transcribed documents through e mail and FTP as well as Dictation and link management Windows only Voice re...

Страница 56: ...ta Ultimate Enterprise Business Home Premium Home Basic Windows Vista Ultimate 64 bit edition Enterprise 64 bit edition Business 64 bit edition Home Premium 64 bit edition Home Basic 64 bit edition Wi...

Страница 57: ...ive and execute setup exe 2 The launcher will startup Select the language you would like to install from the upper left pull down menu and click Installation for Standalone System 3 The Install Wizard...

Страница 58: ...allation according to the instructions on the screen Macintosh 1 Exit DSS Player 2 Delete the Preferences file Delete the DSS Preference file in the following location Macintosh HD User Library Prefer...

Страница 59: ...ows 1 Click the start button then select All Programs OlympusDSSPlayer Dictation Help 2 While DSS Player is running select the Help menu Contents 3 While DSS Player is running press F1 on the keyboard...

Страница 60: ...stroyed Some PCs may not supply sufficient power and the recorder fails to connect Refer to your PC User s Manual regarding the USB port on your PC Do not connect the recorder to a PC by using a USB h...

Страница 61: ...s record play indicator light isn t flashing before removing the recorder from the cradle or disconnect the cable from the recorder terminal Remove the Recorder from the Cradle To prevent damage or lo...

Страница 62: ...ial number Please see the seal attached to the CD ROM package included with the DSS Player for the serial number After the input has ended click OK to complete the registration Disabling Automatic Sta...

Страница 63: ...File Protected Index Full Folder Full Erase Error Card Error Memory Full Format Error System Error Insert Card Action Charge the battery pack or replace with new batteries P 14 17 Use the included AC...

Страница 64: ...s XP or Vista Symptom Nothing appears on the display Won t start Unable to record No playback tone heard Unable to erase Noise heard during playback Recording level too low Unable to set index marks C...

Страница 65: ...0 The AS 5000 transcription kit provides you with a PC footswitch a headset and DSS Player Pro Transcription Module for easy transcription of DSS recordings Foot switch RS27 28 Connect to the USB crad...

Страница 66: ...ll frequency response QP mode 200 to 7 000 Hz SP mode 200 to 5 000 Hz Recording time 512 MB Card QP mode 38 hours 45 minutes SP mode 79 hours 30 minutes Alkaline battery life Recording QP mode Approx...

Страница 67: ...y be having with this system If you encounter problems using your DS 5000 5000iD we recommend that you contact your Olympus Professional Dealer that sold you the system If your dealer cannot fix your...

Страница 68: ...ectriques et lectroniques dans les pays de L UE Veuillez ne pas jeter l quipement dans les ordures domestiques A utiliser pour la mise en rebut de ces types d quipements conform ment aux syst mes de t...

Страница 69: ...U1 BS0038 01 AP0712...

Отзывы: