background image

18

Names of parts

• The indications that appear on a movie picture that has been 

selected and displayed from the index display are different from 
those that appear when the movie picture is displayed using the 
movie playback function. 


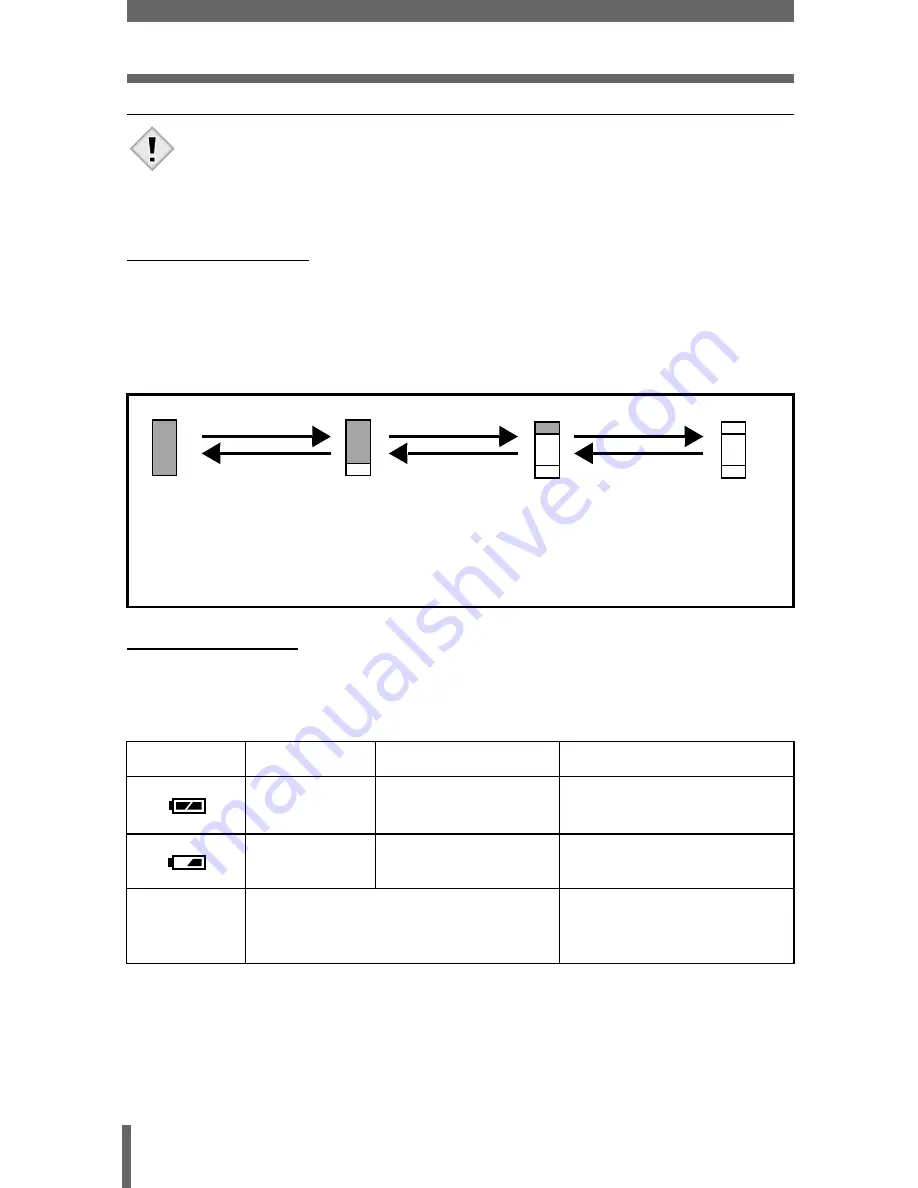
Memory gauge

The memory gauge lights up when you take a still picture. When the gauge is 
lit, the camera is saving a picture to the card. The memory gauge indication 
changes as shown below depending on the shooting status. The indication is 
not displayed during movie recording.


Battery check

If the remaining battery power is low, the battery check indication on the 
control panel and monitor changes as follows when the camera is turned on 
or while the camera is in use.

Battery check

Control panel

Monitor

Status

Lights

Lights (green)

(Goes off after a while)

Remaining power level: high

Blinks

Blinks (red)

Remaining power level: low
Replace with new batteries.

No indication

The green lamp and orange lamp at the 
side of the viewfinder blink. (The control 
panel turns off automatically.)

Remaining power level: 
exhausted 
Replace with new batteries.

Note

Before shooting

(Gauge is off)

No more pictures 

can be taken

(Fully lit)

Wait a while before 

taking the next shot.

One picture 

taken

(Lit)

More than 

two taken

(Lit)

Shoot

Shoot

Shoot

Wait

Содержание 5050 - CAMEDIA C Zoom Digital Camera

Страница 1: ...ENCE MANUAL Click Here Explanation of digital camera functions and operating instructions Explanation of how to download images between your digital camera and PC DIGITAL CAMERA PC CONNECTION OPERATION MANUAL CAMERA OPERATION MANUAL ...

Страница 2: ...onger service life Keep this manual in a safe place for future reference We recommend that you take test shots to get accustomed to your camera before taking important photographs Screen and camera illustrations shown in this manual were pro duced during the developmental stages and may differ from those of the actual product DIGITAL CAMERA C 5050ZOOM REFERENCE MANUAL ...

Страница 3: ...ct complies with the European requirements for safety health environment and customer protection CE mark cameras are intended for sales in Europe For customers in USA Declaration of Conformity Model Number C 5050ZOOM Trade Name OLYMPUS Responsible Party Olympus America Inc Address 2 Corporate Center Drive Melville New York 11747 3157 U S A Telephone Number 631 844 5000 Tested To Comply With FCC St...

Страница 4: ...ngs Getting started Shooting and playback basics Mode dial and direct button functions Using the menus and tabs Flash Advanced shooting Playback Useful functions Print setting Miscellaneous For playing back and arranging pictures Settings that make the camera easier to operate Printing pictures Troubleshooting and other information Contents Names of parts P 4 P 10 P 20 P 39 P 59 P 69 P 79 P 91 P 1...

Страница 5: ...nserting a card 25 Card basics 25 Ejecting the card 27 Switching cards 29 Power on off 31 Startup Shutdown screen 32 If the card is not recognized card check 33 Selecting a language 34 Setting the date and time 36 Adjusting the viewfinder 38 2 Shooting and playback basics 39 Holding the camera 39 Taking still pictures 40 Taking still pictures using the viewfinder 40 Taking still pictures using the...

Страница 6: ...g movies 55 Protecting pictures 57 Erasing pictures Single frame erase 58 3 Mode dial and direct button functions 59 Mode dial 59 Setting related modes 59 Situation related modes 61 Playback mode 62 Direct Buttons 63 Direct buttons and the jog dial 63 Flow of direct button operations 64 Direct button functions 65 4 Using the menus and tabs 69 About the menus 69 How to use the menus 70 Shortcut men...

Страница 7: ...ng My Mode 95 Focusing applications 96 AF MODE Changing the focus range 96 FULLTIME AF A reliable time saving way to focus 97 Changing the position of the AF target mark 98 AF illuminator 99 Manual focus 100 Metering 102 Spot metering 102 Multi metering 103 AE Lock Locking the exposure 105 Macro mode shooting 107 Super macro mode shooting 108 Self timer shooting 109 Remote control shooting 110 Seq...

Страница 8: ...AW Data 129 ISO sensitivity 130 Exposure compensation 131 White balance 133 Auto white balance 133 Preset 1 white balance 134 Preset 2 white balance 134 Custom white balance 135 One touch white balance 136 White balance adjustment 138 Sharpness 139 Contrast 140 Saturation 141 Scene modes 142 Noise reduction 142 Histogram display 144 8 Playback 147 Close up playback 147 Index display 148 Selecting ...

Страница 9: ...he camera s settings 164 Custom button 166 Setting the custom button 167 Using the custom button 168 Shortcut 169 Setting the shortcut menu 170 Using the shortcut menu 171 MY MODE SETUP 172 Formatting cards 175 Information display 177 Dual control panel display 178 Monitor brightness adjustment 180 Rec View 181 Beep sound adjustment 182 Button operation beep 183 Shutter sound 184 Playback volume 1...

Страница 10: ...es 205 Troubleshooting 207 List of menus 213 List of factory default settings 218 List of items by shooting mode 221 Camera maintenance 224 Specifications 225 Glossary of terms 227 index 231 Indications used in this manual l Important information on factors which may lead to a malfunction or operational problems Also warns of operations that should be absolutely avoided Useful information and hint...

Страница 11: ...or P 99 Strap eyelet P 20 Remote control receiver P 110 Self timer Remote control lamp P 109 110 Control panel P 13 Hot shoe P 86 Microphone P 122 124 153 A V OUT jack MONO P 151 Flash P 79 Connector cover P 23 151 USB connector DC IN jack P 23 ...

Страница 12: ...AEL P 105 Erase button P 58 Power switch P 31 Jog dial P 63 Monitor button Quick View P 42 54 Speaker P 185 Card cover P 26 Card access lamp P 40 Arrow pad P 53 69 OK Menu button P 69 Card button CF xD SM P 29 Monitor P 15 43 Battery compartment cover P 21 Battery compartment lock P 21 Tripod socket ...

Страница 13: ...on P 100 107 Diopter adjustment dial P 38 Mode dial P 59 Self timer Remote control button P 109 110 Rotation button P 152 Zoom lever T W P 50 147 148 Shutter button P 40 Custom button P 166 Print button P 197 Flash mode button P 79 Metering button P 102 Protect button P 57 ...

Страница 14: ... Exposure compensation Flash intensity control 2 0 1 0 0 0 1 0 2 0 P 131 P 85 5 Macro mode Manual focus Super macro mode Super macro MF mode Lights MF Lights Blinks MF Blinks P 107 P 100 P 108 P 108 6 Flash mode SLOW SLOW P 79 7 Flash intensity control P 85 8 Sequential shooting mode BKT P 112 9 Remote control P 110 10 Self timer P 109 11 Sound record P 122 124 ...

Страница 15: ...TIFF SHQ HQ SQ SQ1 SQ2 P 125 13 Noise reduction NR P 142 14 AE lock AE memory AEL AEL P 105 P 106 15 Metering P 102 16 ISO ISO P 130 17 White balance WB P 133 18 Selected card P 29 19 Number of storable still pictures Seconds remaining Error code 30 E P 48 126 P 205 ...

Страница 16: ...xposure compensation Exposure differential 2 0 2 0 3 0 3 0 P 131 P 93 5 Battery check P 18 6 Green lamp P 42 7 Flash stand by Camera movement warning Flash charge Lights Blinks P 80 8 Macro mode Super macro mode Manual focus MF P 107 P 108 P 100 9 Noise reduction P 142 10 Flash mode SLOW 1 SLOW 2 SLOW P 79 11 Flash intensity control 2 0 2 0 P 85 Still picture Movie ...

Страница 17: ...target mark P 42 18 Number of storable still pictures Seconds remaining 30 36 P 126 P 48 19 AE lock AE memory P 105 20 Spot metering P 102 21 ISO ISO64 ISO100 ISO200 ISO400 P 130 22 White balance AWB CWB P 133 23 White balance compensation B1 B7 R1 R7 P 138 24 Saturation 5 5 P 141 25 Sharpness 5 5 P 139 26 Contrast 5 5 P 140 27 Scene modes P 142 28 Memory gauge P 18 29 Selected card xD SM CF P 29 ...

Страница 18: ...r of prints Movie x 10 P 197 P 55 4 Sound record P 123 5 Protect P 57 6 Record mode RAW TIFF SHQ HQ SQ1 SQ2 P 125 7 Resolution 2560 1920 2560 1696 1280 960 640 480 320 240 P 126 8 Aperture value F1 8 F8 0 P 91 9 Shutter speed 16 1 2000 P 92 10 Exposure compensation 2 0 2 0 P 131 11 White balance WB AUTO AWB CWB P 133 12 ISO ISO64 ISO100 ISO200 ISO400 P 130 13 Date and time 02 10 17 15 30 P 36 14 F...

Страница 19: ...the remaining battery power is low the battery check indication on the control panel and monitor changes as follows when the camera is turned on or while the camera is in use Battery check Control panel Monitor Status Lights Lights green Goes off after a while Remaining power level high Blinks Blinks red Remaining power level low Replace with new batteries No indication The green lamp and orange l...

Страница 20: ...o the left decreases light emission in steps of 1 3 EV Turning to the right increases light emission in steps of 1 3 EV EV Expo Turning to the left decreases light emission in steps of 1 3 EV Set the mode dial to any of the marks shown here The buttons for the function and their location are clearly illustrated This shows jog dial operations Sharpness This function adjusts the sharpness of the ima...

Страница 21: ...he end of the strap back through the ring and stopper as indicated by the arrows Adjust the strap to the desired length 5 Pull the strap through the stopper to make sure it is fastened securely 6 Attach the strap to the other eyelet following steps 3 to 5 Be careful with the strap when you carry the camera as it can easily catch on stray objects causing injury or damage Attach the strap correctly ...

Страница 22: ...set to OFF 2 Slide the battery compartment lock from to 3 Place your finger on the mark and slide the battery compartment cover in the direction of then lift in the direction of Use the ball of your finger to slide the cover Do not use your fingernail as this could result in injury CR V3 lithium batteries cannot be recharged Do not peel off the label from a CR V3 lithium battery pack Important Pow...

Страница 23: ...t lock from to If the camera is left for about 1 hour with the batteries removed some of the internal settings may revert to the factory default settings Battery alignment The correct way to insert the AA batteries is indicated on the bottom of the camera When using CR V3 lithium battery packs When using AA R6 batteries Note The amount of power consumed varies considerably depending on the operati...

Страница 24: ...ries When you need batteries in a hurry you can use AA R6 alkaline batteries which are easy to obtain anywhere However the number of pictures that you can take may vary considerably depending on the battery manufacturer shooting conditions etc Turn off the monitor whenever possible to save power AC adapter An optional Olympus CAMEDIA brand AC adapter allows you to power your digital camera from a ...

Страница 25: ...ions The life of battery may vary according to the type of battery manufacturer shooting conditions etc Power is consumed continuously during the conditions described below This could reduce the number of pictures that can be taken When the monitor is turned on When the monitor is in the playback mode for an extended period of time Repeated zoom adjustments Repeated auto focus by depressing the sh...

Страница 26: ... camera may not recognize a non Olympus card such as a 3 V 3 3 V SmartMedia or a card that was formatted on another device such as a PC etc Before use be sure to format the card on this camera Formatting cards P 175 xD Picture Card provided 16 to 128 MB SmartMedia SM optional 4 to 128 MB Compact Flash CF optional You can use small flash memory cards and commercially available cards Microdrive opti...

Страница 27: ...t to OFF 2 Open the card cover The xD Picture Card and SmartMedia use the same slot as do Compact Flash and Microdrive Two cards cannot be inserted in the one slot at the same time Power switch xD Picture Card SmartMedia slot Compact Flash Microdrive slot Eject button Note ...

Страница 28: ...into the xD Picture Card SmartMedia slot as shown Compact Flash Microdrive Hold the card straight and insert it correctly into the Compact Flash Microdrive slot 4 Close the card cover securely until it clicks Ejecting the card xD Picture Card Push the card all the way in to unlock it then let it return slowly The card is ejected a short way and then stops Hold the card straight and pull it out Rel...

Страница 29: ...Flash Microdrive Press the eject button gently and allow it to pop out then press it again all the way in The card will be ejected a short way to enable you to pull it out Never open the card cover or remove the card or the batteries while the camera is turned on Doing so could destroy the data stored on the card Once destroyed data cannot be restored Note ...

Страница 30: ...ith your Microdrive You are recommended to use an xD Picture Card SmartMedia or Compact Flash card when taking important pictures Operating environment Microdrive is a compact hard disk drive As it is a rotating recording medium it is not as resistant to vibration or impact as the solid recording medium of other cards When using Microdrive be careful not to subject the camera to vibration or impac...

Страница 31: ...e may shorten the life of the batteries To reduce consumption of the batteries observe the following Whenever possible refrain from using the monitor during shooting Unless there is a particular need do not use an xD Picture Card or SmartMedia at the same time as Microdrive Remove the xD Picture Card or SmartMedia when using Microdrive Use large capacity batteries such as CR V3 lithium battery pac...

Страница 32: ...se is aligned with the red line Choose from 3 Turn the power switch so that ON is aligned with the white line The camera turns on and the lens extends If the lens cap has not been removed the warning beep sounds and the camera does not turn on Be sure to remove the lens cap first 4 To turn the power off turn the power switch so that OFF is aligned with the white line Mode dial Power switch ...

Страница 33: ...omatically enters the sleep mode after about 3 minutes of non operation The camera activates again as soon as you touch the shutter button or zoom lever To save power the camera turns off automatically and retracts the lens after about 4 hours of non operation To resume operation turn the camera on again Startup Shutdown screen You can register a picture that will be displayed on the monitor and s...

Страница 34: ...e camera or the card is not inserted properly Insert a card If a card is already inserted remove it and insert it again correctly CARD ERROR There is a problem with the card Use a different card Insert a new card The card cannot record play back or erase pictures Format the card or replace it with a new one Press to select POWER OFF then press Replace it with a new one Format the card Press to sel...

Страница 35: ...chased this camera 1 Set the mode dial to and turn the camera on Be sure to remove the lens cap before you turn the camera on You can select the language in all modes 2 Press The top menu is displayed 3 Press on the arrow pad to select MODE MENU 4 Press to select the SETUP tab then press Arrow pad OK button Power switch Mode dial WB DRIVE MODE MENU Top menu PLAY EDIt CARD SEtUP ALL RESEt ON ENGLIS...

Страница 36: ...6 Press to select a language then press 7 Press again to exit the menu 8 To turn the camera off set the power switch to OFF PLAY EDIt CARD SEtUP ALL RESEt ON ON ENGLISH ENGLISH ON ON REC VIEW PW ON SEtUP PW OFF SEtUP ENGLISH DEUtSCH SELECt GO FRANÇAIS ESPAÑOL Power switch ...

Страница 37: ... displayed 3 Press on the arrow pad to select MODE MENU 4 Press to select the SETUP tab then press 5 Press to select then press The green frame moves to the selected item Arrow pad OK button Power switch Mode dial WB DRIVE MODE MENU Top menu PLAY EDIt CARD SEtUP ALL RESEt ON ENGLISH ON REC VIEW PW ON SEtUP PW OFF SEtUP SETUP tab PLAY EDIt CARD SEtUP 02 01 01 02 01 01 00 00 00 00 NtSC NtSC m m ft P...

Страница 38: ...date and time are completely set 9 Press For a more accurate setting press when the time signal hits 00 seconds The clock starts when you press the button 10 To turn the camera off set the power switch to OFF The current settings are retained even when the power is turned off unless they are readjusted The date and time settings will be canceled if the camera is left without batteries for approxim...

Страница 39: ...to use adjust the viewfinder to match the eyesight visual acuity of the person using the camera 1 While looking through the viewfinder slowly turn the diopter adjustment dial 2 Turn the dial until the AF target mark can be seen clearly Diopter adjustment dial AF target mark ...

Страница 40: ...m moving When taking pictures in the vertical position hold the camera so that the flash is at the top Keep your fingers and the strap away from the lens and flash Top view Clear pictures cannot be obtained if the camera moves as the shutter button is pressed Hold the camera correctly and press the shutter button gently Horizontal grip Vertical grip Do not hold this part of the lens Note ...

Страница 41: ...to and turn the camera on Power on off P 31 2 Position the AF target mark in the viewfinder on the subject 3 Press the shutter button gently halfway to adjust the focus When the focus and exposure are locked the green lamp lights If the orange lamp lights the flash fires automatically The shutter speed and aperture value automatically set by the camera are displayed on the control panel Mode dial ...

Страница 42: ...ode you can take pictures as close as 3 cm 1 2 from the subject P 108 Depending on the subject the focus and exposure may not be locked Subjects that are difficult to focus on P 47 The orange lamp blinks when the shutter button is pressed halfway The flash is charging Wait until the lamp goes off To check the picture you have just taken immediately Set Rec View to ON Rec View P 181 To record sound...

Страница 43: ...en taking pictures 3 Position the AF target mark on the subject while looking at the image on the monitor Decide the composition of the picture 4 Take the picture by following the same procedure as for shooting using the viewfinder Taking still pictures using the viewfinder P 40 When the focus is locked by pressing the shutter button halfway the green lamp on the monitor lights The AF target mark ...

Страница 44: ...ard to see such as low angle shots 1 Grip the monitor at the position shown and pull the top of the monitor out 2 If you want to use the monitor with it facing upward pull out the bottom of the monitor as shown and change the angle The monitor locks into position at the following angles 20 20 45 90 degrees If you want to take high angle shots it is useful to use the monitor as shown on the right ...

Страница 45: ...al zoom range Using the digital zoom P 51 Also see the TIPS on Taking still pictures using the viewfinder P 40 Press the shutter button gently using the ball of your finger If it is pressed hard the camera may move and pictures may come out blurred Recorded pictures will be saved on the card regardless of whether the camera is turned off or the batteries are replaced or removed Never open the card...

Страница 46: ...ds Camera movement can occur easily and subjects may be difficult to see in bright dark places The monitor uses more battery power than the viewfinder Tips Use the viewfinder for general snapshots landscape pictures casual shots etc Approx 0 8 m 2 6 ft to Use the monitor when you want to shoot while checking the picture area that the camera actually records or take pictures when the subject is les...

Страница 47: ...e AF target mark on the subject you want to focus on When shooting a hard to focus subject or a fast moving subject point the camera at an object about the same distance away as the subject 3 Press the shutter button halfway until the green lamp lights When the focus and exposure are locked the green lamp lights If the monitor is turned on the AF target mark moves to the focused position When the ...

Страница 48: ...d then take the picture If the subject has no vertical lines hold the camera vertically and focus the camera using the focus lock function by pressing the shutter button halfway then return the camera to the horizontal position while keeping the button pressed halfway and take the picture If the subject still cannot be focused on use the manual focus Manual focus P 100 Shutter button The green lam...

Страница 49: ... displayed 2 Decide the composition while looking at the image on the monitor 3 Press the shutter button fully to start recording The orange lamp on the right of the viewfinder lights During movie recording lights red 4 Press the shutter button again to stop recording The card access lamp blinks while the movie is stored on the card When the remaining recording time has been used up recording stop...

Страница 50: ...ON Using the digital zoom P 51 When is set to ON the movie is recorded with the focus and exposure that were set when the shutter button was pressed in step 3 Care should be taken as it may be difficult to achieve the correct focus In mode the flash manual focus MF cannot be used In addition WHITE BOARD and BLACK BOARD cannot be selected in FUNCTION Note Recording will continue until the card is f...

Страница 51: ...By combining the optical zoom with the digital zoom zoom magnification can be increased to a maximum of approximately 10x Using the optical zoom 1 Set the mode dial to and turn the camera on Power on off P 31 2 Turn the zoom lever Mode dial Mode dial Zoom lever Power switch Wide angle Turn the zoom lever toward W to zoom out Telephoto Turn the zoom lever toward T to zoom in ...

Страница 52: ...s to select MODE MENU 4 Press to select the CAMERA tab then press 5 Press to select DIGITAL ZOOM then press Mode dial Arrow pad OK button Zoom lever Power switch Mode dial WB DRIVE MODE MENU CARD SEt PIC CAMERA DRIVE ISO MY MODE FLASH IN IN SLOW SLOW1 SLOW1 CARD SEt PIC CAMERA NOISE REDUCtION DIGItAL ZOOM FULLtIME AF AF MODE iESP iESP OFF OFF OFF OFF OFF OFF OFF OFF ...

Страница 53: ...um digital zoom magnification is 2 5x Pictures taken with the digital zoom may appear grainy Camera movement is likely to occur at higher magnifications Stabilize the camera with a tripod etc to avoid camera movement Turning the monitor off cancels the digital zoom However if the digital zoom is set to ON it will be automatically enabled the next time you turn the monitor on CARD SEt PIC CAMERA NO...

Страница 54: ...r jog dial to play back other pictures Arrow pad Jog dial If the camera is not used for over 3 minutes the monitor turns off automatically Press or any button to turn the monitor on Mode dial Mode dial Power switch Jog dial Arrow pad Displays the next picture Displays the previous picture Jumps to the picture 10 frames back Jumps to the picture 10 frames ahead Displays the next picture Displays th...

Страница 55: ...ant to check shooting results and resume shooting quickly Functions available in normal playback mode are also available in Quick View 1 Press twice quickly double click while in the shooting mode The camera immediately enters the playback mode and displays the last picture taken Single frame playback 2 Press the shutter button halfway to return to the shooting mode Mode dial ...

Страница 56: ...ant to play back Viewing still pictures P 53 3 Press The top menu is displayed 4 Press to select MOVIE PLAY 5 Press to select MOVIE PLAYBACK then press The movie is played back When playback ends the display automatically returns to the beginning of the movie Mode dial Arrow pad OK button Power switch Mode dial Jog dial MOVIE PLAY INFO MODE MENU CANCEL GO SELECt MOVIE PLAYBACK MOVIE PLAY INDEX EDI...

Страница 57: ... The movie can be played continuously by holding the button down Displays the previous frame The movie can be played continuously in reverse by holding the button down Displays the MOVIE PLAYBACK menu TIPS Movies can also be played back in the shooting mode using Quick View Quick View P 54 While the card access lamp blinks the camera is reading the movie from the card Reading of movies may take co...

Страница 58: ...nitor turns on 2 Use the arrow pad or jog dial to display the picture you want to protect Viewing still pictures P 53 3 Press To cancel protection press again Protected pictures cannot be erased by the single frame all frame erase function but they are all erased by formatting Protection cannot be applied to pictures stored on a card SmartMedia with a write protect seal attached Mode dial Protect ...

Страница 59: ...Check each picture before erasing to avoid accidentally erasing pictures you want to keep Protecting pictures P 57 Pictures protected read only by the PC are also erased To prevent erasure the pictures have to be protected on the camera Protecting pictures P 57 1 Set the mode dial to and turn the camera on Power on off P 31 The monitor turns on 2 Use the arrow pad or jog dial to display the pictur...

Страница 60: ...era sets the aperture and shutter speed Other functions such as flash modes and drive modes can be adjusted manually Aperture priority shooting Allows you to set the aperture manually The camera sets the shutter speed automatically By decreasing the aperture value F number the camera will focus within a smaller range producing a picture with a blurred background Increasing the value forces the cam...

Страница 61: ... speed manually To check the exposure refer to the exposure differential This mode gives you more creative control allowing you to make the settings you need to get the type of picture you want regardless of optimum exposure Manual shooting P 93 Aperture F number is decreased Aperture F number is increased Setting the shutter speed higher lets you capture fast moving action without blur The subjec...

Страница 62: ...the distance between your subject and the camera changes when the FULLTIME AF is on factory default setting Recording movies P 48 Night Scene shooting Suitable for shooting pictures in the evening or at night The camera sets a slower shutter speed than is used in normal shooting For example if you take a picture of a street at night in mode the lack of brightness will result in a dark picture with...

Страница 63: ... camera automatically sets the optimal shooting conditions Sports shooting Suitable for capturing fast moving action such as sports without blur Even a fast moving subject will be clear and sharp as if it is not moving enabling you to capture facial expressions and detailed activity The camera automatically sets the optimal shooting conditions Portrait shooting Suitable for taking a portrait style...

Страница 64: ...uch as selecting menu items or changing setting values Certain function settings require the direct button to be pressed repeatedly Direct buttons and the jog dial You can change the function settings by turning the jog dial while pressing a direct button such as or This can be achieved smoothly by pressing the direct buttons with the left or right hand while turning the jog dial with the right th...

Страница 65: ...he flash mode button 1 Turn the jog dial while holding down to select the flash mode The monitor turns on and the setting screen is displayed The setting is made at the moment you release your finger from the direct button and the monitor turns off 2 Press while holding down to display the menu Release the direct button after the menu is displayed 3 Press to select the desired item then press FLAS...

Страница 66: ...ctions Shooting mode c exposure compensation button P 131 Changes the exposure compensation value Jog dial c d e f g h i Jog dial This means to turn the jog dial while holding down the direct button to make function settings Jog dial SEt The histogram display can be set P 144 ...

Страница 67: ... slow synchronization SLOW SLOW and flash off Jog dial c d Press at the same time flash intensity control button P 85 Adjusts the amount of light emitted by the flash Jog dial e metering button P 102 103 Selects the metering method from ESP no indication spot metering and multi metering Jog dial FLASH MODE AUtO SEt Slow synchronization can be set P 84 2 0 ESP ...

Страница 68: ... 109 P 110 Enables the self timer function or remote control function Jog dial h custom button P 166 Activates the function registered on the custom button See Custom button P 166 for details of how to register a function and use the button i AEL AE Lock button P 105 Fixes the exposure The lock function is alternately activated and canceled each time you press the button MF AF SEt MOVE The AF mode...

Страница 69: ... erasure d rotation button P 152 Rotates pictures 90 degrees clockwise or counterclockwise e print button P 197 Stores print reservation data on the card d e Press at same time RESET button P 193 When pressed simultaneously for at least 3 seconds resets the camera s internal settings f erase button P 58 Erases a selected picture c d e f ...

Страница 70: ...OW1 WB DRIVE MODE MENU Take you directly to the setting screens Display operational buttons at the bottom of the screen The functions registered in the shortcut menus can also be accessed from the MODE MENU You can change shortcut menus other than modes Setting the shortcut menu P 170 Lets you access the menu selections to set the ISO sharpness etc Categorizes the settings into 4 tabs Displays the...

Страница 71: ...CtURE HQ HQ WB CUStOM WB AUtO AUtO NORMAL NORMAL SCENE MODES SEt CAM PIC CARD CARD SEtUP PLAY EDIt CARD SEtUP ALL RESEt ON ENGLISH ON REC VIEW PW ON SEtUP PW OFF SEtUP 1Press to display the top menu Press Top menu CAMERA tab PICTURE tab CARD tab SETUP tab 2Press to select a tab then press Press to return to the tab selection screen Arrow pad OK button ...

Страница 72: ...T to OFF All Reset Saving the camera s settings P 164 4Press to select a setting Press to complete setting Press again to exit the menu and return to shooting status The green frame moves to the selected item or 3Press to select an item then press To return to select an item press or CARD SEt PIC CAMERA DRIVE ISO MY MODE IN IN FLASH SLOW SLOW1 SLOW1 CARD SEt PIC CAMERA DRIVE ISO IN IN MY MODE FLAS...

Страница 73: ...explained below Selects a shooting mode from single frame shooting high speed sequential shooting sequential shooting AF sequential shooting and BKT auto bracketing P 112 Records sound when shooting a movie P 124 Sets the image quality and resolution Still picture RAW TIFF SHQ HQ SQ1 SQ2 Movie HQ SQ P 125 Sets the appropriate white balance according to the light source P 133 MODE MENU WB Factory d...

Страница 74: ...ACK Plays back movies P 55 INDEX Creates an index picture of a movie in 9 frames P 158 EDIT Edits a movie P 160 Displays all the shooting information on the monitor P 177 Displays a histogram showing the luminance distribution of still pictures P 144 INFO MODE MENU MOVIE PLAY INFO MODE MENU Still picture Movie MOVIE PLAY INFO ...

Страница 75: ...ts from IN and SLAVE When SLAVE is selected adjusts the intensity of the main flash P 86 SLOW Selects from SLOW 1 1st curtain SLOW 1st curtain with red eye reduction and SLOW 2 2nd curtain when the flash mode is set to SLOW slow synchronization P 84 NOISE REDUCTION Reduces the noise that affects pictures during long exposures P 142 DIGITAL ZOOM Extends the maximum optical zoom making possible up t...

Страница 76: ...HQ SQ P 125 WB Sets the appropriate white balance according to the light source P 133 Lets you make fine changes to the white balance P 138 CUSTOM WB Stores your preferred white balance setting P 135 SCENE MODES Lets you take pictures suited to the situation and the desired effect P 142 SHARPNESS Adjusts the sharpness of the image P 139 CONTRAST Adjusts the contrast of the image P 140 SATURATION A...

Страница 77: ...anges how file names are assigned P 189 PIXEL MAPPING Checks the CCD and image processing functions for errors P 190 Adjusts the brightness of the monitor P 180 Sets the date and time P 36 m ft Sets the measurement unit m ft used during manual focus P 191 VIDEO OUT Selects NTSC or PAL according to your TV s video signal type TV video signal types differ depending on the region P 192 SHORT CUT Lets...

Страница 78: ...le size smaller and saves it as a new file P 154 Crops part of a picture and saves it as a new file P 155 COPY Copies pictures to and from cards Lets you select whether to copy all frames or only a selected frame P 162 CARD tab CARD SETUP Formats a card P 175 Erases all image data stored on the card P 163 SETUP tab ALL RESET Selects whether to keep the current camera settings when you turn off the...

Страница 79: ...OLUME Adjusts the sound volume during playback Also adjusts the volume of the sound selected in PW ON SETUP and PW OFF SETUP P 185 Sets the beep sound used for warnings and adjusts the volume P 182 BEEP Sets the beep sound used for button operations and adjusts the volume P 183 Adjusts the brightness of the monitor P 180 Sets the date and time P 36 VIDEO OUT Selects NTSC or PAL according to your T...

Страница 80: ... follows and the selected mode is displayed on the control panel if all modes are available 2 Press the shutter button halfway When the flash is ready to fire the orange lamp lights steady 3 Press the shutter button fully Flash working range W max Approx 0 8 m to 5 6 m 2 6 ft to 18 ft T max Approx 0 2 m to 3 8 m 0 7 ft to 12 ft Mode dial Flash mode button Jog dial Flash mode No indication Auto fla...

Страница 81: ...on is increased the camera will increase the locked shutter speed accordingly AUTO and SLOW are not available in mode The flash does not fire in the following situations When shooting a bright subject AUTO in the movie record mode during sequential shooting BKT during super macro shooting when FUNCTION is set to WHITE BOARD BLACK BOARD during Panorama shooting The flash may not give you the optimu...

Страница 82: ...non After the pre flashes it takes about 1 second before the shutter is released Hold the camera firmly to avoid camera movement Effectiveness may be limited if the subject is not looking directly at the pre flashes or if the shooting range is too far Individual physical characteristics may also limit effectiveness Fill in flash The flash fires regardless of the available light This mode is useful...

Страница 83: ... slow synchronization flash is designed for slow shutter speeds Normally when shooting with a flash shutter speeds cannot go below a certain level to prevent camera movement But when shooting a night scene background fast shutter speeds can make the background too dark Slow synchronization flash allows both a slow shutter speed for the background and a flash for the subject Since the shutter speed...

Страница 84: ...de 16 sec P A S mode 1 sec 1st curtain with red eye reduction SLOW This mode is for when you want to use slow synchronization yet also reduce the red eye phenomenon For instance when shooting a person against a brightly lit night background A normal flash might make the person s eyes red but 1st curtain with red eye reduction lets you capture the background correctly and reduce the red eye phenome...

Страница 85: ...n menu is displayed release 3 Press to select SLOW1 SLOW or SLOW2 then press TIPS Slow synchronization can also be set from the MODE MENU In the top menu select MODE MENU CAMERA SLOW SLOW1 SLOW or SLOW2 then press How to use the menus P 70 Mode dial Flash mode button Jog dial FLASH MODE AUtO SEt GO SELECt SLOW SLOW1 SLOW SLOW2 CANCEL Slow synchronization menu ...

Страница 86: ... of 2 0 in 1 3 EV steps 1 Adjust the brightness by turning the jog dial while holding down and at the same time The exposure value is displayed on the control panel while the flash intensity control function is set The flash adjustment effect may not be sufficient if the shutter speed is too fast Mode dial Exposurecompensation button Flash mode button Jog dial Turning to the left decreases light e...

Страница 87: ...together allows for more sophisticated lighting such as catch lighting The FL 40 can be mounted on the camera by attaching it to the hot shoe on the top of the camera or by using the exclusive FL BK01 flash bracket optional and FL CB02 bracket cable optional 1 Slide the shoe cover off in the direction of the arrow and attach the external flash For instructions on how to attach the flash refer to t...

Страница 88: ...sed halfway the external flash begins communicating with the camera and automatically switches to TTL AUTO During communication the camera s monitor is turned on and TTL AUTO is displayed 4 Select the flash mode by turning the jog dial while holding down Flash shooting P 79 If close up pictures are overexposed try using the main flash by itself When the main flash and the FL 40 are used together t...

Страница 89: ...ct mode Adjust the shutter speed and aperture Manual shooting P 93 Remember that a slow shutter speed can produce blurred images For the best results we recommend that you set the shutter speed from 1 200 to 1 300 seconds 3 Turn on the external flash 4 Set the mode that automatically controls the amount of light emitted by the external flash Also set the ISO sensitivity and aperture on the externa...

Страница 90: ...c conditions it is possible that the correct exposure may not be obtained anyway In such a case adjust the auto F value or ISO value on the external flash unit or calculate the distance in the manual mode and use it that way Generally however the auto F value and ISO value can only be adjusted 1 step and beyond that exposure compensation cannot be made Exposure compensation in the camera is made i...

Страница 91: ...ash If you set a low amount the flash will fire during sequential shooting The following restrictions apply to the slave flash mode depending on the selected flash mode The setting is changed to AUTO SLOW The setting is changed to SLOW 1 1 In the top menu select MODE MENU CAMERA FLASH SLAVE and press How to use the menus P 70 2 Press to select the amount of light from 1 to 10 then press Mode dial ...

Страница 92: ...mum telephoto and will not go slower Control panel Aperture value indication on the monitor Meaning Lights Displayed in green The aperture setting is suitable for the conditions Blinks Displayed in red The aperture setting is unsuitable for the conditions Take the following steps when the monitor is turned on Mode dial Jog dial Control panel Turn to the right to increase the aperture value F numbe...

Страница 93: ... indication on the monitor Meaning Lights Displayed in green The shutter speed setting is suitable for the conditions Blinks Displayed in red The shutter speed setting is unsuitable for the conditions Take the following steps when the monitor is turned on Mode dial Jog dial Control panel Turn to the right to set a faster shutter speed Turn to the left to set a slower shutter speed Pressing the shu...

Страница 94: ...r speed compared to the exposure level considered optimal by the camera is displayed If the exposure differential appears in red on the monitor it indicates that the exposure differential is less than 3 0 EV or more than 3 0 EV Mode dial Exposure compensation button Jog dial Turn to the right to increase the aperture value F number Turn to the left to decrease the aperture value F number Turn to t...

Страница 95: ... current exposure settings Pressing the shutter button halfway shows how much the current exposure differs from the correct exposure Aperture value F1 8 to F8 0 Shutter speed 16 to 1 1000 sec At F8 0 up to 1 2000 sec To avoid camera movement you are recommended to use a tripod when taking pictures requiring a slow shutter speed Note ...

Страница 96: ...t My Mode settings MY MODE SETUP P 172 1 In the top menu select MODE MENU CAMERA MY MODE MY MODE 1 to MY MODE 8 and press How to use the menus P 70 Press again to exit the menu Only the settings in MY MODE 1 have already been saved You cannot select MY MODE 2 to MY MODE 8 if no settings have been saved in them MY MODE SETUP P 172 When you save the settings you are currently using in My Mode and th...

Страница 97: ...he screen Even when the subject is not in the center of the screen focusing is possible SPOT Focus selection is based on the subject within the AF target mark 1 Turn the jog dial while holding down and select AF or 2 While holding down press The AF MODE menu is displayed 3 Press to select iESP or SPOT then press Mode dial Arrow pad OK button Jog dial MF AF SEt MOVE GO SELECt SPOt iESP A F MODE CAN...

Страница 98: ...t of the lens in focus at all times without having to press the shutter button halfway When ON is selected the focusing time is reduced letting you take successive snapshots 1 In the top menu select MODE MENU CAMERA FULLTIME AF ON and press How to use the menus P 70 The subject is displayed on the monitor If the monitor is turned off FULLTIME AF does not function Press again to exit the menu In mo...

Страница 99: ... mark 1 Set the AF mode to SPOT AF MODE Changing the focus range P 96 2 Turn the jog dial while holding down and select AF or 3 While holding down use the arrow pad and move the AF target mark to the area you want to focus on The AF target mark at the center of the screen can be moved vertically or horizontally Mode dial Arrow pad OK button Jog dial MF AF SEt MOVE EXIt MOVE AF target mark ...

Страница 100: ...on dark subjects When the shutter button is pressed halfway the AF illuminator fires automatically lighting up the subject Factory default setting is ON To turn the AF illuminator off follow the procedure below 1 In the top menu select MODE MENU SETUP AF ILLUMINATOR OFF and press How to use the menus P 70 Press again to exit the menu Even when the AF illuminator is lit the auto focus may still not...

Страница 101: ...en you release 2 Press to set the focus distance During operation the area you are focusing on is enlarged This lets you check whether the focus is in the right position The distance indicator on the left of the monitor is for reference only When the indicator is moved to less than 0 8 m 2 6 ft the display automatically switches to the 20 cm 8 to 80 cm 2 6 ft display 3 Press to save the setting Mo...

Страница 102: ...cked at the same distance as when you performed focus lock Set to AF to return to auto focus Even if you move the cursor to the top of the distance indicator focusing is not possible at Adjust the cursor position by pressing while watching the monitor How to take pictures very close to the subject In super macro MF mode picture as close as 3 cm from the subject can be taken with manual focus Turn ...

Страница 103: ...e AF target area In this mode a subject can be shot with optimal exposure regardless of the background light P 102 Multi metering Meters the brightness of the subject at up to 8 different points to set the optimal exposure based on the average brightness This method is useful with a high contrast subject P 103 Spot metering 1 Turn the jog dial while holding down and select is displayed on the cont...

Страница 104: ...ter and press the AEL AE Lock button The brightness is metered at up to 8 different points The monitor turns on and the multi metering bar appears Brightness meter readings are ignored after the 9th reading To perform metering again press the AEL button for more than 1 second to display Press the AEL button again to cancel the metering values Mode dial Jog dial Metering button AEL button ...

Страница 105: ...ng 2 points pressing the AEL button twice The aperture and shutter speed as calculated from the average values obtained by metering at 2 points These values are recalculated every time another metering point is added The average for the 2 metering points The average is always shown at the center of the bar Indicates how much the present exposure you are metering differs from the average exposure v...

Страница 106: ... value exposure temporarily Next compose your shot again with the sun in the frame and take the picture 1 Compose the picture where you want to lock the metered value exposure then press the AEL button The monitor turns on and the metered value is saved If you want to lock a different exposure press the AEL button again to cancel AE lock Each time you press the AEL button AE lock is engaged and ca...

Страница 107: ... appears While is displayed the exposure is saved Press the AEL button again to cancel the AE memory AE lock was canceled Do not operate any of the buttons or the mode dial after performing AE lock Doing so will cancel AE lock The camera had emerged from sleep mode or the power was turned off AE lock is not available when multi metering is enabled Set the metering method to ESP or Spot metering P ...

Страница 108: ...ct you can fill the entire frame with your subject 1 Turn the jog dial while holding down and select is displayed on the control panel The subject is displayed on the monitor when you release your finger from the button If you are close to a subject the picture in the viewfinder is different from the area that the camera actually records For macro mode shooting we recommend using the monitor If yo...

Страница 109: ... Super macro MF When taking pictures close to the subject shadows may become conspicuous and the auto focus may not be able to maintain correct focus Set the camera to super macro MF and use manual focus 1 Turn the jog dial while holding down and select MF super macro MF MF on the control panel blinks 2 When you release your finger from the button the subject and the distance indicator for manual ...

Страница 110: ...r shooting Pressing the shutter button halfway locks the focus and exposure The self timer remote control lamp lights for approximately 10 seconds then starts blinking After blinking for approximately 2 seconds the picture is taken To stop shooting while in mode press the shutter button fully again To cancel the self timer press The self timer mode is automatically canceled after one shot If seque...

Страница 111: ...pod or place it on a stable flat surface 2 Turn the jog dial while holding down and select is displayed on the control panel 3 Point the remote control device at the remote control receiver on the camera For zooming press the W or T button on the remote control device You can operate the zoom on the camera During operation the self timer remote control lamp blinks Mode dial Jog dial Self timer Rem...

Страница 112: ...terference Change the channel as described in the remote control device s instruction manual How to cancel the remote control mode The remote control mode is not canceled automatically after shooting Perform step 2 on page 110 and set the mode to OFF If the remote control receiver is exposed to strong light the effective signal distance may be reduced or shooting may not take place To shoot sequen...

Страница 113: ...E SIZE mode Focus exposure and white balance are locked at the first frame Approx 11 frames at 1 7 frames sec in HQ mode Focus is individually locked for each frame The AF sequential shooting speed is slower than for normal sequential shooting BKT Auto bracketing P 113 High speed sequential shooting sequential shooting and AF sequential shooting 1 In the top menu select MODE MENU CAMERA DRIVE or a...

Страница 114: ...the camera When auto bracketing is set the exposure is changed automatically for each frame when you start shooting The exposure differential and number of frames can be selected in the menus The focus and white balance are locked at the first frame Ex When BKT is set to 1 0 x3 1 In the top menu select MODE MENU CAMERA DRIVE BKT and press How to use the menus P 70 1 0 0 1 0 Mode dial Arrow pad OK ...

Страница 115: ...le when the record mode is set to RAW In sequential shooting mode BKT the main flash does not fire The external flash does not fire in BKT mode If there is not enough space available on the card for the number of frames you have set during auto bracketing you cannot continue shooting If self timer shooting is attempted when the still picture shooting mode is set to sequential shooting the camera s...

Страница 116: ...ooting Since the shutter speed is set to 1 30 sec max exposure is decreased when shooting a dark subject to prevent camera movement To use the external flash during sequential shooting set the external flash so that it fires for each frame ...

Страница 117: ...MA and press How to use the menus P 70 The PANORAMA mode is set The subject is displayed on the monitor 2 On the monitor use the arrow pad to choose the direction you want the pictures connected Use the arrow pad to choose at which edge you want to connect the pictures Connects the pictures from left to right Connects the pictures from right to left Connects the pictures from bottom to top Connect...

Страница 118: ...he frame on the screen disappears and the camera returns to the normal shooting mode The panorama mode is only available with Olympus CAMEDIA brand cards Your computer s memory may be insufficient if you take too many panorama pictures in HQ or SHQ mode You are recommended to use SQ mode for panorama shooting During panorama shooting the flash and sequential shooting are not available Images are s...

Страница 119: ...ng If the mode dial is operated during panorama shooting the camera cancels the panorama mode and returns to normal shooting The camera itself cannot connect panorama pictures The CAMEDIA Master software is necessary to connect the pictures ...

Страница 120: ...E MENU CAMERA 2 IN 1 and press How to use the menus P 70 The two in one picture mode is set The monitor turns on automatically 2 Take the first shot while observing your subject on the monitor The subject will be positioned on the left in the combined picture 3 Take the second shot The subject will be positioned on the right in the combined picture Picture when played back Mode dial Arrow pad OK b...

Страница 121: ...a and sequential shooting are not available When the batteries are exhausted is displayed the flash automatically turns off To cancel the two in one picture mode after the first shot has been taken press The first shot will not be saved Operating the mode dial will exit two in one picture mode Note ...

Страница 122: ...but with white letters on a black background 1 In the top menu select MODE MENU CAMERA FUNCTION then select a mode and press How to use the menus P 70 WHITE BOARD and BLACK BOARD are not available in mode Press again to exit the menu TIPS Letters do not show clearly with WHITE BOARD or BLACK BOARD Use exposure compensation Exposure compensation P 131 When WHITE BLACK BOARD is selected the flash is...

Страница 123: ...orded automatically every time you take a picture 1 In the top menu select MODE MENU CAMERA ON and press How to use the menus P 70 Press again to exit the menu lights on the control panel 2 When recording starts turn the camera microphone towards the source of the sound you want to record The busy bar is displayed during recording The green lamp blinks during recording and blinks on the control pa...

Страница 124: ...ictures Recorded sound can also be changed Recording sound P 153 If the camera is more than 1 m 3 3 ft away from the source of the sound sound may not be recorded clearly It is not possible to take another picture during sound recording Sound recording is not possible in the following cases the record mode is set to TIFF the drive mode is set to sequential shooting Sound recording may also pick up...

Страница 125: ...l panel 2 Recording starts at the same time as shooting During recording blinks on the control panel When is set to ON the optical zoom cannot be used If is set to OFF you can use both the optical zoom and digital zoom during movie recording If the camera is more than 1 m 3 3 ft away from the source of the sound sound may not be recorded clearly Mode dial Arrow pad OK button Note ...

Страница 126: ...or printing or image processing on a PC This mode has different resolutions to choose from depending on your purpose Selecting lets you print the entire image without losing its borders almost the same image size as that used by photo labs Clearer Normal Larger Smaller SHQ A high quality mode using the JPEG format Because the compression rate is very low high quality can be maintained Selecting le...

Страница 127: ... 960 8 3 7 1024 768 13 2 4 640 480 33 0 9 SHQ 2560 1920 Low compression JPEG 8 8 3 6 2560 1696 9 10 3 2 ENLARGE SIZE 3200 2400 6 6 4 7 HQ 2560 1920 NORMAL 25 26 1 2 2560 1696 28 29 1 1 ENLARGE SIZE 3200 2400 16 16 1 9 SQ1 2288 1712 HIGH 11 11 2 7 NORMAL 31 32 1 0 2048 1536 HIGH 14 14 2 2 NORMAL 39 40 0 8 1600 1200 HIGH 22 22 1 4 NORMAL 60 64 0 5 SQ2 1280 960 HIGH 33 34 0 9 NORMAL 90 99 0 3 1024 76...

Страница 128: ...he AV cable connected the movie recording time will differ from the time listed in the Movie Record Modes table Selecting a record mode 1 In the top menu select MODE MENU PICTURE and press How to use the menus P 70 If is displayed on the top menu as a shortcut menu press the arrow pad in the same direction as the arrow shown next to Setting the shortcut menu P 170 In the top menu press to select H...

Страница 129: ...olution and picture size on a computer screen When a picture is transferred to a computer the size of the picture on the computer screen varies depending on the computer s monitor setting For instance a picture taken in 1024 768 resolution is the same size as the screen if you set the picture to 1x when the monitor setting is 1024 768 However if the monitor setting is over 1024 768 such as 1280 10...

Страница 130: ... such as A3 297 mm 420 mm 11 7 16 5 However file sizes also become larger ENLARGE SIZE can be selected in the SHQ or HQ mode It is not available in mode If the SHQ record mode is set to ENLARGE SIZE the maximum number of pictures in high speed sequential shooting mode is 3 RAW Data As its name suggests RAW data is unprocessed image data in its original state to which white balance sharpness contra...

Страница 131: ...table ISO sensitivity and press How to use the menus P 70 AUTO is not available in A S or M mode Press again to exit the menu When ISO sensitivity is not set to auto ISO is displayed on the control panel Higher ISO settings produce more electrical noise ISO is standardized based on the sensitivity of normal camera film The scale is approximate When ISO is set to AUTO and you are shooting in dark c...

Страница 132: ...the camera sets is compensated adjusted manually You can adjust the exposure in the range of 2 0 in 1 3 steps When the setting is changed you can check the result on the monitor 1 Turn the jog dial while holding down Adjust toward Turn to the right to adjust up to 2 0 in 1 3 steps Adjust toward Turn to the left to adjust up to 2 0 in 1 3 steps The exposure compensation value is displayed on the co...

Страница 133: ...creen for setting the histogram display will appear You can turn the histogram display on and off from this screen Histogram display P 144 You can change the position of the histogram target mark Changing the position of the histogram target mark P 146 The histogram cannot be displayed in mode You can set the aperture by turning the jog dial while holding down in M mode Manual shooting P 93 If the...

Страница 134: ...e same direction as the arrow shown next to WB Setting the shortcut menu P 170 2 Press to select the white balance best suited to the shooting conditions Choose from AUTO PRESET1 PRESET2 CUSTOM and one touch AUTO Press Press again to exit the menu PRESET1 Press to display the next selection screen Preset 1 white balance PRESET2 Press to display the next selection screen Preset 2 white balance CUST...

Страница 135: ...xit the menu For shooting under a daylight fluorescent lamp 6700K This type of lamp is used mainly in homes For shooting under a neutral white fluorescent lamp 5000K This type of lamp is generally used in desk lamps etc For shooting under a cool white fluorescent lamp 4200K This type of lamp is generally used in offices etc For shooting under a white fluorescent lamp 3500K For shooting under a tun...

Страница 136: ...register the current white balance setting and white balance adjustment value in CUSTOM 1 CUSTOM 4 and select them as white balance custom menus 1 In the top menu select MODE MENU PICTURE CUSTOM WB CUSTOM 1 CUSTOM 2 CUSTOM 3 or CUSTOM 4 and press How to use the menus P 70 The current white balance setting and white balance adjustment value are saved as CUSTOM WB If a custom white balance is alread...

Страница 137: ...the shooting conditions point the camera at a white object under the light source you want to use and adjust the white balance 1 Display screen and point the camera at a sheet of white paper Position the paper so that it fills the screen making sure there are no shadows 2 Press The white balance is set To cancel one touch white balance press Press repeatedly to exit the menu GO CANCEL button One t...

Страница 138: ...ight reflected by the paper is too bright or too dark White balance may not be effective under some special light sources After setting a white balance other than AUTO play back the picture and check the colors on the monitor When the flash is fired with a white balance setting other than AUTO colors may appear different in the resulting picture from the colors you see on the monitor Note ...

Страница 139: ... or then press The white balance adjustment indicator appears on the screen 3 The color becomes bluer each time you press and redder each time you press depending on the original white balance conditions Press to save your adjustment The white balance can be adjusted 7 increments in both red and blue directions After saving the adjustment press again to exit the menu Mode dial Arrow pad OK button ...

Страница 140: ...ontours are emphasized making the image appear sharper and more vivid Use this setting when you want to print pictures To reduce the sharpness Press The image contours are softened Use this setting when you want to edit images on a PC When you have finished setting the sharpness press Press again to exit the menu If you adjust the sharpness too far toward noise may become conspicuous in the pictur...

Страница 141: ...e the menus P 70 2 Press to adjust the contrast between 5 and 5 To increase the contrast Press The light and dark areas are defined more clearly making the image look crisper To reduce the contrast Press The light and dark areas become less defined giving the image a softer impression Use this setting when you want to edit images on a PC When you have finished setting the contrast press Press agai...

Страница 142: ... How to use the menus P 70 2 Press to adjust the saturation between 5 and 5 To increase the saturation Press Colors become darker and more intense To reduce the saturation Press Colors become lighter When you have finished setting the saturation press Press again to exit the menu Mode dial Arrow pad OK button CARD SEt CAM PICtURE SHARPNESS CONtRASt SAtURAtION ...

Страница 143: ...P 61 Press again to exit the menu This function reduces the noise that is generated during long exposures When shooting night scenes shutter speeds become slower and noise tends to appear on images When noise reduction is set to ON the camera automatically reduces noise to produce clearer images However shooting time is approximately twice as long as usual Noise reduction can only be used when the...

Страница 144: ...displayed on the control panel Noise reduction is always enabled in the mode When noise reduction is set to ON the camera implements noise reducing processes after each shot When noise reduction is set to ON sequential shooting BKT is not possible This function may not work effectively with some shooting conditions or subjects As the shutter speed is relatively slow the use of a tripod is recommen...

Страница 145: ...y a histogram showing the brightness and contrast of recorded pictures The histogram display can be set separately for shooting mode and playback mode Ex When a histogram is displayed in P mode When the image is bright When the image is dark The part indicated in green in the histogram shows the luminance distribution within the histogram target mark Histogram target mark If the peak fills too muc...

Страница 146: ...ensation P 131 ON The histogram is always displayed Press again to exit the menu When ON is selected the monitor turns on automatically and the histogram is displayed Press in the top menu How to use the menus P 70 The histogram is displayed To return to the normal playback screen press again to display the top menu and press Mode dial Arrow pad OK button CARD SEt PIC CAMERA PANORAMA 2 IN 1 FUNCtI...

Страница 147: ...w during multi metering You can turn the histogram display on and off during exposure compensation Exposure compensation P 131 Changing the position of the histogram target mark While the histogram is displayed in shooting mode hold down and use the arrow pad to move the histogram target mark The area inside the target is displayed in green on the histogram To restore the histogram target mark to ...

Страница 148: ...oom lever toward T By using the arrow pad while the enlarged picture is displayed you can shift the picture in the desired direction enabling you to view a different portion Turning the jog dial allows you to view the next or previous frame in the same magnification To return the picture to the original size 1x turn the zoom lever toward W Pictures cannot be stored in an enlarged state Mode dial Z...

Страница 149: ...9 1 In the single frame playback mode turn the zoom lever toward W Use the arrow pad to select the picture Moves to the previous frame Moves to the next frame Moves to the upper frame Moves to the lower frame Turning the jog dial during an index display allows you to scroll to the next or previous index display To return to the single frame playback turn the zoom lever toward T Mode dial ...

Страница 150: ...n lets you select the number of pictures in an index display from 4 9 and 16 1 In the top menu select MODE MENU SETUP How to use the menus P 70 2 Choose the number of pictures 4 9 or 16 and press Press again to exit the menu Mode dial Arrow pad OK button PLAY EDIt CARD SEtUP ...

Страница 151: ... to display the top menu 2 Press to start the slideshow 3 Press to stop the slideshow The slideshow will not stop until you cancel it by pressing You are recommended to use the optional AC adapter when running a slideshow for a long period of time If batteries are used the camera will stop the slideshow after about 30 minutes and enter sleep mode Mode dial Arrow pad OK button Note ...

Страница 152: ...show functions can also be used on a TV screen TIPS You are recommended to use the optional AC adapter when using the camera with a TV Make sure that the camera s video output signal type is the same as the TV s video signal type Video output selection P 192 The camera s monitor turns off automatically when the AV cable is connected to the camera Be sure to use the AV cable provided to connect the...

Страница 153: ...image in the following sequence 90 degrees counterclockwise 90 degrees clockwise and back to the original The following pictures cannot be rotated Movies protected pictures pictures that have been edited on a PC pictures taken with another camera and pictures stored on a write protected card New picture orientations are saved even when the power is turned off Close up playback is possible after a ...

Страница 154: ...rd the sound you want to record and press to start recording The busy bar is displayed during recording To obtain the optimum sound the microphone should be placed no farther than 1 m 3 3 ft away from the subject If you re record the sound the original sound is erased You may not be able to record sound when there is insufficient card memory the CARD FULL message is displayed Sound recording may p...

Страница 155: ...e the arrow pad to select the still picture you want to edit 2 In the top menu select MODE MENU EDIT then choose each item How to use the menus P 70 Select This page Select P 155 Select RAW DATA EDIT P 156 Resizing 3 Select then press 4 Press to select the new picture size then press The busy bar is displayed during resizing After the image is saved the camera returns to the mode menu To quit the ...

Страница 156: ...press 4 Press to select NEW FILE then press 5 Use the arrow pad zoom lever and jog dial to decide the trimming position and size Press to move the trimming frame and turn the zoom lever toward W or T to decide the size Use the jog dial to select the height and width of the trimming frame 3 2 trimming size can be selected when the size of the selected picture is 2560 1920 or 2560 1696 6 Press The t...

Страница 157: ...n the picture was taken with the record mode set to ENLARGE SIZE It may not be possible to trim pictures taken with another camera If pictures recorded in 3 2 are trimmed the image proportions are changed to the standard 4 3 aspect ratio If a trimmed picture is printed out it may appear grainy RAW editing 3 Select RAW DATA EDIT then press 4 Press to select the item you want to set then press GO SE...

Страница 158: ...ng Item Settings Ref Page TIFF SHQ HQ SQ1 SQ2 P 125 WB PRESET1 PRESET2 CUSTOM P 133 SHARPNESS 5 P 139 CONTRAST 5 P 140 SATURATION 5 P 141 FUNCTION OFF BLACK WHITE SEPIA P 121 P 155 RAW DAtA EDIt WB SHARPNESS CONtRASt AUtO PRESEt1 PRESEt2 CUStOM SAtURAtION When there are two types of card in the camera the card selection screen appears after step 6 Use the arrow pad to select the card and press Whe...

Страница 159: ... a glance Indexes can be stored on the card as a still picture EDIT This function lets you erase parts of the movie that you do not want 1 Use the arrow pad to select a picture with 2 In the top menu select MOVIE PLAY then choose each item How to use the menus P 70 Viewing movies P 55 Creating an index P 158 Editing a movie P 160 Creating an index 3 Press to select INDEX then press Mode dial Arrow...

Страница 160: ...ure from Step 4 To quit the index function select CANCEL and press TIPS The index is stored as a still picture in a different record mode from the original movie The interval between the frames that are automatically picked out varies depending on the length of the movie An index consists of 9 frames You cannot edit movies stored on a write protected card You cannot create an index if there is ins...

Страница 161: ...Select the last frame of the part you want to keep As in Step 4 press to play back the movie and when the frame that you want as the last frame is displayed press 6 Press to select OK then press If you want to select different frames select RESET and press and repeat the procedure from Step 4 To quit the editing function select CANCEL and press CANCEL GO SELECt MOVIE PLAYBACK MOVIE PLAY INDEX EDIt...

Страница 162: ...stored and the screen returns to the playback mode You cannot edit movies with sound which were taken with another digital camera You cannot select NEW FILE if there is insufficient memory space on the card CANCEL GO SELECt NEW FILE OVERWRItE EDIt When there are two types of card in the camera the card selection screen appears after step 5 Use the arrow pad to select the card and press When there ...

Страница 163: ...EDIT COPY and press How to use the menus P 70 The screen is displayed for you to select ALL or SELECT 2 Press to select ALL or SELECT then press If you choose ALL A confirmation screen appears asking if you want to copy the pictures Select YES and press The pictures are copied and the menu is exited If you choose SELECT The playback screen is displayed Turn the jog dial to select the frame you wan...

Страница 164: ...menu select MODE MENU CARD CARD SETUP and press How to use the menus P 70 2 Press to select ALL ERASE then press 3 Press to select YES then press All the pictures are erased Mode dial Arrow pad OK button CARD SEtUP ALL ERASE CANCEL GO SELECt FORMAt YES CAUtION ERASING ALL SELECt GO ALL ERASE NO ...

Страница 165: ...set is set to OFF in one shooting mode this setting applies to all the other modes both shooting and playback ON All settings are returned to the factory default settings after the power is turned off OFF The settings made before the power is turned off are saved 1 In the top menu select MODE MENU SETUP ALL RESET OFF or ON and press How to use the menus P 70 Press again to exit the menu My Mode se...

Страница 166: ... WIDE P 50 DRIVE P 112 BKT 1 3 P 113 ISO AUTO P 130 FLASH IN P 86 SLAVE 1 P 90 SLOW SLOW 1 P 84 NOISE REDUCTION OFF P 142 DIGITAL ZOOM OFF P 51 Function Factory default setting Ref Page FULLTIME AF OFF P 97 AF MODE iESP P 96 OFF P 122 FUNCTION OFF P 121 OFF P 144 HQ P 125 WB AUTO P 133 0 P 138 SCENE MODES NORMAL P 142 SHARPNESS 0 P 139 CONTRAST 0 P 140 SATURATION 0 P 141 TIFF 2560 1920 P 126 SHQ H...

Страница 167: ...The sub menu lets you select further options Functions that can be set on the custom button Settings made by the jog dial Ref Page DRIVE factory default setting BKT P 112 ISO AUTO 64 100 200 400 P 130 MY MODE 1 2 3 4 5 6 7 8 P 95 NOISE REDUCTION OFF ON P 142 DIGITAL ZOOM OFF ON P 51 FULLTIME AF OFF ON P 97 OFF ON P 122 FUNCTION OFF BLACK WHITE SEPIA WHITE BOARD BLACK BOARD P 121 HQ SQ1 SQ2 RAW TIF...

Страница 168: ...ress again to exit the menu If the mode dial is set to a mode other than and is pressed when MY MODE is set on the custom button the customized setting is not activated Set the mode dial to and press to display the MY MODE screen Mode dial Arrow pad OK button PLAY EDIt CARD SEtUP SHORtCUt ON ON OFF OFF CUStOM BUttON DUAL CONtROL PANEL AF ILLUMINAtOR GO SELECt CUStOM BUttON DRIVE NOISE REDUCtION MY...

Страница 169: ...n DRIVE is set on the custom button Set BKT Follow the operation guides displayed at the bottom of the screen to complete the setting Mode dial Custom button Jog dial BKt GO SELECt BKt GO SELECt CANCEL DRIVE AF HI SEt BKt GO SELECt CANCEL Press Use the arrow pad and to set selected items Select BKT by turning the jog dial while holding down Operation guide ...

Страница 170: ...B Functions that can be set in the shortcut menu Ref Page Functions that can be set in the shortcut menu Ref Page DRIVE P 112 2 IN 1 P 119 ISO P 130 FUNCTION P 121 MY MODE P 95 P 144 FLASH P 86 P 125 SLOW P 84 WB P 133 NOISE REDUCTION P 142 P 138 DIGITAL ZOOM P 51 CUSTOM WB P 135 FULLTIME AF P 97 SCENE MODES P 142 AF MODE P 96 SHARPNESS P 139 P 122 CONTRAST P 140 PANORAMA P 116 SATURATION P 141 WB...

Страница 171: ...the top menu select MODE MENU SETUP SHORT CUT and press How to use the menus P 70 2 Press to select A B or C then press 3 Press to select the function you want to set then press The shortcut menu is set Press again to exit the menu MODE MENU Mode dial Arrow pad OK button GO SELECt SHORt CUt DRIVE DRIVE WB WB GO SELECt SHORt CUt DRIVE MY MODE ISO FLASH ...

Страница 172: ...set appears on the top menu 2 Press or to select the shortcut menu The monitor jumps directly to the setting screen for that function Ex When is set in shortcut menu A 3 Follow the operation guides on the screen Mode dial Arrow pad OK button ISO AF MODE MODE MENU ISO AF MODE MODE MENU GO SELECt PRESEt1 PRESEt2 A Ut O CANCEL Press Top menu Setting screen Operation guide Pressing takes you directly ...

Страница 173: ... MODE Default setting Ref Page Functions that can be set in MY MODE Default setting Ref Page P A S M S Prg P P 59 NOISE REDUCTION OFF P 142 FNo F1 8 P 91 DIGITAL ZOOM OFF P 51 SHUTTER 1 1000 P 92 FULLTIME AF OFF P 97 0 P 131 AF MODE iESP P 96 xD SM CF xD SM P 29 OFF P 122 LCD ON PANORAMA OFF P 116 ZOOM POSITION 35 mm 2 IN 1 OFF P 119 FLASH MODE AUTO P 79 FUNCTION OFF P 121 0 P 85 OFF P 144 ESP P 1...

Страница 174: ...y one The MY MODE SETUP screen appears 3 Select a MY MODE number Press to select a MY MODE number from 1 to 8 then press When selecting PRESENT in Step 2 4 Press to select SET then press The current camera settings are saved in the selected MY MODE Mode dial Arrow pad OK button PLAY EDIt CARD SEtUP SHUttER PRESENt RESEt CUStOM BEEP FILE NAME MY MODE SEtUP CANCEL GO SELECt MY MODE1 MY MODE2 MY MODE...

Страница 175: ...hen press For the available items see MY MODE SETUP P 172 Press to change the setting then press The setting is saved You can also change the other custom settings 5 When you have made all the settings you want press The screen displayed in Step 2 appears Press again to exit the menu GO SELECt CANCEL ALL RESEt RESEt PRESENt SEttING MY MODE SEtUP P FNo SHUttER F1 8 F1 8 xD xD SM SM xD SM CF 1 1000 ...

Страница 176: ...MENU CARD CARD SETUP and press How to use the menus P 70 The FORMAT screen is displayed The CARD SETUP screen is displayed 2 If the mode dial is set to press to select FORMAT If the mode dial is set to press to select FORMAT then press The FORMAT screen is displayed Press to select YES 3 Press The busy bar is displayed and the card is formatted Mode dial Arrow pad OK button YES NO CAUtION ERASING ...

Страница 177: ...his may cause the card to malfunction If you format an OLYMPUS template card all the template data stored on the card is erased You are recommended to download image data stored on the template card to a PC For more details read the instructions provided with the template card Write protected cards cannot be formatted Remove the write protect seal before formatting the card Do not reuse the write ...

Страница 178: ...menu displays the full amount of shooting information on the monitor ON How to use the menus P 70 To turn INFO off press to bring up the top menu and press OFF If the picture has been taken with a different camera only the date frame number and battery level are displayed when INFO is set to ON If is set the histogram is displayed regardless of whether INFO is set to ON or OFF Mode dial Arrow pad ...

Страница 179: ...nt to view the subject or menu 1 In the top menu select MODE MENU SETUP DUAL CONTROL PANEL ON and press How to use the menus P 70 Press again to exit the menu The dual control panel is displayed on the monitor Dual control panel screen next page The subject is displayed on the monitor when using functions that use the monitor such as macro shooting or digital zoom Mode dial Arrow pad OK button Not...

Страница 180: ...ery check 2 Shooting mode 3 Shutter speed 4 Aperture value 5 Exposure compensa tion 6 Noise reduction 7 AE lock AE memory 8 Focus mode 9 Flash mode 10 Flash intensity control 11 Drive 12 Self timer Remote con trol 13 Sound record 14 Record mode number of pixels 15 Number of storable still pictures Seconds re maining 16 Memory gauge 17 Spot metering multi metering bar 18 ISO 19 White balance com pe...

Страница 181: ...e monitor 1 In the top menu select MODE MENU SETUP and press How to use the menus P 70 2 Press to adjust the brightness of the monitor and when you have set the desired level press Pressing brightens the monitor and pressing darkens it Press again to exit the menu Mode dial Arrow pad OK button ADJUSt GO ...

Страница 182: ...ew lets you resume shooting immediately OFF The picture being recorded to the card is not displayed This is useful when you want to prepare for your next shot while the previous picture is being recorded 1 In the top menu select MODE MENU SETUP REC VIEW OFF or ON and press How to use the menus P 70 Press again to exit the menu If the batteries are running low when you take a picture with the monit...

Страница 183: ...sound used for warnings from OFF LOW or HIGH The factory default setting is HIGH You can turn the sound off completely by setting OFF 1 In the top menu select MODE MENU SETUP OFF LOW or HIGH and press How to use the menus P 70 Press again to exit the menu Mode dial Arrow pad OK button ...

Страница 184: ...re 1 short beep for the kind of sound and LOW for the volume You can turn the sound off completely by setting OFF 1 In the top menu select MODE MENU SETUP BEEP and press How to use the menus P 70 2 Select 1 or 2 and press Then select LOW or HIGH and press To turn off the button operation beep select OFF and press Press again to exit the menu Mode dial Arrow pad OK button BEEP OFF LOW HIGH GO SELEC...

Страница 185: ...1 for the kind of sound and LOW for the volume You can turn the sound off completely by setting OFF 1 In the top menu select MODE MENU SETUP SHUTTER SOUND and press How to use the menus P 70 2 Select 1 or 2 and press Then select LOW or HIGH and press To turn off the shutter sound select OFF and press Press again to exit the menu Mode dial Arrow pad OK button SHUttER SOUND OFF LOW HIGH GO SELECt ...

Страница 186: ...when the power is turned on or off There are 5 levels to choose from To mute the sound completely select 0 The factory default setting is 3 1 In the top menu select MODE MENU SETUP VOLUME and press How to use the menus P 70 2 Press to select the volume level then press Press again to exit the menu Mode dial Arrow pad OK button PLAY EDIt CARD SEtUP VOLUME VOLUME BEEP ...

Страница 187: ...d when the power is turned on or off Press to select OFF 1 or 2 then press OFF No picture is displayed 1 Factory default setting 2 Selects the picture already registered If there is no picture registered nothing is displayed when the power is turned on or off 3 Press to select SOUND and choose the sound when the power is turned on or off Press to select OFF 1 or 2 then press To turn off the sound ...

Страница 188: ...ff 1 In the top menu select MODE MENU SETUP SCREEN SETUP and press How to use the menus P 70 2 Press to select PW ON or PW OFF then press If a picture is already registered the IMAGE EXISTING screen is displayed asking if you want to cancel the currently registered picture and register a new one To register a new picture select RESET and press If you select KEEP the screen returns to the PW ON OFF...

Страница 189: ...he picture is registered and the screen returns to Step 2 You can register other pictures Press to return to the menu You cannot register pictures and movie frames that cannot be played back on this camera GO SELECt CANCEL OK SEt AS PW ON SCREEN SCREEN SEtUP CANCEL Note ...

Страница 190: ...001 This method is useful when grouping files on separate cards AUTO Even if a new card is inserted the folder number and file number are retained from the previous card so the same file number is not used on different cards This helps you to manage multiple cards This method is useful when you want to manage all your files with sequential numbers 1 In the top menu select MODE MENU SETUP FILE NAME...

Страница 191: ...sary to operate this function frequently Approximately once a year is recommended Wait a few minutes after the monitor is used or continuous shots are taken to allow for proper performance of the Pixel Mapping function 1 In the top menu select MODE MENU SETUP PIXEL MAPPING and press How to use the menus P 70 2 Press The busy bar is displayed during Pixel Mapping When Pixel Mapping is finished the ...

Страница 192: ... focus mode m At long ranges the camera measures in meters and at shorts ranges in centimeters ft At long ranges the camera measures in feet and at shorts ranges in inches 1 In the top menu select MODE MENU SETUP m ft m or ft and press How to use the menus P 70 Press again to exit the menu Mode dial Arrow pad OK button ...

Страница 193: ...orded pictures properly on your TV 1 In the top menu select MODE MENU SETUP VIDEO OUT NTSC or PAL and press How to use the menus P 70 Press again to exit the menu The factory default setting varies depending on the area where you purchased this camera TIPS TV video signal types main regions Check the video signal type before using the camera NTSC Japan Taiwan Korea North America PAL European count...

Страница 194: ...unction Factory default setting Ref Page FNo F1 8 P 91 FULLTIME AF OFF P 97 SHUTTER 1 1000 P 92 AF MODE SPOT P 96 0 P 131 OFF P 122 Histogram target Center P 146 PANORAMA OFF P 116 FLASH MODE AUTO P 79 2 IN 1 OFF P 119 0 P 85 FUNCTION OFF P 121 AF P 100 107 108 OFF P 144 AF target Center P 98 HQ P 125 METERING ESP P 102 WB AUTO P 133 AEL Multi metering OFF P 105 0 P 138 OFF P 109 110 SCENE MODES N...

Страница 195: ...ATURATION 0 P 141 ISO AUTO P 130 TIFF 2560 1920 P 126 FLASH IN P 86 SHQ HQ 2560 1920 P 126 SLAVE 1 P 90 SQ1 1600 1200 NORMAL P 126 SLOW SLOW1 P 84 SQ2 640 480 NORMAL P 126 NOISE REDUCTION OFF P 142 INFO OFF P 177 DIGITAL ZOOM OFF P 51 640 480 P 154 Function Factory default setting Ref Page Function Factory default setting Ref Page ...

Страница 196: ...pports the DPOF format the pictures can be printed according to the DPOF reservations Or pictures can be printed out at home on a personal DPOF compatible printer Printing on an Olympus CAMEDIA P 400 P 330N E or P 200 digital printer By inserting a card containing print reservation data into the printer printing is possible without using a PC For more details refer to the printer s instruction man...

Страница 197: ... changes using the original device If a card contains DPOF reservations set by another device entering reservations using this camera may overwrite the previous reservations Even if an image appears with the message PICTURE ERROR it may be possible to make print reservations In this case the print reservation icon does not appear when an image is displayed for full view appears when multiple image...

Страница 198: ...You cannot print pictures with 2 Press The PRINT ORDER screen appears Press to select then press If print reservation data is already stored on the card the PRINT ORDER SETTING screen appears giving you the choice of resetting the data or keeping it Resetting print reservation data P 204 3 Press to select x number of prints or date time then press Mode dial Print button Arrow pad OK button EXIt GO...

Страница 199: ...Increases the number Decreases the number Set the date time printing data Press to select NO DATE or TIME then press NO The pictures are printed without the date and time DATE All the pictures are printed with the shooting date TIME All the pictures are printed with the shooting time After completing all the print reservations press to return to the playback mode menu SEt GO SELECt EXIt GO SELECt ...

Страница 200: ...ictures with 2 Press The PRINT ORDER screen appears Press to select then press If data is already stored on the card the PRINT ORDER SETTING screen appears giving you the choice of resetting the data or keeping it Resetting print reservation data P 204 3 Select the frame you want to print using the arrow pad or the jog dial and press Mode dial Print button Arrow pad OK button EXIt GO SELECt PRINt ...

Страница 201: ...s date time or trimming then press 6 Perform each setting Set the number of prints Press to set the desired number of prints then press If you want to continue to set the date time printing data and or trim the pictures press to return to Step 5 Increases the number Decreases the number Set the date time printing data Press to select NO DATE or TIME then press NO The pictures are printed without t...

Страница 202: ... print reservations have been made the PRINT ORDER SETTING screen will not be displayed Canceling reservations Selecting CANCEL in Step 4 displays the selection screen for the frame to be cancelled 1 Select the print reservation frame you want to cancel and press 2 The screen shown above is displayed Press to select END The PRINT ORDER screen appears Press again to display the PRINT ORDER SETTING ...

Страница 203: ...g size and returns to the single frame reservation screen RESET Sets a new trimming size Go to Step 3 CANCEL Cancels the current trimming setting and returns to the single frame reservation screen 3 Use the arrow pad zoom lever and jog dial to decide the trimming position and size Press to select the trimming frame and press the zoom lever toward W or T to decide the trimming size Use the jog dial...

Страница 204: ...ing on the printer settings If the trimmed picture size is small printing magnification increases accordingly resulting in a printed picture with lower resolution For best results with close up prints you are recommended to use theTIFF SHQ or HQ mode The original picture is not trimmed If your printer does not have the DPOF function the picture will be printed untrimmed Do not rotate pictures that...

Страница 205: ... 3 Press to select RESET then press If there is no print reservation data stored on the card the PRINT ORDER SETTING screen does not appear The PRINT ORDER screen appears To quit the print reservation press to return to the playback mode menu TIPS To cancel the print reservations for selected pictures only Select KEEP then press The screen in Step 2 of Single frame reservation P 199 is displayed F...

Страница 206: ...s prohibited Remove the write protect seal attached to the card For details refer to the instruction manual provided with the card CARD FULL The card is full No more pictures can be taken or no more information such as print reservation can be recorded Replace the card or erase unwanted pictures Before erasing download important images to a PC NO PICTURE There are no pictures on the card The card ...

Страница 207: ...206 11 Miscellaneous The card is not formatted Format the card F POWER OFF FORMAt CARD SEtUP SELECt GO ...

Страница 208: ...tside the water vapor in the air is rapidly cooled and turns to droplets of water Condensation occurs when the camera is suddenly taken from a cold place into a warm room No picture is taken when the shutter button is pressed Possible cause Corrective action Ref Page The camera is in the playback mode Set the mode dial to any position except P 40 The flash has not finished charging Remove your fin...

Страница 209: ...DRIVE menu P 112 The camera is in the movie mode The flash does not fire in the movie mode Set a different shooting mode P 48 FUNCTION is set to BLACK WHITE BOARD The flash does not fire in the BLACK WHITE BOARD mode P 121 Super macro mode is set The flash does not fire in the super macro mode Set the super macro mode to OFF P 108 Panorama mode is set The flash does not fire in the panorama mode C...

Страница 210: ... is in the shooting mode Press twice quickly or set the mode dial to P 53 54 There are no pictures on the card NO PICTURE appears on the monitor Record pictures There is a problem with the card Refer to Error codes P 205 The camera is connected to a TV The monitor does not function when the AV cable is connected to the camera P 151 The date recorded with the image data is wrong Possible cause Corr...

Страница 211: ...ON Select the SETUP tab in the mode menu and set All Reset to OFF P 164 No picture is displayed on the TV when connected to the camera Possible cause Corrective action Ref Page The video output signal is incorrect Set the video output signal according to the region where used P 192 The camera is not in the playback mode Set the mode dial to P 151 The TV video signal setting is incorrect Set the TV...

Страница 212: ... colors of pictures taken indoors look unnatural Possible cause Corrective action Ref Page Indoor lighting can affect the picture s colors Set the white balance according to the lighting P 133 There is no white in the subject Include something white in the picture or shoot using the fill in flash mode P 79 The white balance setting is wrong Adjust the white balance according to the light source P ...

Страница 213: ...or hold the camera firmly P 79 Halation produces unnatural colors in the picture Possible cause Corrective action Ref Page This may be caused by excessively bright ultraviolet light on the subject such as sunlight shining through the leaves of trees window frames in bright light at night reflection of metal in direct sunlight etc Use a UV filter As this may upset the overall color balance it shoul...

Страница 214: ...GITAL ZOOM OFF ON P 51 FULLTIME AF OFF ON P 97 AF MODE iESP SPOT P 96 OFF ON P 122 PANORAMA 4 P 116 2 IN 1 P 119 FUNCTION OFF BLACK WHITE SEPIA WHITE BOARD BLACK BOARD P 121 5 OFF ON ON P 144 PICTURE RAW TIFF SHQ HQ SQ1 SQ2 P 125 WB AUTO PRESET1 PRESET2 CUSTOM P 133 7 7 P 138 CUSTOM WB CUSTOM 1 CUSTOM 2 CUSTOM 3 CUSTOM 4 P 135 SCENE MODES 3 NORMAL P 142 SHARPNESS 5 5 P 139 CONTRAST 5 5 P 140 SATUR...

Страница 215: ...f Page MODE MENU SETUP ALL RESET 6 OFF ON P 164 7 ENGLISH FRANÇAIS DEUTSCH ESPAÑOL P 34 PW ON SETUP OFF 1 2 P 186 PW OFF SETUP OFF 1 2 P 186 REC VIEW OFF ON P 181 OFF LOW HIGH P 182 BEEP OFF 1 2 P 183 SHUTTER SOUND OFF 1 2 P 184 MY MODESETUP PRESENT RESET CUSTOM P 172 FILE NAME RESET AUTO P 189 PIXEL MAPPING P 190 P 180 P 36 m ft m ft P 191 VIDEO OUT NTSC PAL P 192 SHORTCUT A B C P 169 CUSTOM BUTT...

Страница 216: ...142 SHARPNESS 5 5 P 139 CONTRAST 5 5 P 140 SATURATION 5 5 P 141 CARD CARD SETUP YES NO P 175 SETUP ALL RESET OFF ON P 164 7 ENGLISH FRANÇAIS DEUTSCH ESPAÑOL P 34 PW ON SETUP OFF 1 2 P 186 PW OFF SETUP OFF 1 2 P 186 OFF LOW HIGH P 182 BEEP OFF 1 2 P 183 FILE NAME RESET AUTO P 189 PIXEL MAPPING P 190 P 180 P 36 VIDEO OUT NTSC PAL P 192 DUALCONTROL PANEL OFF ON P 178 movies P 124 HQ SQ P 125 WB AUTO ...

Страница 217: ...40 x 480 320 x 240 CANCEL P 154 NEW FILE CANCEL P 155 COPY ALL SELECT P 162 CARD CARD SETUP ALL ERASE FORMAT P 175 SETUP ALL RESET OFF ON P 164 7 ENGLISH FRANÇAIS DEUTSCH ESPAÑOL P 34 PW ON SETUP OFF 1 2 P 186 PW OFF SETUP OFF 1 2 P 186 SCREEN SETUP PW ON PW OFF P 187 VOLUME P 185 OFF LOW HIGH P 182 BEEP OFF 1 2 P 183 P 180 P 36 VIDEO OUT NTSC PAL P 192 4 9 16 P 148 P 150 INFO P 177 P 144 ...

Страница 218: ...T P 175 SETUP ALL RESET OFF ON P 164 7 ENGLISH FRANÇAIS DEUTSCH ESPAÑOL P 34 PW ON SETUP OFF 1 2 P 186 PW OFF SETUP OFF 1 2 P 186 VOLUME P 185 OFF LOW HIGH P 182 BEEP OFF 1 2 P 183 P 180 P 36 VIDEO OUT NTSC PAL P 192 4 9 16 P 148 MOVIE PLAY MOVIE PLAYBACK PLAYBACK FRAME BY FRAME EXIT P 55 INDEX OK RESET CANCEL P 158 EDIT OK RESET CANCEL P 160 INFO P 177 ...

Страница 219: ...erted in the xD SM slot 0 FLASH AUTO SLOW1 0 METERING ESP fixed on AF AF target mark Center Histogram target mark Center OFF AE lock Off DRIVE BKT 1 EV 3 ISO AUTO 64 MY MODE MY MODE 1 FLASH IN SLAVE 1 SLOW SLOW1 NOISE REDUCTION OFF fixed on ON DIGITAL ZOOM OFF FULLTIME AF OFF ON AF MODE iESP fixed on iESP OFF movie OFF PANORAMA OFF 2 IN 1 OFF ...

Страница 220: ...0 480 NORMAL WB AUTO 0 CUSTOM WB OFF SCENE MODES NORMAL SHARPNESS 0 CONTRAST 0 SATURATION 0 ALL RESET ON ENGLISH PW ON SETUP 1 PW OFF SETUP 1 REC VIEW ON LOW BEEP 1 LOW SHUTTER SOUND 1 LOW MY MODE SETUP PRESENT FILE NAME RESET NORMAL Y M D 2002 01 01 00 00 m ft m VIDEO OUT NTSC SHORTCUT A DRIVE B C WB CUSTOM BUTTON DRIVE DUAL CONTROL PANEL OFF AF ILLUMINATOR ON ...

Страница 221: ...settings 11 Miscellaneous Playback mode OFF INFO OFF OFF OFF 0 OFF 640 480 OFF COPY ALL ALL RESET ON ENGLISH PW ON SETUP 1 PW OFF SETUP 1 SCREEN SETUP BLUE BACKGROUND VOLUME 3 LOW BEEP 1 LOW FILE NAME RESET NORMAL VIDEO OUT NTSC 9 ...

Страница 222: ...hooting mode Mode Function Zoom 9 Digital zoom 9 AF 9 Focus lock 9 AF MODE 9 FULLTIME AF 9 AF target 9 AF ILLUMINATOR 9 Manual focus 9 FLASH MODE AUTO 9 9 9 9 9 9 SLOW1 9 SLOW 9 9 SLOW2 9 9 9 SLOW 9 FLASH 9 9 9 9 9 9 9 9 MF 9 9 9 1 BKT 9 9 1 ...

Страница 223: ... 9 FUNCTION BLACK WHITE 9 SEPIA 9 WHITE BOARD 9 BLACK BOARD 9 9 movie 9 9 ISO 9 9 9 WB 9 9 CUSTOM WB 9 SHARPNESS 9 CONTRAST 9 SATURATION 9 SCENE MODES 9 9 NOISE REDUCTION 9 9 9 Histogram target mark 9 9 ALL RESET 9 2 9 PW ON SETUP 9 PW OFF SETUP 9 REC VIEW 9 Mode Function ...

Страница 224: ...laneous 9 Available Not available 1 Cannot be selected in mode 2 Cannot be selected in mode 9 BEEP 9 SHUTTER SOUND 9 MY MODE SETUP 9 FILE NAME 9 PIXEL MAPPING 9 9 9 m ft 9 VIDEO OUT 9 SHORTCUT 9 CUSTOM BUTTON 9 DUAL CONTROL PANEL 9 Mode Function ...

Страница 225: ...l Wipe the camera with the damp cloth and then dry it with a dry cloth If you have used the camera at the beach use a cloth soaked in clean water and well wrung Monitor and viewfinder Wipe gently with a soft cloth Lens Blow dust off the lens with a commercially available blower then wipe gently with a lens cleaning paper Card Wipe gently with a soft dry cloth Do not use strong solvents such as ben...

Страница 226: ...ution 3200 2400 pixels ENLARGE SIZE SHQ HQ 2560 1920 pixels RAW TIFF SHQ HQ 2560 1696 pixels 3 2 TIFF SHQ HQ 2288 1712 pixels TIFF SQ1 2048 1536 pixels TIFF SQ1 1600 1200 pixels TIFF SQ1 1280 960 pixels TIFF SQ2 1024 768 pixels TIFF SQ2 640 480 pixels TIFF SQ2 No of storable pictures When a 32MB card used without sound Approx 4 frames RAW 2560 1920 Approx 2 frames TIFF 2560 1920 Approx 8 frames SH...

Страница 227: ...IN jack USB connector A V OUT jack Automatic calendar system Up to 2099 Operating environment Temperature 0 C to 40 C 32 F to 104 F operation 20 C to 60 C 4 F to 140 F storage Humidity 30 to 90 operation 10 to 90 storage Power supply 2 CR V3 lithium battery packs or 4 AA R6 alkaline batteries lithium batteries NiMH batteries or NiCd batteries AC adapter optional Manganese zinc carbon batteries can...

Страница 228: ...kground Aperture is measured in f stops Larger aperture values indicate smaller apertures and smaller aperture values indicate larger apertures Backlight A light source to illuminate the monitor from behind the screen CCD Charge Coupled Device This converts light passing through the lens into electrical signals On this camera light is picked up and converted into RGB signals to build a single imag...

Страница 229: ...d in the CCD to create the image EV Exposure Value A system for measuring exposure EV0 is when the aperture is at F1 and the shutter speed is 1 second The EV then increases by 1 each time the aperture increases by one F stop or the shutter speed increases by one increment EV can also be used to indicate brightness and ISO settings Exposure The amount of light used to capture an image The exposure ...

Страница 230: ...s A pixel is the smallest unit dot used to make up an image Clear large sized printed images require millions of pixels Ring Flash A flash unit that uses a circular xenon fluorescent tube as its light source It is used for taking close ups S Shutter Priority Mode Also called Shutter Priority AE mode The user selects the shutter speed and the camera automatically varies the aperture so that the pic...

Страница 231: ...ions TFT Thin Film Transistor Color Monitor A color monitor constructed using thin film technology TTL Through The Lens System To help adjust exposure a light receptor built into the camera directly measures the light passing through the lens TTL AUTO For use with an external flash Light emitted by the flash is measured by the light receptor in the camera as it passes through the lens A signal is ...

Страница 232: ...und 182 BKT 113 Black and white picture 121 Black board 121 Button operation beep 183 C Camera movement warning 80 Card 25 Card access lamp 11 40 Card button 11 29 Card check 33 Card cover 11 26 Card setup 175 Close up playback 147 Cloudy day 134 Compact Flash CF 25 29 Connector cover 10 151 Contrast 140 Control panel 10 13 Copy 162 Custom button 12 166 CUSTOM WB setting 135 Custom white balance 1...

Страница 233: ... Histogram target mark 146 Hot shoe 10 86 Hot shoe cover 86 HQ 125 I iESP 96 Index Creating an index 158 Index display 148 Information display 177 ISO sensitivity 130 J Jog dial 11 63 L Landscape shooting 62 Landscape Portrait shooting 62 Language setting 34 Lens 10 Lens cap 20 Lens cap string 20 Lithium battery pack 23 M Macro mode shooting 107 Manual focus 100 Manual shooting 60 93 Measurement u...

Страница 234: ...urtain SLOW2 83 Rec View 181 Rechargeable batteries 23 Recording movies 48 Recording sound 153 Recording sound with still pictures 122 Red eye reduction flash 81 Remote control 110 Remote control Receiver 10 110 Resizing 154 Resolution 126 Rotation button 12 152 S Saturation 141 Scene modes 142 Screen setup 187 Seconds remaining 48 Self timer 109 Self timer Remote control button 12 109 110 Self ti...

Страница 235: ...day 134 Super macro mode shooting 108 Super macro MF mode shooting 108 T TIFF 125 Top menu 69 Trimming 155 Tripod socket 11 Tungsten light 134 Two in one pictures 119 U USB connector 10 V Video output 192 Viewfinder 11 38 Volume 185 W White balance 133 White balance adjustment 138 White board 121 Write protect seal 25 X xD Picture Card 25 29 Z Zoom lever 12 50 147 148 ...

Страница 236: ...ined at http olympus com digital Adobe Photoshop Support Adobe software updates and technical information can be obtained at http www adobe com support OLYMPUS AMERICA INC Premises Goods delivery Wendenstrasse 14 18 20097 Hamburg Germany Tel 040 237730 Letters Postfach 10 49 08 20034 Hamburg Germany Hotline Numbers for customers in Europe Tel 01805 67 10 83 for Germany Tel 00800 67 10 83 00 for Au...

Страница 237: ...era Thank you for purchasing an Olympus digital camera This manual provides instructions on how to install the USB driver To ensure correct installation refer only to these installation procedures DIGITAL CAMERA PERSONAL COMPUTER DIGITAL CAMERA PC CONNECTION OPERATION MANUAL ...

Страница 238: ...re its accuracy However if you find any errors or incomplete information please contact your local Olympus representative It is prohibited by copyright laws to duplicate in part or in whole the information contained in this manual except for personal use Reproduction without permission of the copyright owner is prohibited The PC screens shown in this manual may differ slightly from the actual disp...

Страница 239: ...3 Macintosh Windows INDEX Flowchart 4 Identifying the OS 6 Windows 98 Me 2000 XP 8 Macintosh OS 9 X 23 Downloading image files using other OS For other OS users 31 ...

Страница 240: ...Windows 95 NT 4 0 Windows 98 98 SE upgrade from Windows 95 Mac OS 8 6 or lower except Mac OS 8 6 equipped with USB MASS Storage Support 1 3 5 installed at the factory Data transfer is not guaranteed on a home built PC system or PCs with no factory installed OS Identifying the OS p 6 Windows 98 98 SE Second Edition Windows Me 2000 XP MacOS 9 0 9 1 OS X 10 0 For OS 8 6 see below Installing the USB d...

Страница 241: ...the AC adapter disconnect the camera from the computer and make sure that the camera is turned off To avoid computer malfunctions do not turn off the camera when the camera is connected to a computer If the camera is connected to the computer via a USB hub operation may not be stable if there are any compatibility problems between the computer and the hub In such cases do not use the hub and conne...

Страница 242: ... your desktop When the My computer icon is not on your desktop click Control Panel from the Start menu 2 Double click the Control Panel icon 3 Double click the System icon The way the file icons inside the folder appear may vary depending on your version of Windows If you don t see the icon you are looking for click on view all Control Panel options on the left of the window ...

Страница 243: ...lose the window If your OS is Windows 98 98 SE proceed to Installing the USB driver for Windows 98 p 9 Users running Windows Me 2000 XP p 11 Users running other OS p 31 Mac OS Macintosh Select About This Computer from the Apple menu on the menu bar A window appears with the name of the computer s OS Confirm that the OS is OS 9 0 9 1 or OS X Users running Mac OS 9 X p 23 Users running other OS p 31...

Страница 244: ...e camera the camera will turn off in the middle of the operation and this could destroy image files data If you are using batteries make sure that there is sufficient remaining battery power Installing the USB driver for Windows 98 When using Windows 98 98 SE 9 Connecting the camera to the computer 11 Confirming the computer recognizes the camera 14 Confirming the USB driver is installed 15 Downlo...

Страница 245: ...the procedure below as the USB driver will be automatically installed Proceed to Connecting the camera to the computer p 11 1 Insert the provided software CD into your CD ROM drive 2 The Olympus Windows Installer should automatically launch Click USB driver for Windows 98 If the installer is not automatically launched select Run on the Start menu and then execute drive letter Information exe The d...

Страница 246: ...k Continue The installation of the USB driver will start 4 Click OK to restart your computer and the installation is complete 5 When the computer has restarted installation is complete If the Olympus Windows Installer screen appears click Close and remove the CD ROM from the CD ROM drive ...

Страница 247: ...B cable to the USB connector on the camera The location of the USB connector or multi connector varies depending on the camera model Refer to the camera manual for details The location of the USB port varies depending on the computer For details refer to your computer s manual Look for this mark USB port Terminal Camera with a USB connector USB port Computer USB connector USB cable Smaller termina...

Страница 248: ...monitor button When the camera is turned on the lamp on the right of the viewfinder lights up Camera with a mode Set the mode dial to If the camera has a power switch as well as a mode dial turn the power switch to ON Camera with a mode Camera setup connection mode Set the mode dial to to turn the camera on Lens barrier Lamp monitor button Mode dial Mode dial Power switch Mode dial Power switch ...

Страница 249: ...ows XP You can download image files from the camera easily Select Copy pictures to folder on my computer using Microsoft Scanner and Camera Wizard then follow the on screen instructions You may also select take no action to bypass the Microsoft Scanner and Camera Wizard You may then use a more advanced image viewing editing program such as Olympus CAMEDIA Master software For detailed instructions ...

Страница 250: ...lready be other Removable Disk icons for other devices such as a removable media drive or USB Reader Writer In this case the digital camera is recognized as another Removable Disk If you cannot find the icon the camera and computer are not connected properly Turn the camera off disconnect the camera from the computer and connect again or proceed to Confirming the USB driver is installed p 15 to ma...

Страница 251: ...le Disk follow the procedure below to check whether the USB driver has been fully installed 1 Open My Computer and double click the Control Panel icon For users running Windows XP open Control Panel from the Start menu 2 Double click the System icon 3 The System window will appear Click the Device Manager tab ...

Страница 252: ...and start again Users running Windows 98 98 SE start again from Confirming the USB driver is installed and Users running Window Me 2000 XP start from Connecting the camera to the computer If the USB driver was successfully installed you can find the following in the Device Manager the name of the camera you have connected listed under Disk drives OLYMPUS Digital Camera listed as one of the items i...

Страница 253: ...d as a Removable Disk 3 Double click the Dcim folder If an error message appears when you double click the icon there may be a problem with one of the following the camera s power source the AC adapter is not properly connected or the battery power is low Make sure that the AC adapter is correctly connected or that the batteries are not running low the card there is no card in the camera or there ...

Страница 254: ...the My Documents icon The camera automatically assigns folder names and file names according to the following rules Serial numbers of image files run from 0001 to 9999 Serial numbers of folders run from 100 to 999 When file number 9999 is reached a new folder is created and assigned the next number Months January through September are expressed by the numbers 1 through 9 October by the letter A No...

Страница 255: ...age files downloaded to your computer The files will be opened in the default image viewer of the operating system If you want to view the image a different size or process it you will need to open the image with software that supports JPEG or TIFF images files such as Paint Shop Pro Photoshop or CAMEDIA Master software The lamp on the right of the viewfinder or the card access lamp blinks while t...

Страница 256: ...f the viewfinder or the card access lamp is not blinking Some camera models have either a lamp on the right of the viewfinder or a card access lamp and the location varies depending on the model Refer to your camera s reference manual 2 Double click the My Computer icon and right click the Removable Disk to display the menu 3 Click Eject on the menu Lamp Card access lamp ...

Страница 257: ...B cable from the camera 6 Remove the USB cable from your computer Windows Me 2000 XP 1 Make sure that the lamp on the right of the viewfinder or the card access lamp is not blinking Some camera models have either a lamp on the right of the viewfinder or a card access lamp and the location varies depending on the model Refer to your camera s reference manual Lamp Lamp ...

Страница 258: ...ars 3 Click on the message The Unplug or Eject Hardware window appears 4 When a message appears click OK 5 Remove the USB cable from the camera 6 Remove the USB cable from your computer If the window returns the following message when you click Unplug or Eject Hardware first make sure that no image data is being downloaded from the camera and then remove the USB cable ...

Страница 259: ...mage files data If you are using batteries make sure that there is sufficient remaining battery power If you are running Mac OS X the connection to the computer and downloading the image data are verified Restrictions such as the following may occur due to the OS The image file properties are not displayed correctly Images in the camera cannot be opened without first downloading them etc For more ...

Страница 260: ...onnector or multi connector varies depending on the camera model Refer to the camera manual for details The location of the USB port varies depending on the computer For details refer to your computer s manual Look for this mark Terminal USB port Camera with a USB connector USB port Computer USB connector USB cable Smaller terminal Rectangular terminal Camera with a multi connector USB cable Small...

Страница 261: ... power switch to ON Camera with a mode Camera setup connection mode Set the mode dial to to turn the camera on 4 The computer recognizes the camera as a new device The computer recognizes the camera automatically and an Untitled icon appears on the desktop If you cannot find this icon turn off the camera and connect again Mac OS X When the computer has recognized the camera the Apple Image Capture...

Страница 262: ...rror message appears when you double click the icon there may be a problem with one of the following the camera s power source the AC adapter is not properly connected or the battery power is low the card there is no card in the camera or there is a problem with the card Check that you can play back pictures on the monitor of your camera the USB cable the camera is not properly connected to the co...

Страница 263: ...e names according to the following rules Serial numbers of image files run from 0001 to 9999 Serial numbers of folders run from 100 to 999 When file number 9999 is reached a new folder is created and assigned the next number Months January through September are expressed by the numbers 1 through 9 October by the letter A November by B and December by C Folder name Example File name Example Serial ...

Страница 264: ...iles in the Hard Disk folder The files will be opened in the default image viewer of the operating system If you want to view the image a different size or process it you will need to open the image with software that supports JPEG or TIFF images files such as Paint Shop Pro Photoshop or CAMEDIA Master software The lamp on the right of the viewfinder or the card access lamp blinks while the image ...

Страница 265: ... Capture software dialog appears 1 From the Download To menu select a destination folder 2 To download all images click Download All To selectively download images click Download Some and highlight the desired images The images are transferred from the camera to your computer If you are operating Mac OS X and you want to download images using the same procedure as for Mac OS 9 select File Close an...

Страница 266: ...viewfinder or the card access lamp is not blinking 2 Drag the untitled icon on the desktop to Trash 3 Make sure that the lamp on the right of the viewfinder or the card access lamp is not blinking 4 Remove the USB cable from the camera 5 Remove the USB cable from your computer Lamp Card access lamp Lamp ...

Страница 267: ...rd slot Consult your nearest Olympus representative Is your OS one of the following Windows 98 Windows 2000 Windows Me Windows XP Mac OS 9 X Yes No No Yes Connect the camera directly to your computer using the provided USB cable Use the optional USB reader writer Certain card readers may not be compatible with Mac OS X Check the Olympus website for the most up to date compatibility information Use...

Страница 268: ...ined at http olympus com digital Adobe Photoshop Support Adobe software updates and technical information can be obtained at http www adobe com support OLYMPUS AMERICA INC Premises Goods delivery Wendenstrasse 14 18 20097 Hamburg Germany Tel 040 237730 Letters Postfach 10 49 08 20034 Hamburg Germany Hotline Numbers for customers in Europe Tel 01805 67 10 83 for Germany Tel 00800 67 10 83 00 for Au...

Отзывы: